本文汇总了 TKE Serverless 的集群常见问题,介绍集群相关常见问题的出现原因及解决办法。
为什么 Pod 规格与填写的 Request/Limit 不一致?
在分配 Pod 资源量时,TKE Serverless 需要对工作负载设置的 Request 及 Limit 进行计算,自动判断 Pod 运行所需的资源量,并非按照设置的 Request 及 Limit 值进行资源分配。详情请参见 CPU Pod 规格计算方法 及 GPU Pod 规格计算方法,进一步了解如何通过 Request、Limit 自动计算指定资源规格。
如何新增或修改 TKE Serverless 集群的容器网络?
在创建集群时,需要选择一个 VPC 网络作为集群网络,同时指定一个子网作为容器网络,详情请参见 容器网络说明。Serverless 集群的 Pod 会直接占用容器网络子网 IP。在使用集群过程中,如需新增或修改容器网络,需要通过新增/移出超级节点的操作来实现,具体操作请参考以下步骤。
步骤1:新建超级节点以新增容器网络
1. 登录容器服务控制台,选择左侧导航栏中的 集群。
2. 单击需要修改容器网络的集群 ID,进入集群基本信息页。
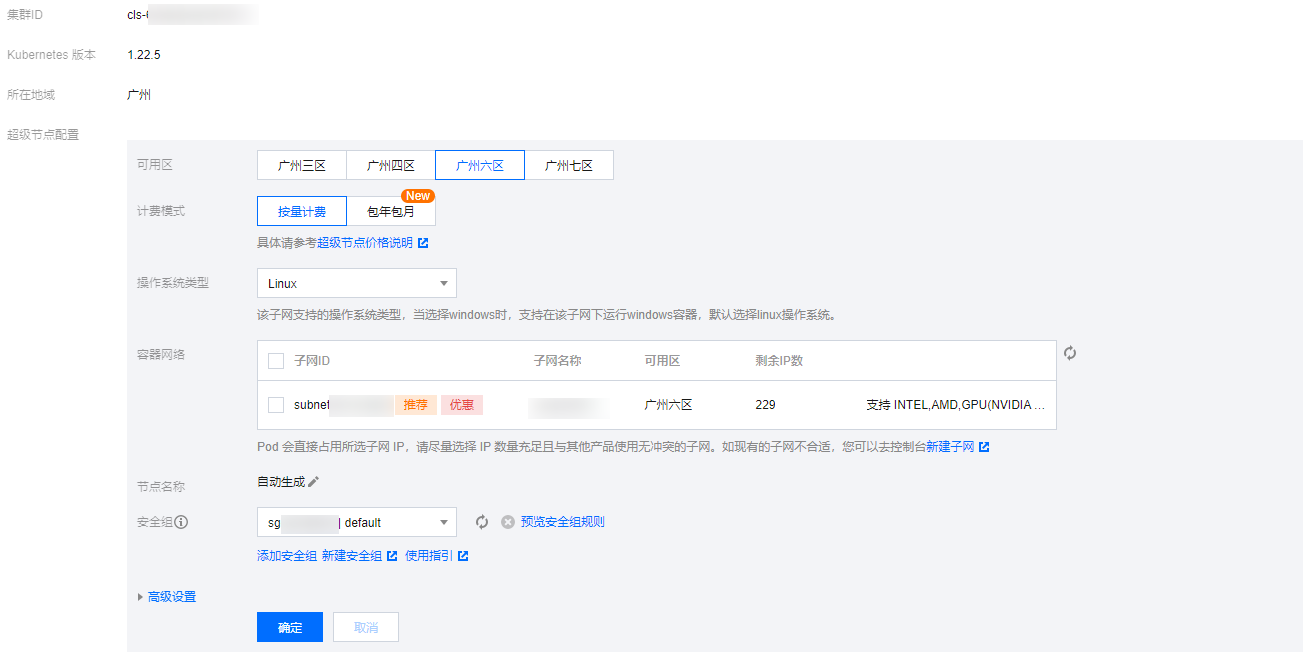
3. 选择左侧的超级节点,在超级节点页面,单击新建。
4. 在新建超级节点页面,选择 IP 充足的容器网络,单击确定即可完成新建。
步骤2:移出超级节点以删除容器网络
注意:
移出超级节点后必须保证 Serverless 集群至少存在一个超级节点,即若此时只存在一个超级节点,则无法执行移出操作。
移出超级节点之前,需要将此超级节点上的 Pod 全部驱逐到其他超级节点上(不包含 DaemonSet 管理的 Pod),完成驱逐后才可执行移出操作,否则会导致移出节点失败。具体操作请参考以下步骤。
1. 登录容器服务控制台 ,选择左侧导航栏中的 集群。
2. 单击需要修改容器网络的集群 ID,进入集群基本信息页。
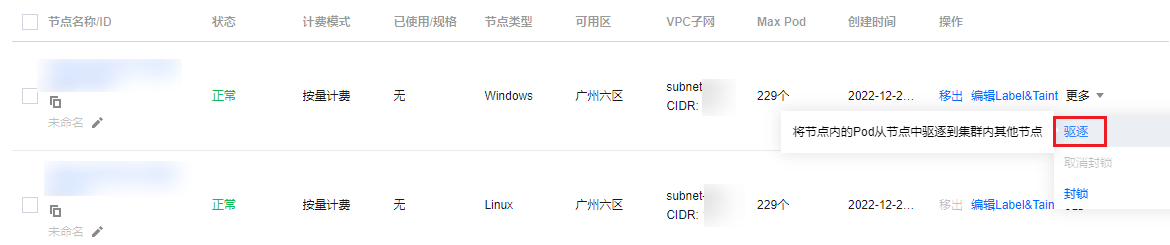
3. 选择左侧的超级节点,在超级节点页面选择节点名称右侧的更多 > 驱逐。如下图所示:
4. 在驱逐节点页面,确定节点信息,单击确定。驱逐后,该超级节点的状态会变更为“已封锁”,将不再向该节点上调度 Pod。
注意:
驱逐会导致 Pod 重建,请谨慎操作。
5. 在超级节点页面中,选择节点名称右侧的移出。
6. 在删除节点页面中,单击确定即可完成删除节点操作。
Pod 因子网 IP 耗尽调度失败时,该如何处理?
当 Pod 因容器网络的子网 IP 耗尽而发生调度失败时,会在节点日志中观察到如下图所示两种事件:
事件一:

事件二:

kubectl get nodes -oyaml
返回结果如下所示:
spec:taints:- effect: NoSchedulekey: node.kubernetes.io/network-unavailabletimeAdded: "2021-04-20T07:00:16Z"
- lastHeartbeatTime: "2021-04-20T07:55:28Z"lastTransitionTime: "2021-04-20T07:00:16Z"message: eklet node has insufficient IP available of subnet subnet-bok73g4creason: EKLetHasInsufficientSubnetIPstatus: "True"type: NetworkUnavailable
TKE Serverless 安全组使用指引和说明有哪些?
在创建 Serverless 集群 Pod 时,若未指定安全组,则默认使用 default 安全组,您也可以通过
Annotation eks.tke.cloud.tencent.com/security-group-id: 安全组 ID 为 Pod 指定安全组,请确保同地域已存在该安全组 ID。关于此 Annotation 的详细说明请参加 Annotation 说明。如何设置容器终止消息?
Kubernetes 可以通过 terminationMessagePath 设置容器退出的消息来源,即当容器退出时,Kubernetes 将从容器的 terminationMessagePath 字段中指定的终止消息文件中检索终止消息,并使用此内容来填充容器的终止消息,消息默认值为:
/dev/termination-log。此外,您还可以设置容器的 terminationMessagePolicy 字段,进一步自定义容器终止消息。该字段默认值为
File,即仅从终止消息文件中检索终止消息。您可以根据需求设置为 FallbackToLogsOnError,即在容器因错误退出时,如果终止消息文件为空,则使用容器日志输出的最后一部分内容来作为终止消息。代码示例如下:
apiVersion: apps/v1beta2kind: Deploymentmetadata:name: nginxspec:containers:- image: nginximagePullPolicy: Alwaysname: nginxresources:limits:cpu: 500mmemory: 1Girequests:cpu: 250mmemory: 256MiterminationMessagePath: /dev/termination-logterminationMessagePolicy: FallbackToLogsOnError
通过以上配置,当容器错误退出且消息文件为空时,Get Pod 会发现 stderr 的输出显示在 containerStatuses 中。
如何使用 Host 参数?
在使用 Serverless 集群时需要注意以下事项:
Serverless 集群虽然没有节点,但兼容 Hostpath、Hostnetwork: true、DnsPolicy: ClusterFirstWithHostNet 等与 Host 相关的参数。您在使用时请注意以下内容:
1. 因为没有节点,这些参数提供能力并不能完全与标准 k8s 对齐。
例如,期望使用 Hostpath 共享数据,但调度到同一个超级节点上的两个 Pod 查看到的是不同子机的 Hostpath,而且 Pod 重建后,Hostpath 的文件也将同时删除。
2. 系统不会自动清理 Hostpath 目录下的文件,需要您手动清理 ,在 镜像复用的场景 下,Hostpath 的文体也会保留在系统盘上,占用系统盘空间。
如何挂载 CFS/NFS?
在 Serverless 集群中,支持使用腾讯云 文件存储 CFS,也支持使用自建的文件存储 NFS 以 Volume 的形式挂载到 Pod 上,以实现持久化的数据存储。Pod 挂载 CFS/NFS 的 YAML 示例如下:
apiVersion: v1kind: Podmetadata:name: test-pdspec:containers:- image: k8s.gcr.io/test-webservername: test-containervolumeMounts:- mountPath: /cachename: cache-volumevolumes:- name: nfsnfs:path: /dirserver: 127.0.0.1
spec.volumes:设置数据卷名称、类型、数据卷的参数。
spec.volumes.nfs:设置 NFS/CFS 盘。
spec.containers.volumeMounts:设置数据卷在 Pod 的挂载点。
如何通过镜像复用加快容器启动速度?
TKE Serverless 支持缓存容器镜像以便在下次用同样镜像启动容器时加快启动速度。
复用条件:
1. 对于同一工作负载的 Pod,如果缓存时间内在同一个可用区(Zone)有 Pod 创建且销毁过,新建的 Pod 默认不重复拉取相同的镜像。
2. 如果不同的工作负载(包括 Deployment、Statefulset、Job)的 Pod 想复用镜像,可以使用如下 annotation:
eks.tke.cloud.tencent.com/cbs-reuse-key
同一个用户账号下,有同一个 annotation value 的 Pod,缓存时间内会尽量复用启动镜像,建议 annotation value 填写镜像名:
eks.tke.cloud.tencent.com/cbs-reuse-key: "image-name"。缓存时间:2小时。
如何解决复用镜像异常问题?
当启用复用镜像功能时,当创建 Pod 时,
$kubectl describe pod 可能见到如下错误:no space left on device: unknownWarning FreeDiskSpaceFailed 26m eklet, eklet-subnet-xxx failed to garbage collect required amount of images. Wanted to free 4220828057 bytes, but freed 3889267064 bytes恢复方法:
无需任何操作,等待若干分钟后 Pod 会自动 running。
原因:
no space left on device: unknown
Pod 默认复用系统盘时,系统盘内的原有镜像占满磁盘空间,导致磁盘当前没有足够的空间下载新镜像,所以报错 “no space left on device: unknown”。TKE Serverless 支持定时镜像回收机制,遇到磁盘空间占满时,会自动将系统盘中现有的多余镜像删除,给当前磁盘腾出可用空间。(耗时若干分钟)Warning FreeDiskSpaceFailed 26m eklet, eklet-subnet-xxx failed to garbage collect required amount of images. Wanted to free 4220828057 bytes, but freed 3889267064 bytes
该条日志说明当前 Pod 下载镜像需要4220828057空间,但目前只清空了3889267064空间的数据。产生该条 event 的原因为磁盘上有多个镜像,目前只清理了部分镜像,TKE Serverless 的定时镜像回收机制会继续清理镜像,直到能成功拉取到新镜像为止。挂载自建的 nfs 时,事件报 Operation not permitted 如何处理?
如果您使用自建的 nfs 实现持久化存储时,连接时事件报 Operation not permitted。您需要修改自建 nfs 的 /etc/exports 文件,添加 /<path><ip-range>(rw,insecure) 参数,示例如下:
/data/ 10.0.0.0/16(rw,insecure)
Pod 磁盘满了(ImageGCFailed)如何处理?
TKE Serverless 的 Pod 默认免费提供 20G 可用的系统盘空间,若系统盘空间满了,可以通过如下方式进行处理。
1. 清理未使用的容器镜像
如果使用空间达到 80%,TKE Serverless 后台会触发容器镜像的回收流程,尝试回收未使用的容器镜像来释放磁盘空间。如果未能释放任何空间,则会有一条事件提醒:ImageGCFailed: failed to garbage collect required amount of images, 提醒用户磁盘空间不足。
常见磁盘空间不足的原因有:
业务有大量临时输出。您可以通过 du 命令确认。
业务持有已删除的文件描述符,导致磁盘空间未释放。您可以通过 lsof 命令确认。
如果业务希望调整容器镜像回收的阈值,可以设置如下 annotation:
eks.tke.cloud.tencent.com/image-gc-high-threshold: "80"
2. 清理已退出的容器
如果业务原地升级过,或者容器异常退出过,已退出的容器仍会保留,直到磁盘空间达到 85% 时才会清理已退出的容器。清理阈值可以使用如下 Annotation 调整:
eks.tke.cloud.tencent.com/container-gc-threshold: "85"
如果已退出的容器不想被自动清理(例如需要退出的信息进一步排障的),可以通过如下 Annotation 关闭容器的自动清理,但副作用是磁盘空间无法自动释放:
eks.tke.cloud.tencent.com/must-keep-last-container: "true"
说明:
此特性上线时间为 2021-09-15,故在此时间前创建的 Pod,并未带有此特性。
3. 重启磁盘用量高的 Pod
业务需要在容器的系统盘用量超过某个百分比后直接重启 Pod,可以通过 Annotation 配置:
eks.tke.cloud.tencent.com/pod-eviction-threshold: "85"
只重启 Pod,不会重建子机,退出和启动都会进行正常的 gracestop、prestop、健康检查。
说明:
此特性上线时间在 2022-04-27,故在此时间前创建的 Pod,需要重建 Pod 来开启特性。
9100 端口问题
TKE Serverless 的 Pod 默认会通过 9100 端口对外暴露监控数据,用户可以执行以下命令访问 9100/metrics 获取数据:
获取全部指标:
curl -g "http://<pod-ip>:9100/metrics"
大集群建议去掉 ipvs 指标:
curl -g "http://<pod-ip>:9100/metrics?collect[]=ipvs"
如果业务本身需要监听 9100 端口,则可以在创建 Pod 时,通过使用 9100 之外的端口来收集监控数据,避免跟业务的 9100 端口冲突。配置方式如下:
eks.tke.cloud.tencent.com/metrics-port: "9110"
如果没有变更监控暴露的端口,业务直接监听 9100 端口,则在 TKE Serverless 新的网络方案里,将报错提醒用户 9100 端口已经被使用:
listen() to 0.0.0.0:9100, backlog 511 failed (1: Operation not permitted)
出现报错提醒时,需要为 Pod 添加一个 Annotation:
metrics-port,以变更监控端口,再重建 Pod。注意:
如果 Pod 带有公网 eip,则需要设置安全组,注意 9100 端口问题,并放通需要的端口。


