介绍
智能客服用户端 iOS UIKit。使用此 UIKit,您可以在一天内将智能客服的能力集成到您的 iOS 项目。极简接入,用智能客服为您的产品增收提效,提升用户满意度和付费转化。
效果展示
快速集成
环境与版本
iOS 版本: iOS 13 以上。
支持模拟器调试及真机运行。
CocoaPods 集成
方式1:拉取远程 CocoaPods 集成
在 Xcode 工程中,通过 CocoaPods 集成 TencentCloudAIDeskCustomer。
在 Podfile 中,添加如下示例代码:
target 'MyApp' douse_frameworks!use_modular_headers!pod 'TencentCloudAIDeskCustomer'end
方式2:DevelopPods 源码集成(有源码修改时推荐)
从代码仓库下载 TencentCloudAIDeskCustomer-iOS、TDeskCustomerServicePlugin、TDeskChat、TDeskCommon、TDeskCore,然后将文件拖入您的工程目录 TDesk 下。
target 'MyApp' douse_frameworks!use_modular_headers!pod 'TencentCloudAIDeskCustomer', :path => "../TDesk/TencentCloudAIDeskCustomer-iOS"pod 'TDeskCustomerServicePlugin', :path => "../TDesk/TDeskCustomerServicePlugin"pod 'TDeskChat', :path => "../TDesk/TDeskChat"pod 'TDeskCommon', :path => "../TDesk/TDeskCommon"pod 'TDeskCore', :path => "../TDesk/TDeskCore"end
带昵称和头像登录
调用
initWithProfile 方法登录智能客服。此接口支持同时设置用户的昵称和头像,可与业务侧账号体系打通。如果您希望人工客服在工作台接待用户咨询时,能看到用户的昵称、头像等信息以提升沟通效率,请在登录时设置 nickName 和 avatar 参数。效果如下图所示:
#import <TencentCloudAIDeskCustomer/TencentCloudCustomerManager.h>int SDKAppID = 0; // Your SDKAppID,即开通了智能客服 Desk 的应用 IDNSString *userID = @""; // Your userID,可复用您 app 的账号体系,或随机生成NSString *userSig = @""; // Your userSig,接入阶段可控制台生成,生产阶段请务必由服务端生成// 用户昵称。设置后,用户端转人工成功时,人工客服在工作台可见。您可将用户手机号,用户来源等信息写入昵称,长度限制500字节// 注意!设置后,即时通信 IM 同 userID 的昵称也会被更新// 如您不希望变更,请设置为 @"" 或 nilNSString *nickName = @"";// 用户头像。设置后,用户端转人工成功时,人工客服在工作台可见// 注意!设置后,即时通信 IM 同 userID 的头像也会被更新// 如您不希望变更,请设置为 @"" 或 nilNSString *avatar = @"";[[TencentCloudCustomerManager sharedManager]initWithProfile:SDKAppIDuserID:userIDuserSig:userSignickName:nickNameavatar:avatarcompletion:^(NSError *error) {if (error) {NSLog(@"login failed. error:%@", error);}}];
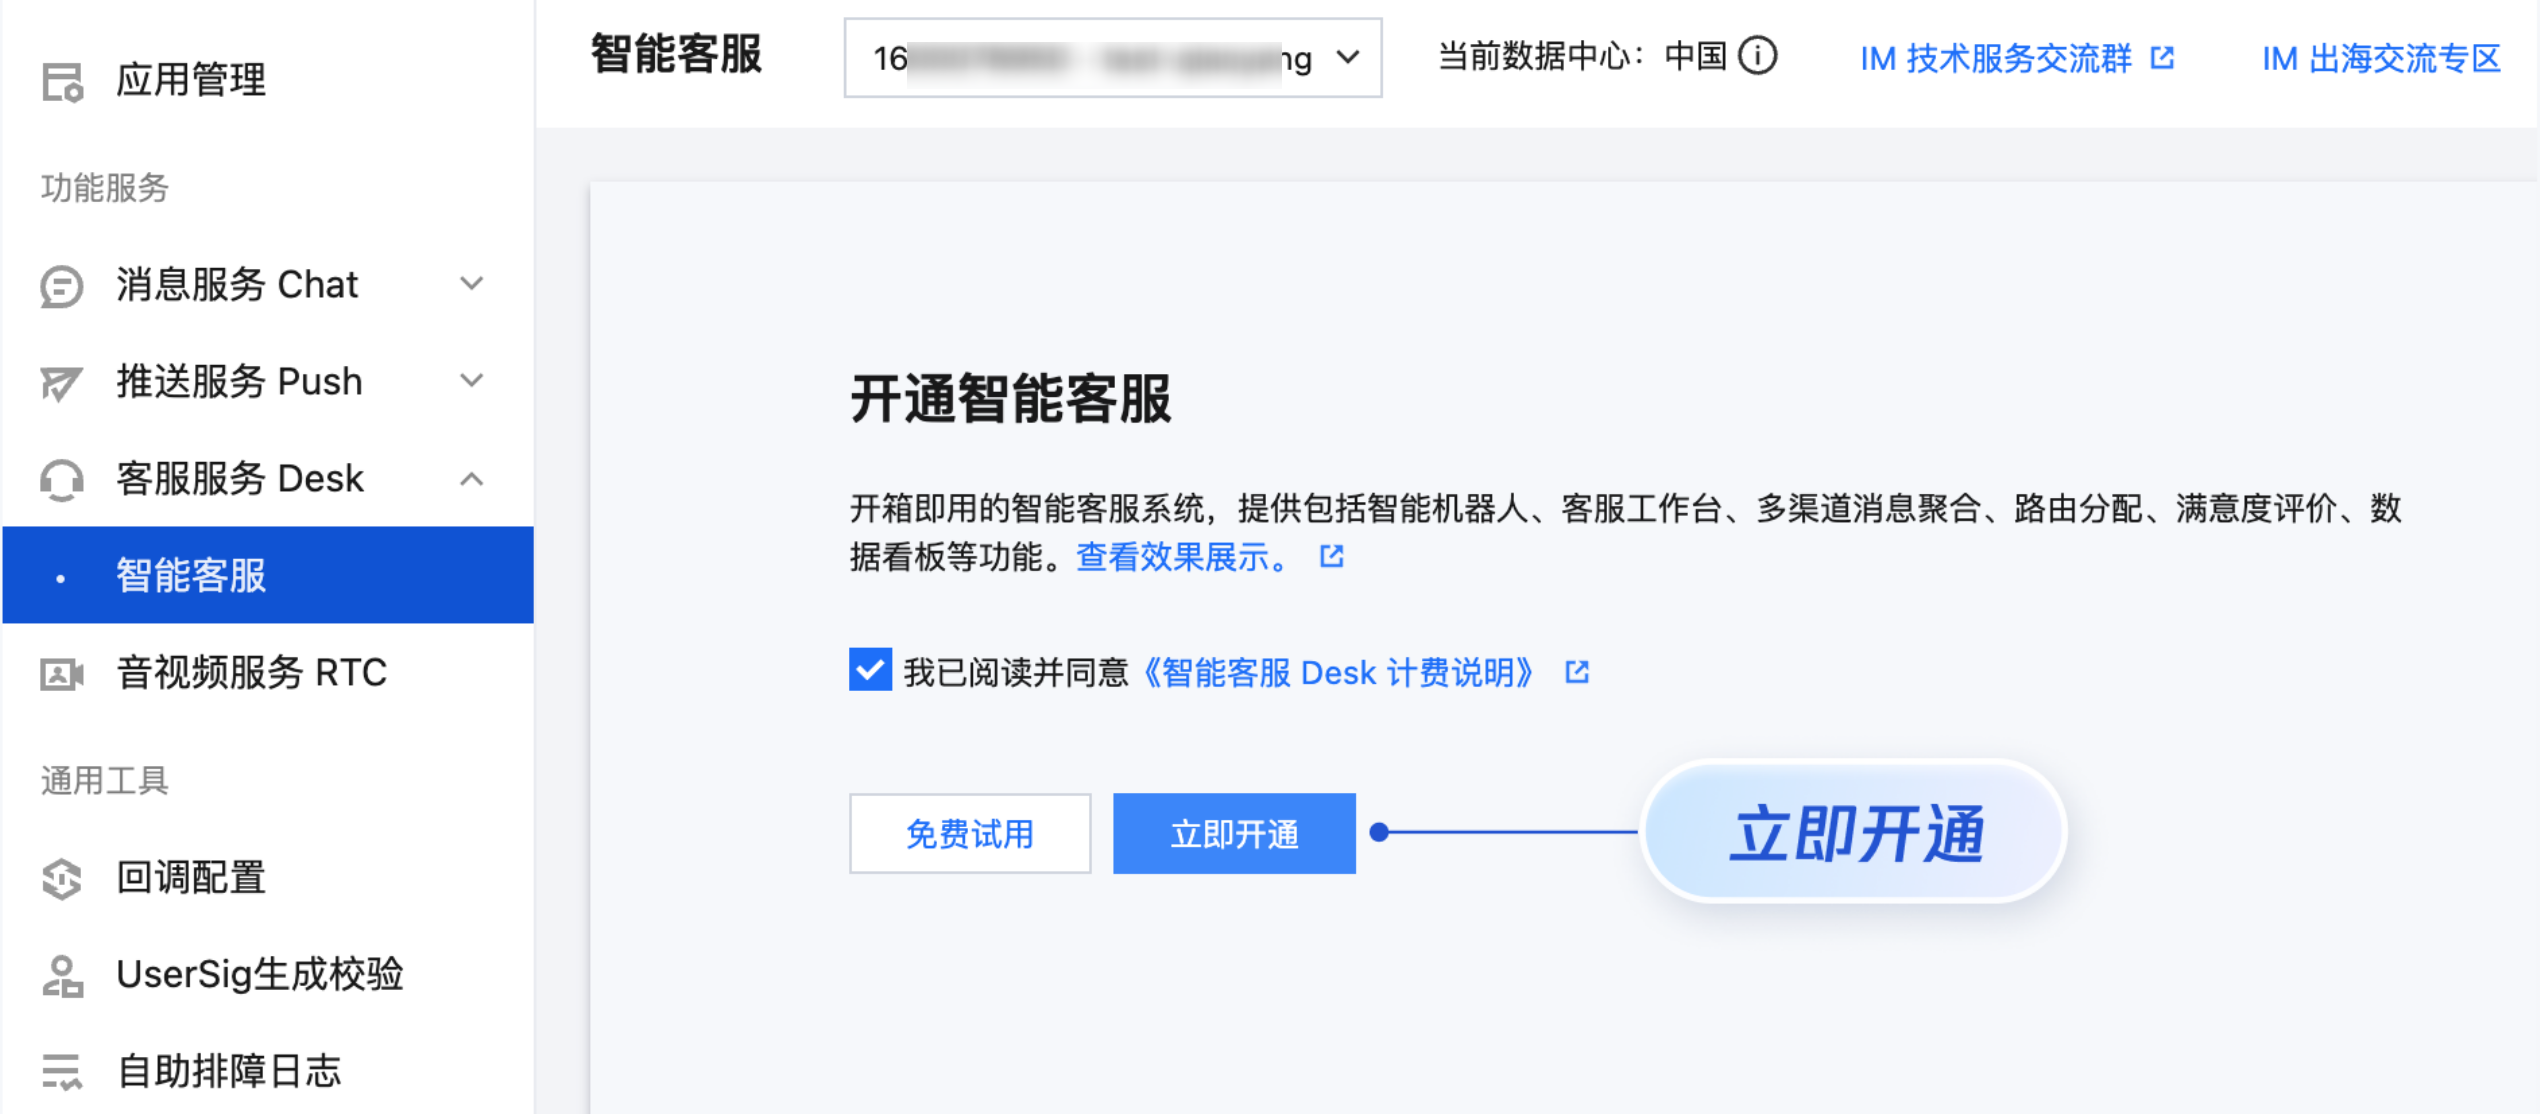
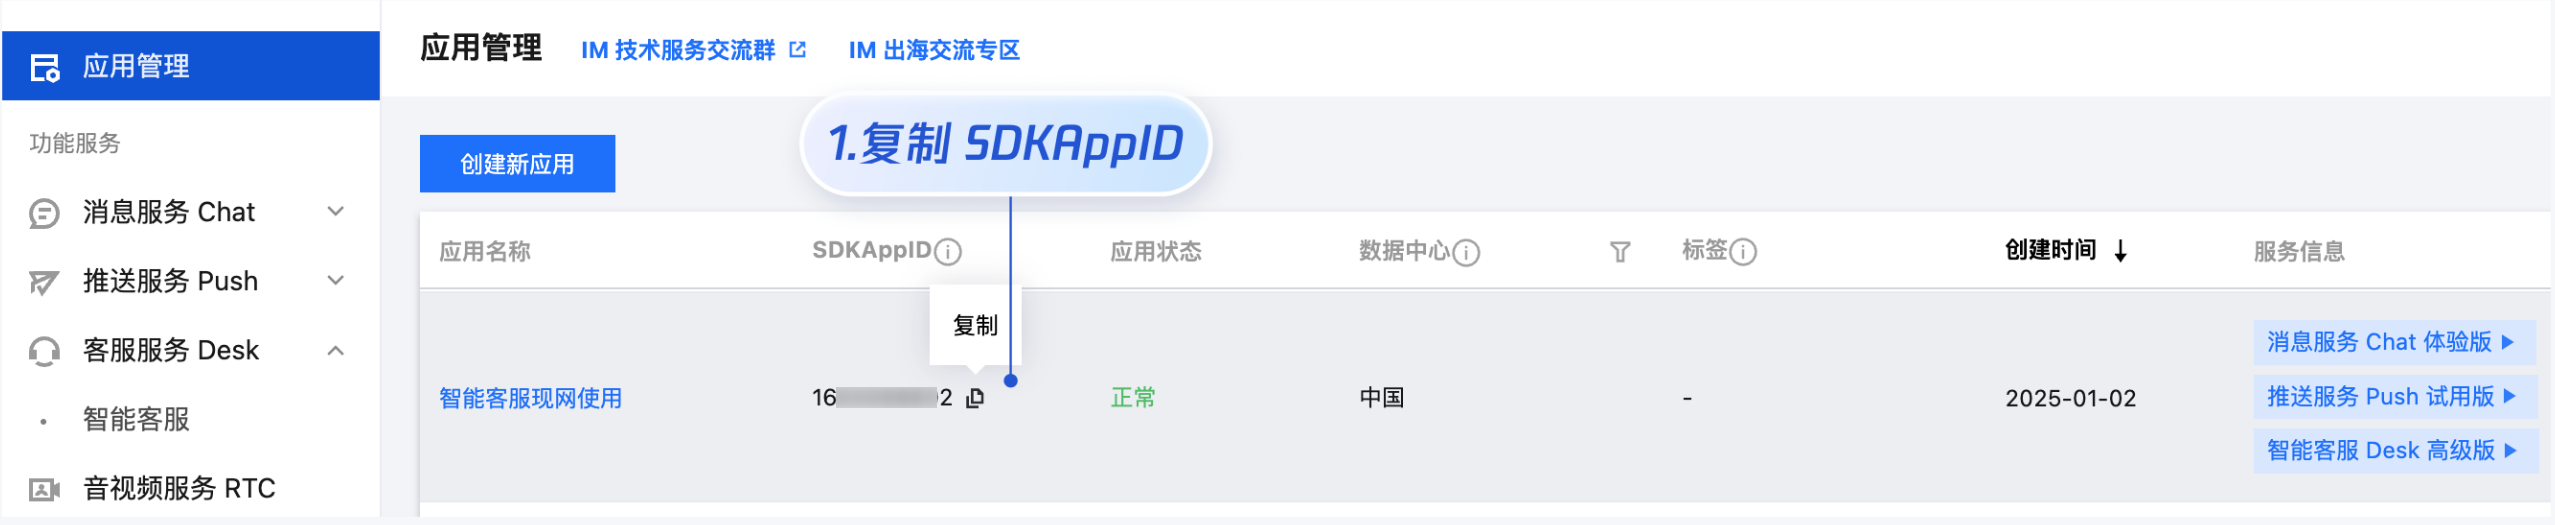
SDKAppID 信息,可在 即时通信 IM 控制台,单击应用管理 > 创建新应用,并选择客服服务 Desk > 智能客服, 开通智能客服 后获取。
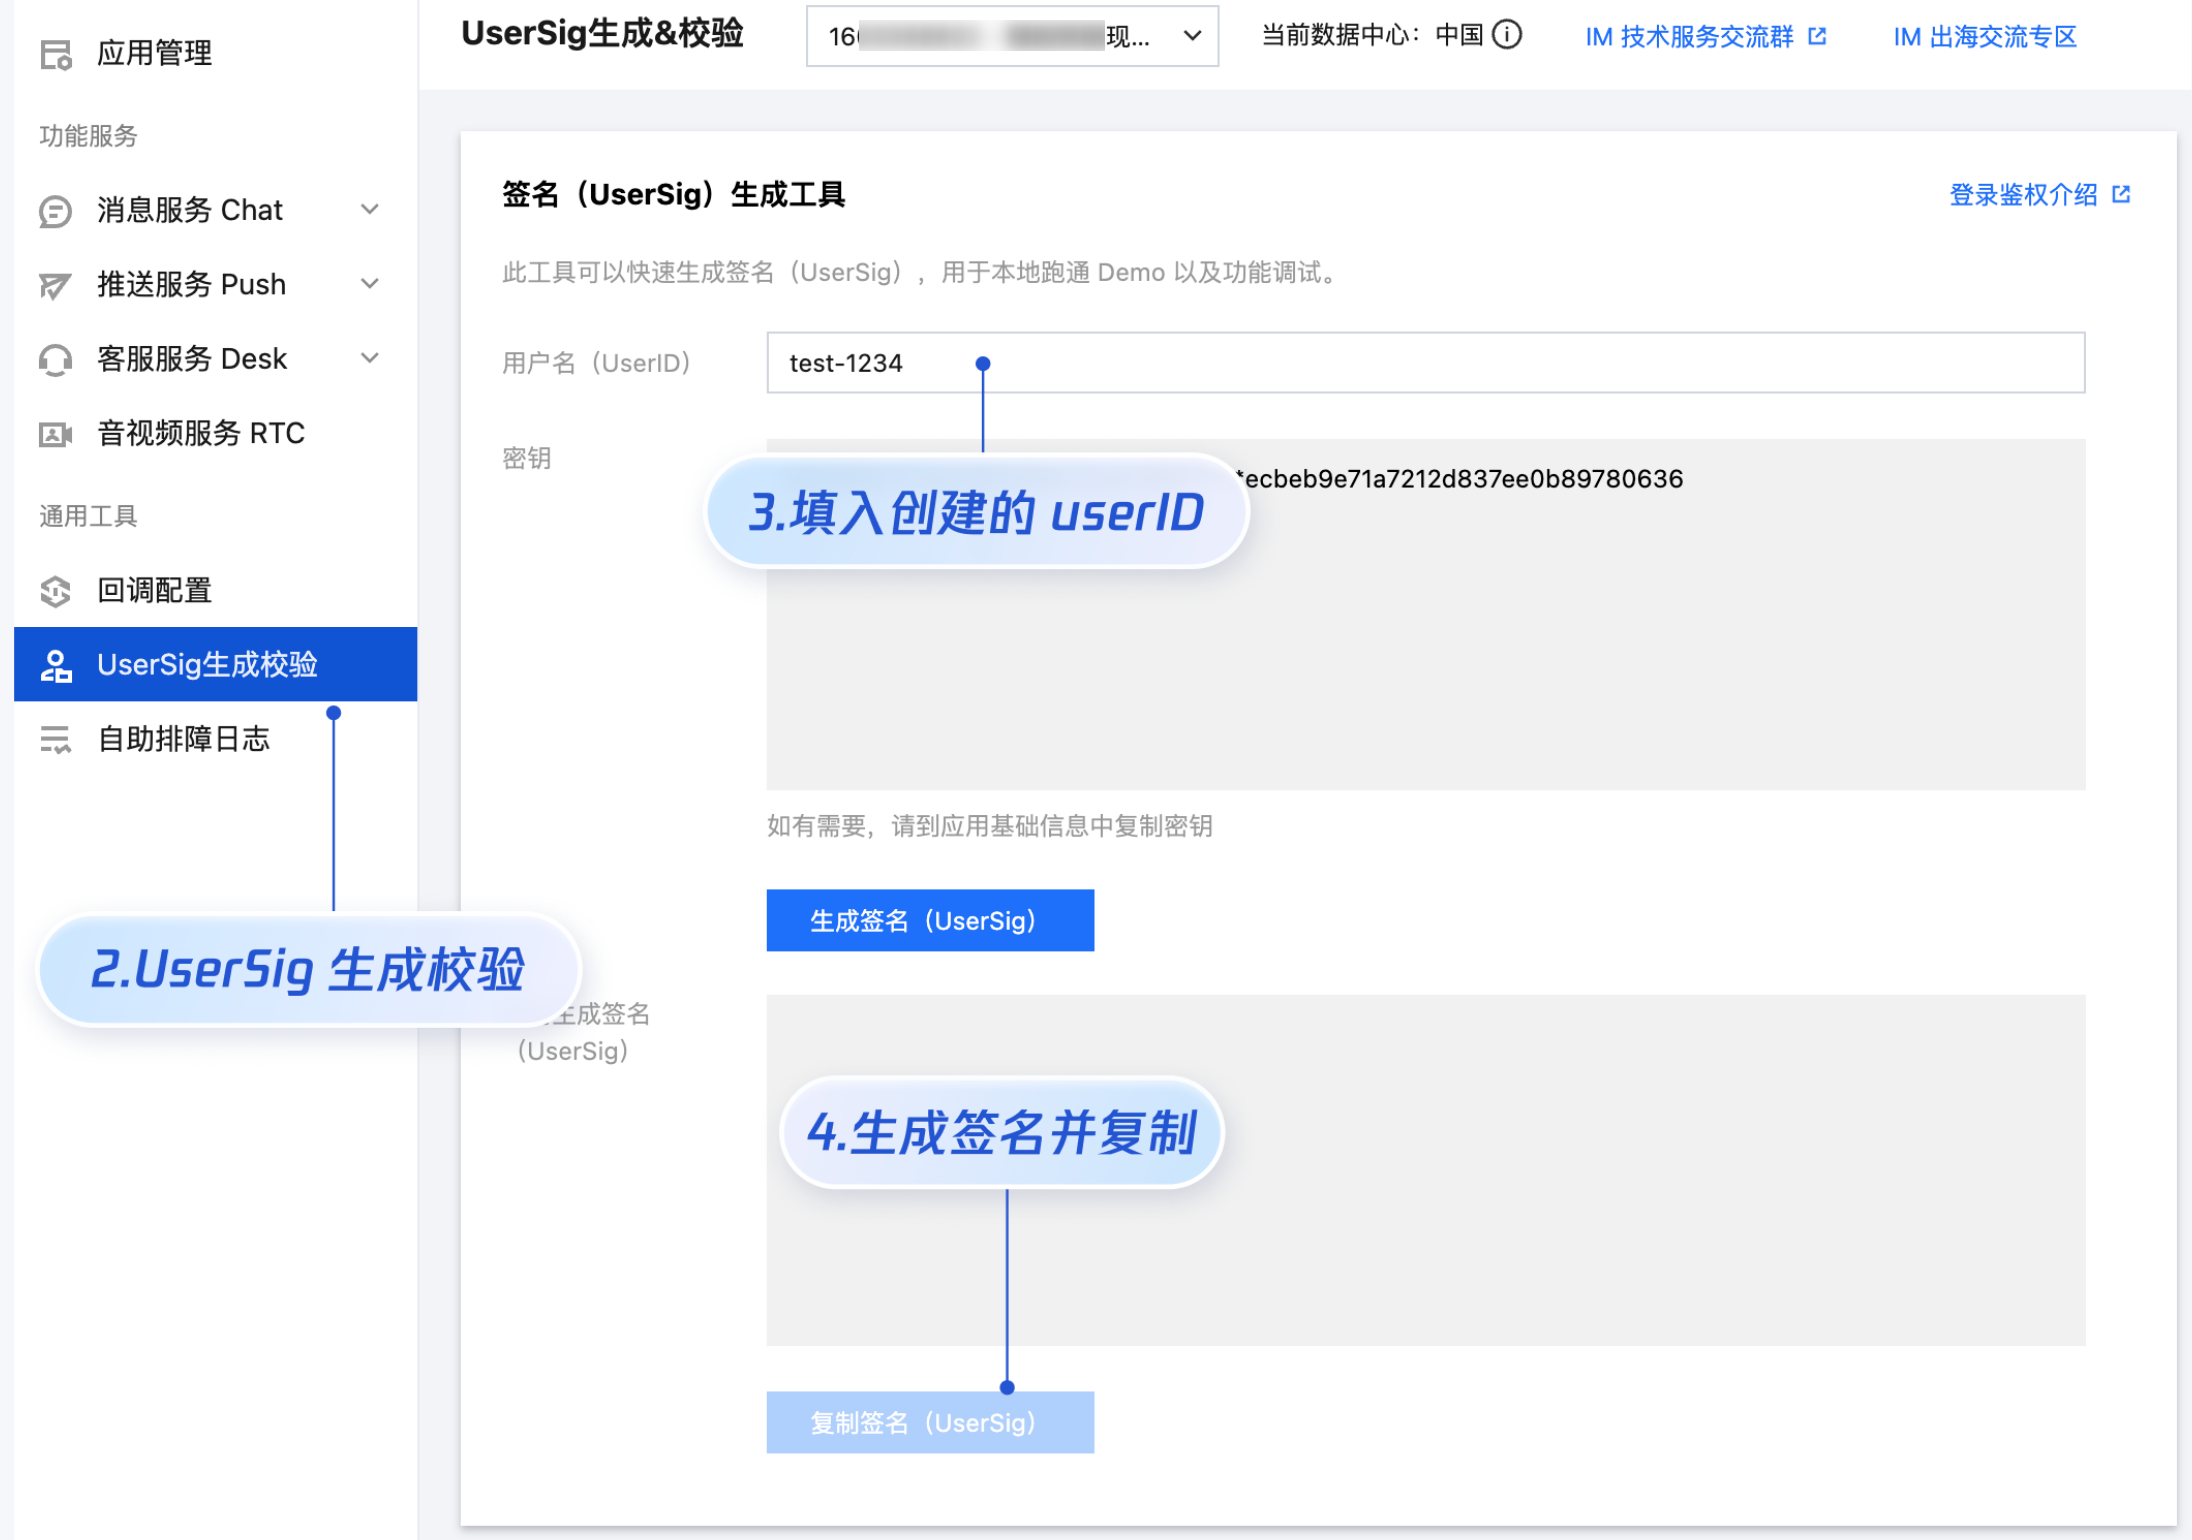
userID 信息,可本地生成一个随机的字符串,例如 test-1234。
userSig 信息,可单击 即时通信 IM 控制台 > UserSig 生成校验,填写创建的 userID,即可生成 userSig。
说明:
打开客服聊天页,发起您的第一条客服咨询
在您项目的 ViewController 里调用
pushCustomerServiceChatFromController 方法,跳转至客服聊天页面。说明:
#import <TencentCloudAIDeskCustomer/TencentCloudCustomerManager.h>[[TencentCloudCustomerManager sharedManager] pushCustomerServiceChatFromController:self];
高级用法
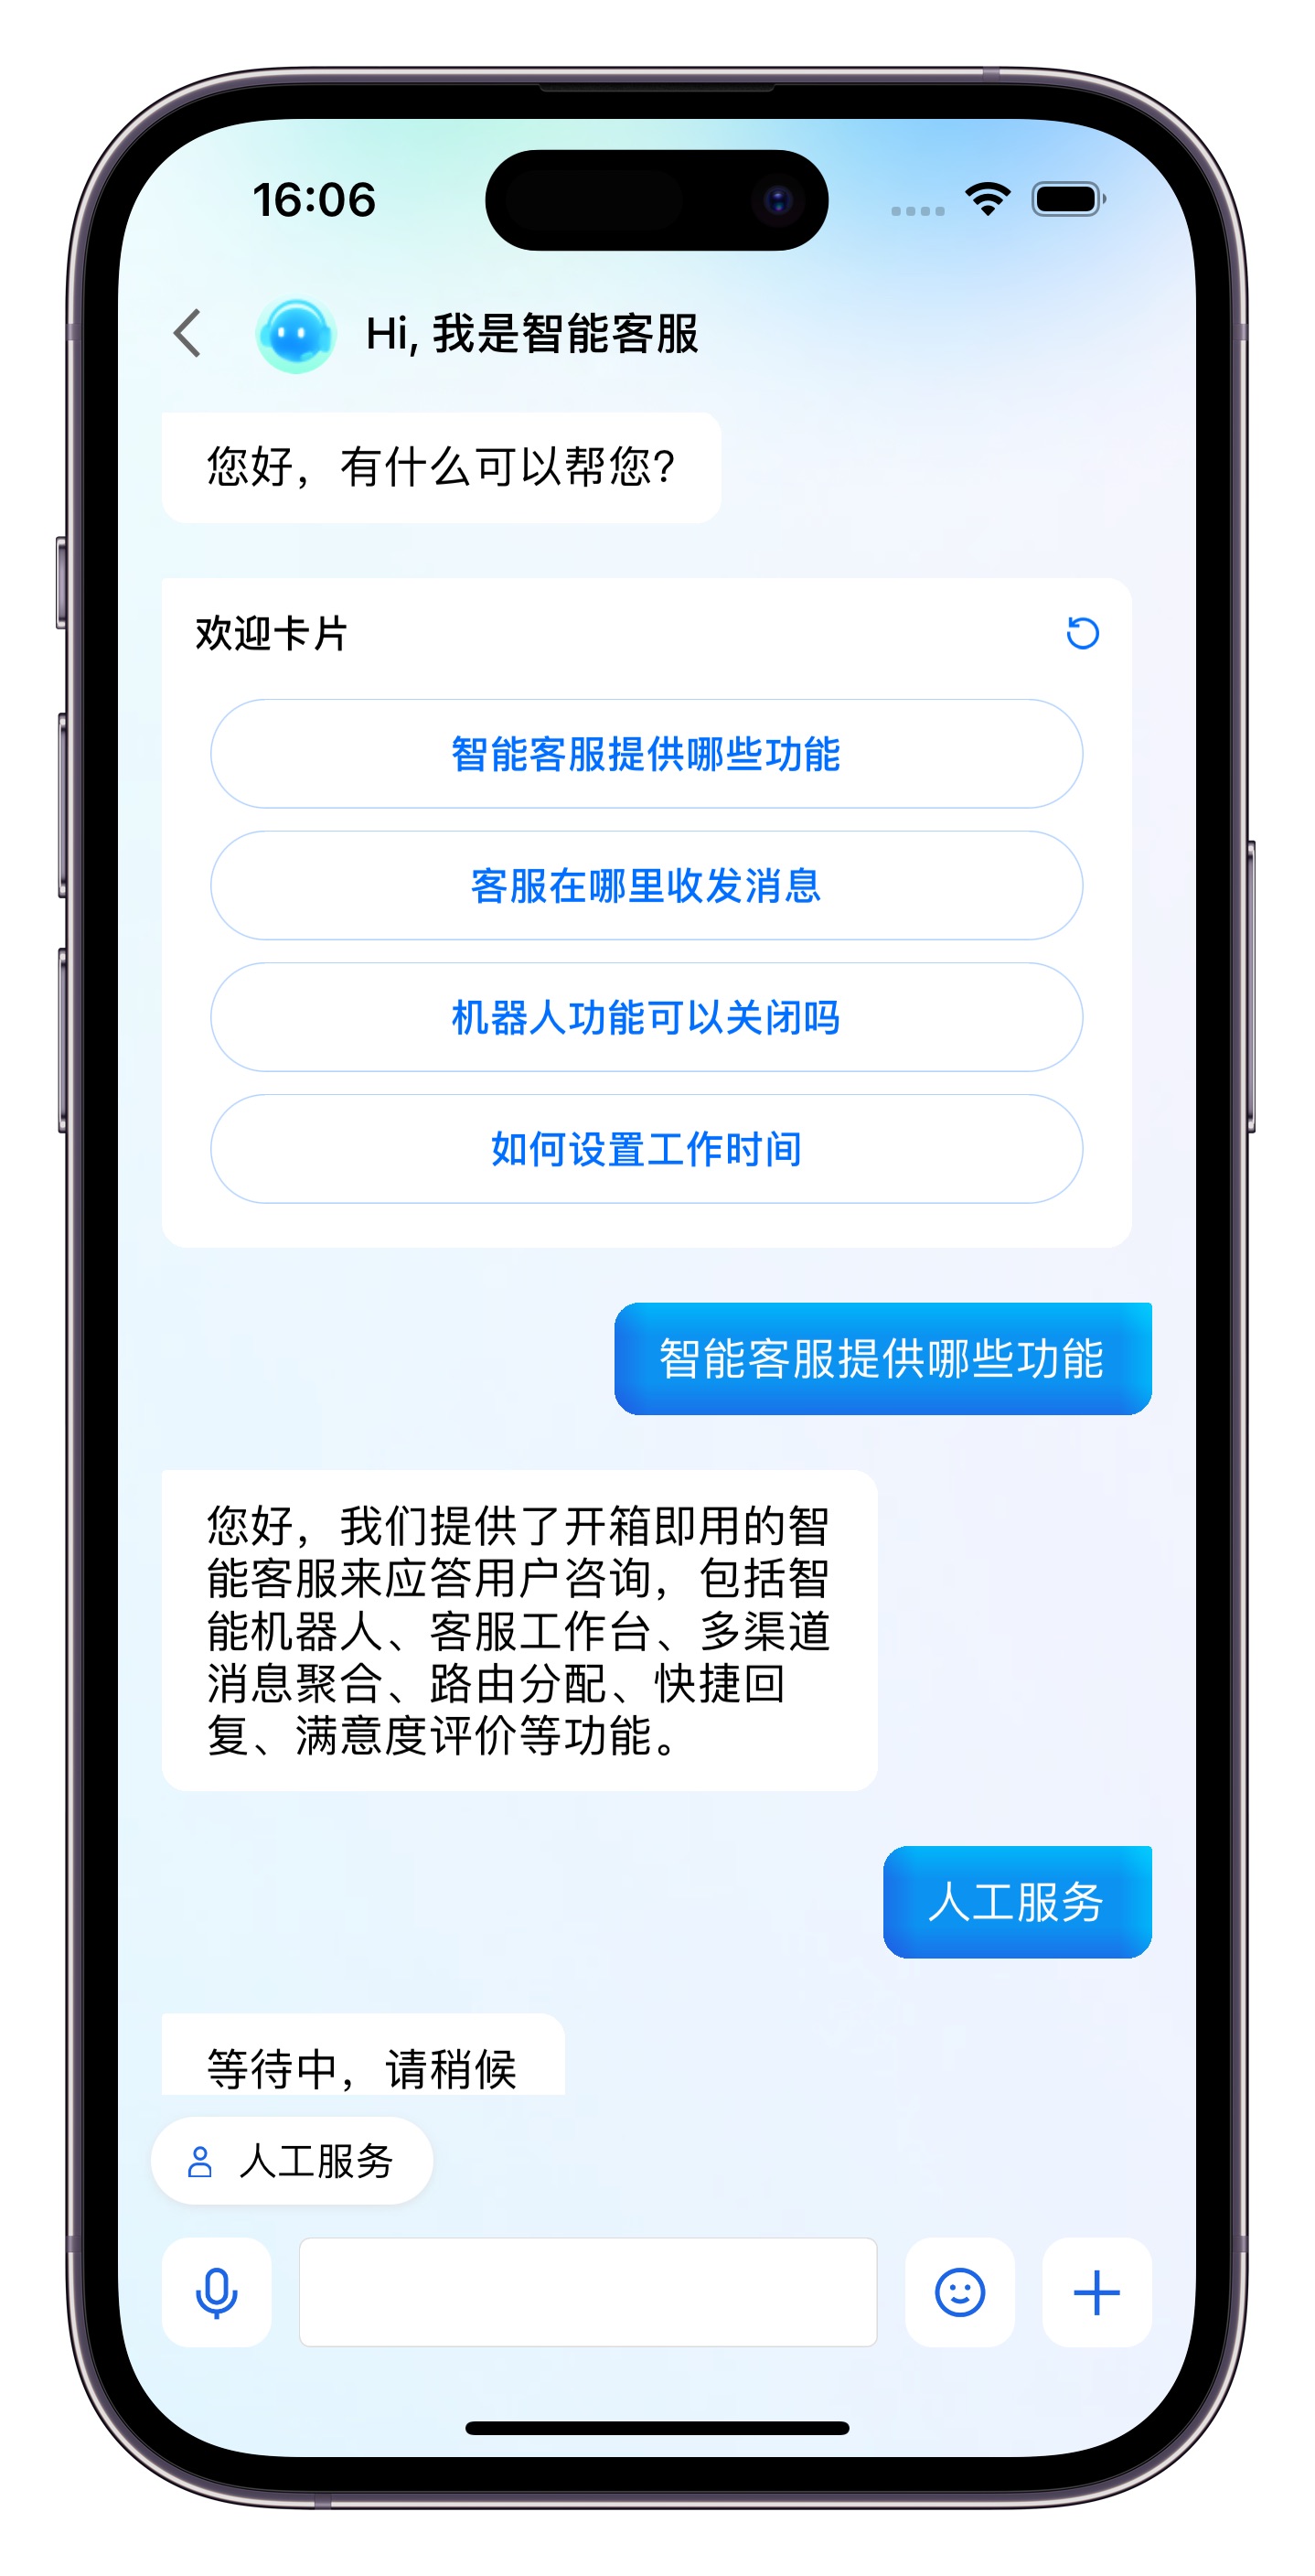
设置显示人工服务按钮
// 设置为 true 后,只有没在人工服务阶段就会显示“人工服务”按钮,在人工服务阶段会自动隐藏。// 设置为 false 后,永远不显示“人工服务”按钮[[TencentCloudCustomerManager sharedManager] setShowHumanService:YES];
设置显示结束排队按钮
// 设置为 true 后,转人工排队阶段显示“结束排队”按钮// 设置为 false 后,永远不显示“结束排队”按钮[[TencentCloudCustomerManager sharedManager] setShowLeaveQueue:YES];
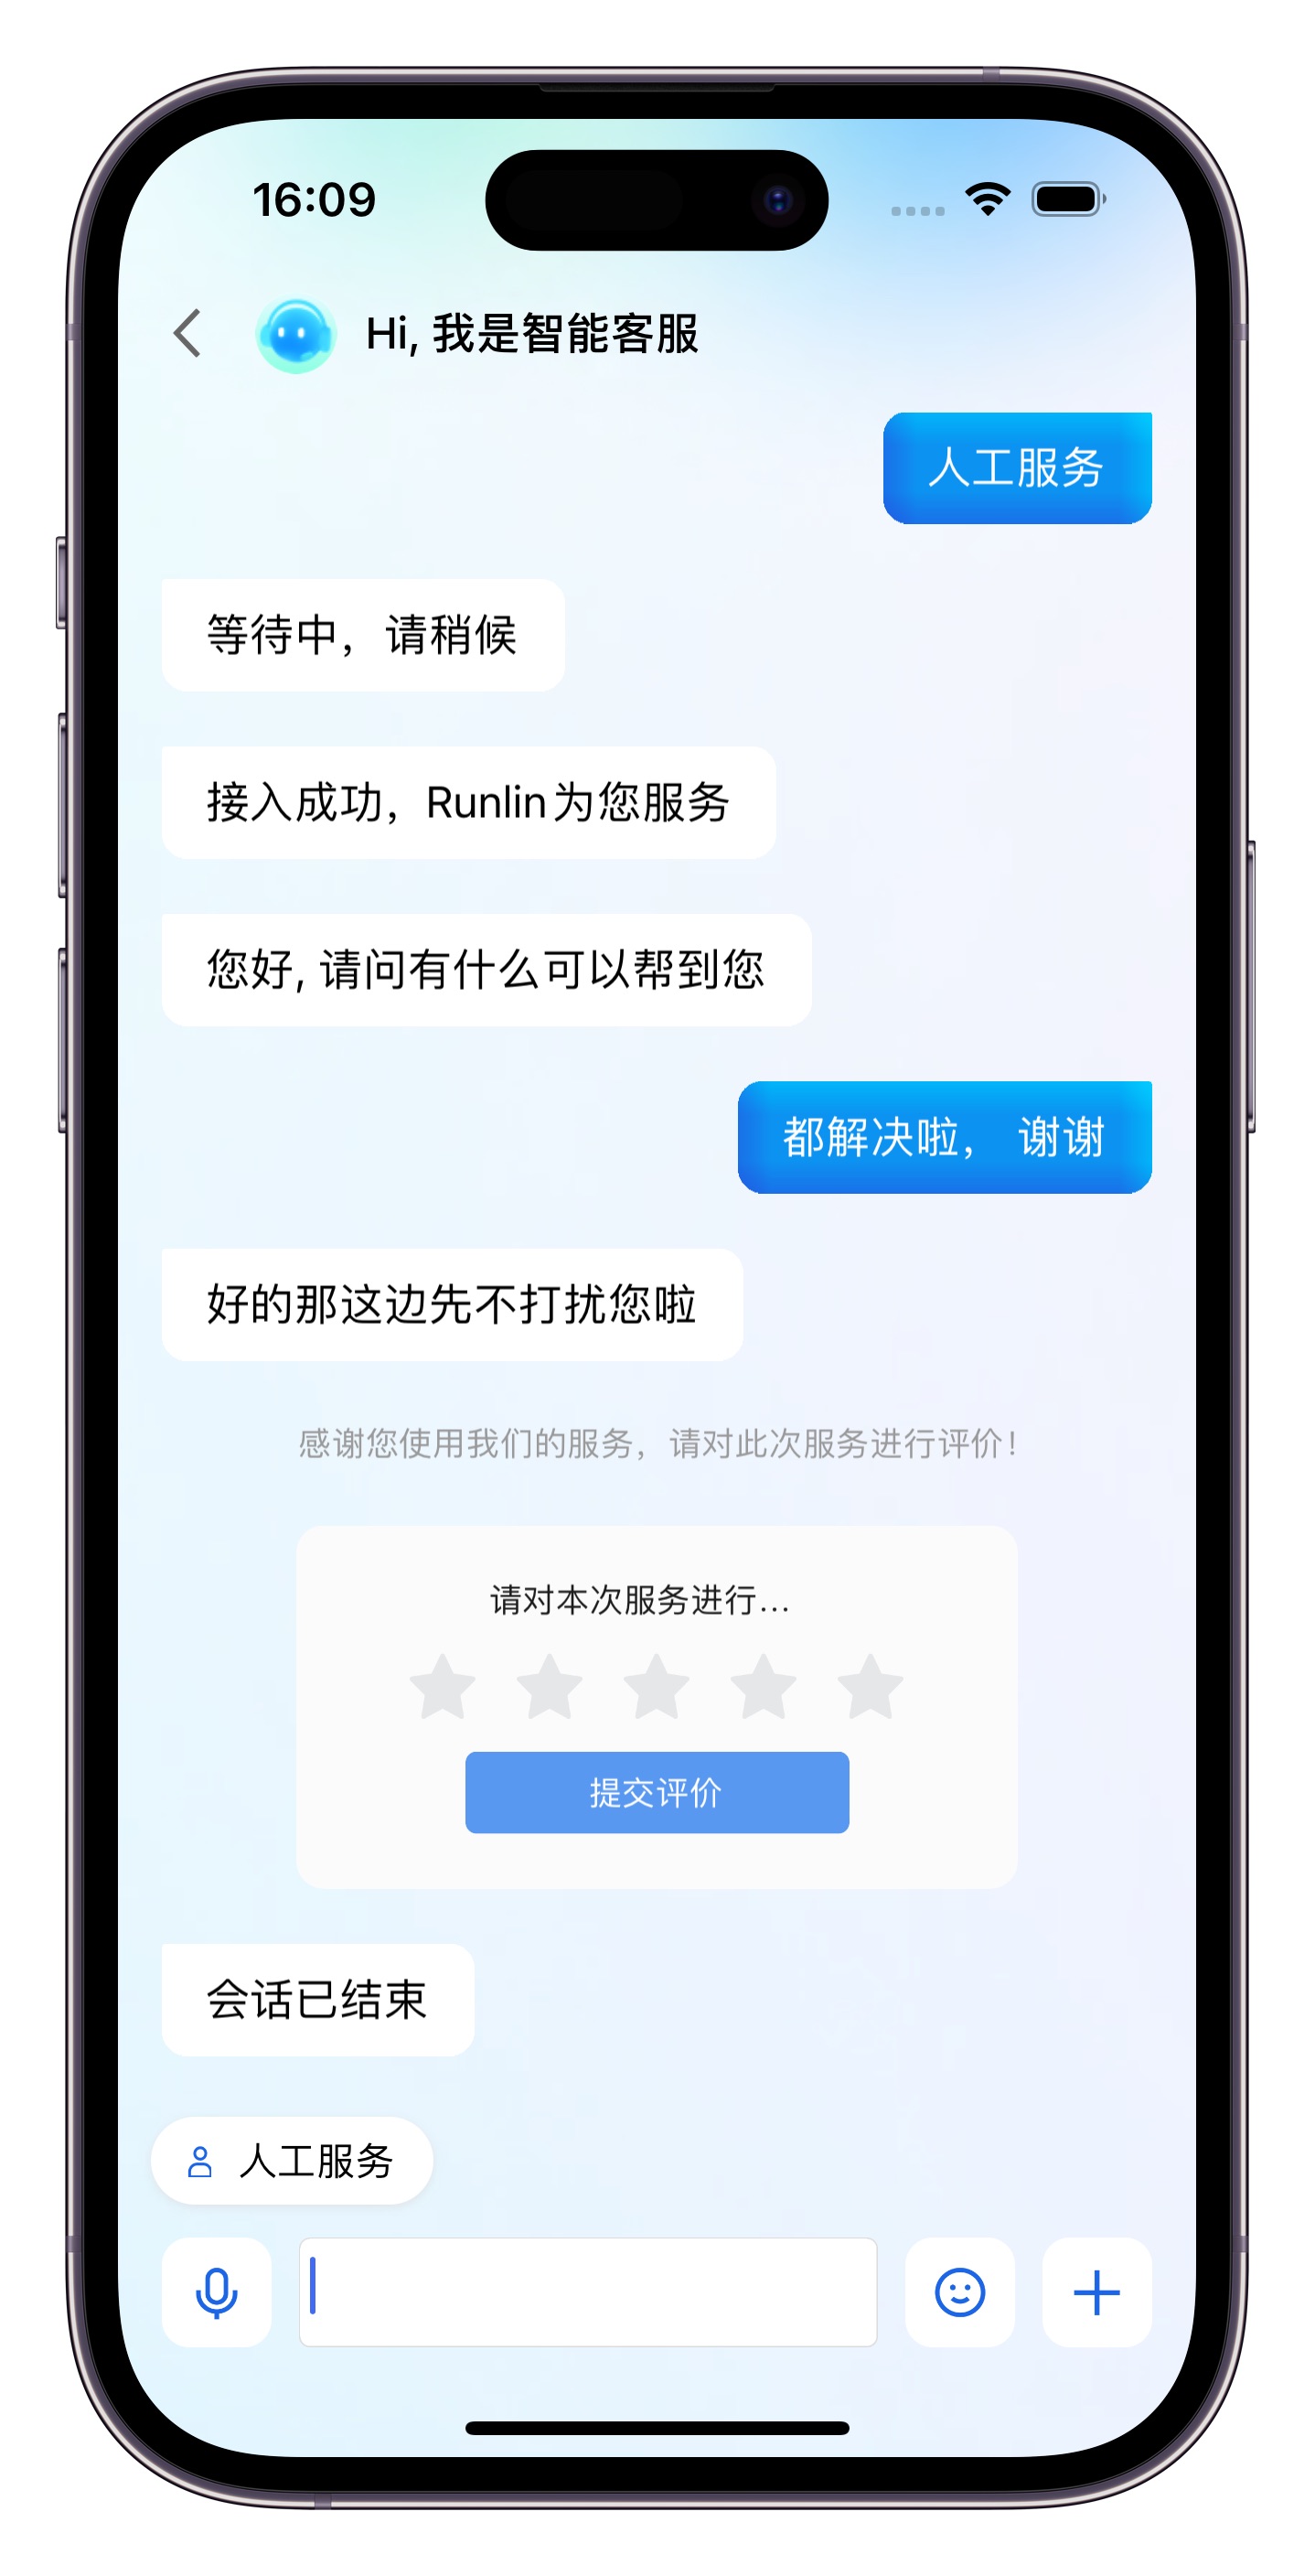
设置显示服务评价按钮
// 设置为 true 后,进入人工服务阶段就会显示“服务评价”按钮// 设置为 false 后,永远不显示“服务评价”按钮[[TencentCloudCustomerManager sharedManager] setShowServiceRating:YES];
设置显示结束会话按钮
// 设置为 true 后,进入人工服务阶段就会显示“结束会话”按钮// 设置为 false 后,永远不显示”结束会话“按钮[[TencentCloudCustomerManager sharedManager] setShowEndHumanService:YES];
设置聊天窗口头像和昵称的显隐
// 设置聊天窗口显示头像。YES-显示头像,NO-隐藏头像(默认值为NO)[[TencentCloudCustomerManager sharedManager] setShowAvatar:YES];// 设置聊天窗口显示昵称。YES-显示昵称,NO-隐藏昵称(默认值为NO)[[TencentCloudCustomerManager sharedManager] setShowNickName:YES];
设置机器人的头像和昵称
// 设置机器人头像。如果您未设置机器人头像,则 UIKit 展示客服号默认的头像。[[TencentCloudCustomerManager sharedManager] setRobotAvatar:@"https://tccc-im-agent-avatar-1258344699.cos.ap-nanjing.myqcloud.com/robot_default_avatar_3.png"];// 设置机器人昵称[[TencentCloudCustomerManager sharedManager] setRobotNickName:@"your robot nickname"];
设置人工客服的头像和昵称
说明:
仅转人工成功后,与人工客服对话时有效。
客服成员或管理员可以在智能客服管理端 > 团队管理 > 成员界面,编辑成员的昵称和头像。
如果您的应用需要区分人工客服的头像和昵称,请设置
enableUnifiedMemberProfile 值为 NO。默认值为 YES,即展示统一的人工客服的头像和昵称。如果您未在代码中设置统一的人工客服头像和昵称,则 UIKit 会使用客服号的头像和昵称进行展示。// 设置为 NO,则 UIKit 展示在智能客服管理端配置的人工客服的头像和昵称[[TencentCloudCustomerManager sharedManager] setEnableUnifiedMemberProfile:NO];// 设置为 YES(默认值),则 UIKit 展示设置的统一的客服头像和昵称// 如果您未设置统一的客服头像,则展示客服号默认的头像// 如果您未设置统一的客服昵称,则展示客服号默认的昵称[[TencentCloudCustomerManager sharedManager] setEnableUnifiedMemberProfile:YES];[[TencentCloudCustomerManager sharedManager] setMemberAvatar:@"https://tccc-im-agent-avatar-1258344699.cos.ap-nanjing.myqcloud.com/seat_default_avatar_2.png"];[[TencentCloudCustomerManager sharedManager] setMemberNickName:@"your member name"];
触发指定任务流
如果您的应用需要在用户登录后自动触发指定任务流,请参考以下代码实现。
// 监听客服会话启动的通知[NSNotificationCenter.defaultCenteraddObserver:selfselector:@selector(onCustomerServiceChatDidStart)name:TUIKitNotification_CustomerServiceChatDidStartobject:nil];- (void)onCustomerServiceChatDidStart {int taskFlowID = 0; // 请替换为您应用的任务流 ID[[TencentCloudCustomerManager sharedManager]transferToTaskFlow:taskFlowIDdescription:@"your description"];}
设置消息阅读状态
// 消息阅读状态默认展示,如果您想隐藏消息阅读状态,请设置为 NO[[TencentCloudCustomerManager sharedManager] setShowReadStatus:NO];
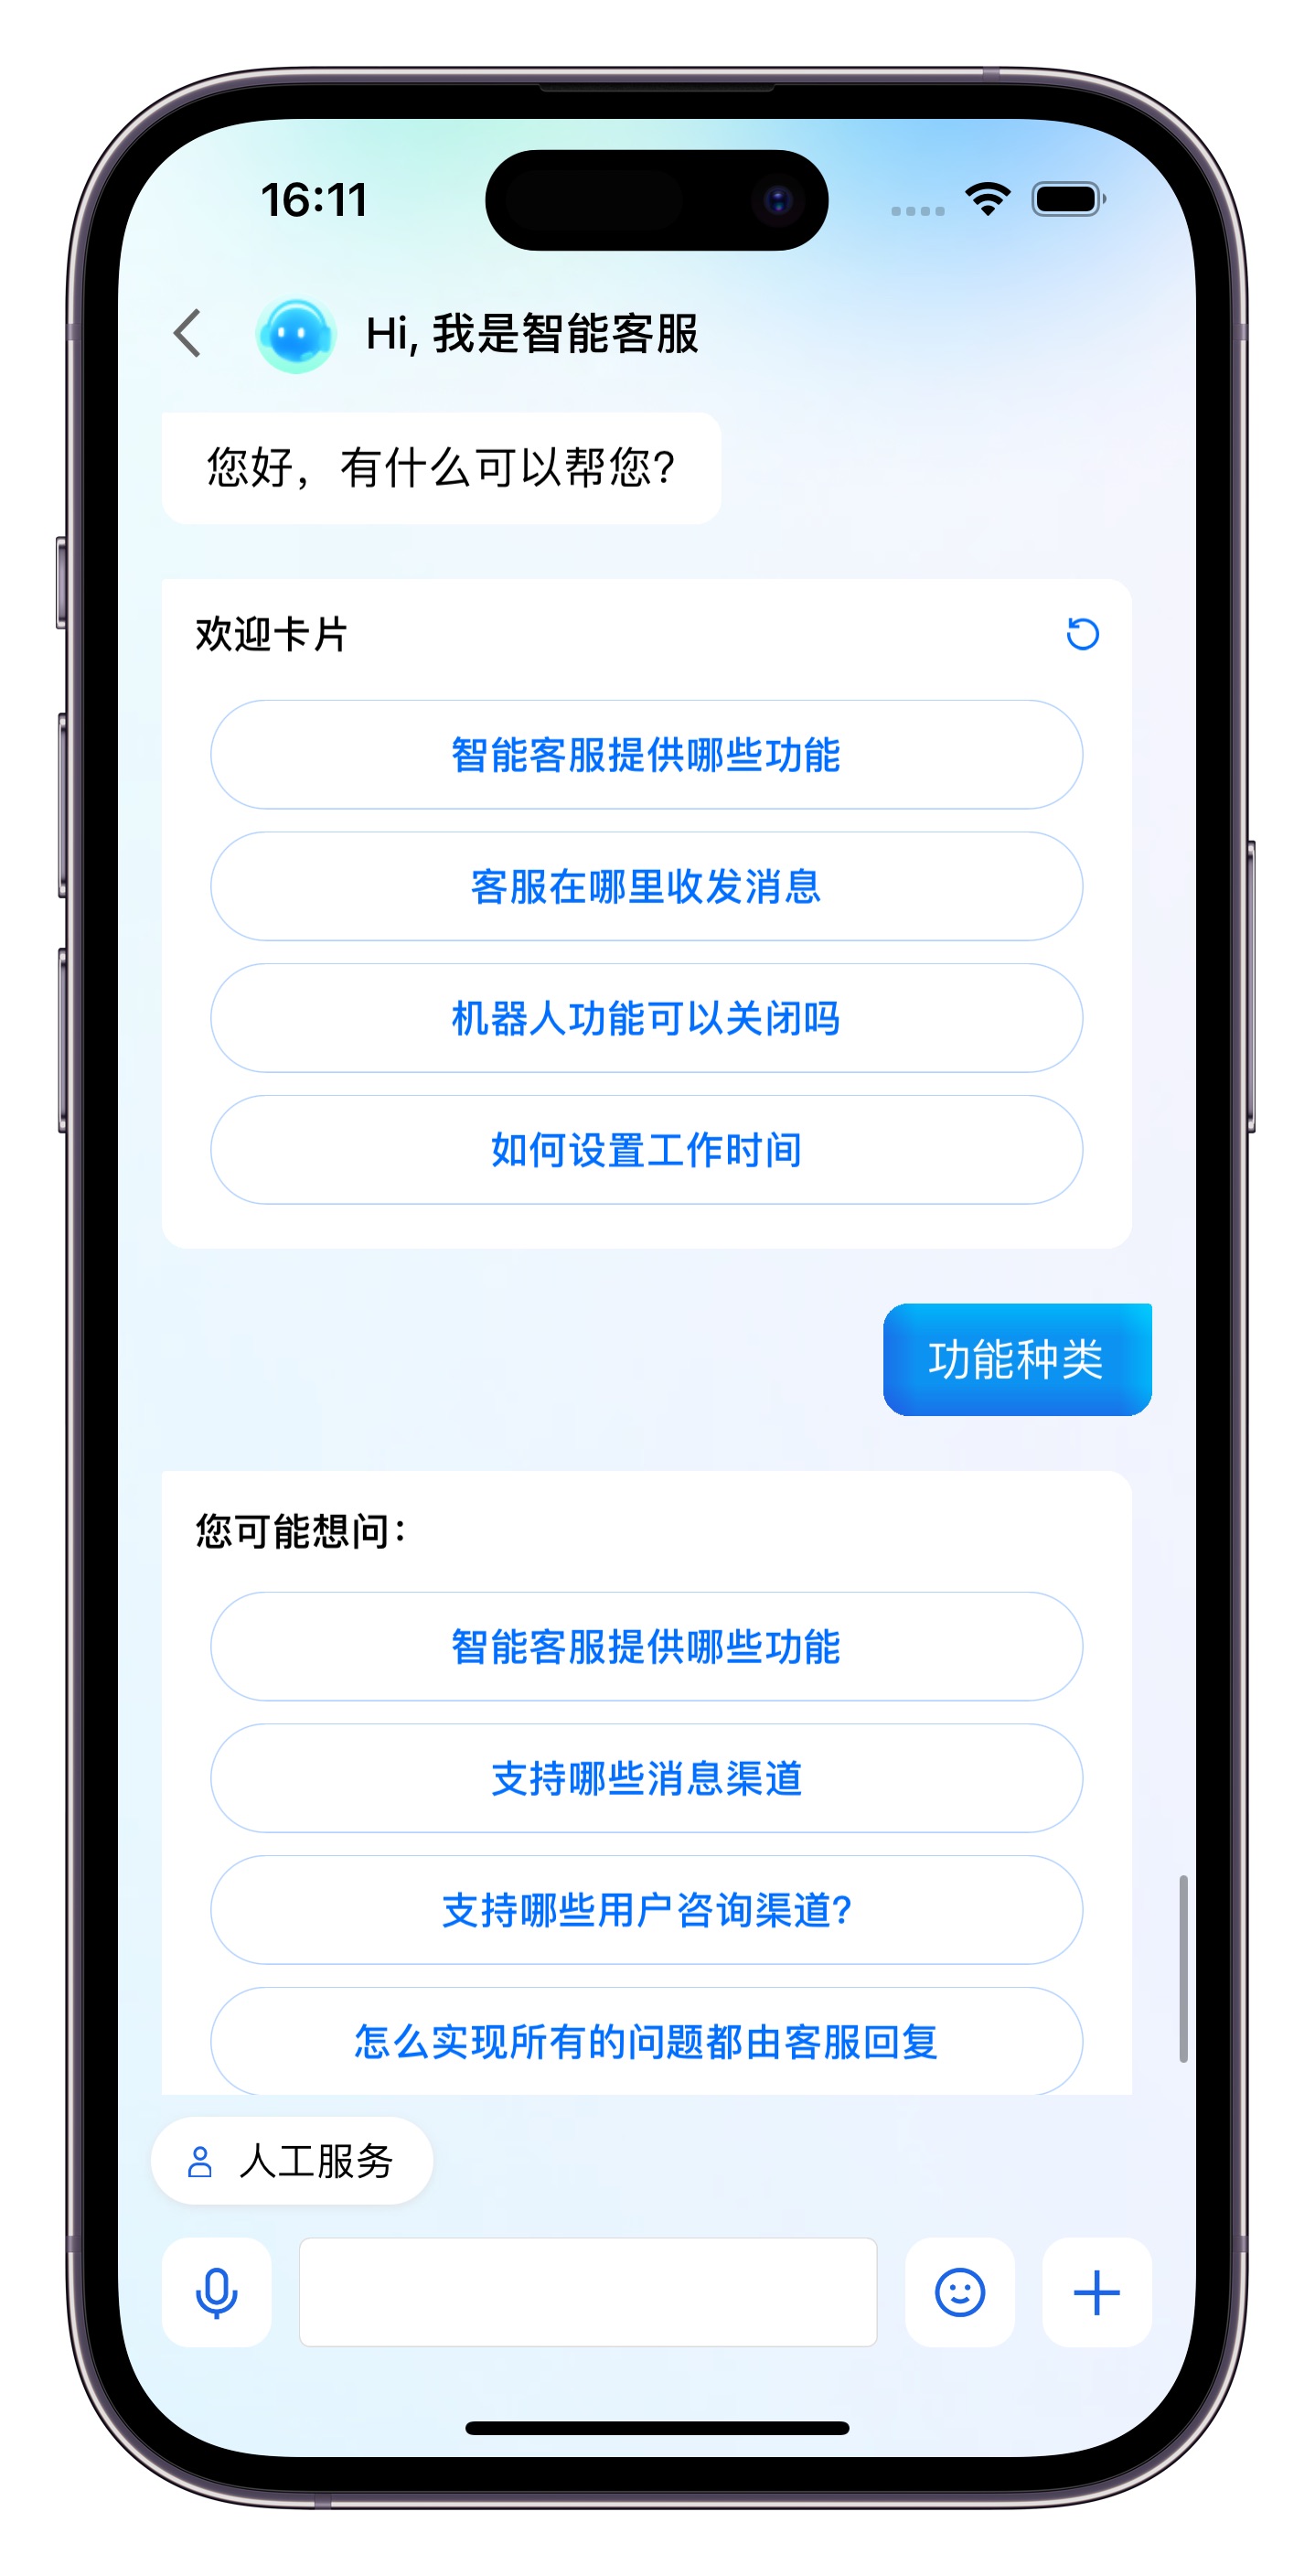
设置快捷入口
如果您想实现输入框上方增加快捷按钮,方便用户使用,例如增加“在线时间”,“售后查询”等,可使用
setQuickAccessItems 接口。效果如下所示: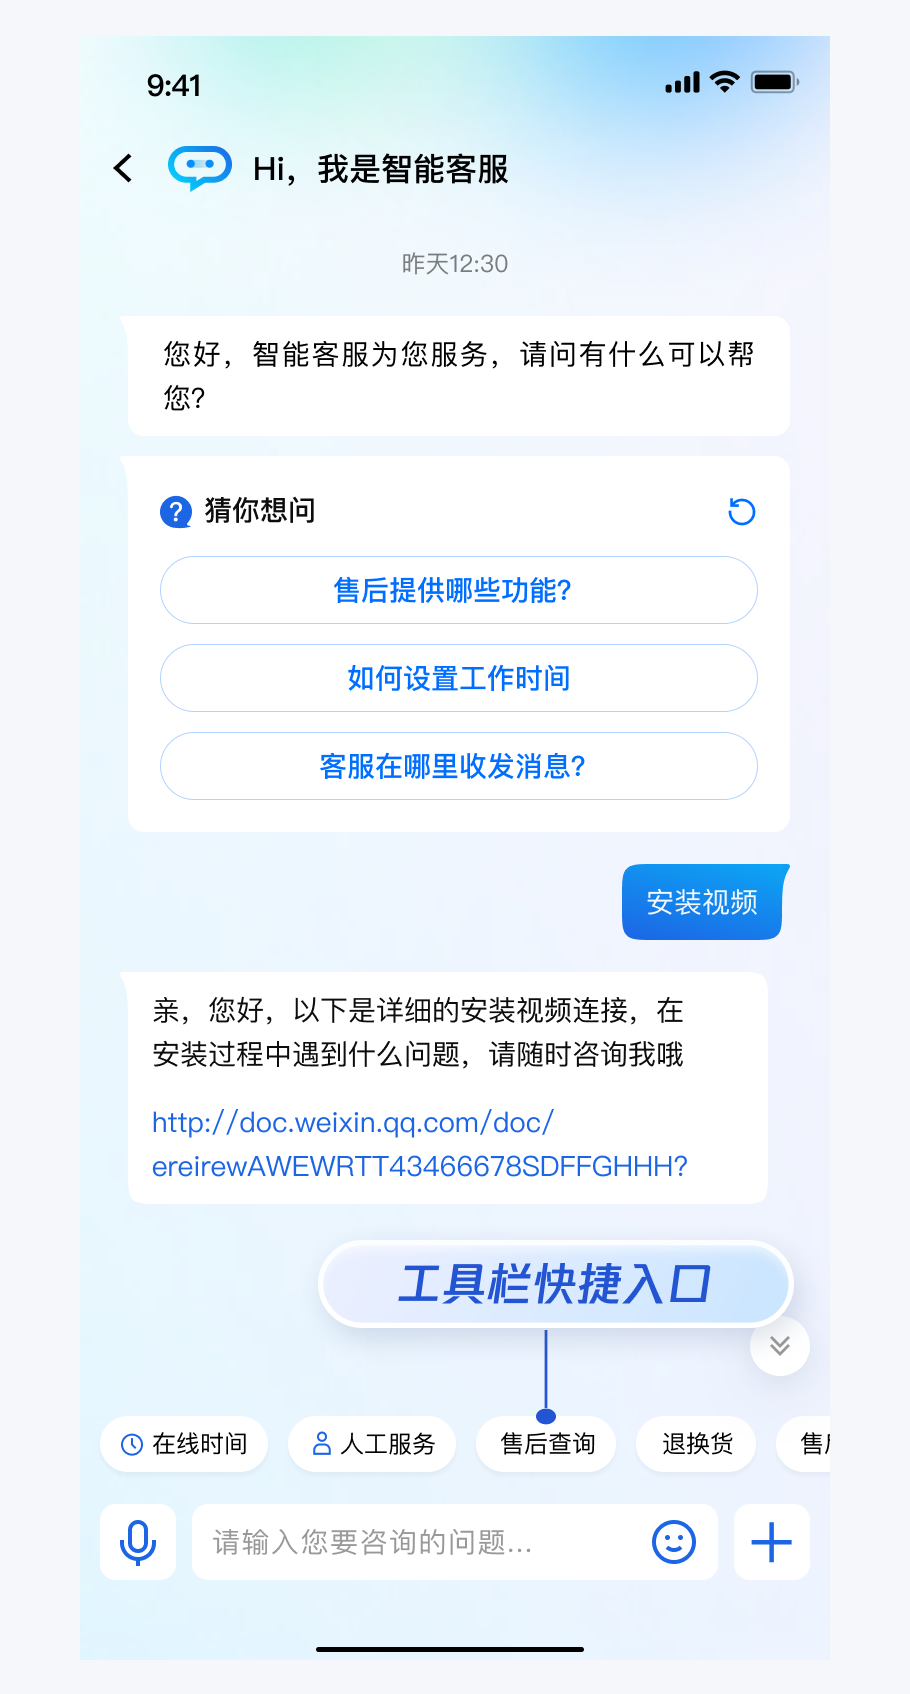
TUICustomerServicePluginMenuCellData *quickAccess1 = [[TUICustomerServicePluginMenuCellData alloc] init];quickAccess1.title = @"售后查询";quickAccess1.autoSendMessageUseContent = YES; // 用户点击后发送 title 对应的文本内容quickAccess1.onClick = ^{NSString *text = @"售后查询";NSLog(@"%@", text);};NSArray<TUICustomerServicePluginMenuCellData *> *quickAccessItems = @[quickAccess1];[[TencentCloudCustomerManager sharedManager] setQuickAccessItems:quickAccessItems];
底部快捷订单
如果您想实现打开客服会话时在聊天区域底部展示快捷订单,效果如下所示:
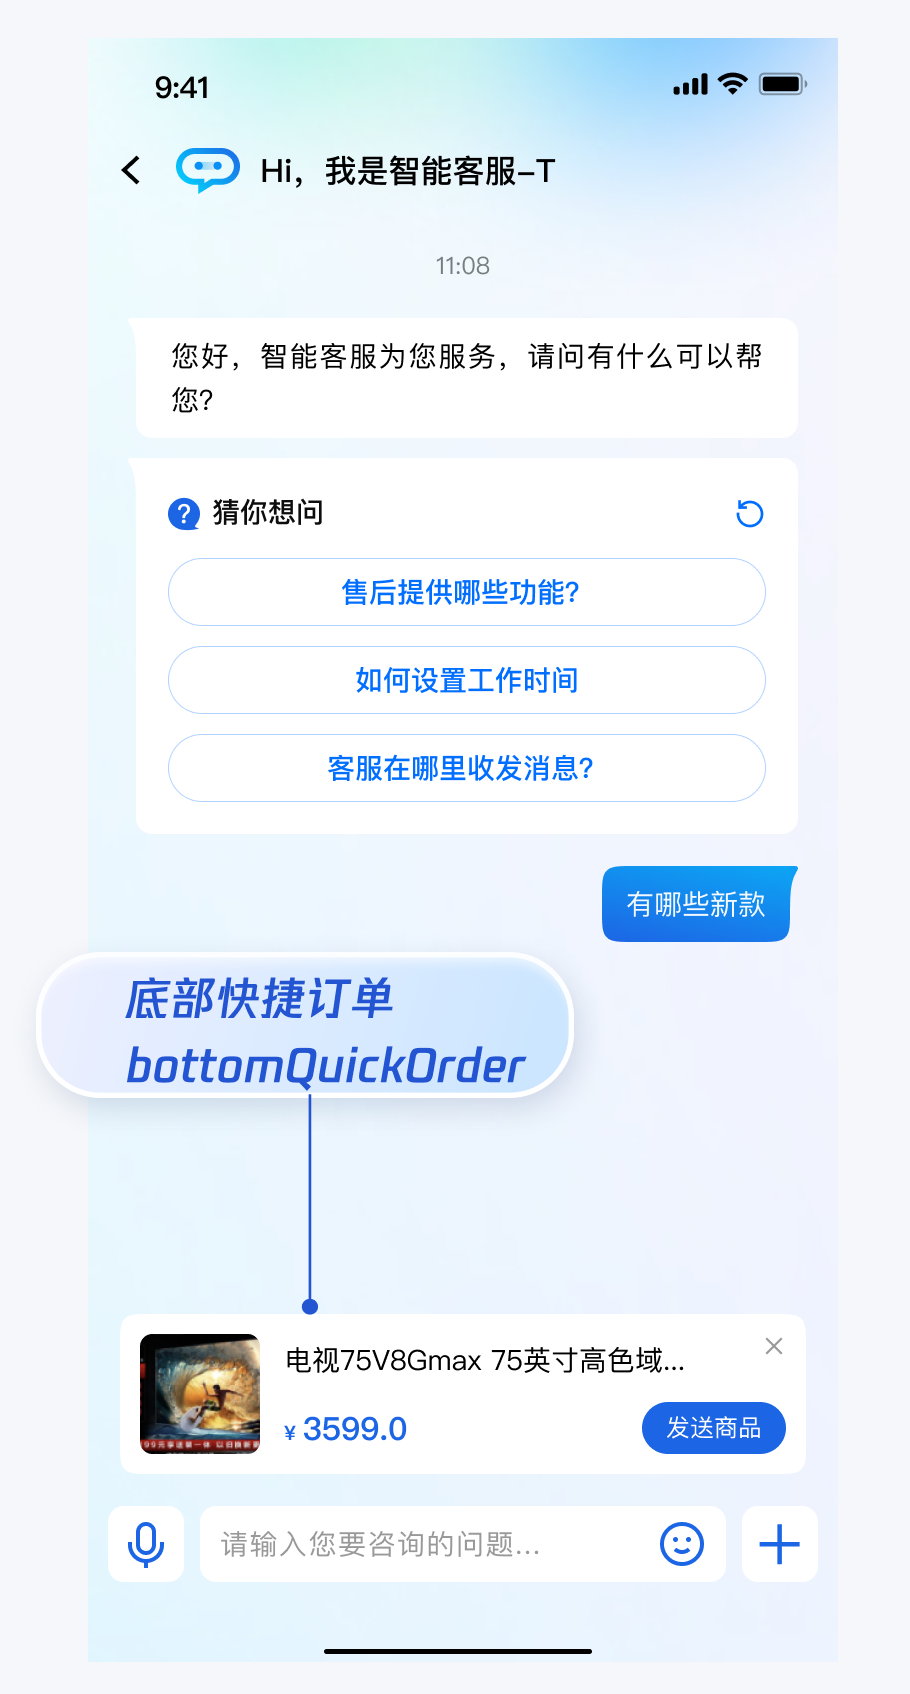
// 建议在会话激活后展示(监听客服会话启动的通知 TUIKitNotification_CustomerServiceChatDidStart)TencentCloudAIDeskBottomQuickOrder *bottomQuickOrder = [[TencentCloudAIDeskBottomQuickOrder alloc] init];bottomQuickOrder.title = @"腾讯云 - 高级版智能客服";bottomQuickOrder.desc = @"¥3000/月";bottomQuickOrder.picURL = @"https://qcloudimg.tencent-cloud.cn/image/document/cdbef3bc3e441e46503e1230ac6f65cf.png";bottomQuickOrder.linkURL = @"https://cloud.tencent.com/document/product/269/96056";bottomQuickOrder.clickAutoSend = YES; // 这里配置成 YES 就不需要配置 onSendClickListener, 即可自动发送bottomQuickOrder.customField = @{@"客服许可": @"3个,可加购",@"知识库语言数": @"不限制",@"多机器人": @"3个",@"多客服号": @"200个"};// [[TencentCloudCustomerManager sharedManager] setBottomQuickOrder:nil]; // 关闭快捷订单[[TencentCloudCustomerManager sharedManager] setBottomQuickOrder:bottomQuickOrder];
// 建议在会话激活后发送(监听客服会话启动的通知 TUIKitNotification_CustomerServiceChatDidStart)TencentCloudAIDeskBottomQuickOrder *bottomQuickOrder = [[TencentCloudAIDeskBottomQuickOrder alloc] init];bottomQuickOrder.title = @"腾讯云 - 高级版智能客服";bottomQuickOrder.desc = @"¥3000/月";bottomQuickOrder.picURL = @"https://qcloudimg.tencent-cloud.cn/image/document/cdbef3bc3e441e46503e1230ac6f65cf.png";bottomQuickOrder.linkURL = @"https://cloud.tencent.com/document/product/269/96056";bottomQuickOrder.customField = @{@"客服许可": @"3个,可加购",@"知识库语言数": @"不限制",@"多机器人": @"3个",@"多客服号": @"200个"};[[TencentCloudCustomerManager sharedManager] sendCustomMessage:[bottomQuickOrder toJsonData]];
获取客服会话未读数
如果您的应用需要获取客服会话未读数,展示角标数或者红点以提醒用户,请参考以下代码实现。
// 1. 实现 TencentCloudCustomerManagerDelegate- (void)onUnreadCountDidChange:(int)unreadCount {NSLog(@"onUnreadCountDidChange %d", unreadCount);}// 2. 设置 delegate[TencentCloudCustomerManager sharedManager].delegate = self;
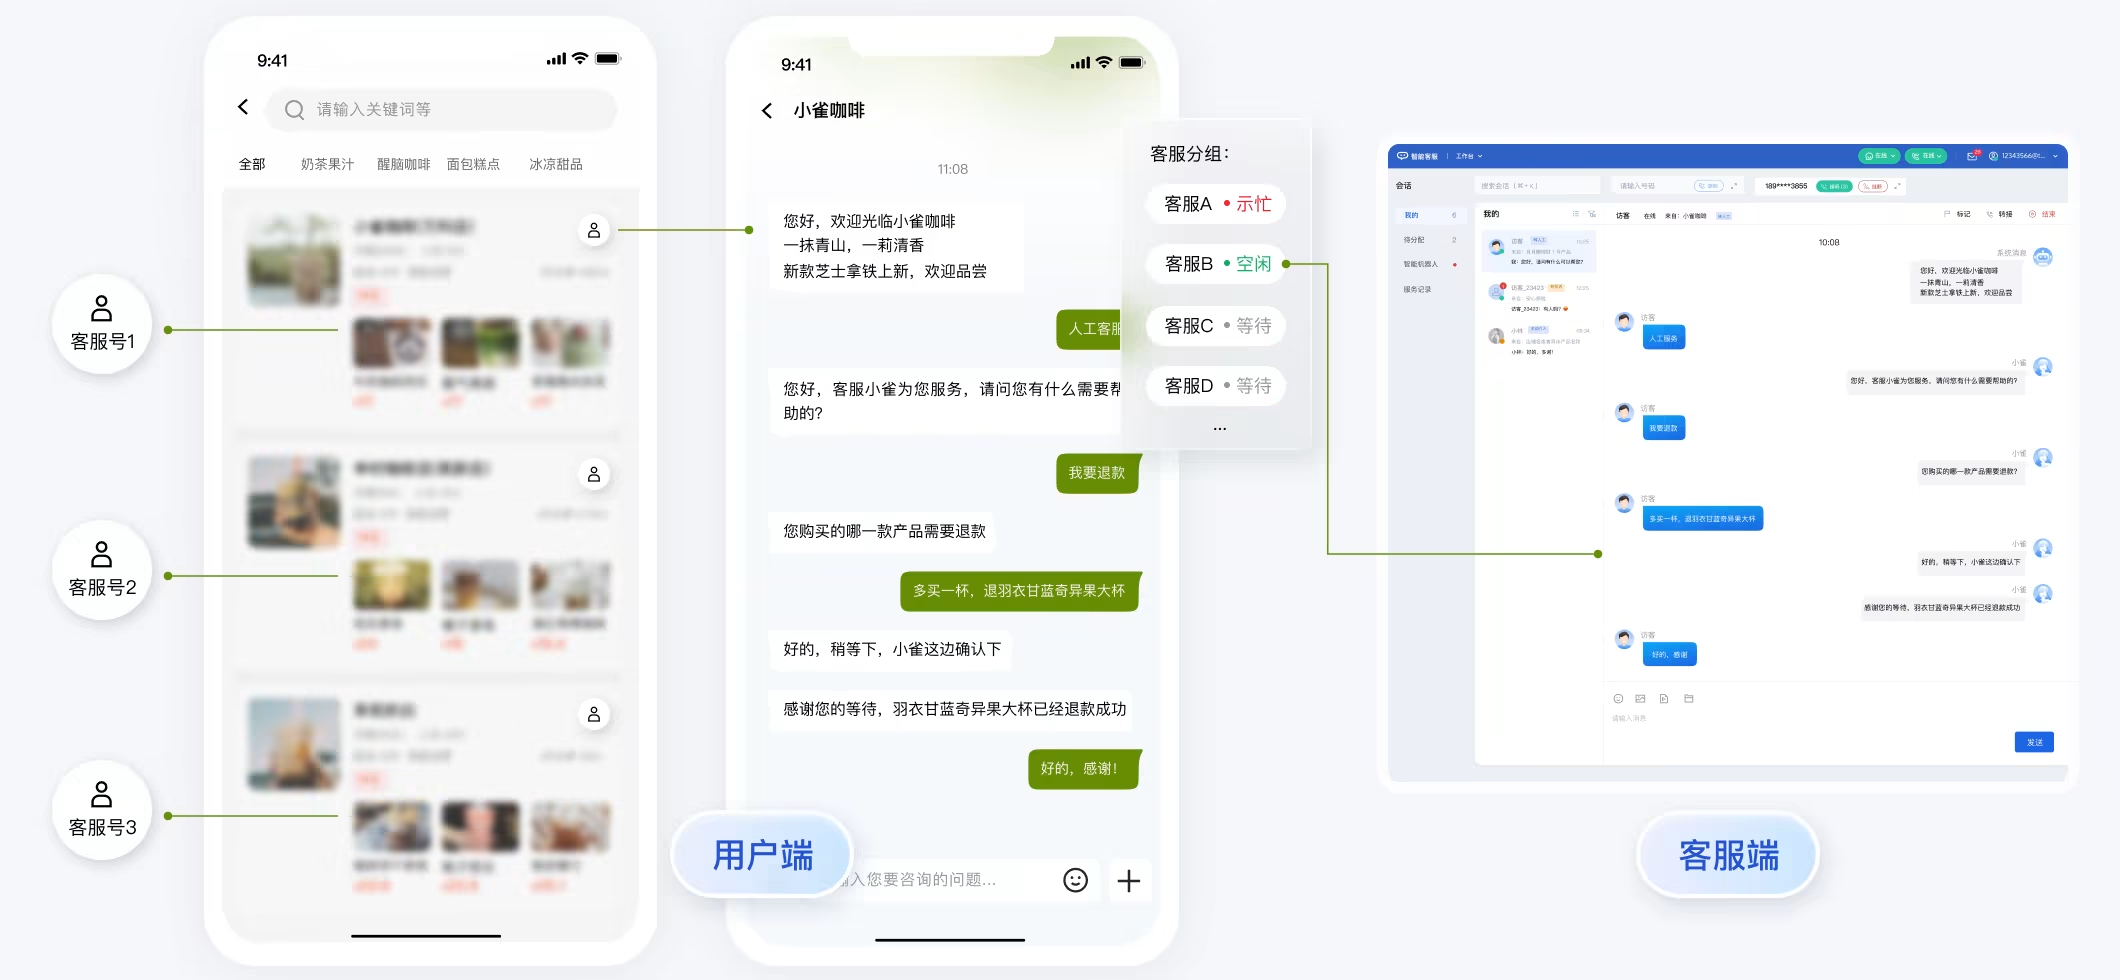
设置多客服号
如果您的应用内需要多个客服号,为用户提供专属客服功能,以提高服务质量和响应速度,可用 UIKit 提供的多客服号功能实现。效果如下所示:
// 设置多客服号列表NSArray *list = @[@"customerServiceID_001", @"customerServiceID_002", @"customerServiceID_003"];[[TencentCloudCustomerManager sharedManager] setCustomerServiceIDList:list];// 在您项目的 ViewController 里调用 pushCustomerServiceChatFromController: 方法,跳转至指定客服号聊天页面。[[TencentCloudCustomerManager sharedManager] pushCustomerServiceChatFromController:selfcustomerServiceID:@"customerServiceID_002"];
发送自定义消息
如果您的业务需要更灵活地控制客服会话,例如在用户退出客服聊天时主动结束会话,可以通过调用
sendCustomMessage 接口,发送自定义消息来实现。// 结束会话NSDictionary *messageDict = @{@"customerServicePlugin": @(0),@"src": @"27",};NSError *error = nil;NSData *jsonData = [NSJSONSerialization dataWithJSONObject:messageDictoptions:NSJSONWritingPrettyPrintederror:&error];if (!error) {[[TencentCloudCustomerManager sharedManager] sendCustomMessage:jsonData customerServiceID:@"your customerServiceID" onlineUserOnly:YES];}
登出与账号切换
说明:
如果您希望在应用中实现账号切换的需求,只需要调用
initWithProfile 接口传入新的账号即可,SDK 内部会自动处理账号的切换。一般情况下,如果您的应用生命周期跟智能客服 SDK 生命周期一致,退出应用前可以不登出,直接退出即可。有些特殊场景,例如您只在进入特定界面后才使用智能客服,退出界面后不再使用,此时可以调用
unInit 接口登出 SDK 并反初始化。登出成功后,应用不会再收到任何消息。[[TencentCloudCustomerManager sharedManager] unInit:^(BOOL success) {if (success) {NSLog(@"unInit ok");}}];
离线推送
如果您希望在应用离线时仍能触达用户,推荐接入 推送服务(Push)。该服务可与智能客服(Desk)深度融合,实现低成本、高效率的消息触达,请您参考 快速接入 文档进行配置。以下是融合使用的核心代码实现:
返回推送证书 ID
在 AppDelegate.m 文件中,实现
- businessID 协议方法返回推送证书 ID。#pragma mark - TIMPush- (int)businessID {int kBusinessID = 47877; // 请替换为您的推送证书 IDreturn kBusinessID;}
注册推送服务
在 AppDelegate.m 文件中,在
application:didFinishLaunchingWithOptions: 方法内注册推送服务。说明:
如果未集成 Chat,请显式调用
registerPush 接注册推送服务。如果已集成 Chat,调用
TUILogin.login 接口即可使用 Chat 和 Push,无需调用 registerPush。- (BOOL)application:(UIApplication *)application didFinishLaunchingWithOptions:(NSDictionary *)launchOptions {// Override point for customization after application launch.// APP_KEY 为应用的【客户端密钥】,非【服务端密钥】[TIMPushManager registerPush:SDKAppID appKey:APP_KEY succ:^(NSData * _Nonnull deviceToken) {NSLog(@"registerPush ok.");} fail:^(int code, NSString * _Nonnull desc) {NSLog(@"registerPush failed. code:%d desc:%@", code, desc);}];...return YES;}
注册监听与自定义跳转
在 AppDelegate.m 文件中,在
application:didFinishLaunchingWithOptions: 方法内注册推送监听,并实现 - (void)onNotificationClicked:(NSString *)ext 方法。- (BOOL)application:(UIApplication *)application didFinishLaunchingWithOptions:(NSDictionary *)launchOptions {// Override point for customization after application launch....[TIMPushManager addPushListener:self];return YES;}#pragma mark - TIMPushListener- (void)onNotificationClicked:(NSString *)ext {// 获取 ext 自定义跳转NSData *data = [ext dataUsingEncoding:NSUTF8StringEncoding];NSError *err = nil;NSDictionary *dict = [NSJSONSerialization JSONObjectWithData:data options:NSJSONReadingMutableContainers error:&err];if (err || ![dict isKindOfClass:[NSDictionary class]]) {NSLog(@"Json parse failed: %@", ext);return;}NSDictionary *pairs = dict[@"entity"];if ([pairs[@"action"] isEqualToNumber:@1]) {NSString *customerServiceID = pairs[@"sender"];if (!customerServiceID) {return;}[ExtManager shared].pendingCustomerServiceID = customerServiceID;}}
在合适的时机,如 SceneDelegate.m 文件的
- (void)sceneDidBecomeActive:(UIScene *)scene 方法内实现自定义跳转。- (void)sceneDidBecomeActive:(UIScene *)scene {UIViewController *topVC = [self currentTopViewController];if (topVC) {if ([ExtManager shared].pendingCustomerServiceID) {[[TencentCloudCustomerManager sharedManager] initWithProfile:SDKAppID userID:userID userSig:userSig nickName:nil avatar:nil completion:^(NSError *error) {if (error) {NSLog(@"login failed. error:%@", error);return;}[[TencentCloudCustomerManager sharedManager] pushCustomerServiceChatFromController:topVC customerServiceID:[ExtManager shared].pendingCustomerServiceID];[ExtManager shared].pendingCustomerServiceID = nil;}];}}}
常见问题
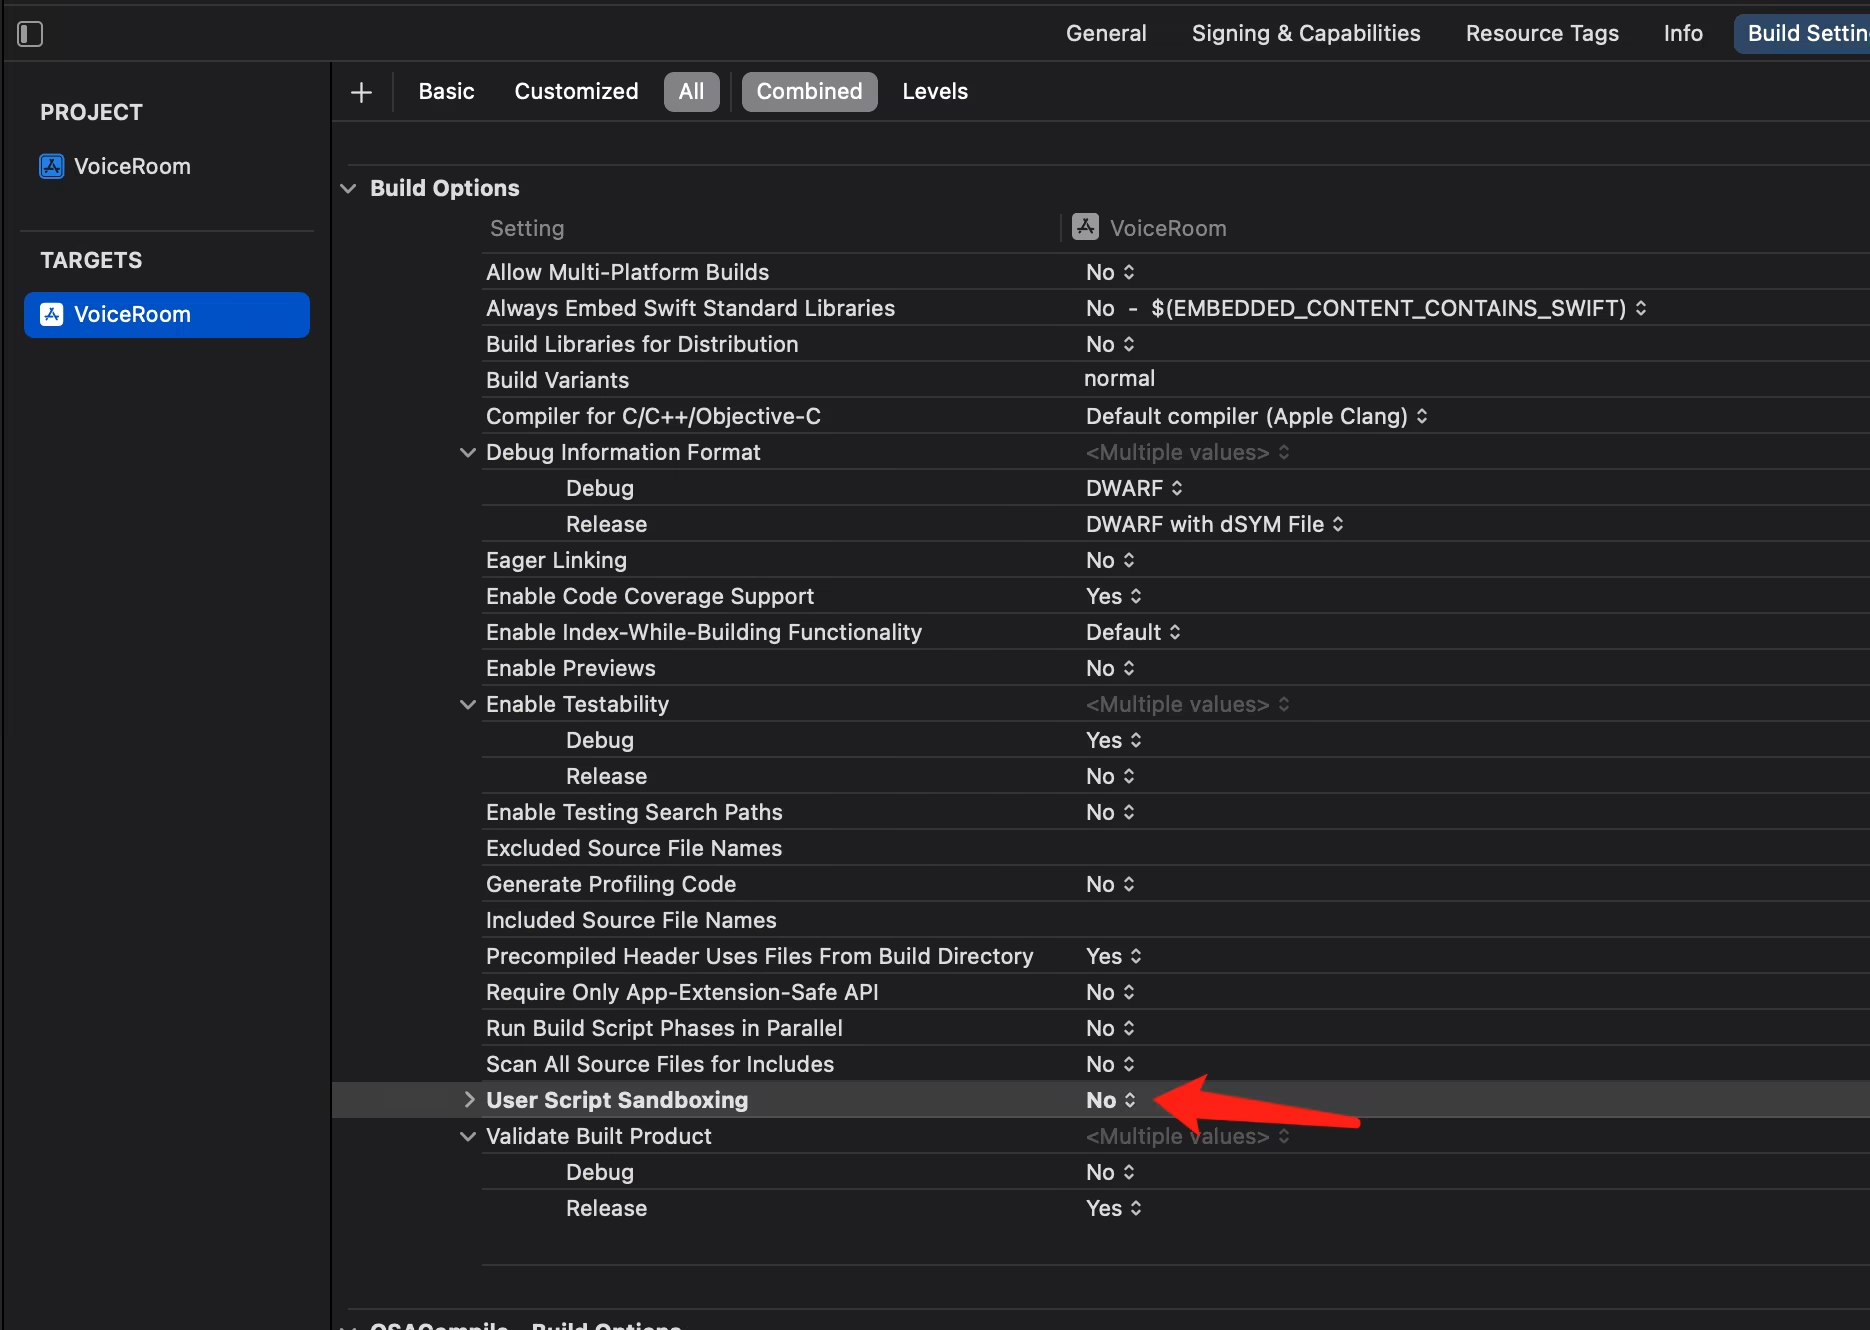
Sandbox: bash(xxx) deny(1) file-write-create
当您使用 Xcode 15 创建一个新工程时, 如果遇到下图所示的错误
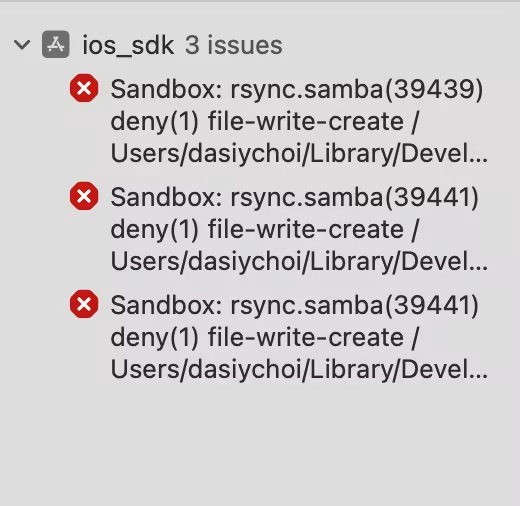
建议您关闭 User Script Sandboxing。