Sweet Alert弹窗插件的安装及使用详解笔记
Sweet Alert弹窗插件的安装及使用详解笔记


首先,介绍一下 什么是 Sweet Alert ?
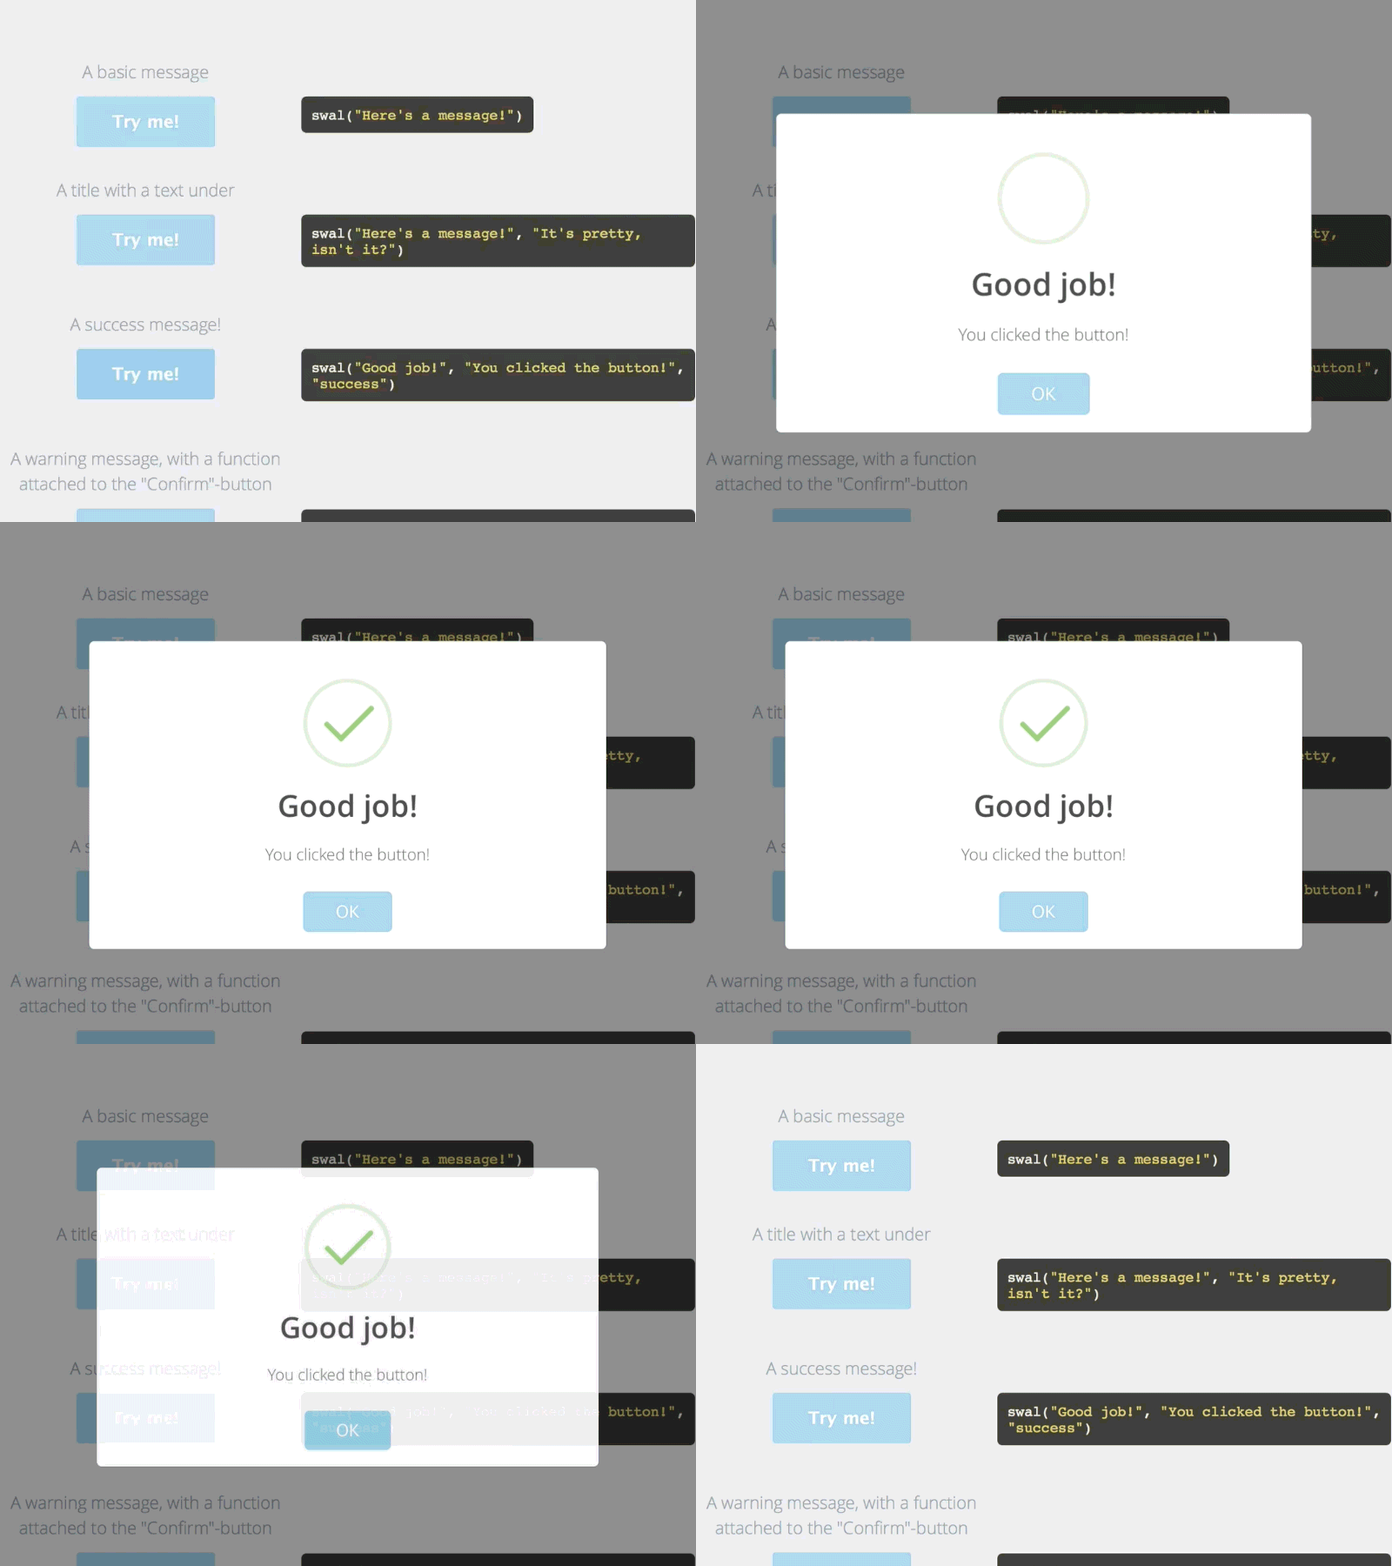
Sweet Alert 是一个替代传统的 JavaScript Alert 的“美化版”提示效果。SweetAlert 自动居中对齐在页面中央,不管是台式电脑,手机还是平板电脑看起来效果都很不错。
另外提供了丰富的自定义配置选择,可以灵活控制。项目主页: http://t4t5.github.io/sweetalert/
安装 Sweet Alert
npm 安装
NPM结合Browserify或Webpack等工具是安装SweetAlert的推荐方法。
npm install sweetalert --save然后,将其导入您的项目:
import swal from 'sweetalert';CDN 引用
您还可以在 unpkg 或者 jsDelivr 等 CDN 库中找到 SweetAlert 直接引入到页面中,使用全局 swal 变量。
<script src="https://unpkg.com/sweetalert/dist/sweetalert.min.js"></script>开始使用
将文件引入页面中,可以调用 swal 函数(确保在DOM加载后调用!)
swal("Hello world!");传递参数:
如果传递两个参数,第一个是模态的标题,第二个是文本。
swal("Here's the title!", "...and here's the text!");如果使用第三个参数,可以在警告中添加一个图标!
swal("Good job!", "You clicked the button!", "success");有四个预定义图标:"warning" , "error" , "success" 和 "info".
使用自定义选项
也可以用对象来分别重写参数:
swal({
  title: "Good job!",
  text: "You clicked the button!",
  icon: "success",
});
使用下面的格式,可以指定更多选项来自定义警告。例如,我们可以将确认按钮上的文字更改为“确定”:
swal({
    title: "Good job!",
    text: "You clicked the button!",
    icon: "success",
    button: "确定",
});
也可以把第一个语法和第二个语法结合起来,简写成下面的格式:
swal("Good job!", "You clicked the button!", "success", {
    button: "确定",
});
使用 promises
SweetAlert 可以使用 promises 来跟踪用户如何与警告交互。
如果用户单击 confirm(确认) 按钮,promises 将解析为 true 。如果警告被解除(通过单击警告外部),promises 将解析为 null 。
swal("Click on either the button or outside the modal.")
.then((value) => {
  swal(`The returned value is: ${value}`);
});
设置更多选项
如果您想在执行危险操作之前警告用户,可以通过设置更多选项,更好地提醒他们:
icon 可以设置为预定义 "warning" 以显示警告图标。
通过设置 buttons(复数) true ,除默认确认按钮外,SweetAlert 还会显示取消按钮。
通过设置 dangerMode 为 true ,焦点将在“取消”按钮而不是“确认”按钮上,并且“确认”按钮将为红色以强调危险操作。
swal({
    title: "你确定吗?",
    text: "删除后,您将无法恢复这些文件!",
    icon: "warning",
    buttons: true,
    dangerMode: true,
})
    .then((willDelete) => {
        if (willDelete) {
            swal("您的文件已被删除!", {
                icon: "success",
            });
        } else {
            swal("您的文件是安全的!");
        }
    });
高级示例
自定义按钮:
刚刚我们已经通过 button: "确定" 设置了“确定”按钮的文本。如果要显示并自定义取消按钮,可以设置 buttons 为一个字符串数组,其中第一个值是“取消”按钮的文本,第二个值是“确认”按钮的文本:
swal("你确定要这么做吗?", {
    buttons: ["取消", "确定"],
});
如果您希望其中一个按钮只有默认文本,则可以将值设置为 true 而不是字符串:
swal("你确定要这么做吗?", {
    buttons: ["取消", true],
});
设置更多按钮:
SweetAlert 不只可以设置“确认”和“取消”按钮。通过为其指定对象 buttons ,可以根据需求设置完全相同的按钮,并指定它们在单击时解析的值!
在下面的示例中,我们设置了3个按钮:
cancel ,默认情况下解析为 null 并具有自定义 "逃跑!" 文本。
catch ,它将解析为 value 我们指定的("catch")并有自定义文本 "Pokéball!" 。
defeat 。我们指定的("defeat")并有自定义文本 "打败他!" 。在这里,如果设置为 true ,可以让 SweetAlert 为按钮设置一些默认配置。在这种情况下,它将设置 text 为 "Defeat" (大写)和已解析的值 defeat 。如果我们将cancel 按钮设置为 true ,它仍将 null 按预期解析。
swal("一个狂野的CXK出现了,你打算怎么做?", {
    buttons: {
        cancel: "逃跑!",
        catch: {
            text: "Pokéball!",
            value: "catch",
        },
        // defeat: true,
        defeat: {
            text: "打败他!",
            value: "defeat",
        },
    },
})
    .then((value) => {
        switch (value) {

            case "defeat":
                swal("CXK昏了过去!你获得了500 EXP!");
                break;

            case "catch":
                swal("真棒!", "CXK被抓住了!", "success");
                break;

            default:
                swal("安全离开!");
        }
    });
AJAX 请求
由于 SweetAlert 是基于 promise 的,可以将它与同样基于 promise 的AJAX函数配对。下面是一个使用 fetch 在 iTunes API上 搜索艺术家的例子。
注意,我们使用 content: "input" ,以便在用户单击“确认”按钮时显示输入字段并检索它的值:
swal({
  text: '搜索一个电影,例如:"La La Land"。',
  content: "input",
  button: {
    text: "搜索",
    closeModal: false,
  },
})
.then(name => {
  if (!name) throw null;
  return fetch(`https://itunes.apple.com/search?term=${name}&entity=movie`);
})
.then(results => {
  return results.json();
})
.then(json => {
  const movie = json.results[0];

  if (!movie) {
    return swal("No movie was found!");
  }

  const name = movie.trackName;
  const imageURL = movie.artworkUrl100;

  swal({
    title: "Top result:",
    text: name,
    icon: imageURL,
  });
})
.catch(err => {
  if (err) {
    swal("Oh noes!", "The AJAX request failed!", "error");
  } else {
    swal.stopLoading();
    swal.close();
  }
});
使用 DOM 节点作为内容
虽然我们提倡使用 SweetAlert 提供的功能,但是有时可能会遇到一些特有的场景,需要自定义UI,不仅仅是样式按钮和文本。为此,SweetAlert 提供了 content 选项。
在上面的示例中,我们了解到如何将 content 选项值设置 "input" ,在模态框中加入 <input /> 元素,该元素根据输入的值,变换“确认”按钮需要的解析值。 "input" 是为了方便而存在的预定义选项,但您也可以设置 content 为任意 DOM 节点!
下面的示例,可以展示如何重新创建模态框的功能:
...swal("Write something here:", {
  content: "input",
})
.then((value) => {
  swal(`You typed: ${value}`);
});!
使用自定义 DOM 节点
我们在这里使用 React ,它是一个比较常用的的 UI 库,可以帮助我们理解如何创建更复杂的 SweetAlert 接口,您也可以使用任何所需的库,只要您可以从中提取 DOM 节点!
import React, { Component } from 'react';
import ReactDOM from 'react-dom';

const DEFAULT_INPUT_TEXT = "";

class MyInput extends Component {
  constructor(props) {
    super(props);

    this.state = {
      text: DEFAULT_INPUT_TEXT,
    };
  }

  changeText(e) {
    let text = e.target.value;

    this.setState({
      text,
    });

    /*
     * This will update the value that the confirm
     * button resolves to:
     */
    swal.setActionValue(text);
  }

  render() {
    return (
      <input
        value={this.state.text}
        onChange={this.changeText.bind(this)}
      />
    )
  }
}

// We want to retrieve MyInput as a pure DOM node:
let wrapper = document.createElement('div');
ReactDOM.render(<MyInput />, wrapper);
let el = wrapper.firstChild;

swal({
  text: "Write something here:",
  content: el,
  buttons: {
    confirm: {
      /*
       * We need to initialize the value of the button to
       * an empty string instead of "true":
       */
      value: DEFAULT_INPUT_TEXT,
    },
  },
})
.then((value) => {
  swal(`You typed: ${value}`);
});
看起来可能看起来非常复杂,但实际上非常简单。我们所做的只是创建一个输入标记作为 React 组件。然后,我们提取其 DOM 节点,并将其传递到 swal 函数的 content 选项下,将其呈现为无样式元素。
唯一特定于 SweetAlert 的代码是最后 swal.setActionValue() 的 swal() 调用。其余的只是基本的 React 和 JavaScript 。

使用这种技术,我们可以创建具有更多交互式 UI 的模态框,例如来自 Facebook 的这种模式。
与库一起使用
虽然上面介绍的用于创建更高级模态设计的方法可行,但手动创建嵌套 DOM 节点变得非常繁琐。我们也可以使用 SweetAlert Transformer 轻松将您喜爱的模板库集成到 SweetAlert 中。
使用React
为了将 SweetAlert 与 JSX 语法一起使用,您需要 使用React 安装 SweetAlert 。请注意,您需要同时拥有 sweetalert 和 @sweetalert/with-react 依赖关系 package.json。
每当你想在 SweetAlert 模态框中使用 JSX 时,只需从 @sweetalert/with-react 而不是从中导入 swal sweetalert。
import React from 'react'
import swal from '@sweetalert/with-react'

swal(
  <div>
    <h1>Hello world!</h1>
    <p>
      This is now rendered with JSX!
    </p>
  </div>
)
JSX 语法取代了 modal 的 content 选项,您仍然可以使用 SweetAlert 的其他功能。
下面的实例可以实现我们上面看到的 Facebook 的弹窗模式:
import React from 'react'
import swal from '@sweetalert/with-react'

const onPick = value => {
  swal("Thanks for your rating!", `You rated us ${value}/3`, "success")
}

const MoodButton = ({ rating, onClick }) => (
  <button
    data-rating={rating}
    className="mood-btn"
    onClick={() => onClick(rating)}
  />
)

swal({
  text: "How was your experience getting help with this issue?",
  buttons: {
    cancel: "Close",
  },
  content: (
    <div>
      <MoodButton
        rating={1}
        onClick={onPick}
      />
      <MoodButton
        rating={2}
        onClick={onPick}
      />
      <MoodButton
        rating={3}
        onClick={onPick}
      />
    </div>
  )
})
配置项详解
text
类型: string
默认值: ""(空字符串)
描述:模态框的文字。
示例:
swal({
  text: "Hello world!",
});
title
类型: string
默认值: ""(空字符串)
描述:模态的标题。
示例:
swal({
  title: "Here's a title!",
});
icon
类型: string
默认值: ""(空字符串)
描述:模态的图标。
示例:
swal({
  icon: "success",
});
内置的预定义选项:
"warning"
"error"
"success"
"info"
button
类型: string|boolean|ButtonOptions
默认:
{
  text: "OK",
  value: true,
  visible: true,
  className: "",
  closeModal: true,
}
描述:默认显示的确认按钮。您可以通过设置 button 为字符串来更改其文本,也可以通过传递 ButtonOptions 对象来调整更多设置。将其设置为 false 隐藏按钮。
示例:
swal({
  button: "Coolio",
});swal({
button: {
text: "Hey ho!",
},
});swal("Hello world!", {
button: false,
});buttons
类型: boolean|string[]|ButtonOptions[]|ButtonList
默认:
{
  cancel: {
    text: "Cancel",
    value: null,
    visible: false,
    className: "",
    closeModal: true,
  },
  confirm: {
    text: "OK",
    value: true,
    visible: true,
    className: "",
    closeModal: true
  }
}描述:指定按钮的确切数量及其行为。如果使用数组,则可以将元素设置为字符串(仅设置文本),列表ButtonOptions或两者的组合。您还可以将其中一个元素设置true为简单地获取默认选项。
如果您不仅需要预定义的取消和确认按钮,则需要指定一个ButtonList对象,其中键(按钮的命名空间)指向ButtonOptions。
您还可以指定false隐藏所有按钮(与button选项相同的行为)。
示例:
swal({ buttons: ["Stop", "Do it!"],});swal({
buttons: [true, "Do it!"],
});swal("Hello world!", {
buttons: false,
});swal({
buttons: {
cancel: true,
confirm: true,
},
});swal({
buttons: {
cancel: true,
confirm: "Confirm",
roll: {
text: "Do a barrell roll!",
value: "roll",
},
},
});content
类型: Node|string
默认: null
描述:自定义内容,不仅仅是文本和图标。
示例:
swal({
  content: "input",
});swal({
content: {
element: "input",
attributes: {
placeholder: "Type your password",
type: "password",
},
},
});var slider = document.createElement("input");
slider.type = "range";
swal({
content: slider,
});className
类型: string
默认值:""(空字符串)
说明:将自定义类添加到 SweetAlert 模式,可以方便的修改样式。
示例:
swal("Hello world!", {
  className: "red-bg",
});
closeOnClickOutside
类型: boolean
默认: true
描述:决定用户是否应该能够通过点击外部来关闭模态。
示例:
swal({
  closeOnClickOutside: false,
});
closeOnEsc
类型: boolean
默认: true
描述:决定用户是否应该能够通过 ESC按键 关闭模态。
示例:
swal({
  closeOnEsc: false,
});
dangerMode
类型: boolean
默认: false
描述:如果设置为 true,则“确认”按钮变为红色,默认聚焦设置在“取消”按钮上。常用在确认操作有危险的警告模式(例如删除项目)时。
示例:
swal("Are you sure?", {
  dangerMode: true,
  buttons: true,
});
timer
类型: number
默认: null
描述:在一定时间后(单位:ms)关闭模态。有用的结合 buttons: false。
示例:
swal("This modal will disappear soon!", {
  buttons: false,
  timer: 3000,
});
方法
名称 | 描述 | 例 |
|---|---|---|
close | 关闭当前打开的 SweetAlert ,就像按下取消按钮一样。 | swal.close() |
getState | 获取当前 SweetAlert 模态的状态。 | swal.getState() |
setActionValue | 更改其中一个模态按钮的 promise 值。您可以只传入一个字符串(默认情况下它会更改确认按钮的值)或一个对象。 | swal.setActionValue({ confirm: 'Text from input' }) |
stopLoading | 删除模态按钮上的所有加载状态。将其与按钮选项结合使用 closeModal: false。 | swal.stopLoading() |
主题化
swal-overlay
示例:
.swal-overlay {
  background-color: rgba(43, 165, 137, 0.45);
}
swal-modal
示例:
.swal-modal {
  background-color: rgba(63,255,106,0.69);
  border: 3px solid white;
}
swal-title
示例:
.swal-title {
  margin: 0px;
  font-size: 16px;
  box-shadow: 0px 1px 1px rgba(0, 0, 0, 0.21);
  margin-bottom: 28px;
}
swal-text
示例:
.swal-text {
  background-color: #FEFAE3;
  padding: 17px;
  border: 1px solid #F0E1A1;
  display: block;
  margin: 22px;
  text-align: center;
  color: #61534e;
}
swal-footer
示例:
.swal-footer {
  background-color: rgb(245, 248, 250);
  margin-top: 32px;
  border-top: 1px solid #E9EEF1;
  overflow: hidden;
}
swal-button
示例:
模态的按钮。它有一个额外的类,根据按钮的类型改变 swal-button--{type} 。例如,确认按钮的额外类是 swal-button--confirm 。
例:
.swal-button {
  padding: 7px 19px;
  border-radius: 2px;
  background-color: #4962B3;
  font-size: 12px;
  border: 1px solid #3e549a;
  text-shadow: 0px -1px 0px rgba(0, 0, 0, 0.3);
}声明:本文由w3h5原创,转载请注明出处:《Sweet Alert弹窗插件的安装及使用详解笔记》 https://cloud.tencent.com/developer/article/1538120
- 安装 Sweet Alert
- npm 安装
- CDN 引用
- 开始使用
- 传递参数:
- 使用自定义选项
- 使用 promises
- 设置更多选项
- 高级示例
- 自定义按钮:
- 设置更多按钮:
- AJAX 请求
- 使用 DOM 节点作为内容
- 使用自定义 DOM 节点
- 与库一起使用
- 使用React
- 配置项详解
- 默认: null
- 方法
- 主题化

腾讯云开发者

扫码关注腾讯云开发者
领取腾讯云代金券
Copyright © 2013 - 2025 Tencent Cloud. All Rights Reserved. 腾讯云 版权所有
深圳市腾讯计算机系统有限公司 ICP备案/许可证号:粤B2-20090059 深公网安备号 44030502008569
腾讯云计算(北京)有限责任公司 京ICP证150476号 | 京ICP备11018762号 | 京公网安备号11010802020287
Copyright © 2013 - 2025 Tencent Cloud.
All Rights Reserved. 腾讯云 版权所有


