Prometheus-Operator:自定义监控
上篇文章我们主要是讲解了使用prometheus-operator来进行部署,其中大部分需要监控的指标我们都可以收集到,但是也是有不完善的地方,例如我们自定义的exporter。本篇文章将会讲解如何自定义监控。
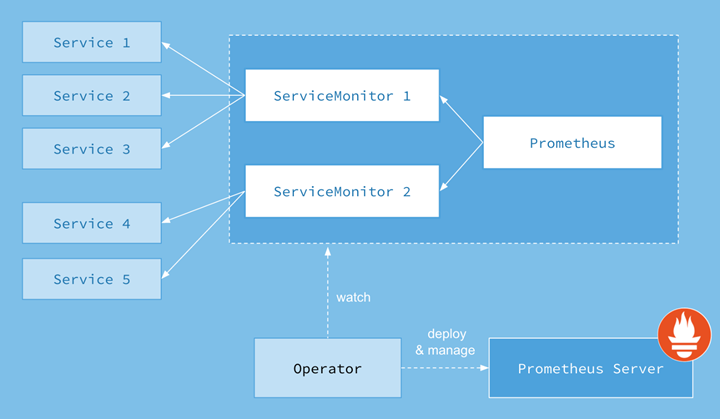
Prometheues Opeartor 架构图

此架构图可以看出prometheus数据源主要是来自于ServiceMonitor,所以我们也按照该方案部署一个ServiceMonitor。接下来的案例以监控MySQL为例。
环境概述
$ kubectl get nodes
NAME               STATUS   ROLES                  AGE   VERSION
k8s-master-50.57   Ready    control-plane,master   77d   v1.20.5
k8s-node-50.58     Ready    <none>                 77d   v1.20.5
k8s-node-50.59     Ready    <none>                 77d   v1.20.5
实验介绍
- 监控对象:MySQL
- exporter:mysql_exporter
部署 MySQL_Exporter
$ cat   mysql_exporter.yaml

apiVersion: apps/v1
kind: Deployment
metadata:
  name: mysql-exporter
  namespace: kube-ops
  labels:
    k8s-app: mysql-exporter
spec:
  replicas: 1
  selector:
    matchLabels:
      k8s-app: mysql-exporter
  strategy:
    rollingUpdate:
      maxSurge: 70%
      maxUnavailable: 25%
    type: RollingUpdate
  template:
    metadata:
      labels:
        k8s-app: mysql-exporter
    spec:
      terminationGracePeriodSeconds: 60
      containers:
      - name: mysql-exporter
        image: prom/mysqld-exporter
        imagePullPolicy: IfNotPresent
        env:
        - name: DATA_SOURCE_NAME
          value: 'exporter:aMxxxxx@(192.168.70.204:3306)/' # user:password@(hostname:3306)/
        readinessProbe:
          httpGet:
            port: 9104
            path: /health
          initialDelaySeconds: 30
          periodSeconds: 10
          timeoutSeconds: 30
          failureThreshold: 10
        livenessProbe:
          httpGet:
            port: 9104
            path: /health
          initialDelaySeconds: 30
          periodSeconds: 10
          timeoutSeconds: 3
          failureThreshold: 1
        resources:
          limits:
            cpu: 500m
            memory: 1Gi
          requests:
            cpu: 100m
            memory: 512Mi
---
apiVersion: v1
kind: Service
metadata:
  name: mysql-exporter
  namespace: kube-ops
  labels:
    k8s-app: mysql-exporter
spec:
  selector:
    k8s-app: mysql-exporter
  ports:
  - name: mysql-exporter
    port: 9104
    protocol: TCP
  type: ClusterIP

# 创建mysql_export
$ kubectl apply -f   mysql_exporter.yaml
注:连接mysql使用的账号密码需要提前创建,建议只赋予查看权限
查看MySQL_Exporter状态
$ kubectl get pod -n kube-ops -o wide
NAME                             READY   STATUS    RESTARTS   AGE   IP              NODE             NOMINATED NODE   READINESS GATES
mysql-exporter-dc5c494ff-2fgqq   1/1     Running   0          89m   100.244.1.102   k8s-node-50.58   <none>           <none>

# 出现如上状态说明是正常的
查看MySQL Metrics
# curl 100.244.1.102:9104/metrics
### 省略
# TYPE mysql_info_schema_innodb_cmpmem_relocation_time_seconds_total counter
mysql_info_schema_innodb_cmpmem_relocation_time_seconds_total{buffer_pool="0",page_size="1024"} 0
mysql_info_schema_innodb_cmpmem_relocation_time_seconds_total{buffer_pool="0",page_size="16384"} 0
mysql_info_schema_innodb_cmpmem_relocation_time_seconds_total{buffer_pool="0",page_size="2048"} 0
mysql_info_schema_innodb_cmpmem_relocation_time_seconds_total{buffer_pool="0",page_size="4096"} 0
mysql_info_schema_innodb_cmpmem_relocation_time_seconds_total{buffer_pool="0",page_size="8192"} 0
mysql_info_schema_innodb_cmpmem_relocation_time_seconds_total{buffer_pool="1",page_size="1024"} 0
mysql_info_schema_innodb_cmpmem_relocation_time_seconds_total{buffer_pool="1",page_size="16384"} 0
mysql_info_schema_innodb_cmpmem_relocation_time_seconds_total{buffer_pool="1",page_size="2048"} 0
mysql_info_schema_innodb_cmpmem_relocation_time_seconds_total{buffer_pool="1",page_size="4096"} 0
mysql_info_schema_innodb_cmpmem_relocation_time_seconds_total{buffer_pool="1",page_size="8192"} 0
### 省略
部署 ServiceMonitor
$ cat  servicemonitor.yaml
apiVersion: monitoring.coreos.com/v1
kind: ServiceMonitor
metadata:
  name: mysql-exporter  # ServiceMonitor名称
  namespace: monitoring # ServiceMonitor所在名称空间
spec:
  endpoints:  # prometheus所采集Metrics地址配置,endpoints为一个数组,可以创建多个,但是每个endpoints包含三个字段interval、path、port
    - interval: 15s # prometheus采集数据的周期,单位为秒
      path: /metrics # prometheus采集数据的路径
      port: mysql-exporter # prometheus采集数据的端口,这里为port的name,主要是通过spec.selector中选择对应的svc,在选中的svc中匹配该端口
  namespaceSelector: # 需要发现svc的范围
    any: true     # 有且仅有一个值true,当该字段被设置时,表示监听所有符合selector所选择的svc
  selector:
    matchLabels:  # 选择svc的标签
      k8s-app: mysql-exporter

# 创建servicemonitor对象
$ kubectl apply -f  servicemonitor.yaml
注:这里的namespaceSelector中我们也可以指定名称空间,如下:
namespaceSelector:
  matchNames:
  - default
  - kube-ops
此时就可以指定在default、kube-ops名称空间中对service进行匹配
修改Prometheus ClusterRole.yaml
# cat  prometheus-clusterRole.yaml
apiVersion: rbac.authorization.k8s.io/v1
kind: ClusterRole
metadata:
  labels:
    app.kubernetes.io/component: prometheus
    app.kubernetes.io/name: prometheus
    app.kubernetes.io/part-of: kube-prometheus
    app.kubernetes.io/version: 2.26.0
  name: prometheus-k8s
rules:
- apiGroups:
  - ""
  resources:
  - nodes/metrics
  - services
  - endpoints
  - pods
  verbs:
  - get
  - list
  - watch
- nonResourceURLs:
  - /metrics
  verbs:
  - get

# kubectl apply -f  prometheus-clusterRole.yaml
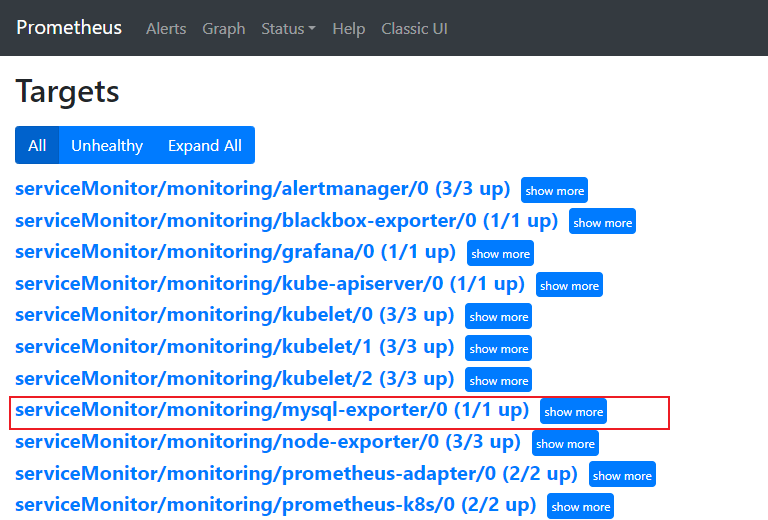
查看prometheus中的targets

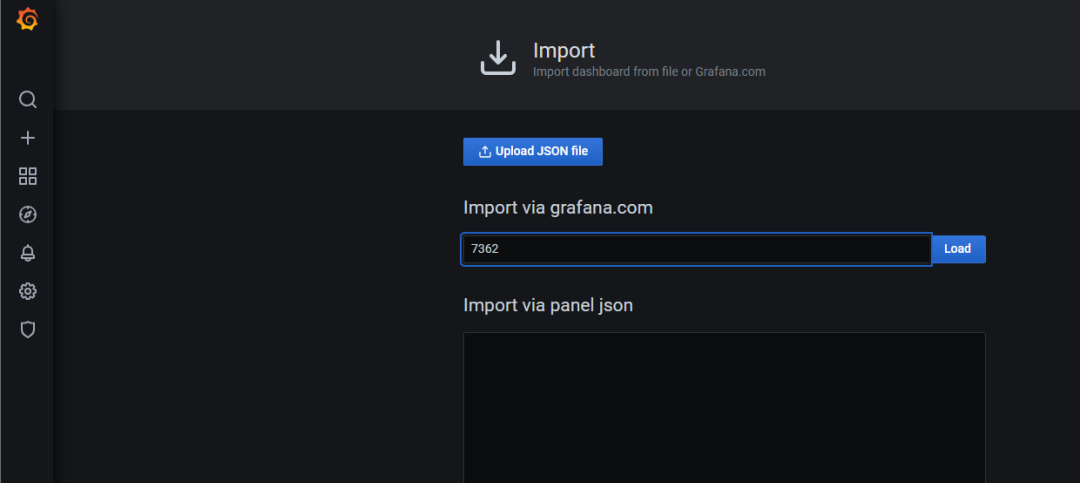
Grafana加载Dashboard
点击load,加载即可

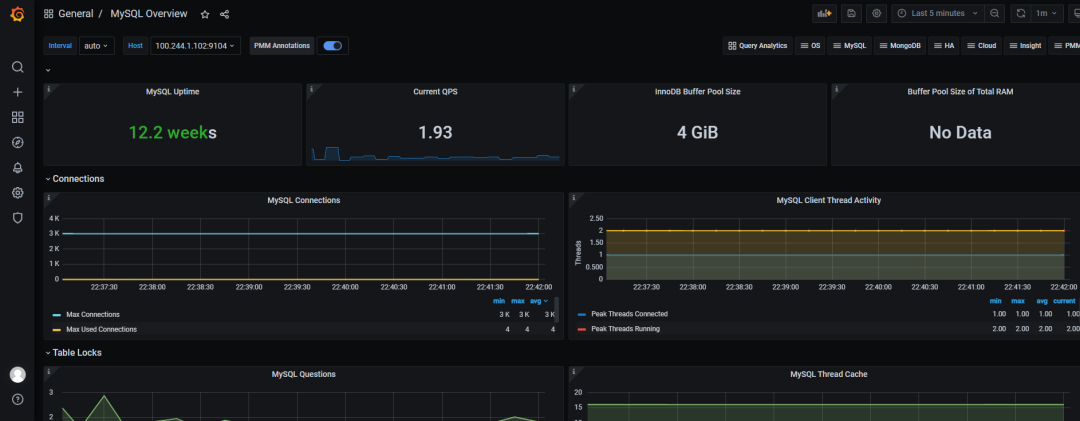
可以看到如下内容,说明成功了!

总结
本文章讲解了自定义监控以及修改ClusterRole资源,下期内容:Prometheus自动发现。
本文参与 腾讯云自媒体同步曝光计划,分享自微信公众号。
原始发表:2023-08-18,如有侵权请联系 cloudcommunity@tencent.com 删除
评论
登录后参与评论
推荐阅读
目录
相关产品与服务
云数据库 MySQL
腾讯云数据库 MySQL(TencentDB for MySQL)为用户提供安全可靠,性能卓越、易于维护的企业级云数据库服务。其具备6大企业级特性,包括企业级定制内核、企业级高可用、企业级高可靠、企业级安全、企业级扩展以及企业级智能运维。通过使用腾讯云数据库 MySQL,可实现分钟级别的数据库部署、弹性扩展以及全自动化的运维管理,不仅经济实惠,而且稳定可靠,易于运维。
