TUIKit 是基于 IM SDK 的一款 UI 组件库,可通过 UI 组件快速实现聊天、会话、搜索、关系链、群组等功能。本文介绍如何快速集成 TUIKit 并实现核心功能。
关键概念
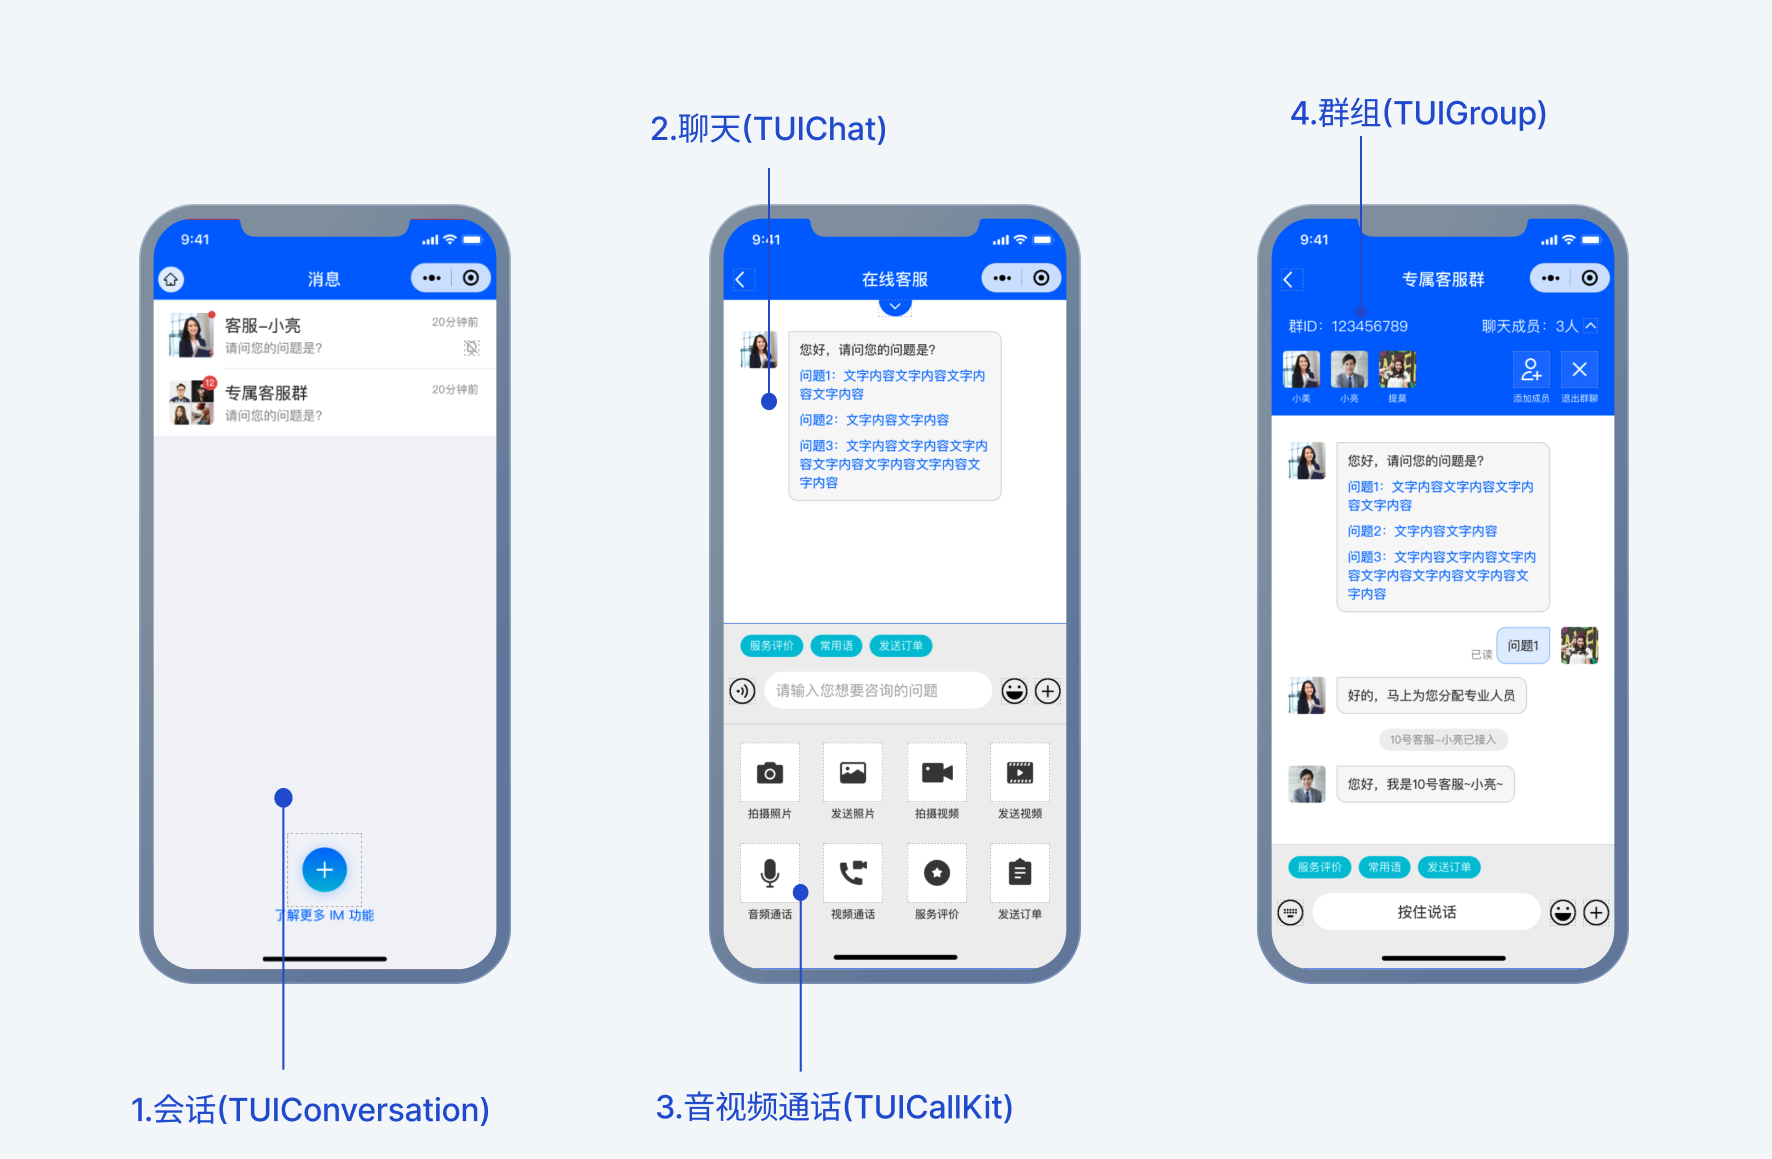
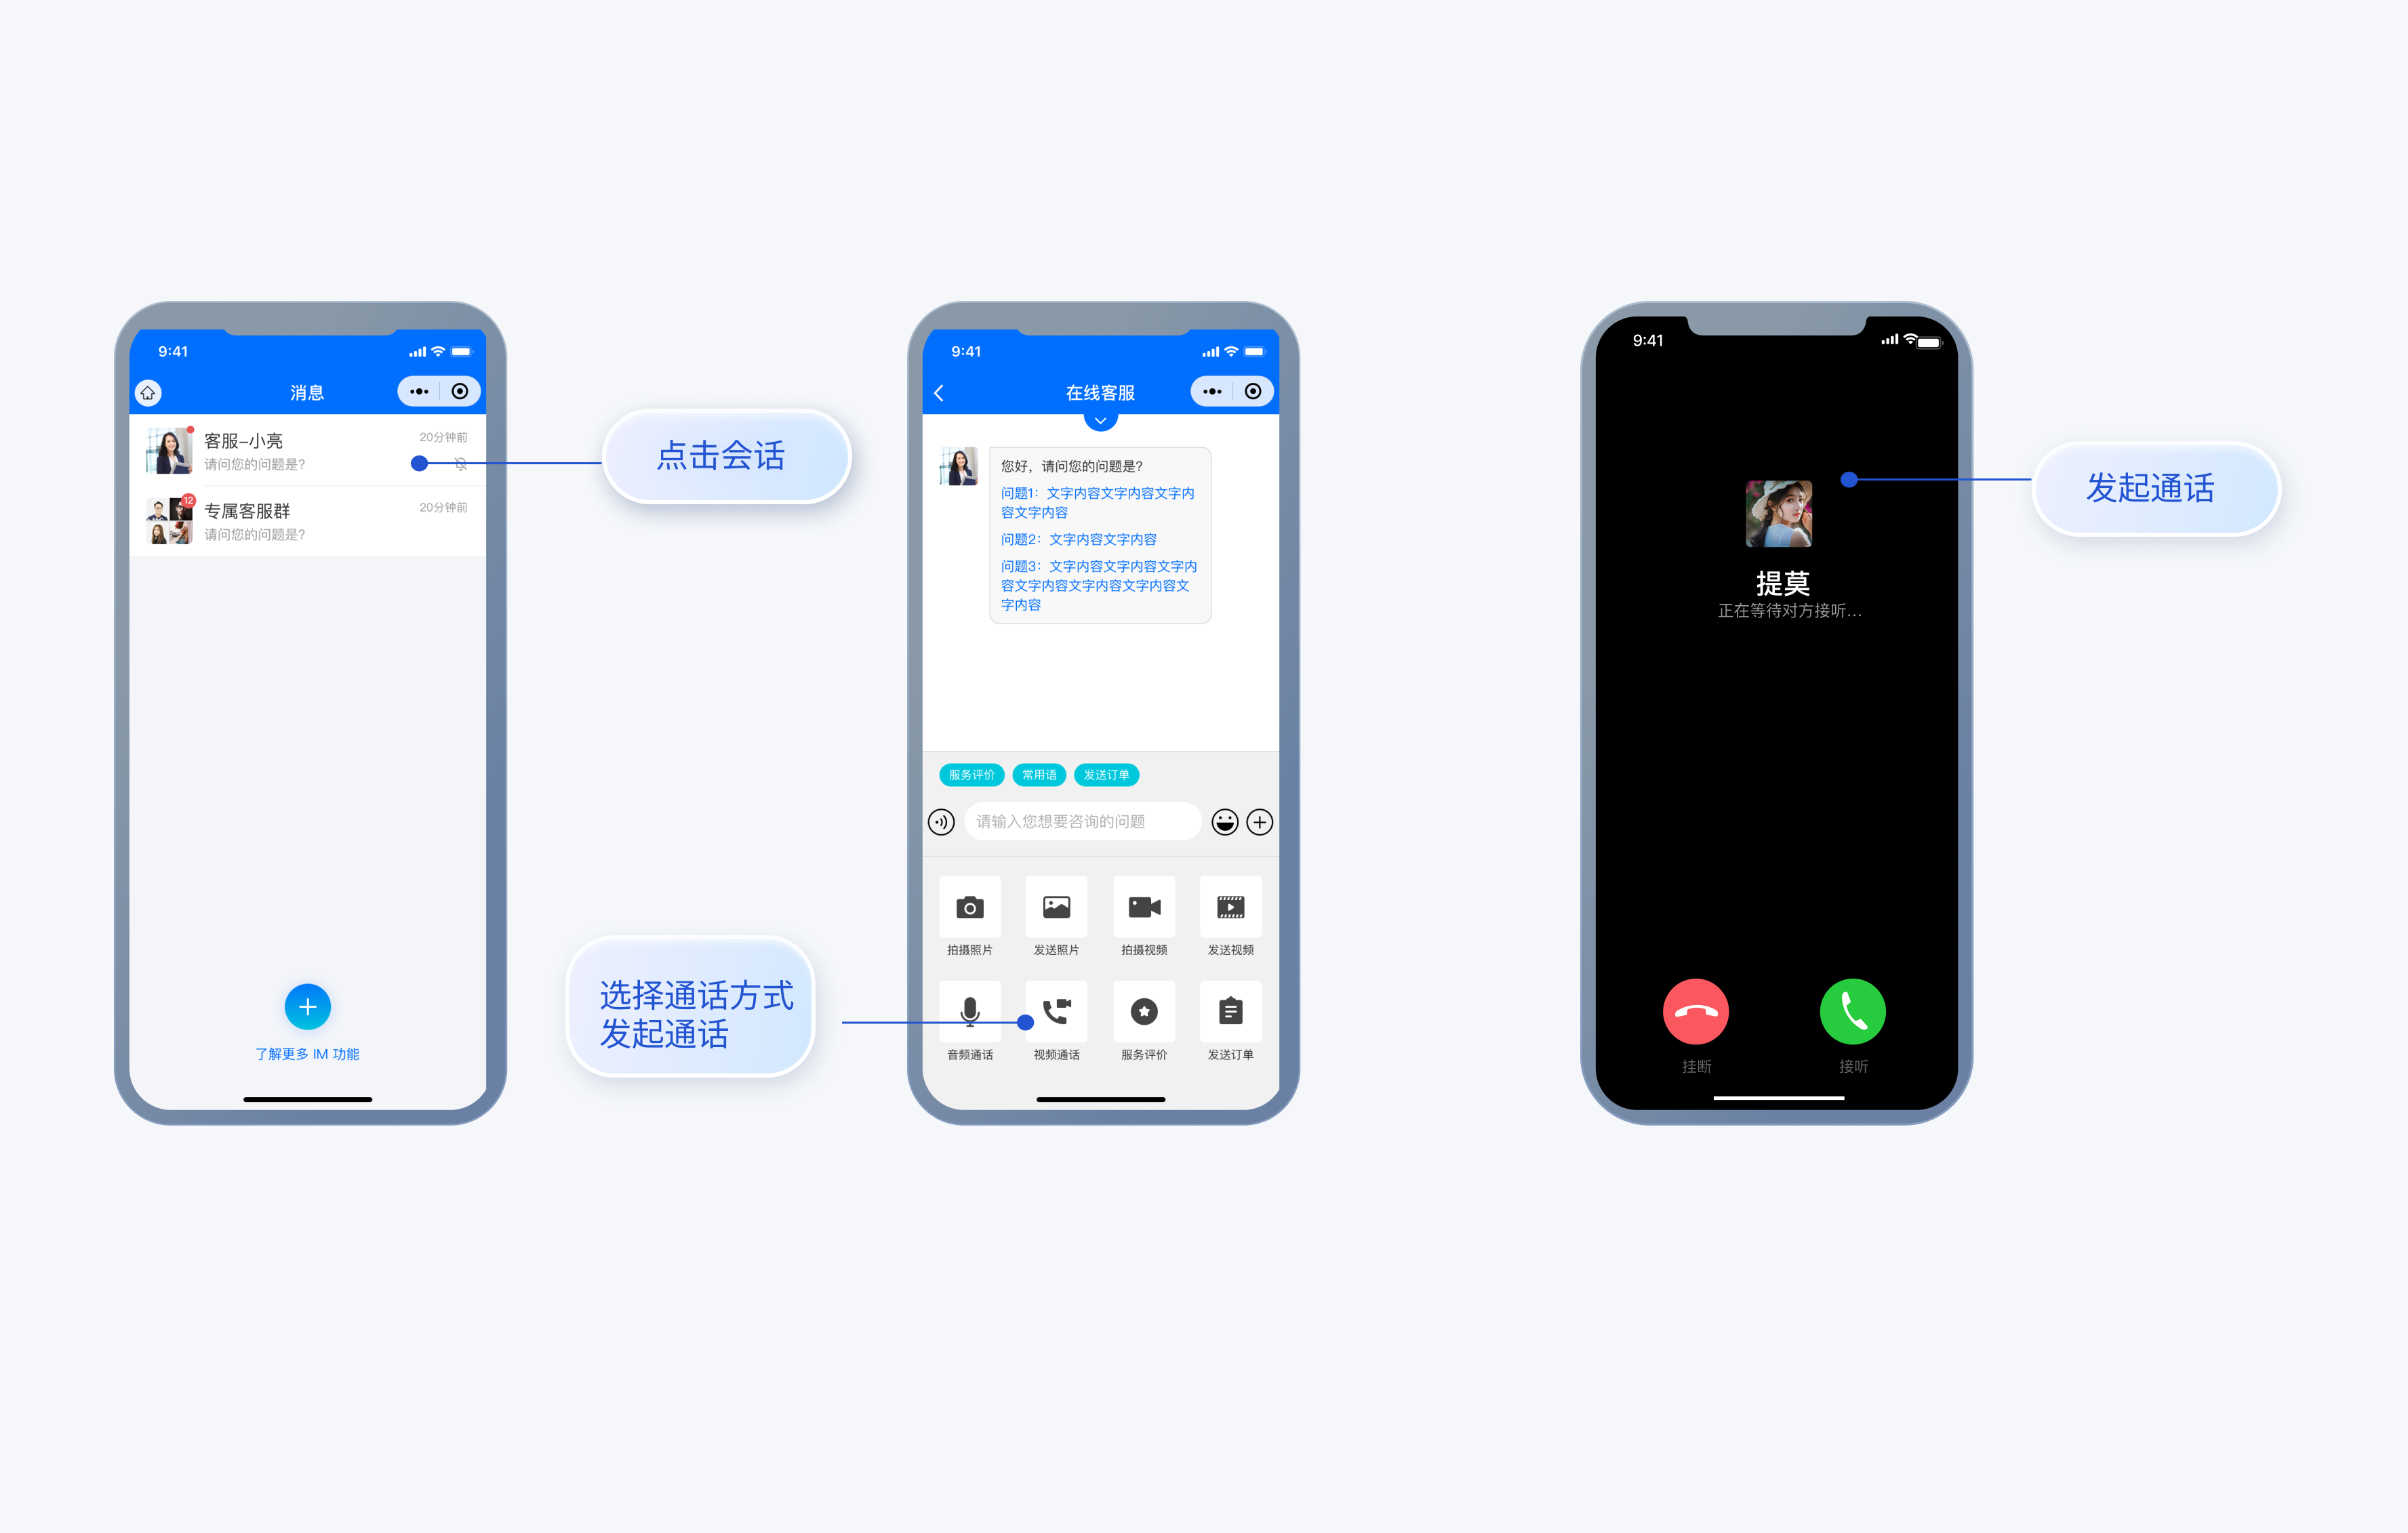
TUIKit 主要分为 TUIConversation、TUIChat、TUICallKit、和 TUIGroup 几个 UI 子组件,每个 UI 组件负责展示不同的内容。
界面效果如下图所示:
注意:
前提条件
微信开发者工具
JavaScript
node(node.js ≥ 16.0.0)
npm(版本请与 node 版本匹配)
创建项目
说明:
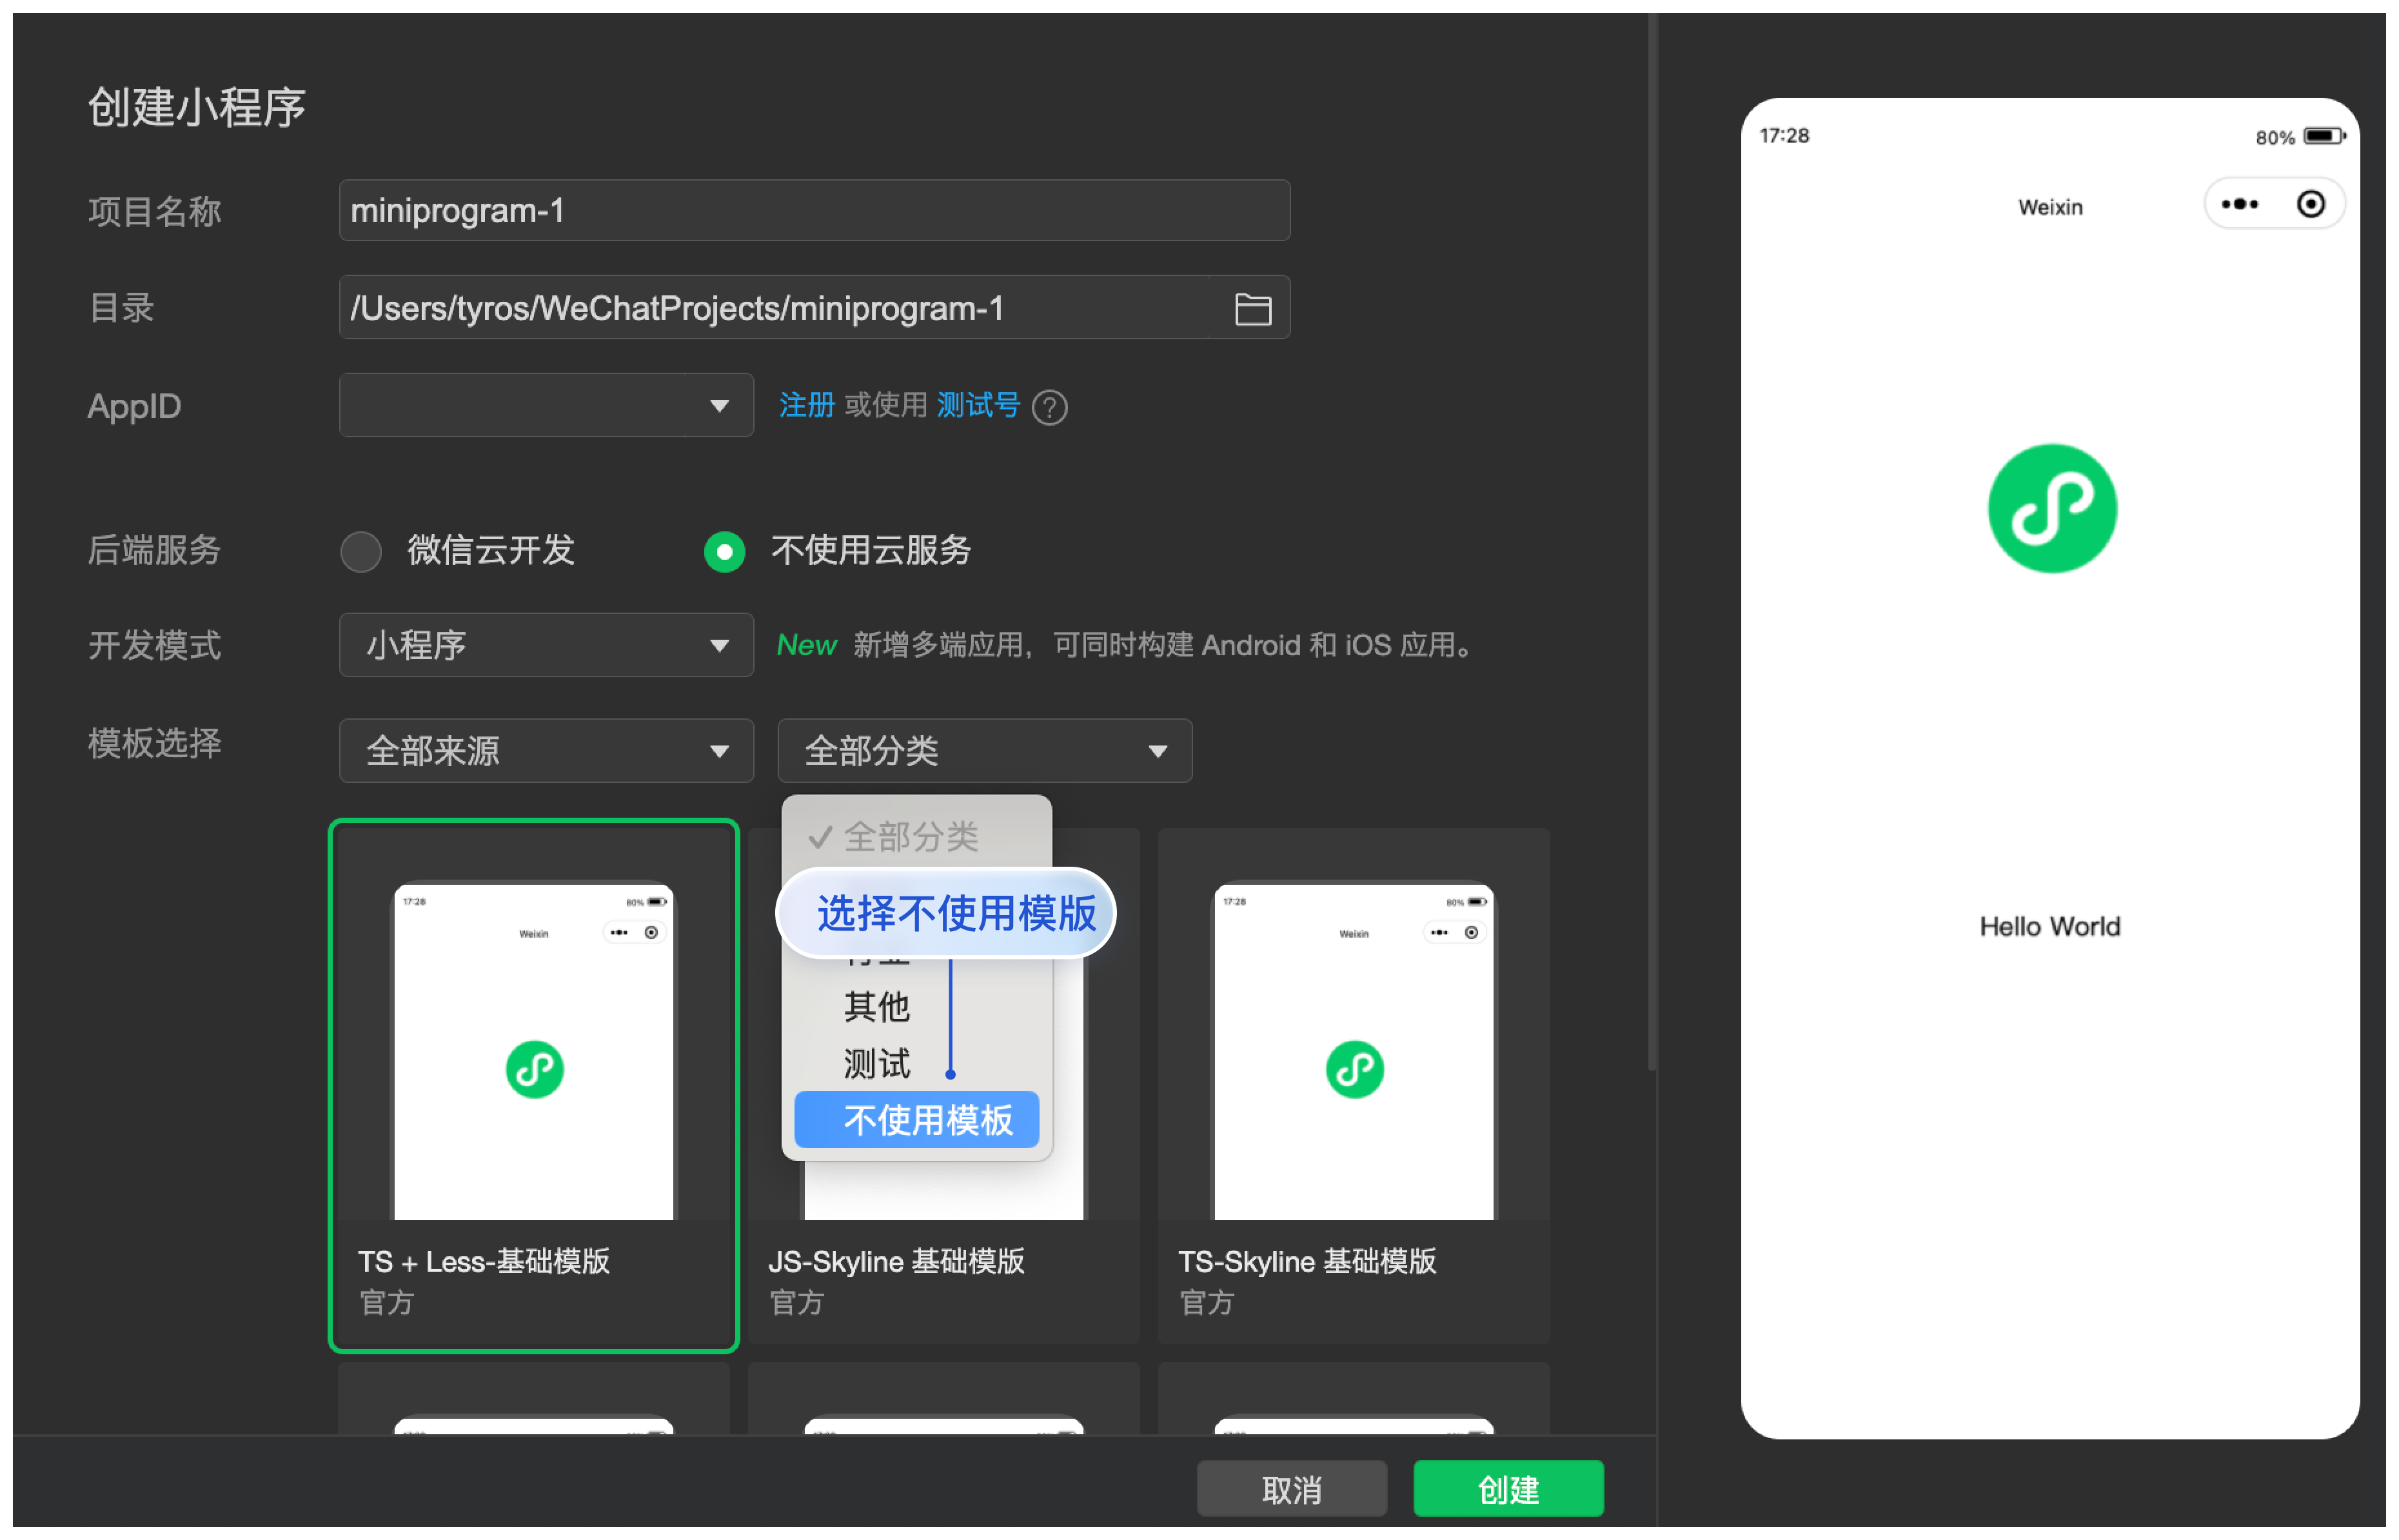
@tencentcloud/chat-uikit-wechat 使用 WebView 渲染,暂不支持 Skyline 渲染。
1. 创建项目,在微信开发者工具上创建一个不使用模板的小程序项目。如图所示:
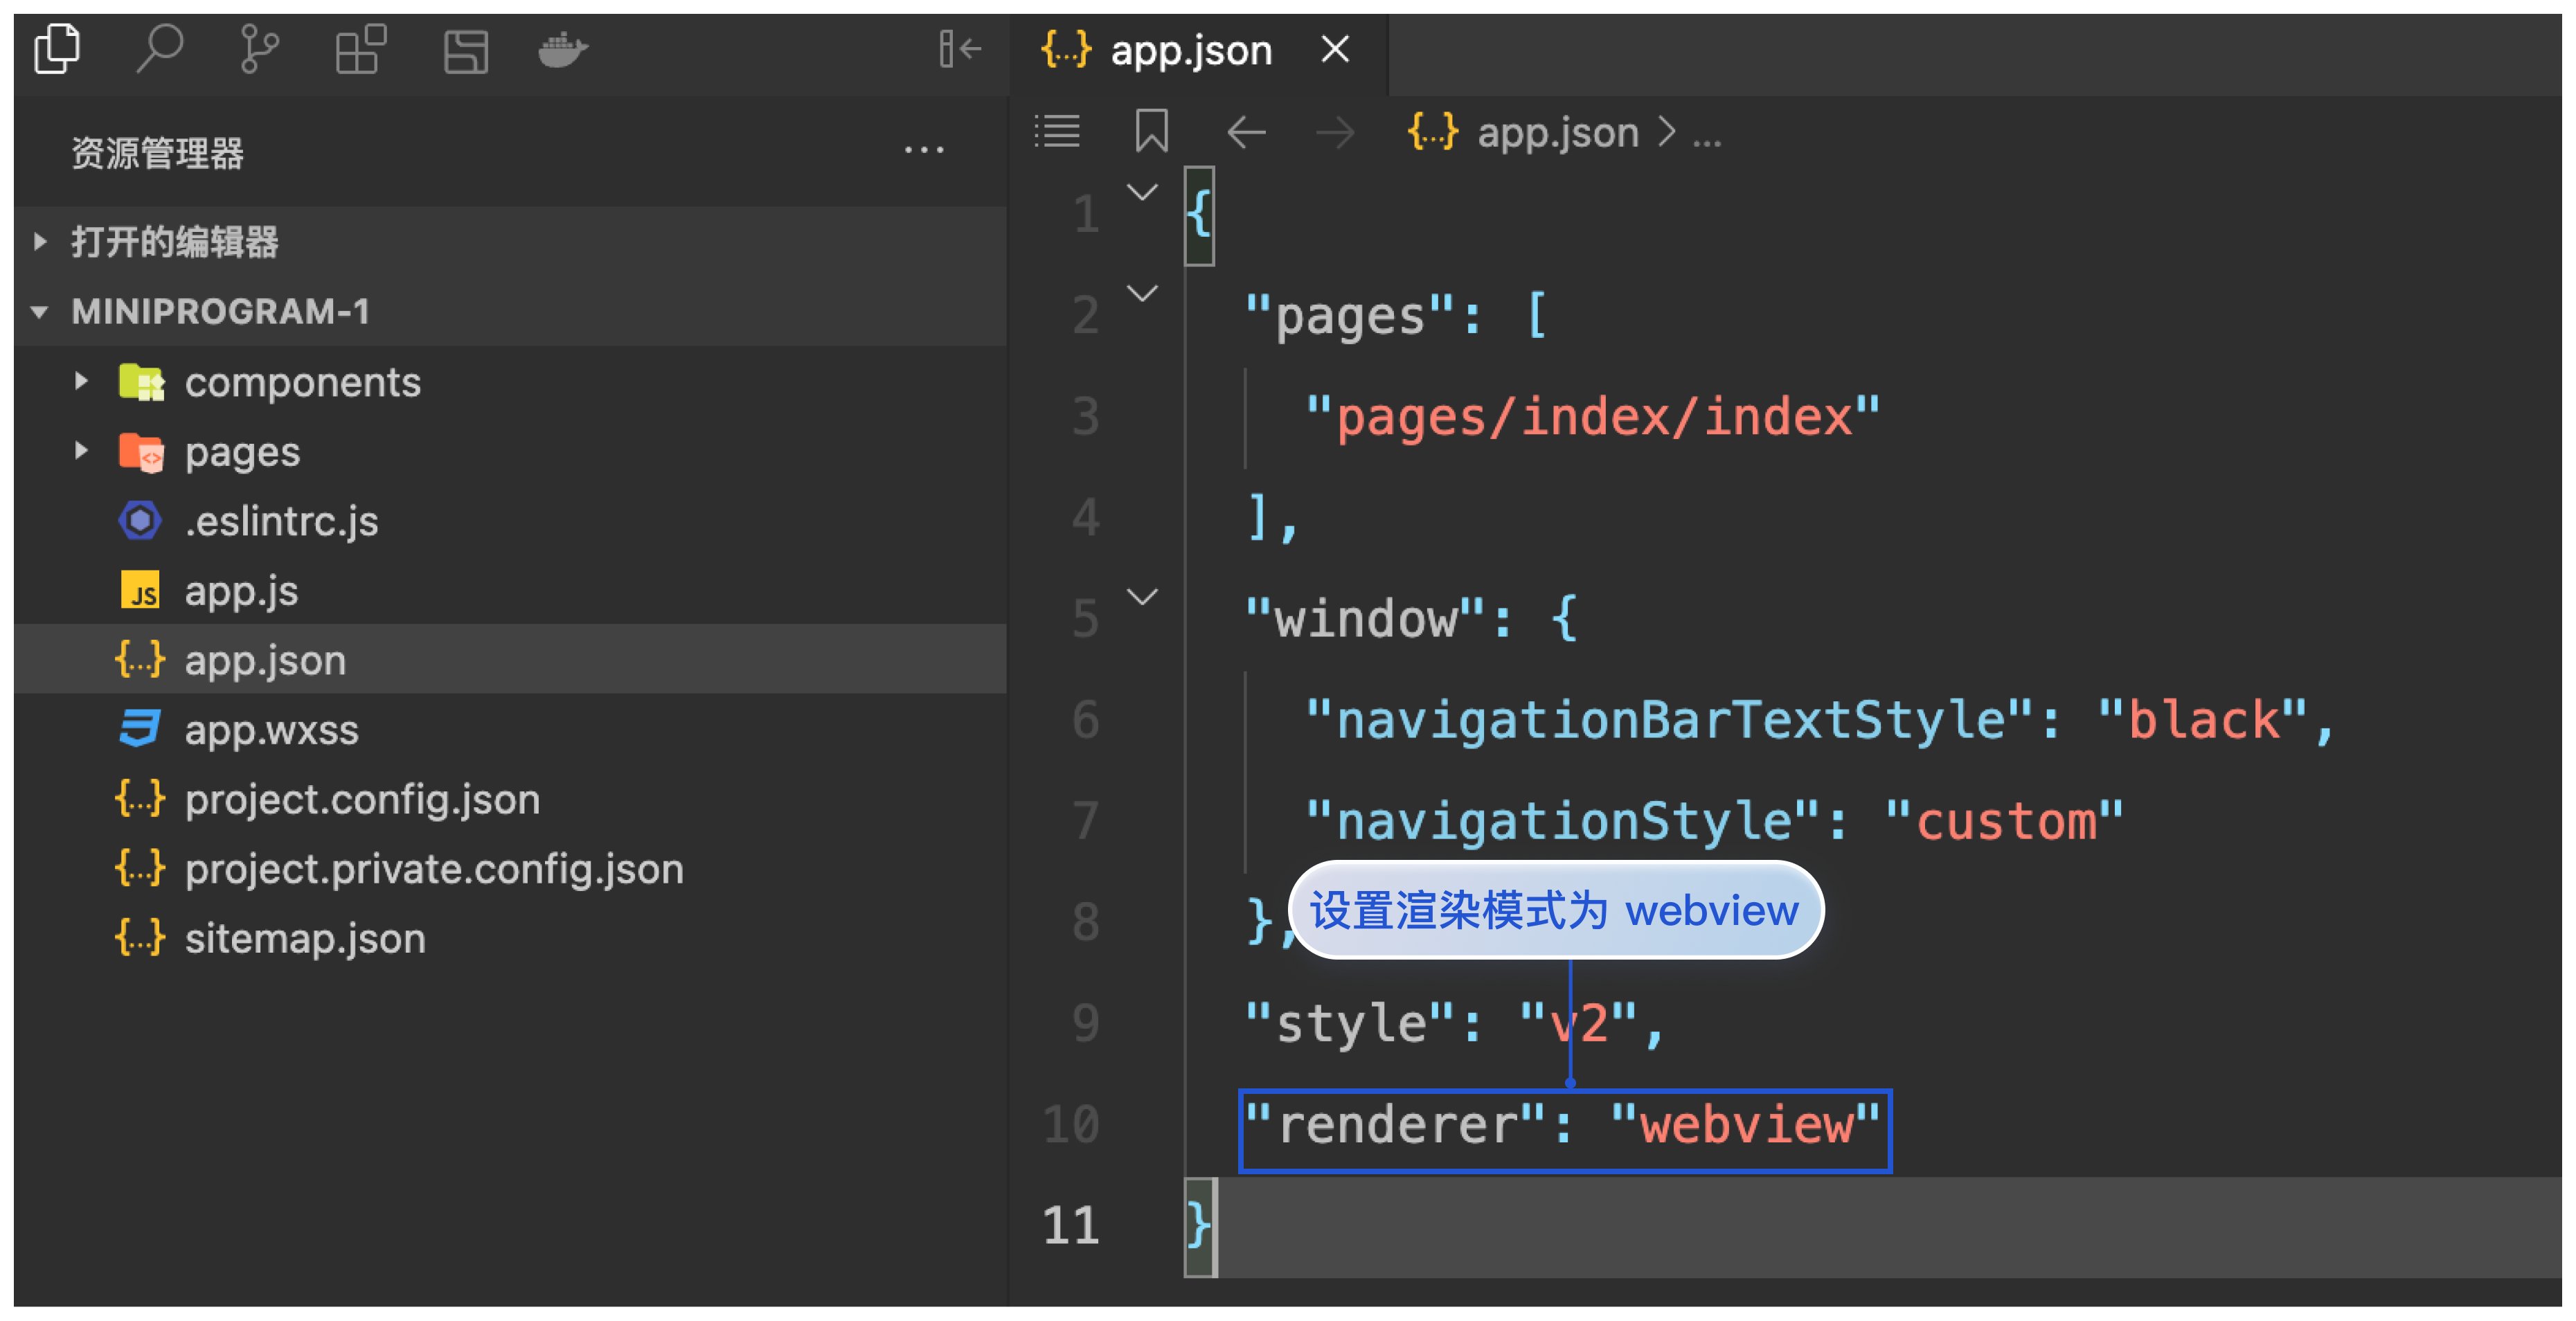
2. 配置渲染模式,在 app.json 中设置
renderer 为 webview。如图所示:{"pages": ["pages/index/index"],"window": {"navigationBarTextStyle": "black","navigationStyle": "custom"},"style": "v2","renderer": "webview"}
下载并导入组件
步骤1:下载依赖
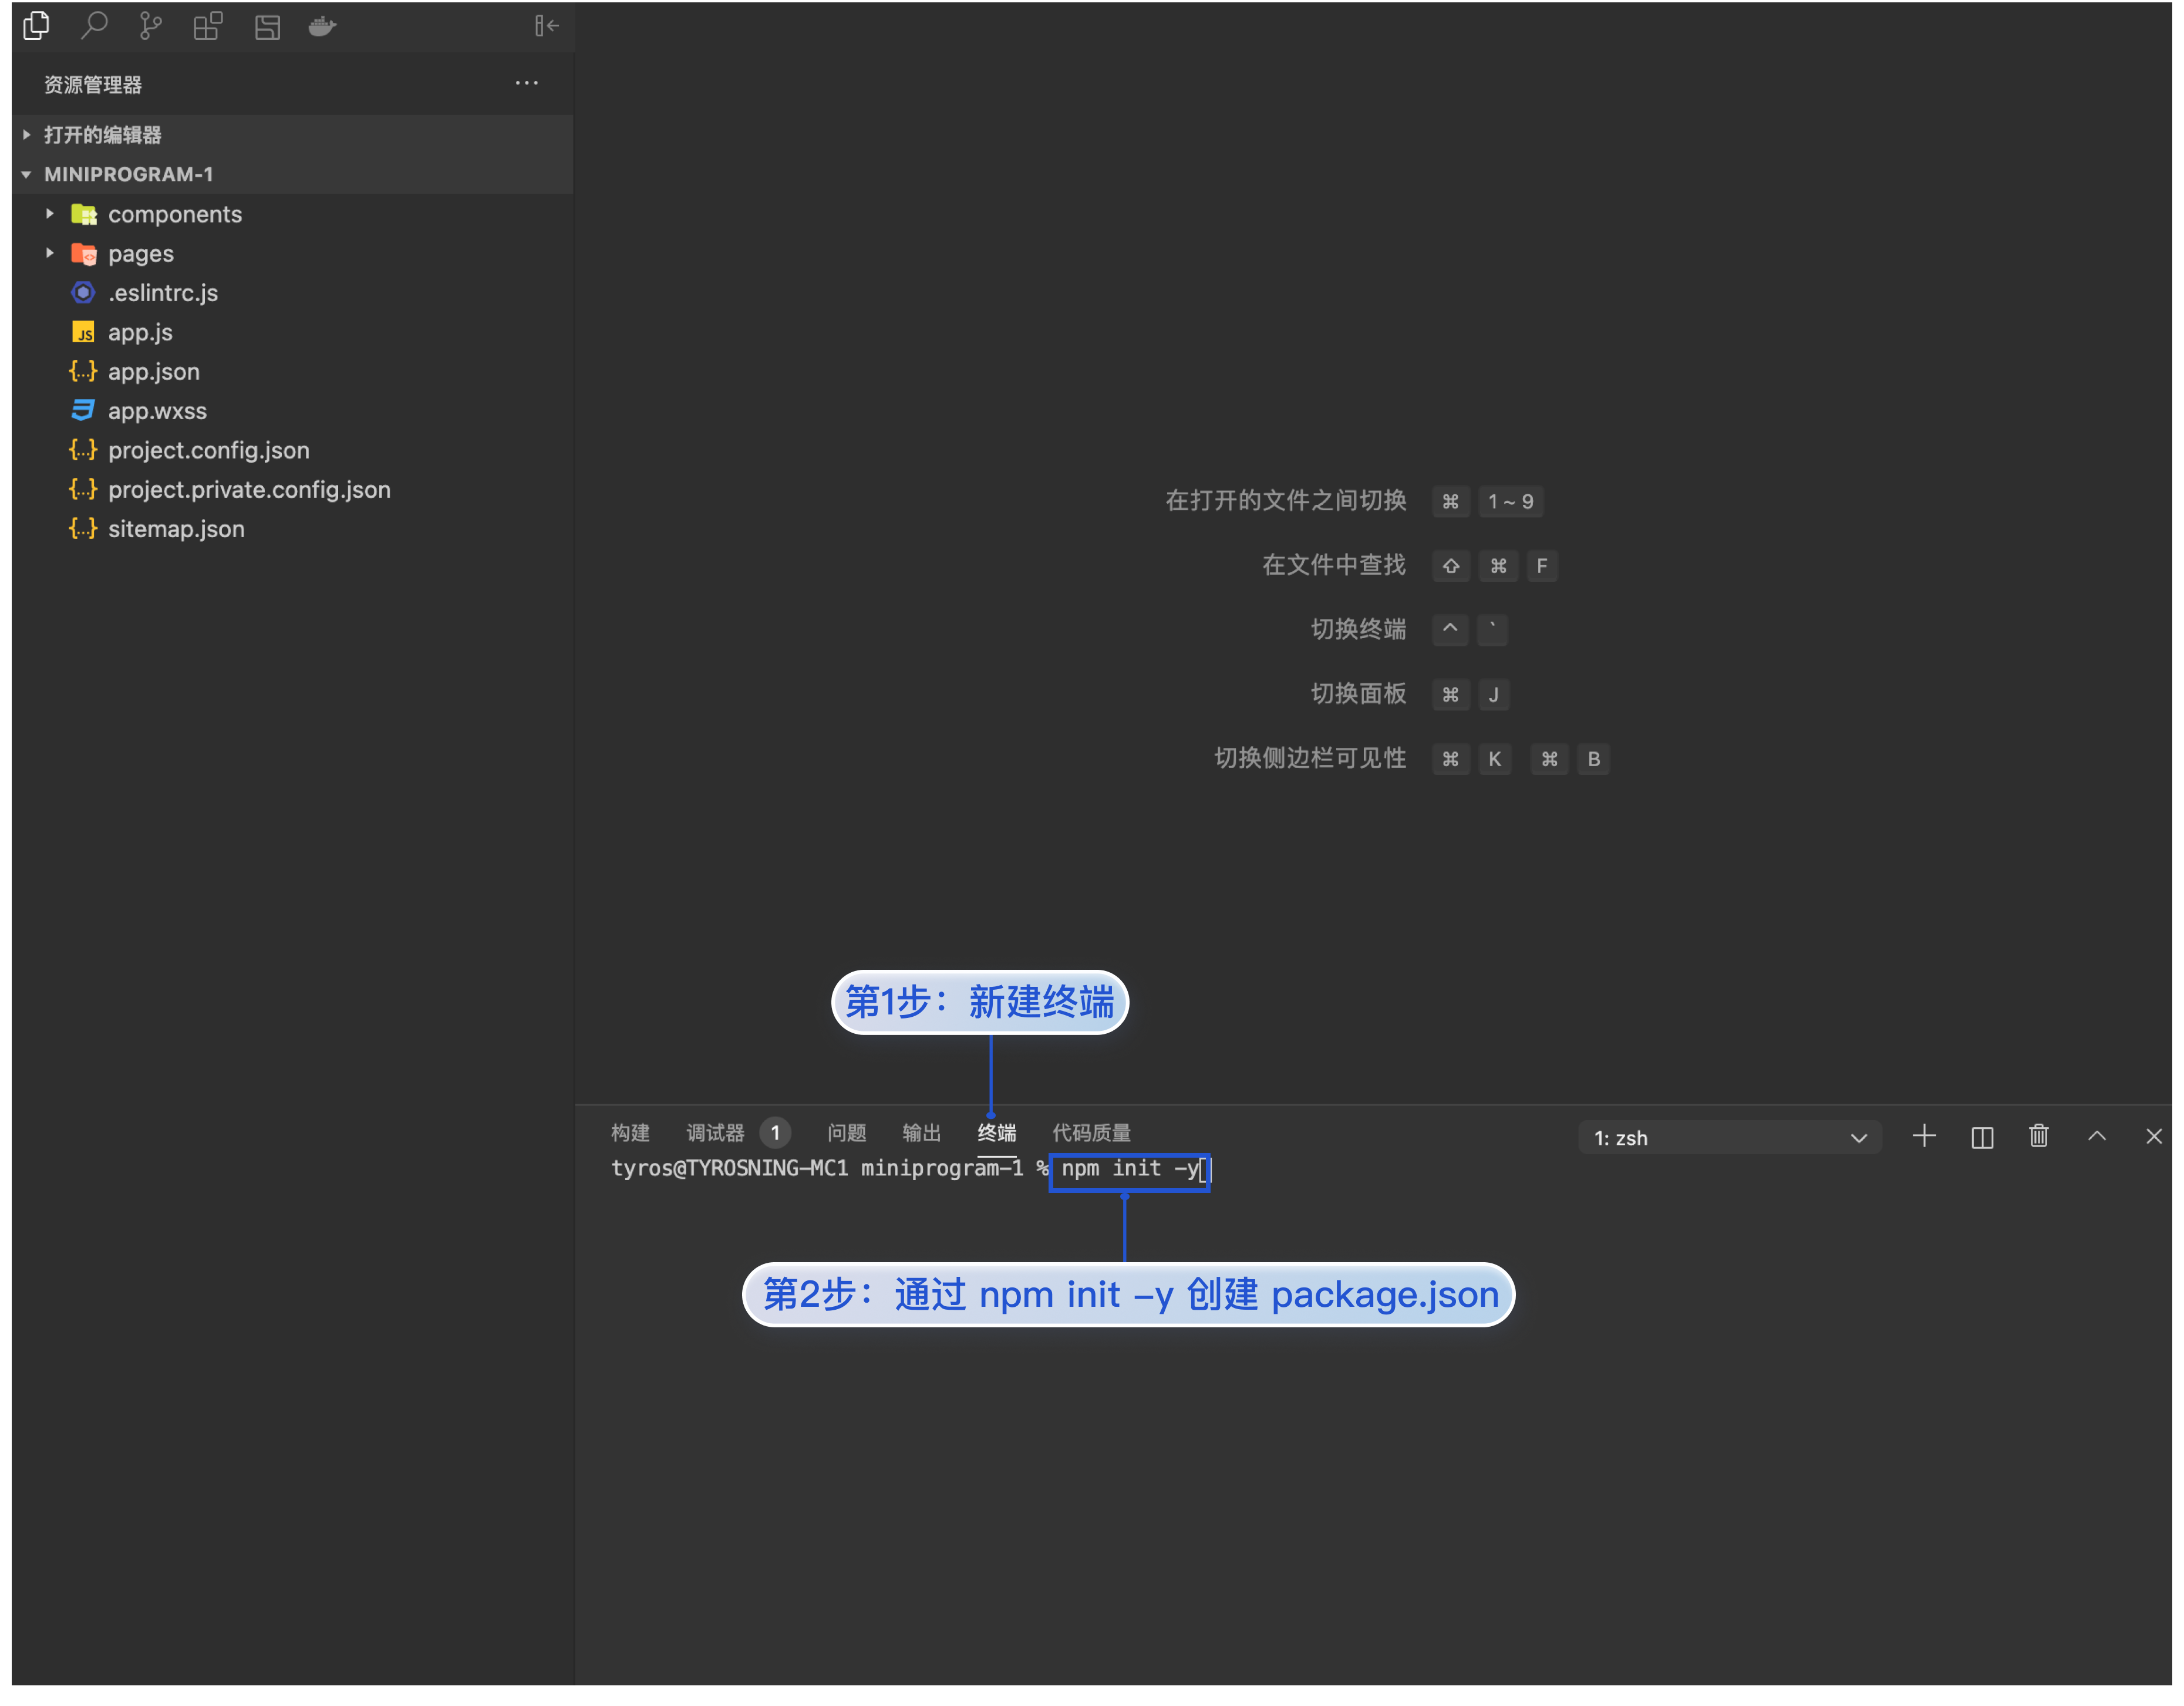
1. 创建 package.json,微信开发者工具创建的小程序项目默认没有 package.json,因此您需要先创建 package.json 文件,如图所示:
npm init -y
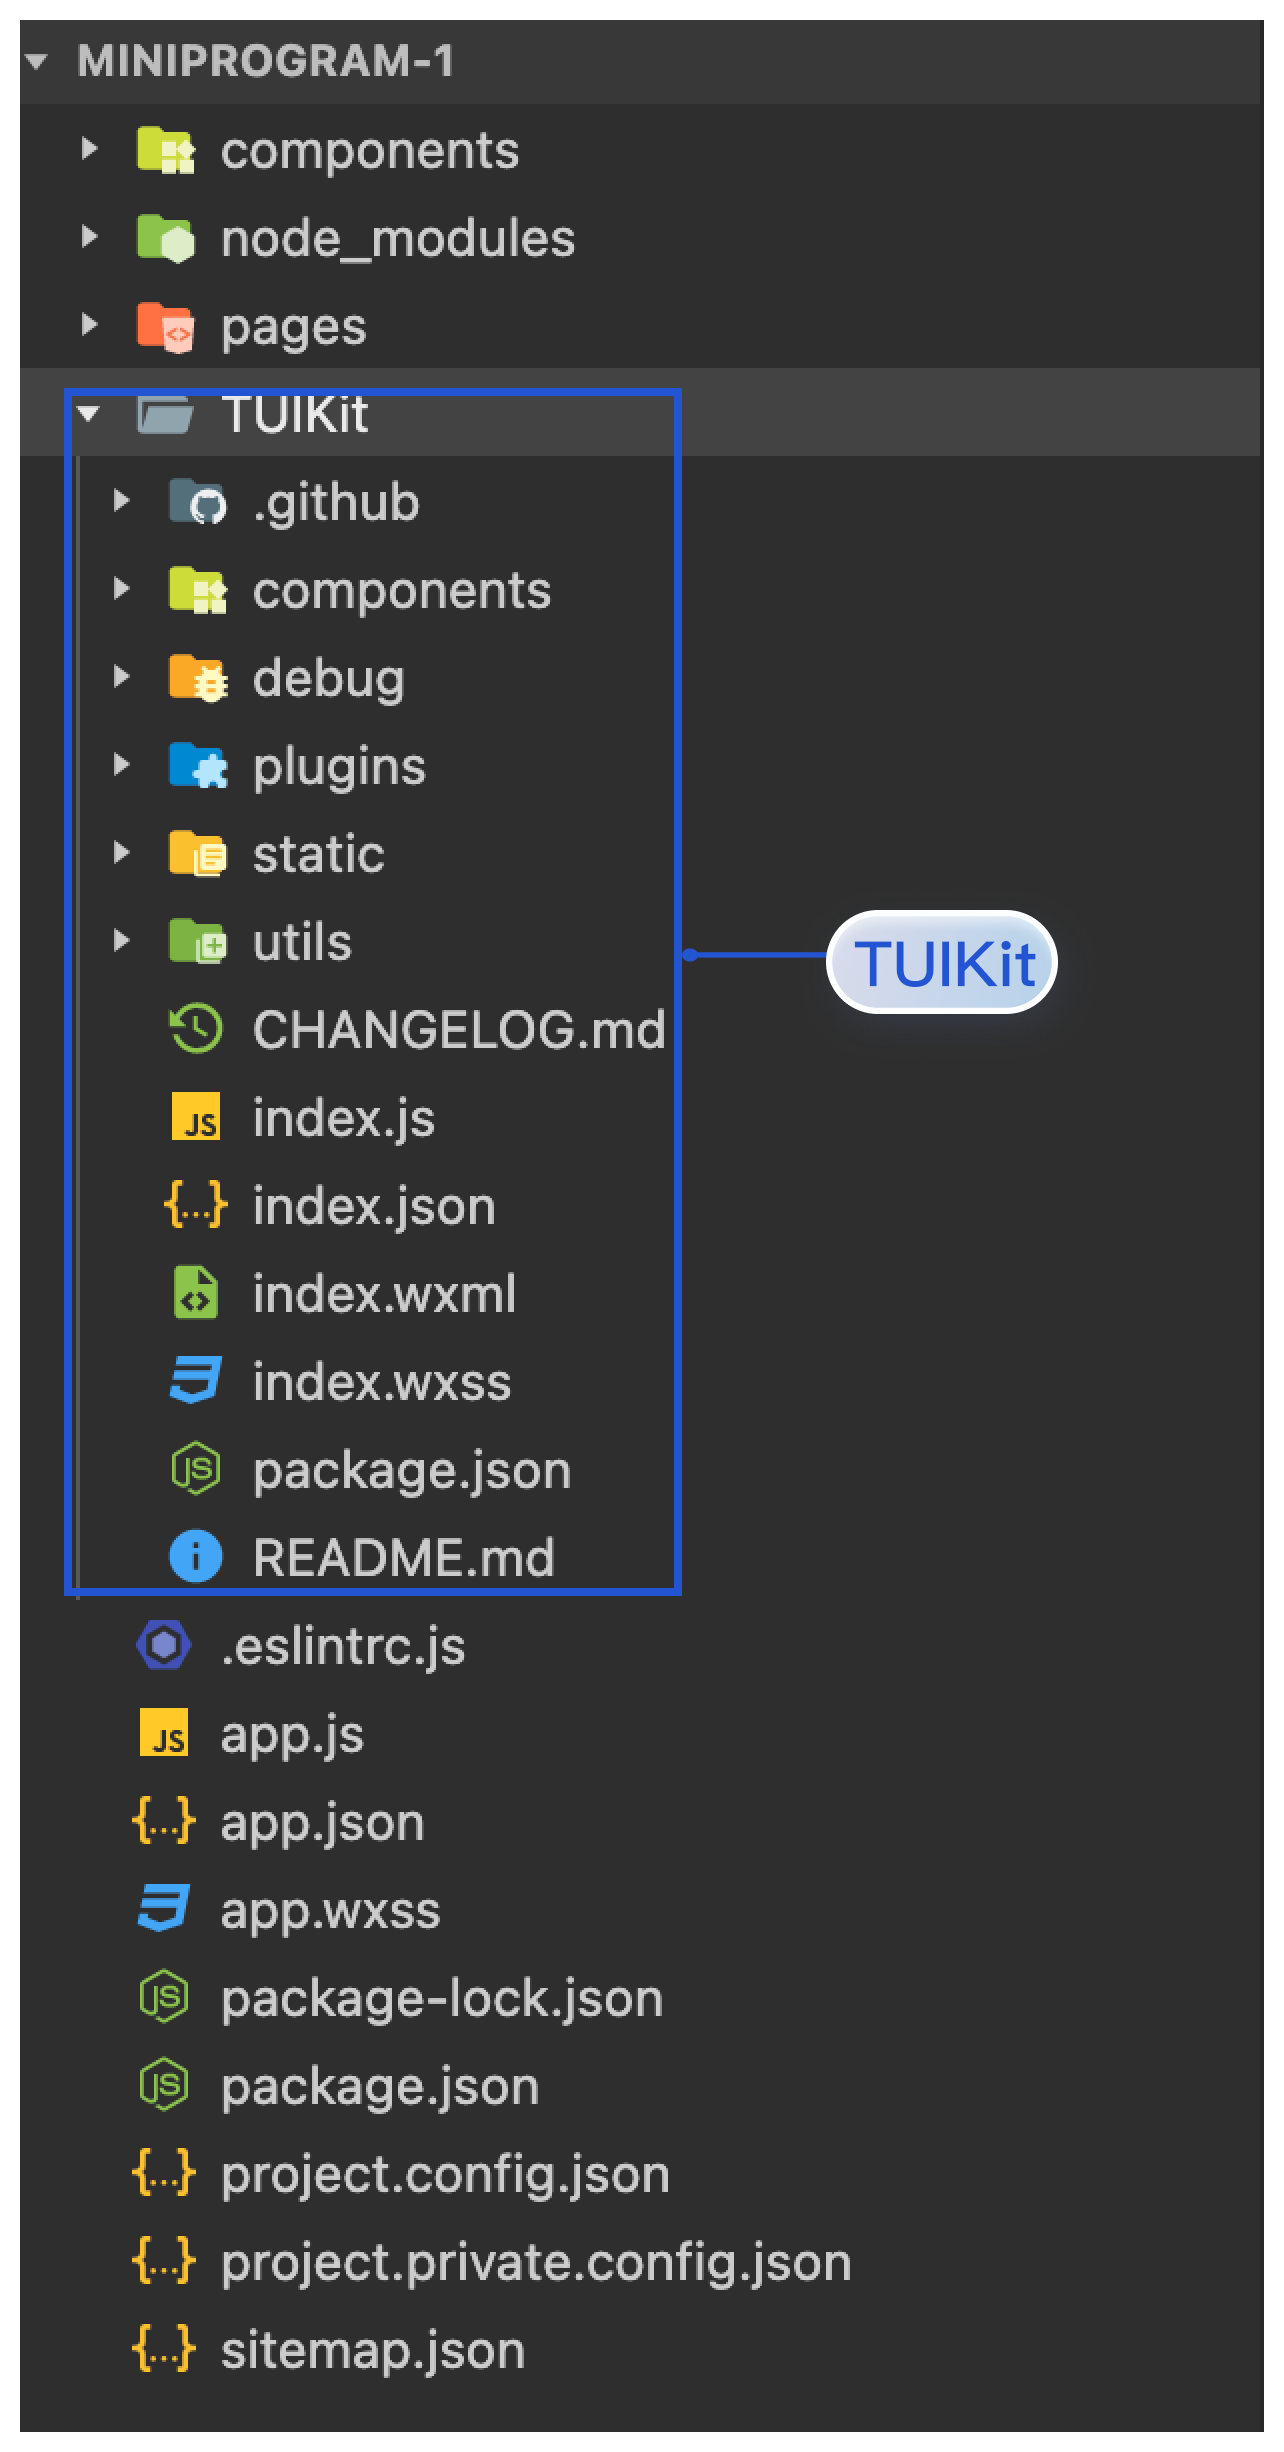
2. 通过 npm 方式下载 TUIKit 组件, 并复制到自己的小程序目录下,目录结构如图所示:
npm i @tencentcloud/chat-uikit-wechat
mkdir -p ./TUIKit && cp -r node_modules/@tencentcloud/chat-uikit-wechat/ ./TUIKit
npm i @tencentcloud/chat-uikit-wechat
xcopy node_modules\\@tencentcloud\\chat-uikit-wechat .\\TUIKit /i /e
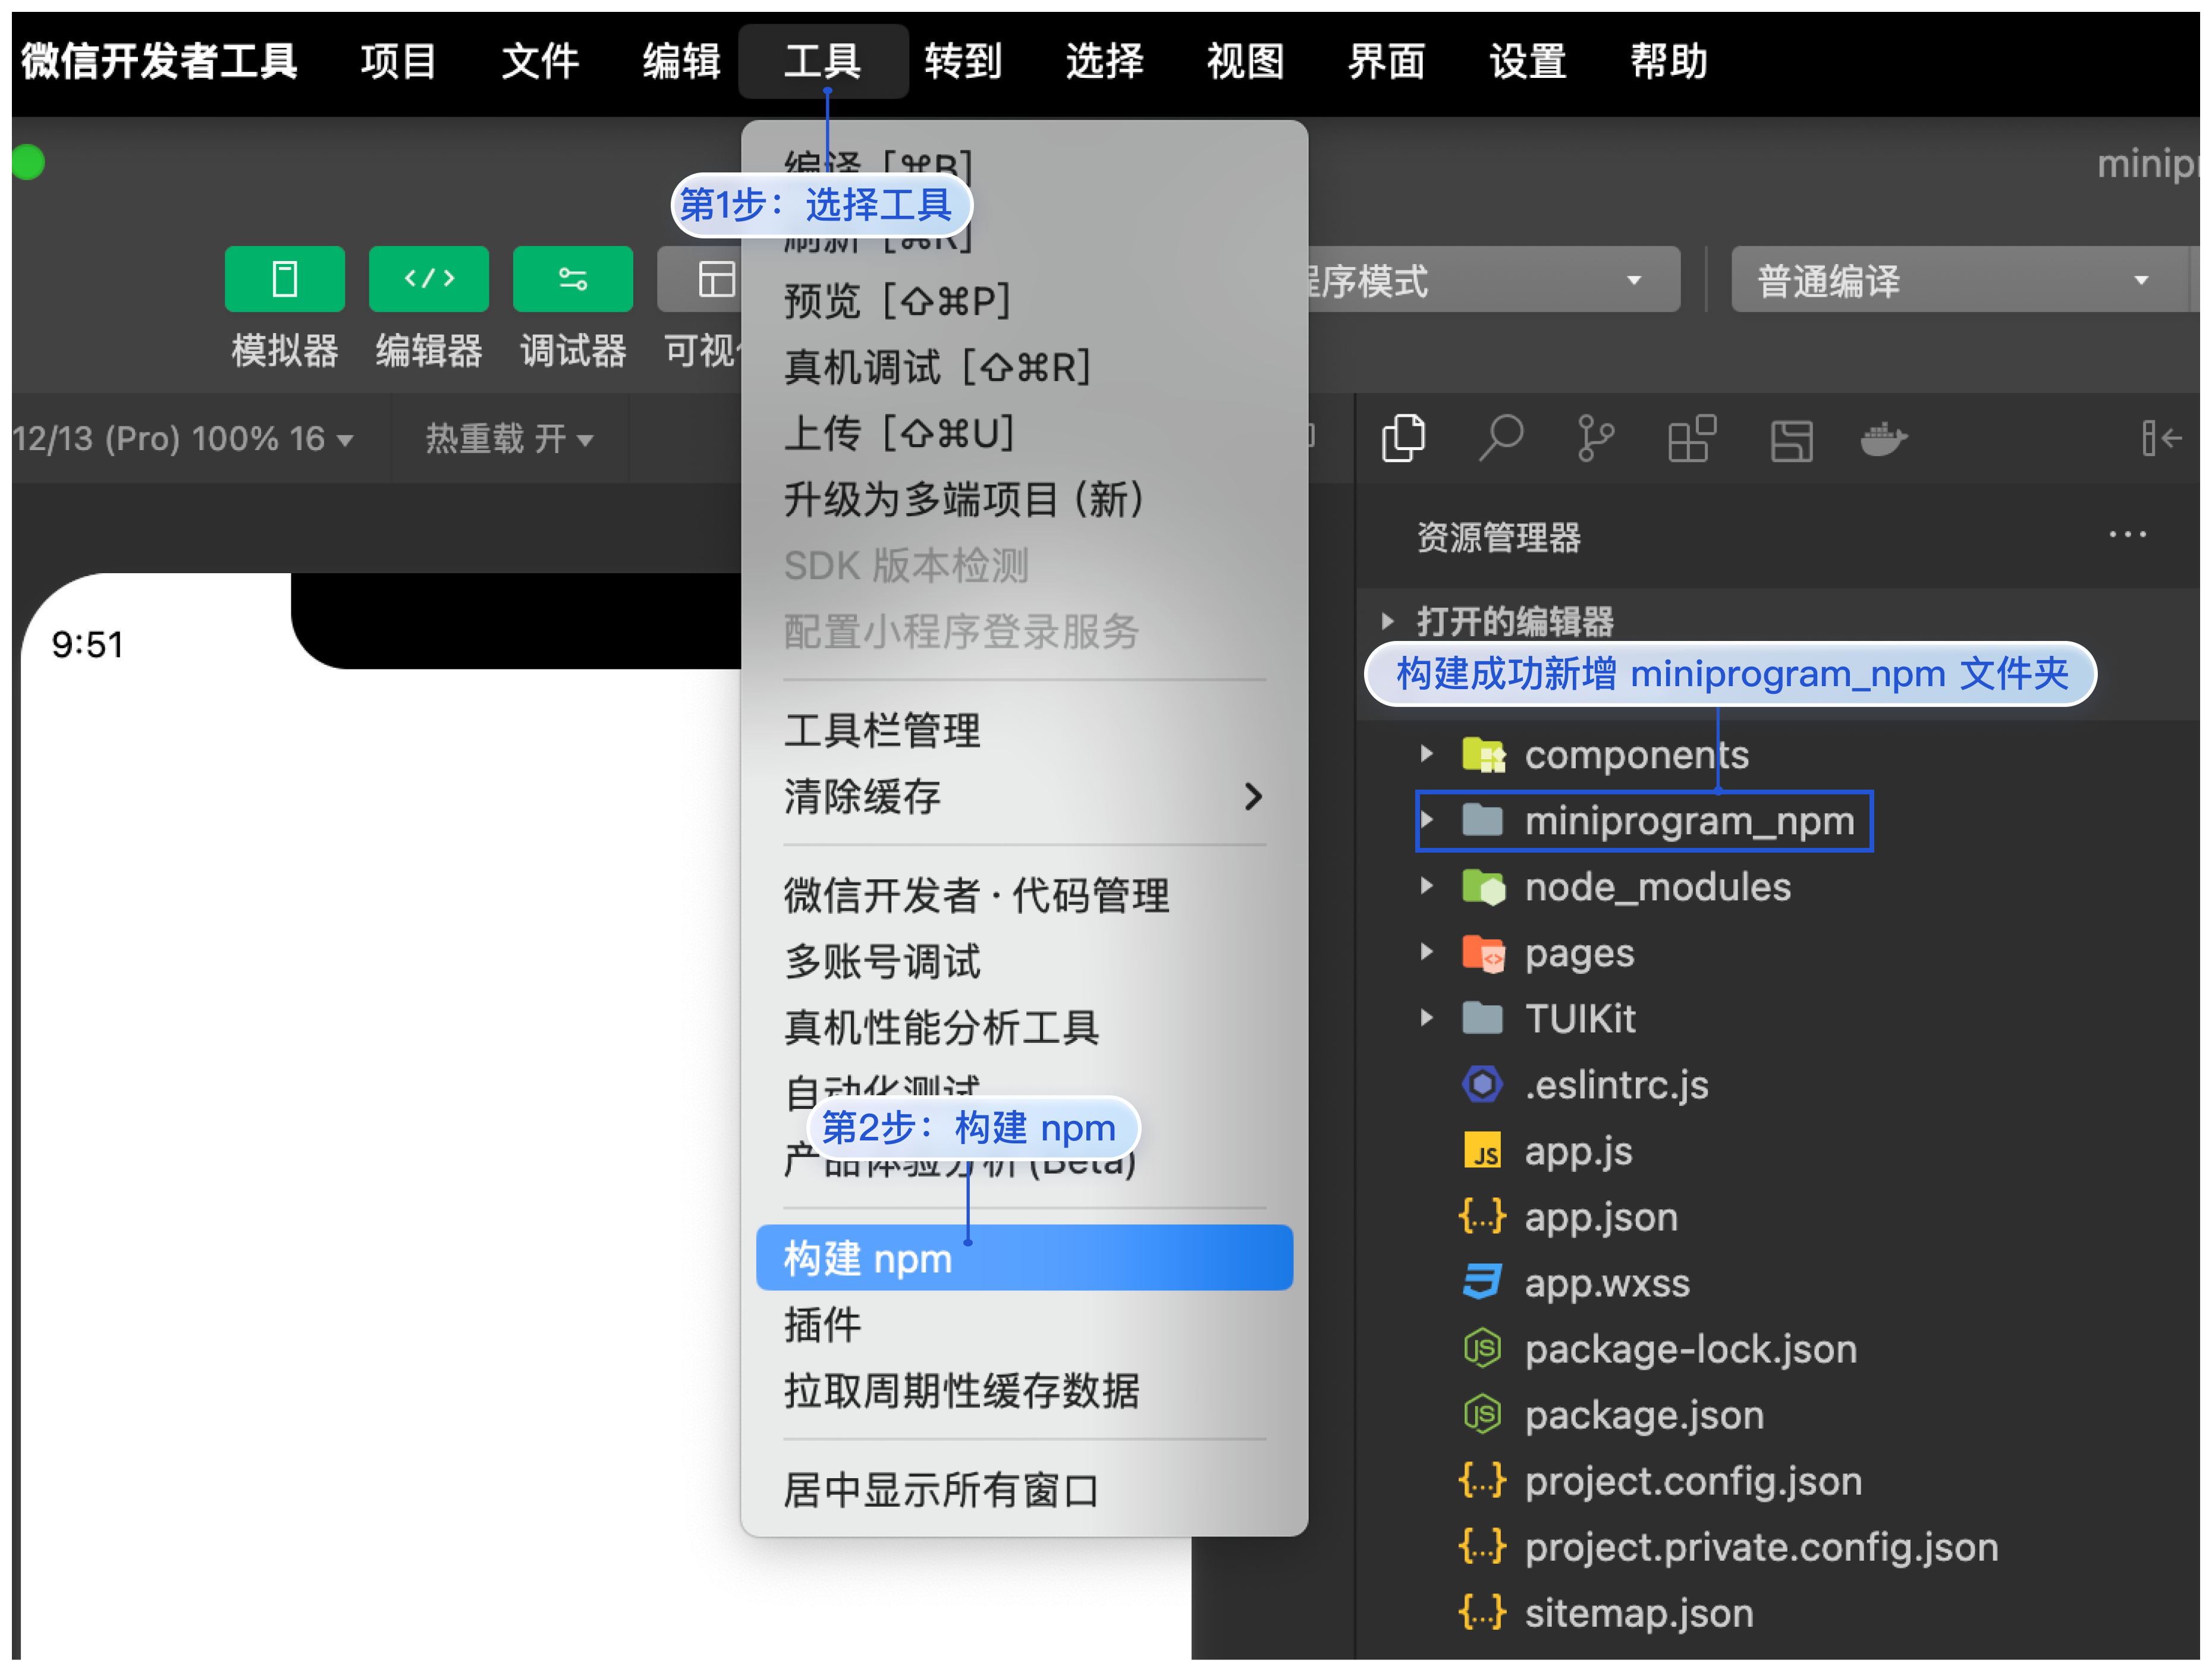
3. 构建 npm:单击工具 > 构建 npm,构建成功会新增 miniprogram_npm 文件夹,如图所示:
步骤2:引入组件
说明:
小程序分包有如下好处:
规避所有逻辑代码放主包,导致主包文件体积超限问题;
支持按需载入,降低小程序载入耗时和页面渲染耗时;
支持更加复杂的功能。
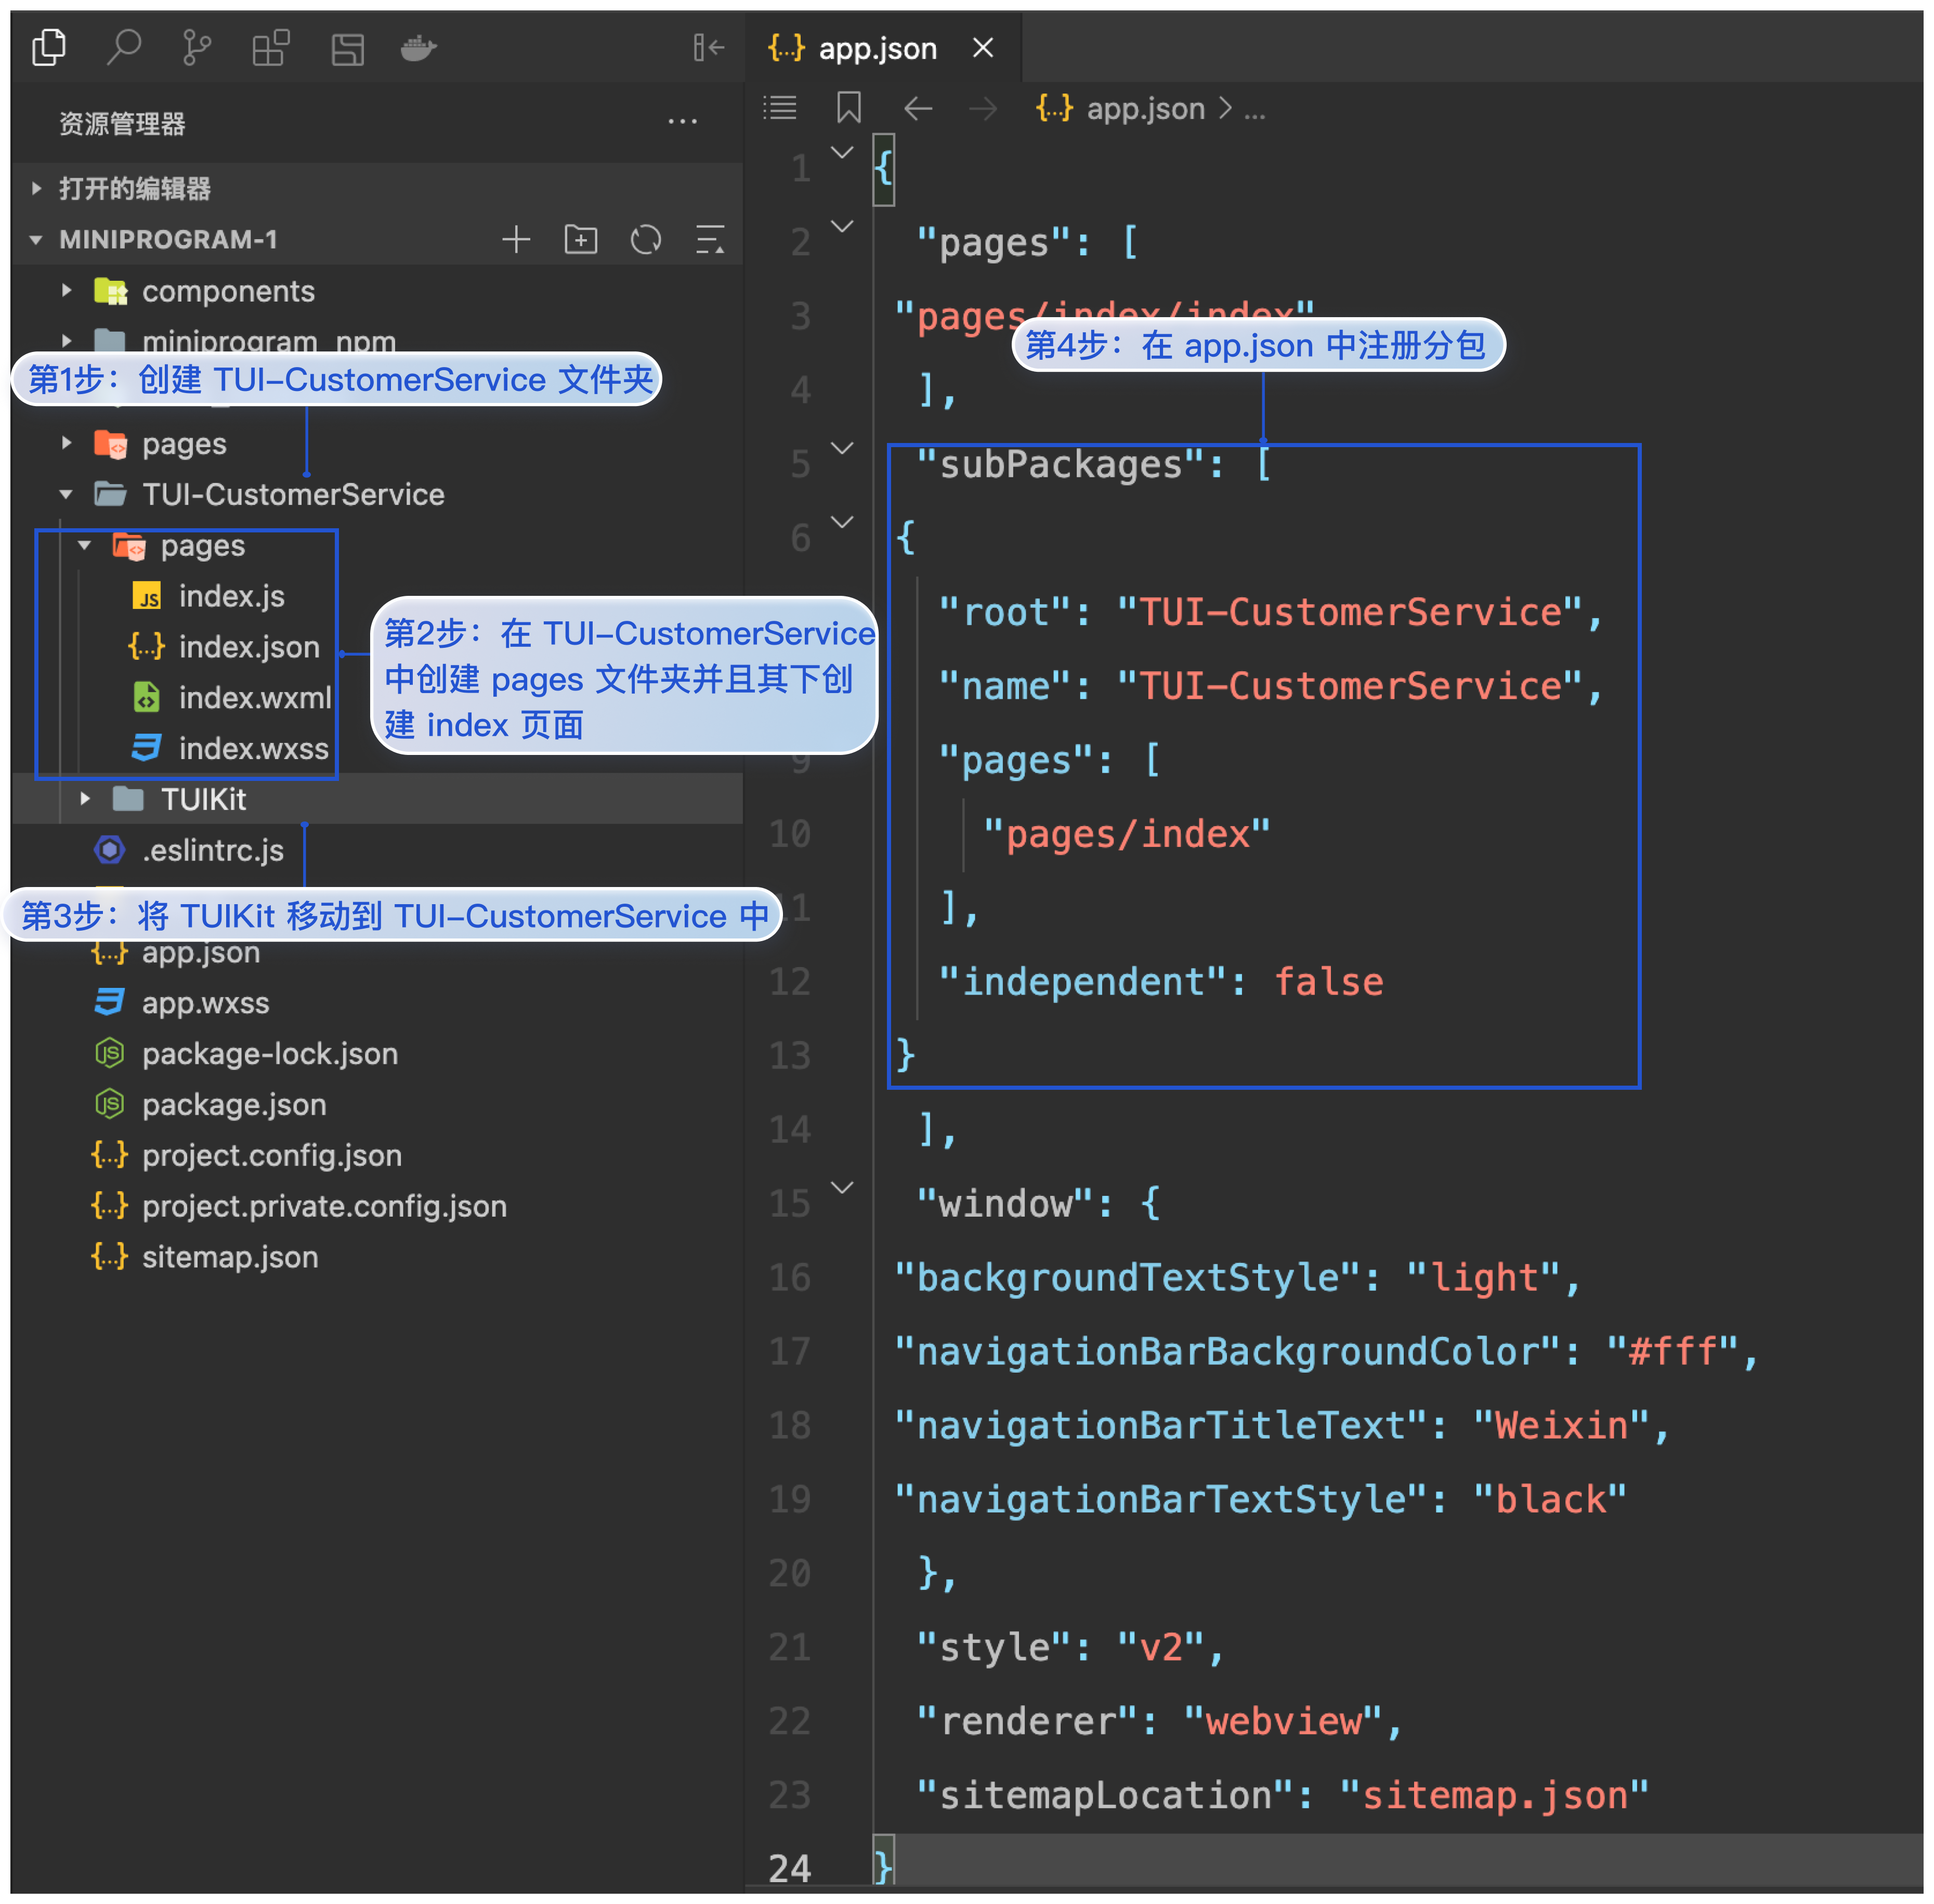
1. 在自己项目里创建分包,本文以 TUI-CustomerService 为例。和 pages 同级创建 TUI-CustomerService 文件夹,并在文件夹内部创建 pages 文件夹并且其下创建 index 页面,将 TUIKit 移动到 TUI-CustomerService 目录下,并在 app.json 中注册分包。如图所示:
{"pages": ["pages/index/index"],"subPackages": [{"root": "TUI-CustomerService","name": "TUI-CustomerService","pages": ["pages/index"],"independent": false}],"window": {"backgroundTextStyle": "light","navigationBarBackgroundColor": "#fff","navigationBarTitleText": "Weixin","navigationBarTextStyle": "black"},"style": "v2","renderer": "webview","sitemapLocation": "sitemap.json"}
2. 将 TUIKit 文件夹下的 debug 文件夹复制到主包,并在 app.js 初始化 chat 和设置 TUIKit 参数,如图所示:
import TencentCloudChat from '@tencentcloud/lite-chat/basic';import { TUILogin } from '@tencentcloud/tui-core-lite';import TUIChatEngine from '@tencentcloud/chat-uikit-engine-lite';async function login(config) {wx.TencentCloudChat = TencentCloudChat;const { SDKAppID, userID, userSig } = config;if (!userID || !userSig) {return;}wx.showLoading({title: '登录中...',mask: true});try {await TUILogin.login({SDKAppID,userID,userSig,})wx.$TUIKit = TUILogin.chatawait TUIChatEngine.login({chat: wx.$TUIKit,sdkAppID: SDKAppID,userID,userSig,})handleSdkReady()wx.$chat_userID = userID;wx.$chat_userSig = userSig;wx.$chat_SDKAppID = SDKAppID;wx.setStorageSync('islogin', true);wx.$TUIKit.setLogLevel(0);wx.$TUIKit.on(wx.TencentCloudChat.EVENT.KICKED_OUT, onKickedOut);wx.hideLoading();} catch (error) {wx.hideLoading();throw error;}}function handleSdkReady(event) {const app = getApp();app.globalData.isReady = true;const fromPageIndex = app.globalData.fromPage.indexOf('TUI-Index');if (app.globalData.fromPage === '') return;wx.showLoading();wx.hideLoading();wx.$TUIKit.getMyProfile().then((imResponse) => {app.globalData.userProfile = imResponse.data;wx.setStorage({key: 'userProfile',data: imResponse.data,});});let routeName = getCurrentPages()[1].route.indexOf('TUI-Login') > -1 ? 'redirectTo' : 'navigateTo';if (fromPageIndex > 1) {routeName = 'switchTab';}if (!app.globalData.userInfo) {routeName = fromPageIndex > 1 ? 'switchTab' : 'redirectTo';}wx[routeName]({url: app.globalData.fromPage,});app.globalData.fromPage = '';}function onKickedOut() {wx.showToast({title: '您被踢下线',icon: 'error',});wx.reLaunch({url: './pages/TUI-Login/login',});}App({onLaunch: function () {login({SDKAppID: 0,userID: '',userSig: '',})},onUnload() {wx.$TUIKit.off(wx.TencentCloudChat.EVENT.KICKED_OUT, onKickedOut);TUILogin.logout();},globalData: {userInfo: null,// 个人信息userProfile: null,headerHeight: 0,statusBarHeight: 0,isFirstLogin: true,reportType: 'imWxTuikit',isReady: false,fromPage: '',},onSDKReady(event) {// 监听到此事件后可调用 SDK 发送消息等 API,使用 SDK 的各项功能。}});
3. 在分包内引用 TUIKit 组件,为此需要分别修改分包内部 index.wxml 、index.js 、index.json 文件。
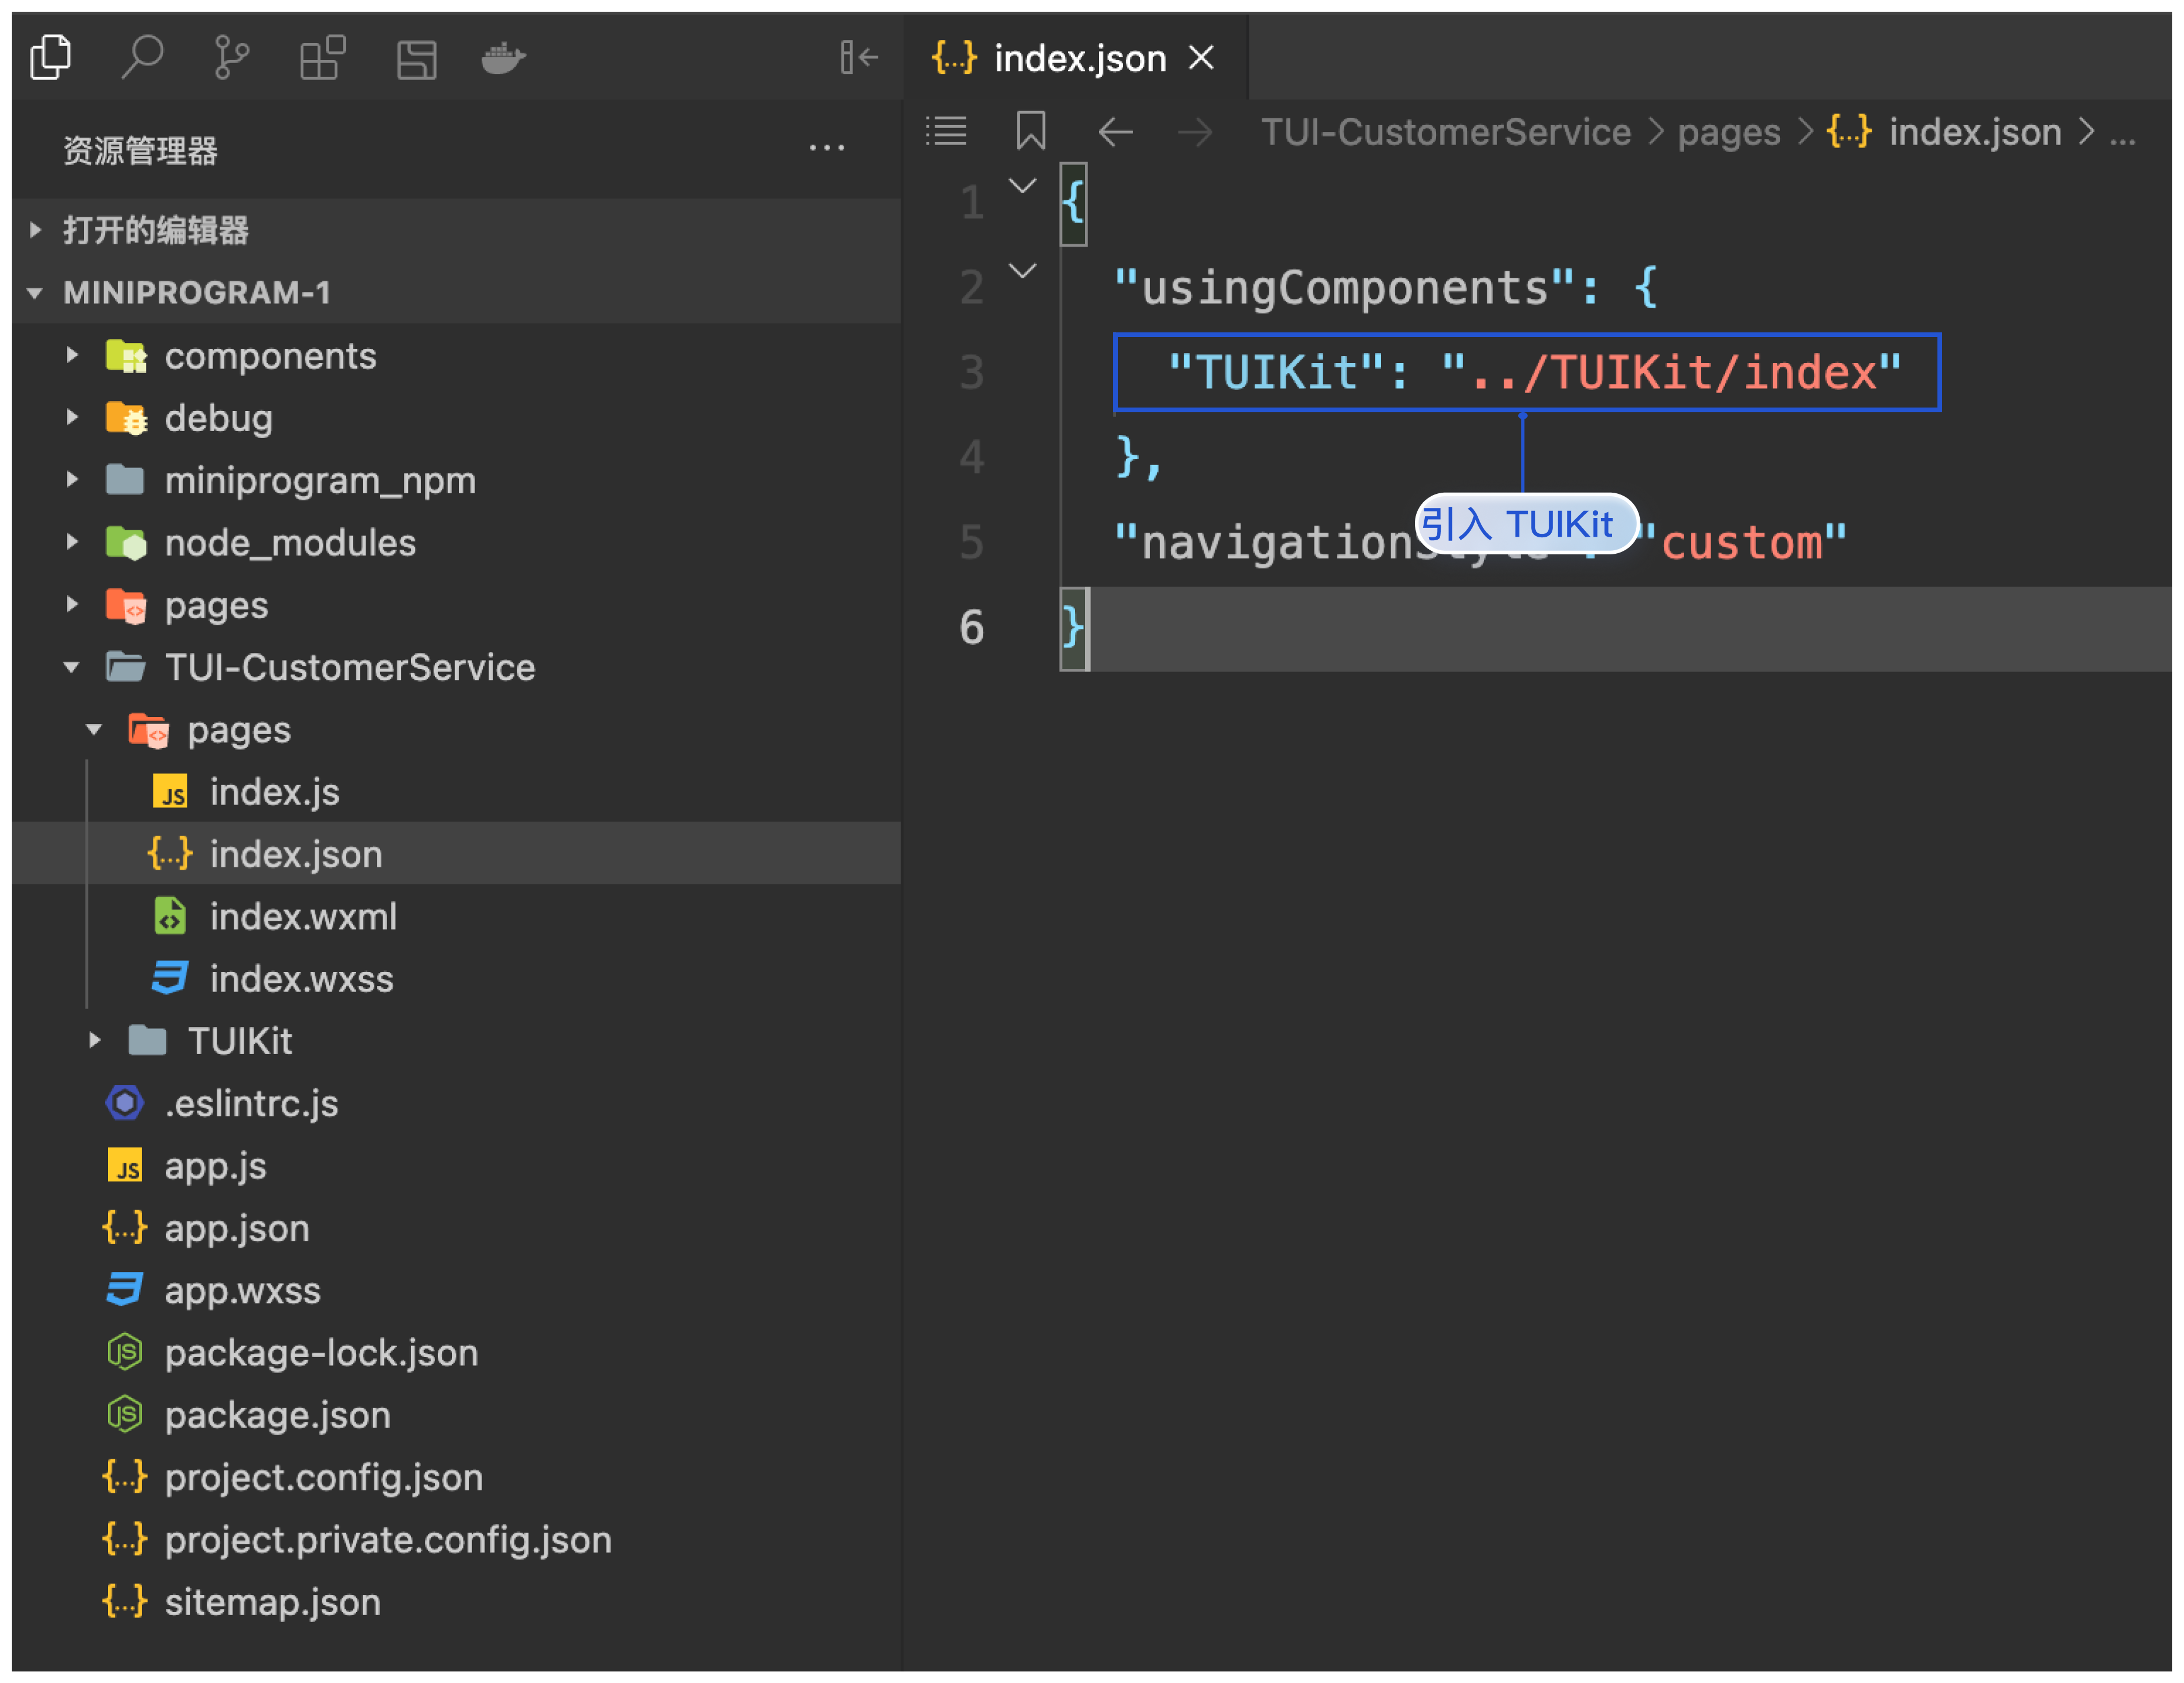
在 TUI-CustomerService/pages/index.json 中引入 TUIKit 组件,如图所示:
{"usingComponents": {"TUIKit": "../TUIKit/index"},"navigationStyle": "custom"}
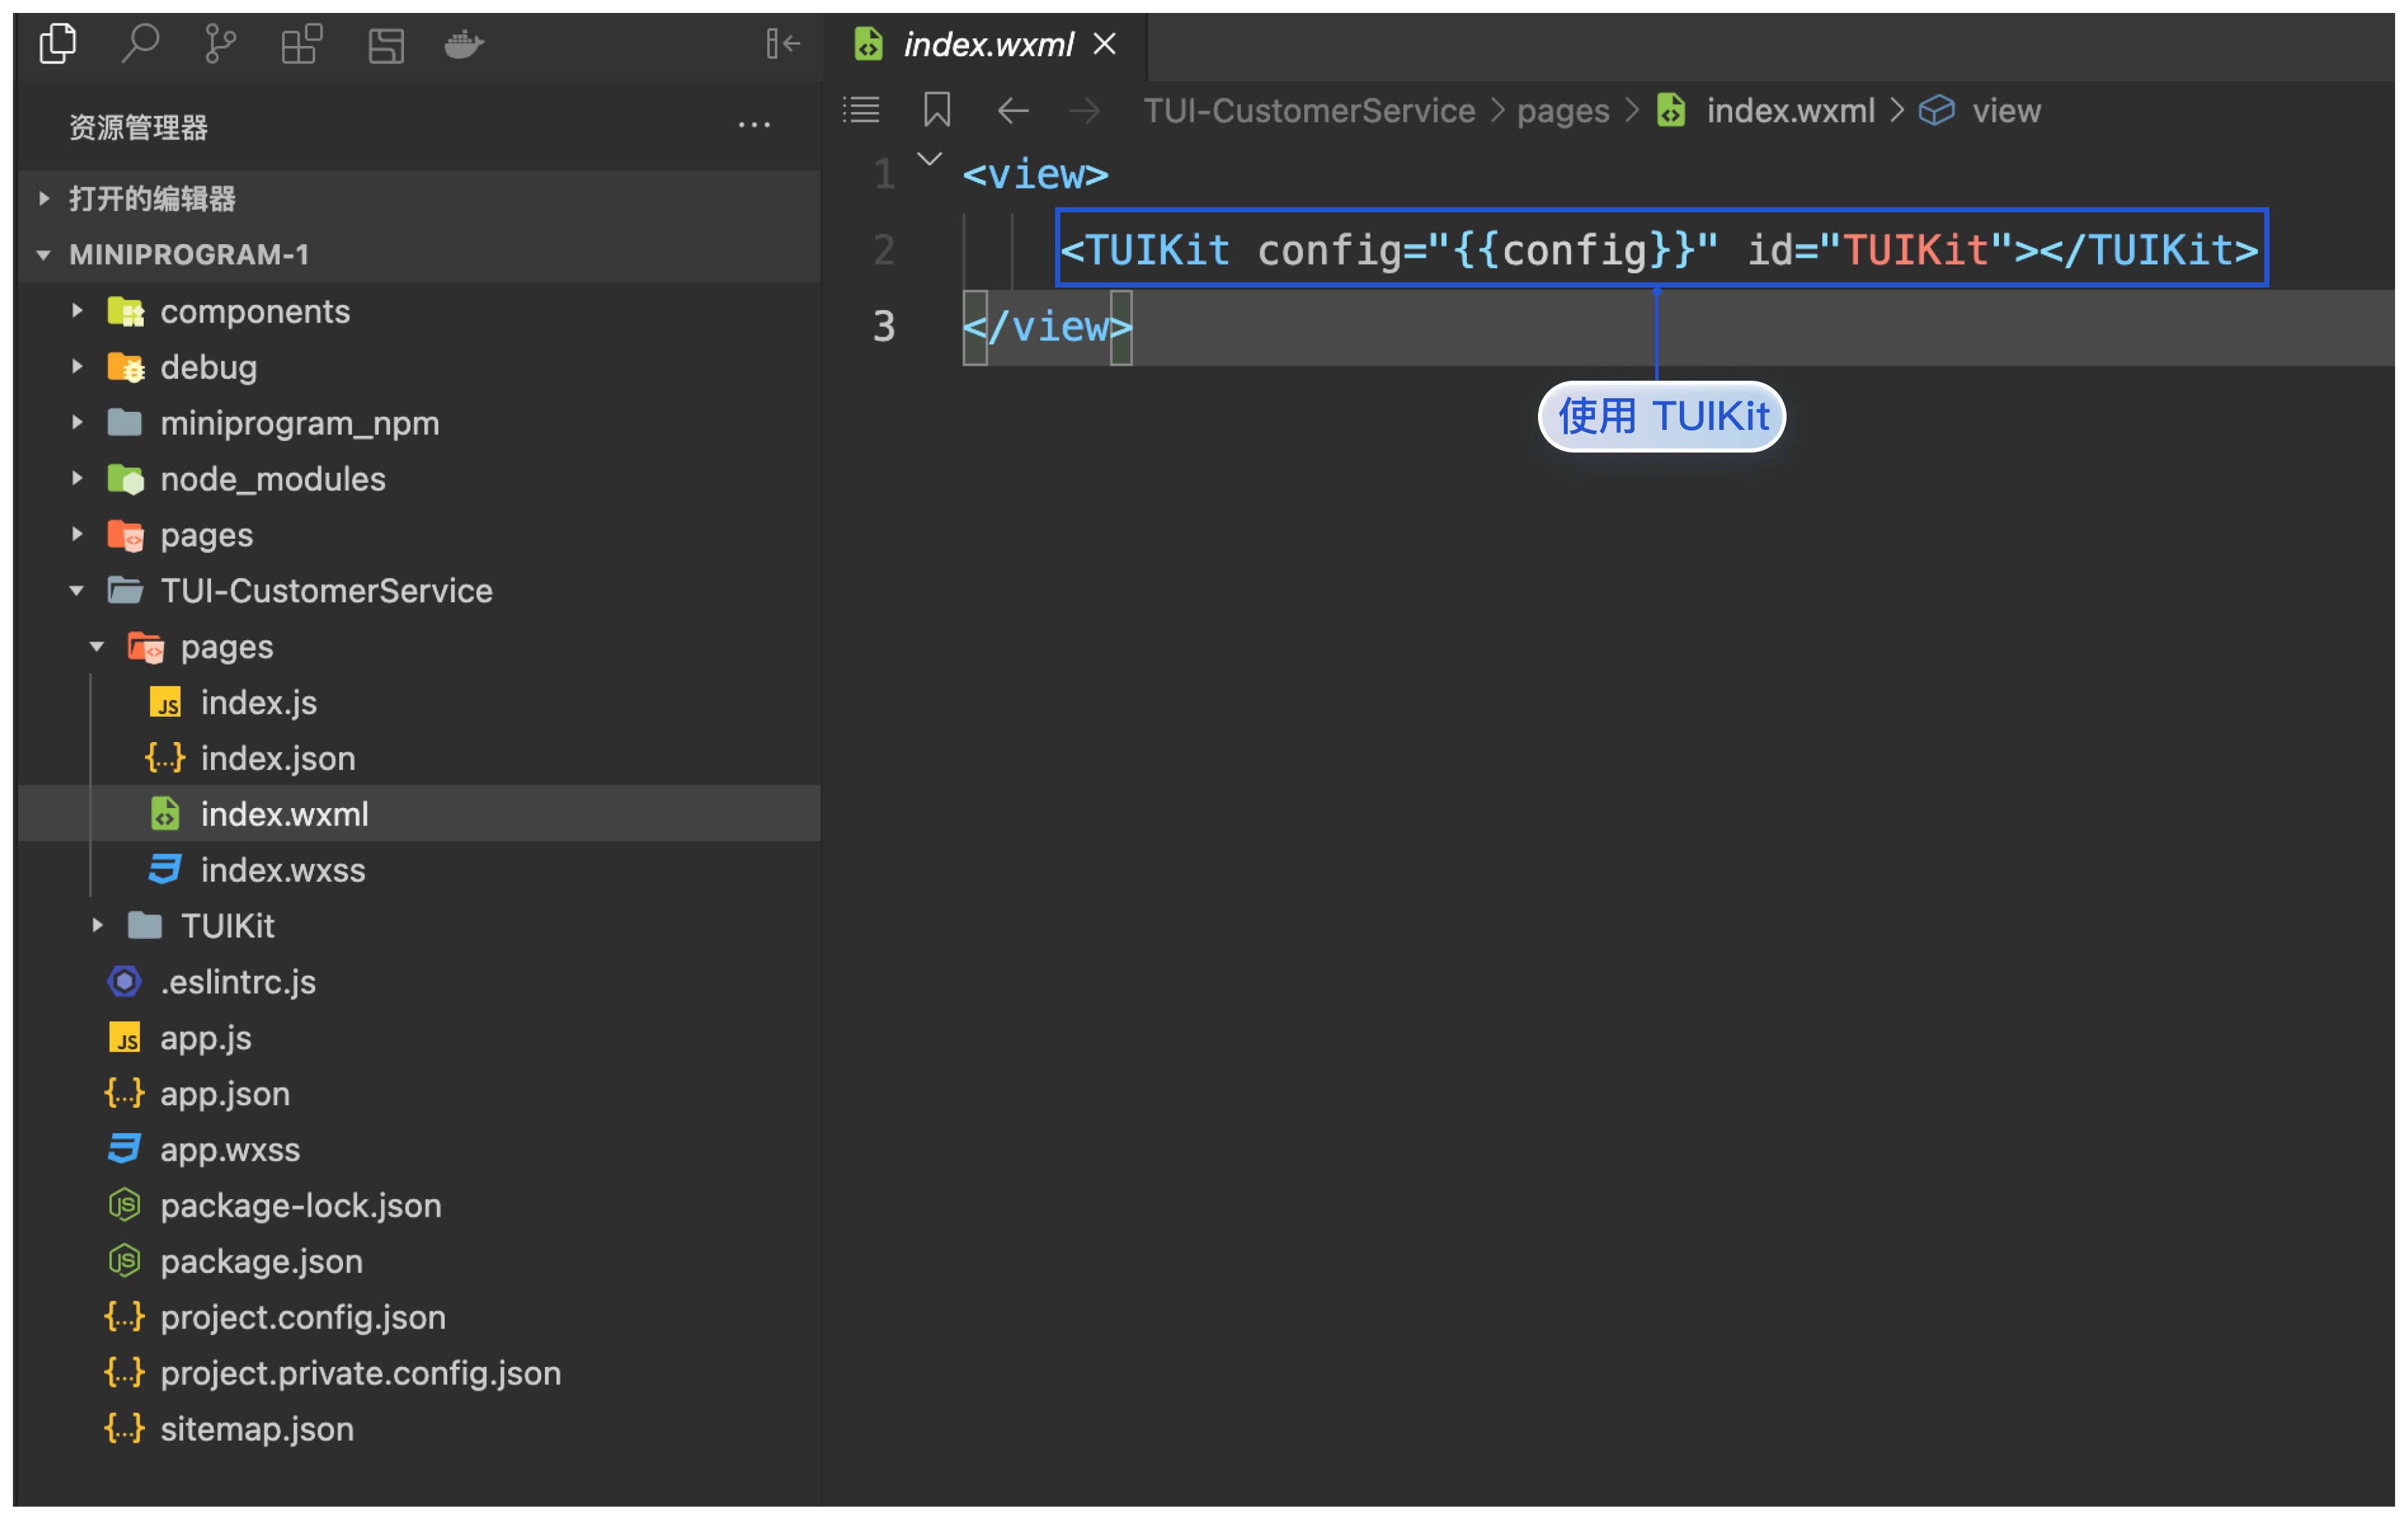
在 TUI-CustomerService/pages/index.wxml 中使用 TUIKit 组件,如图所示:
<view><TUIKit config="{{config}}" id="TUIKit"></TUIKit></view>
config 的参数如下表所示:
参数 | 类型 | 是否必填 | 含义 |
userID | String | 是 | 当前用户的 ID,字符串类型,只允许包含英文字母(a-z 和 A-Z)、数字(0-9)、连词符(-)和下划线(_) |
SDKAPPID | Number | 是 | 即时通信 IM 应用的 SDKAppID |
SECRETKEY | String | 是 | |
EXPIRETIME | Number | 否 | userSig 过期时间 |
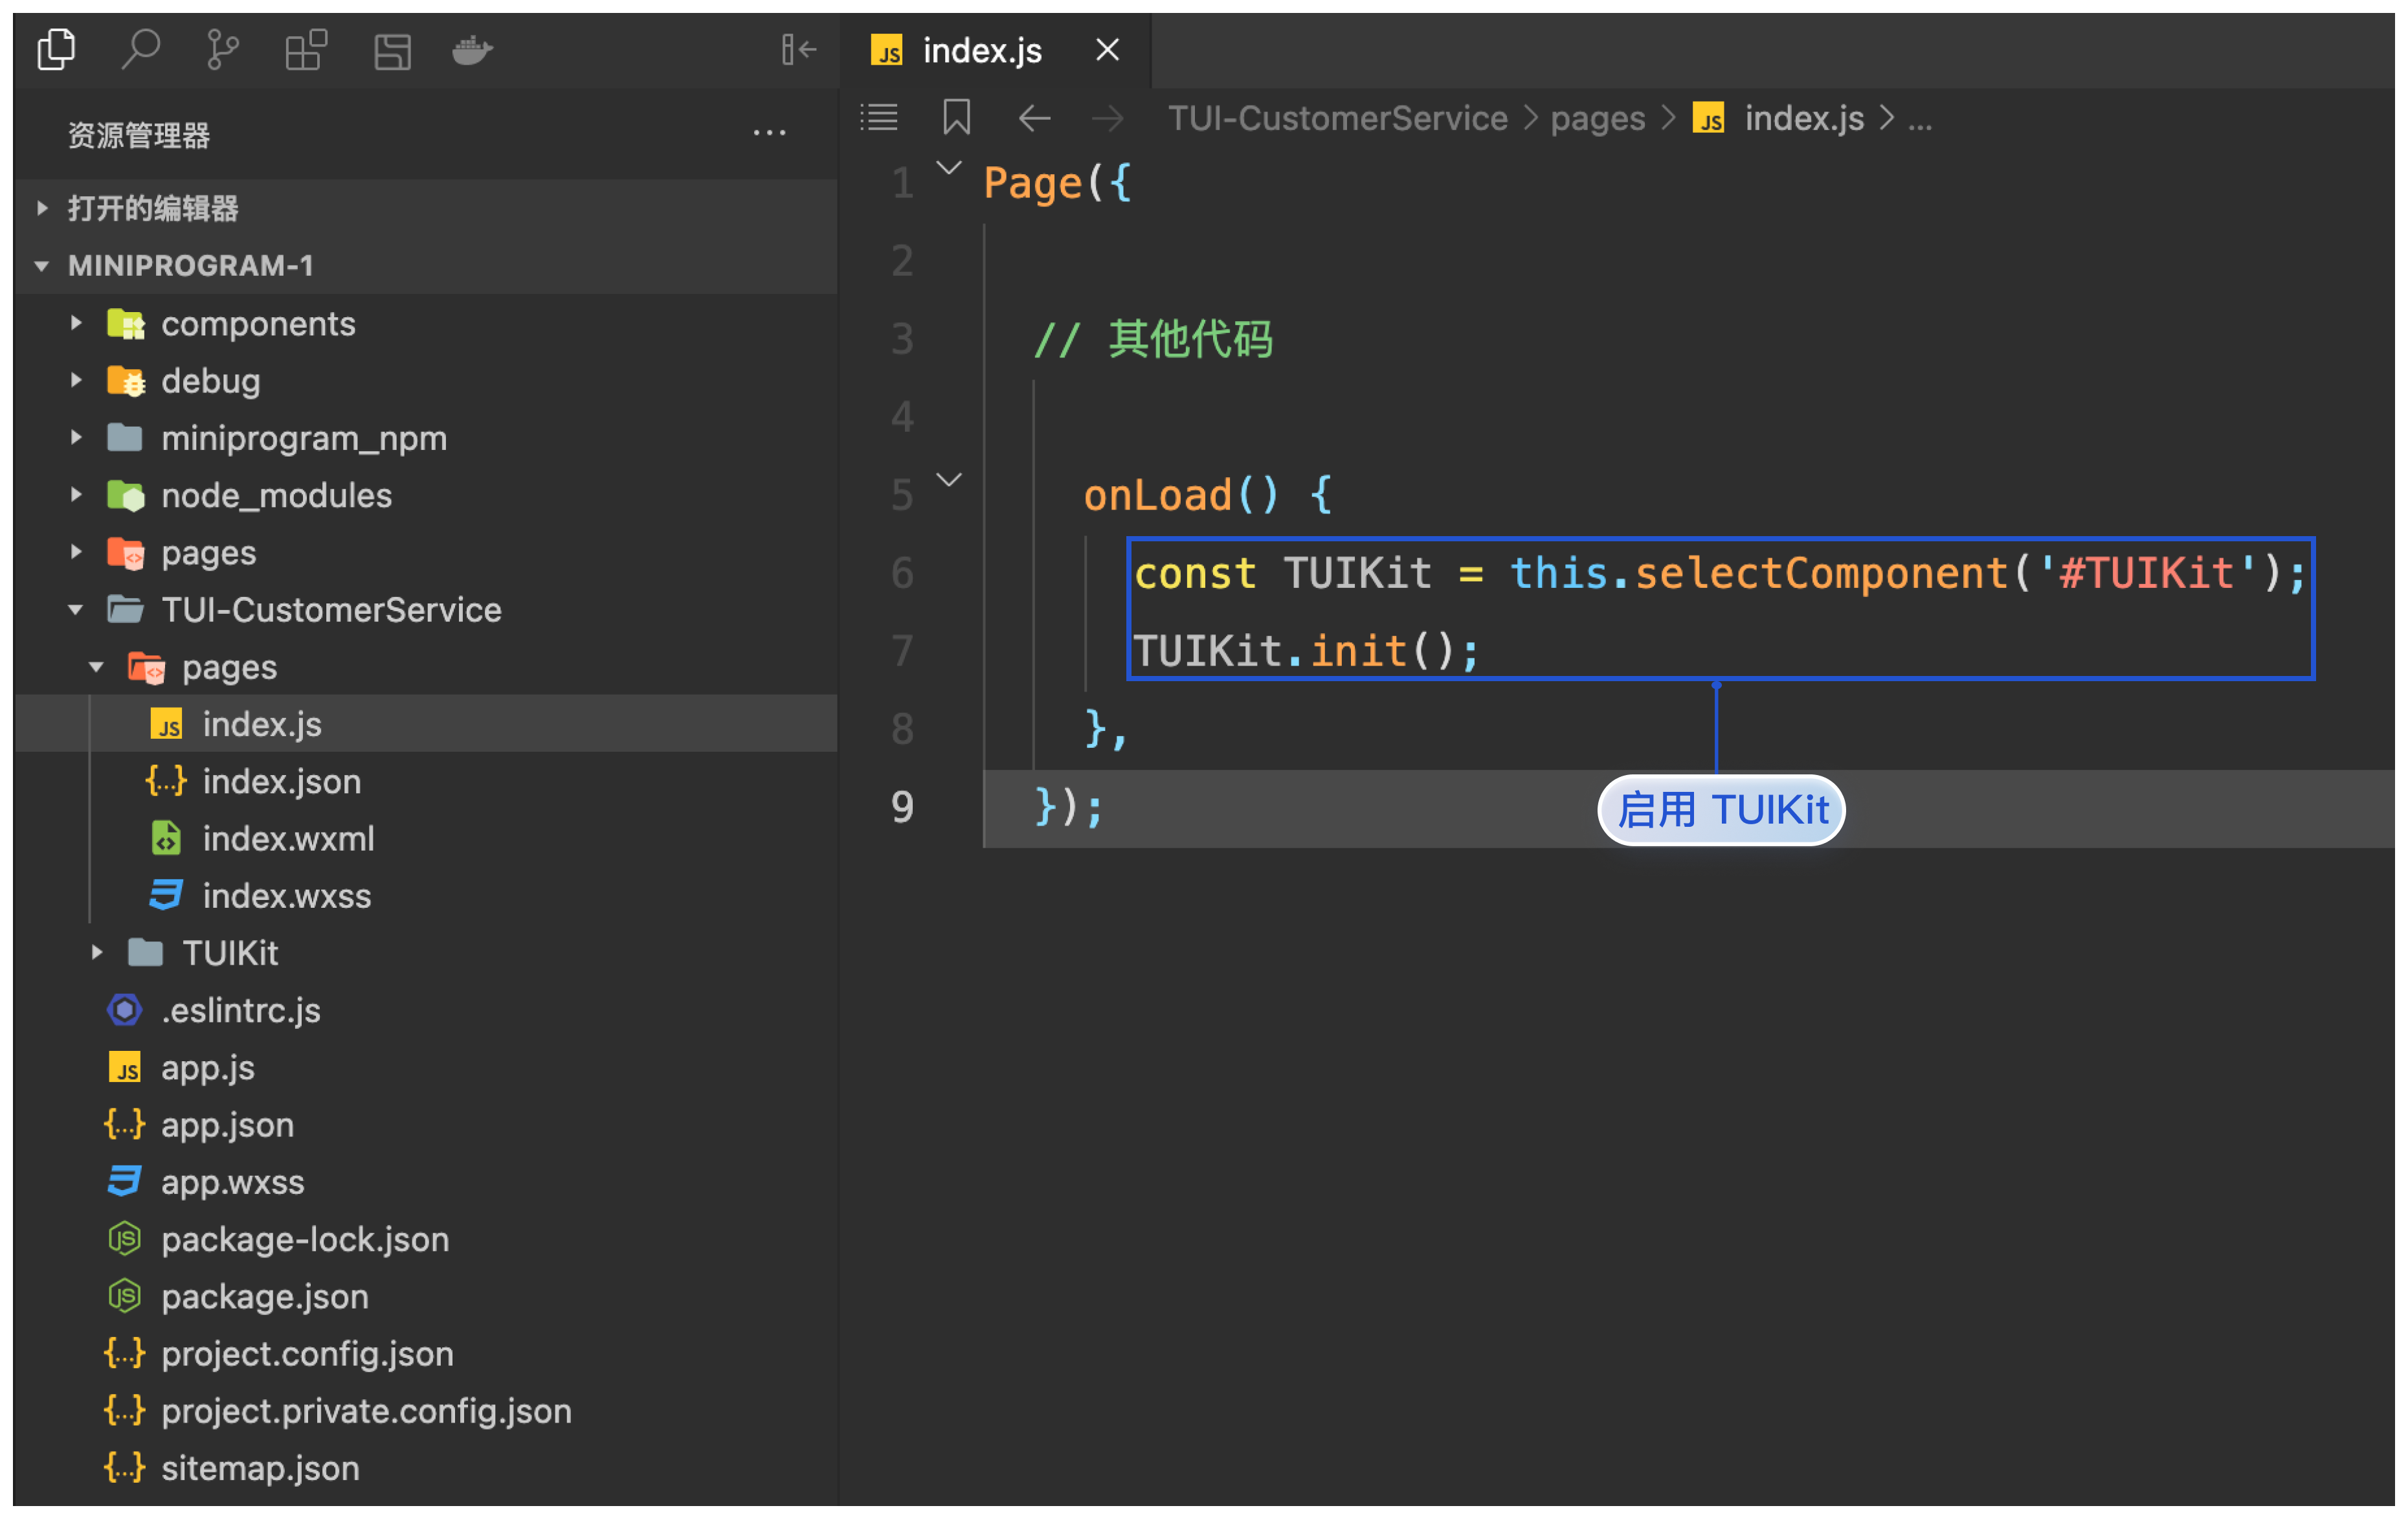
在 TUI-CustomerService/pages/index.js 中启用 TUIKit 组件,如图所示:
Page({// 其他代码onLoad() {const TUIKit = this.selectComponent('#TUIKit');TUIKit.init();},});
4. 按需载入分包,您需要修改主包 pages 下的 index.wxml 、index.js。
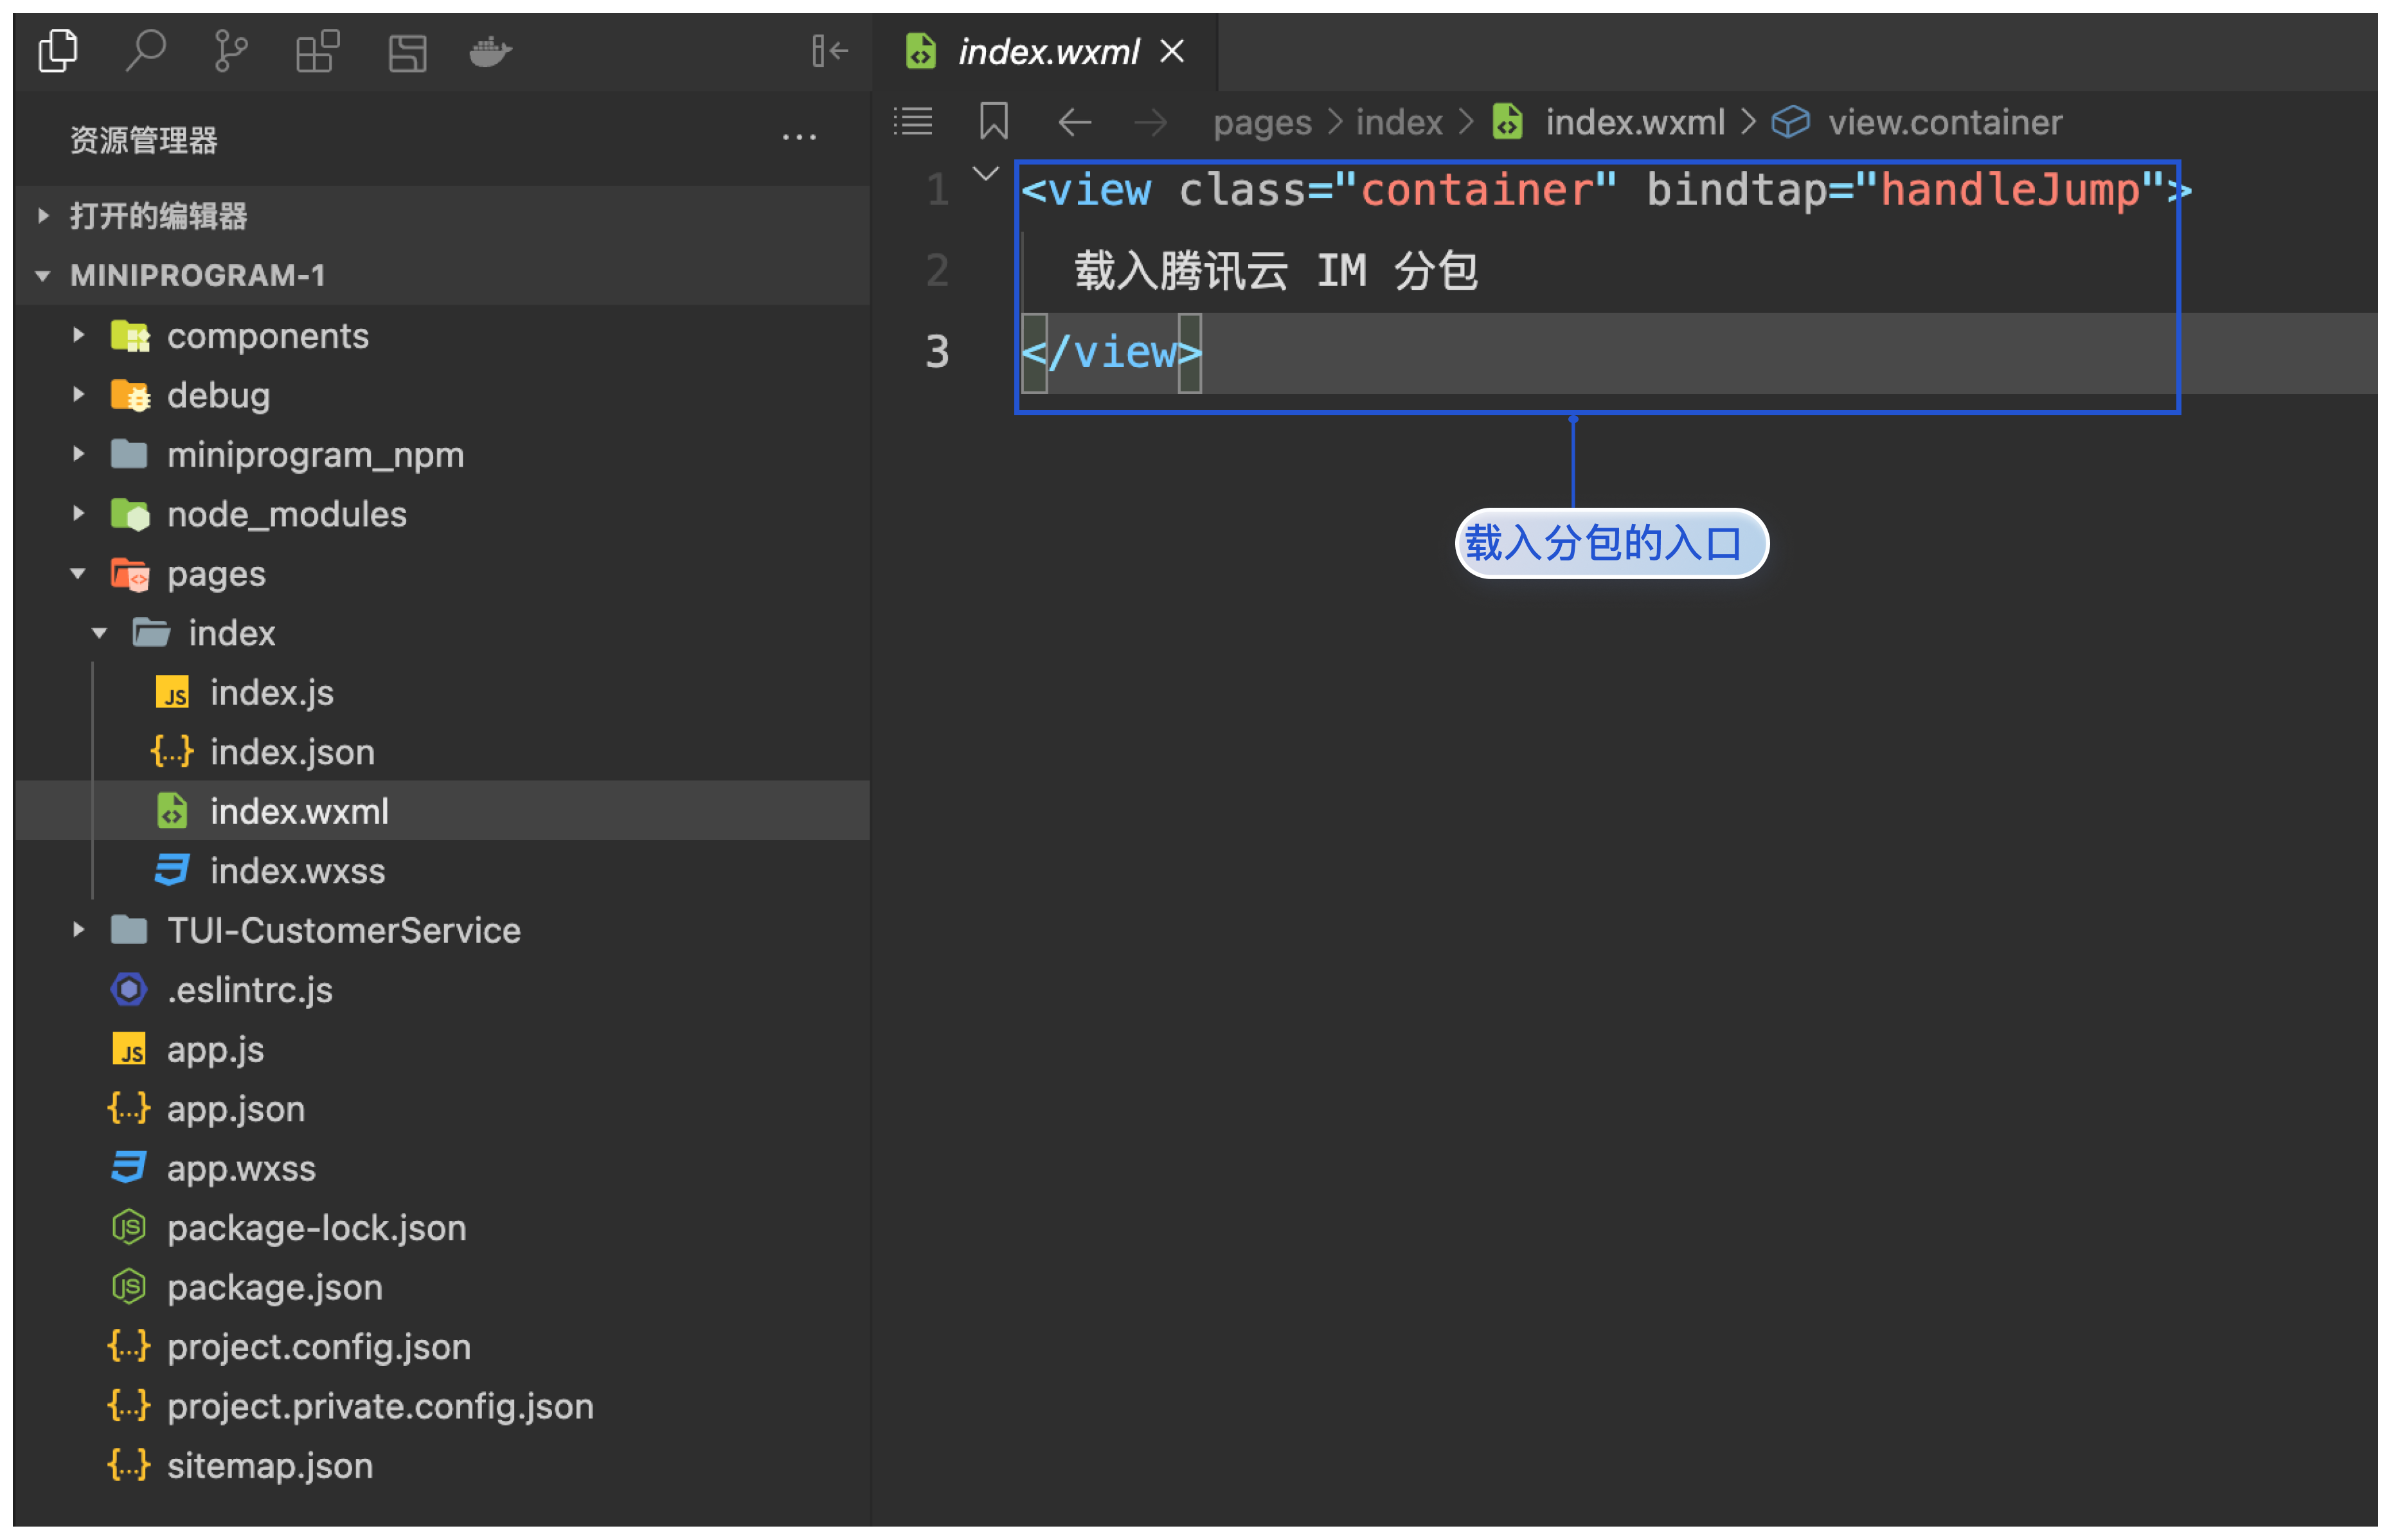
在 pages/index/index.wxml 中增加载入分包的入口,如图所示:
<view class="container" bindtap="handleJump">载入腾讯云 IM 分包</view>
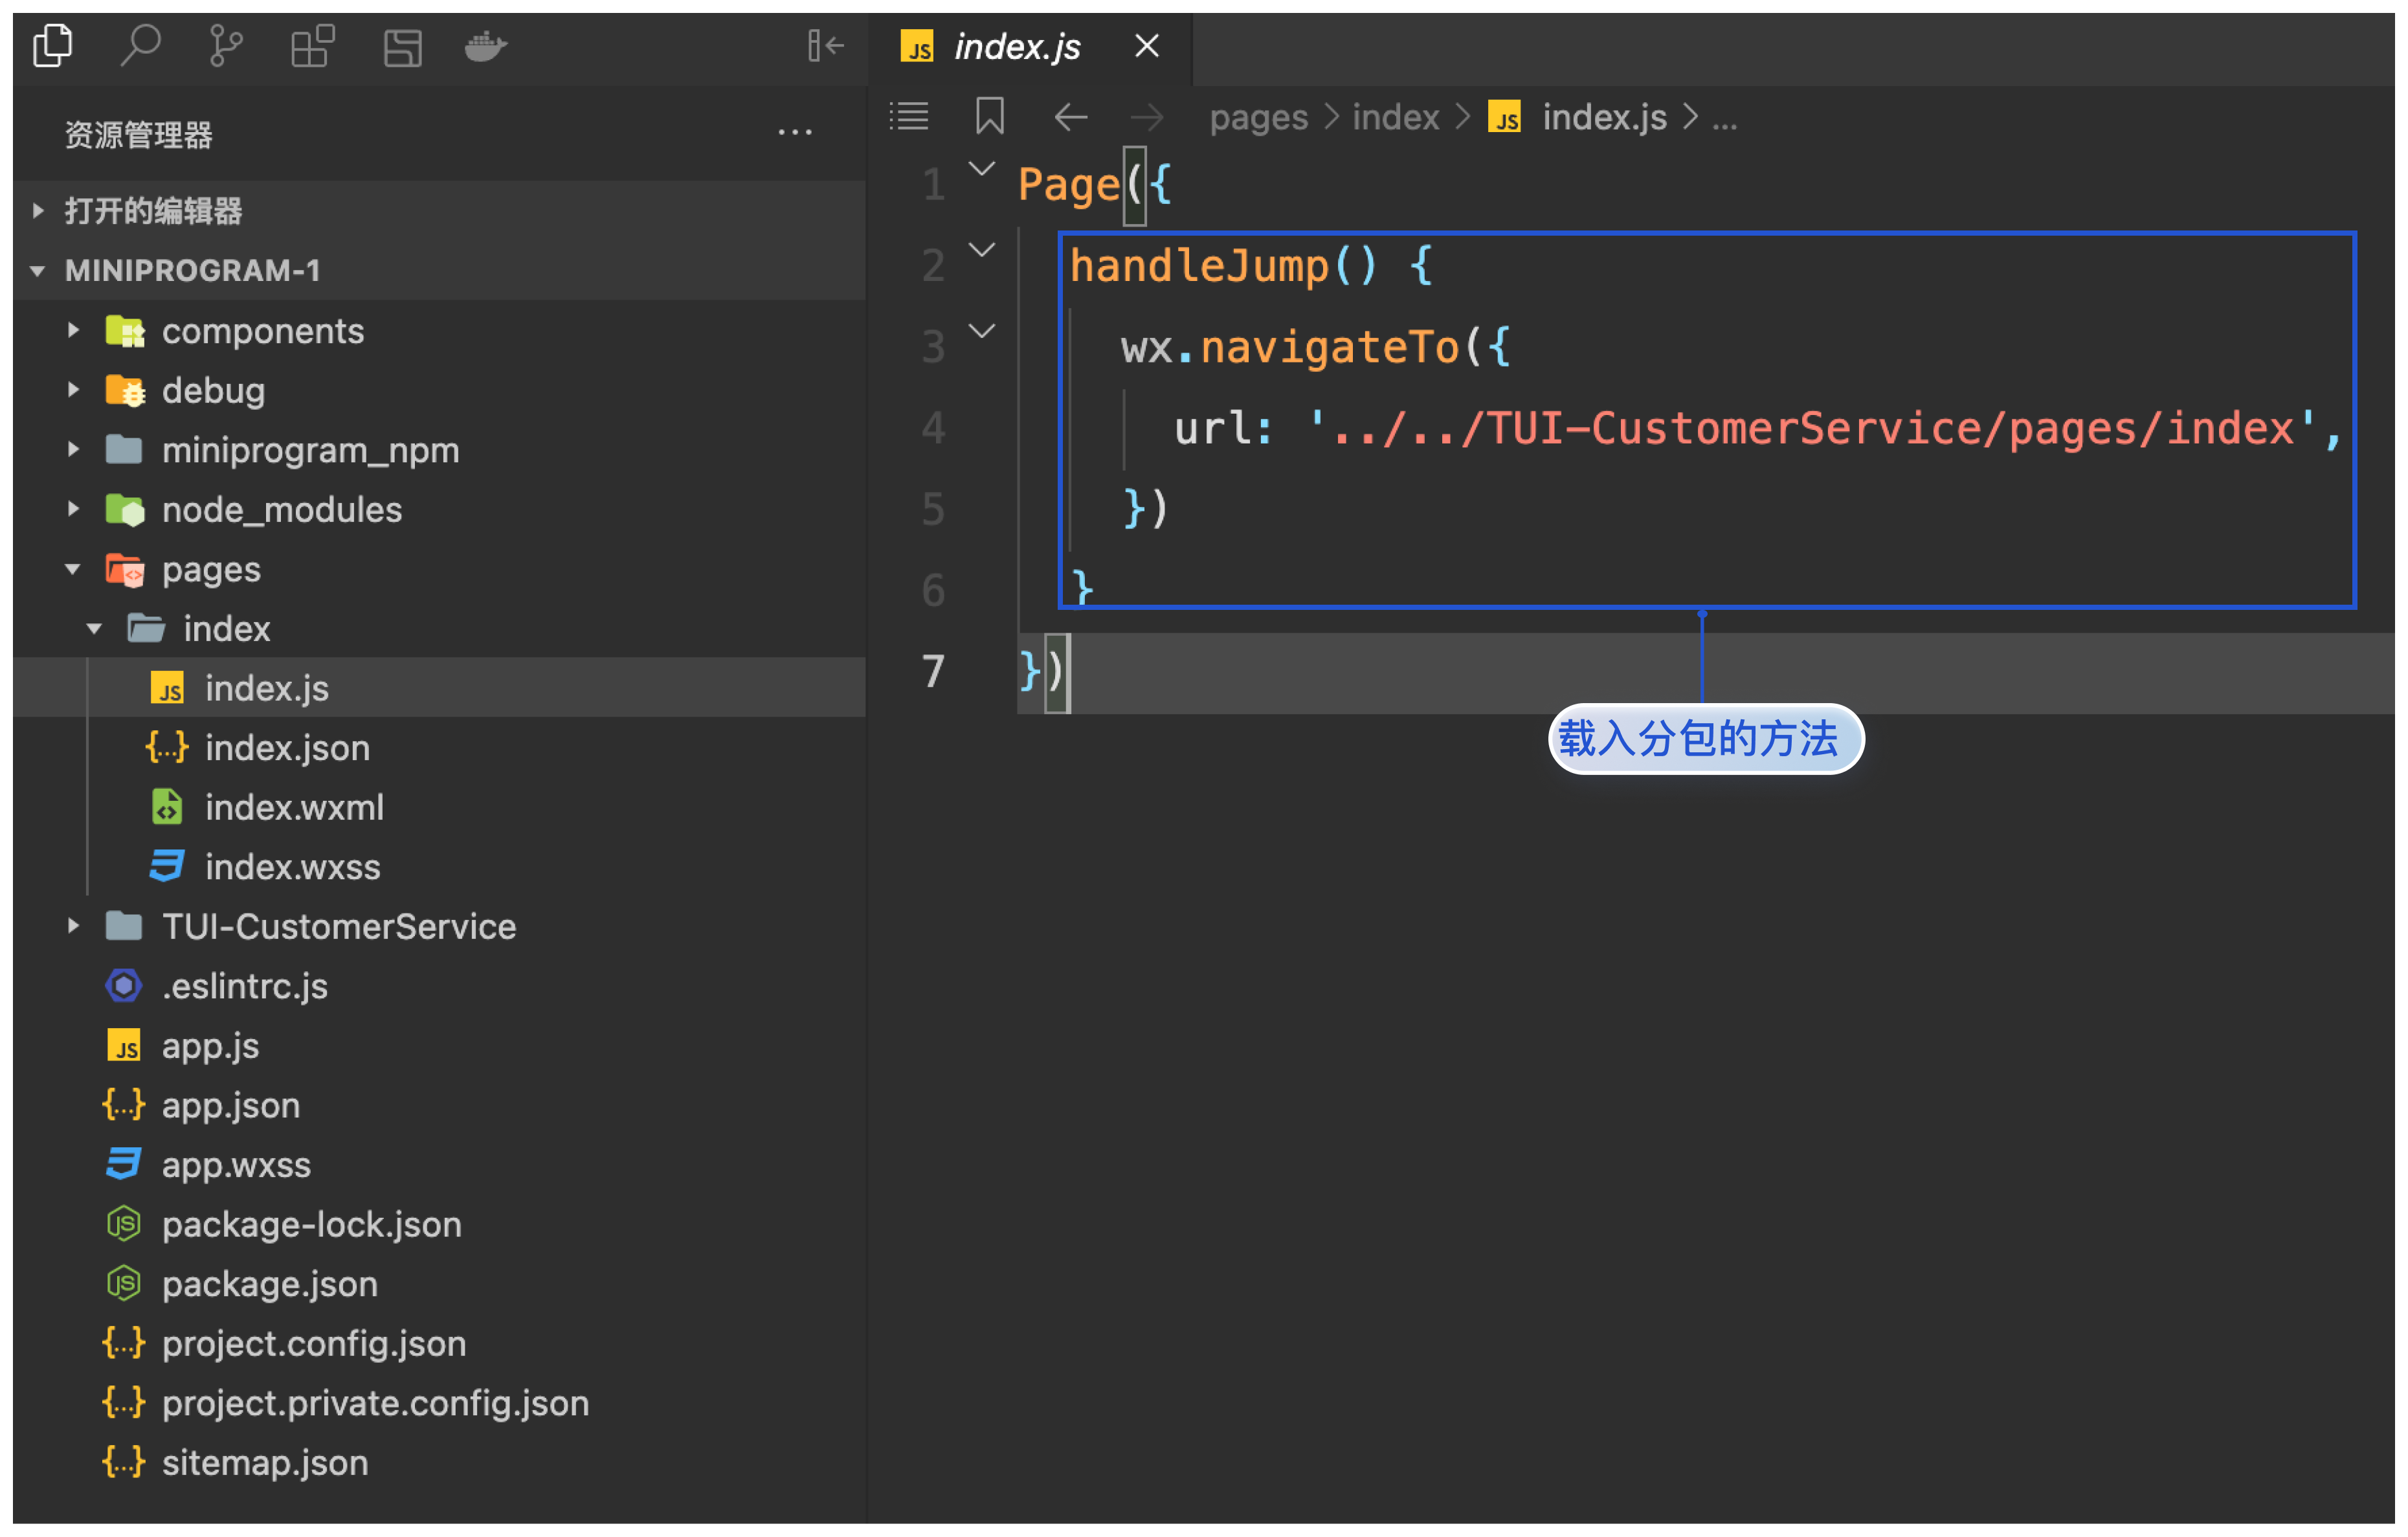
在 pages/index/index.js 中增加载入分包的入口方法,如图所示:
Page({handleJump() {wx.navigateTo({url: '../../TUI-CustomerService/pages/index',})}})
在 pages 页面引用 TUIKit 组件,为此您需要分别修改 index.wxml 、index.js 和 index.json。
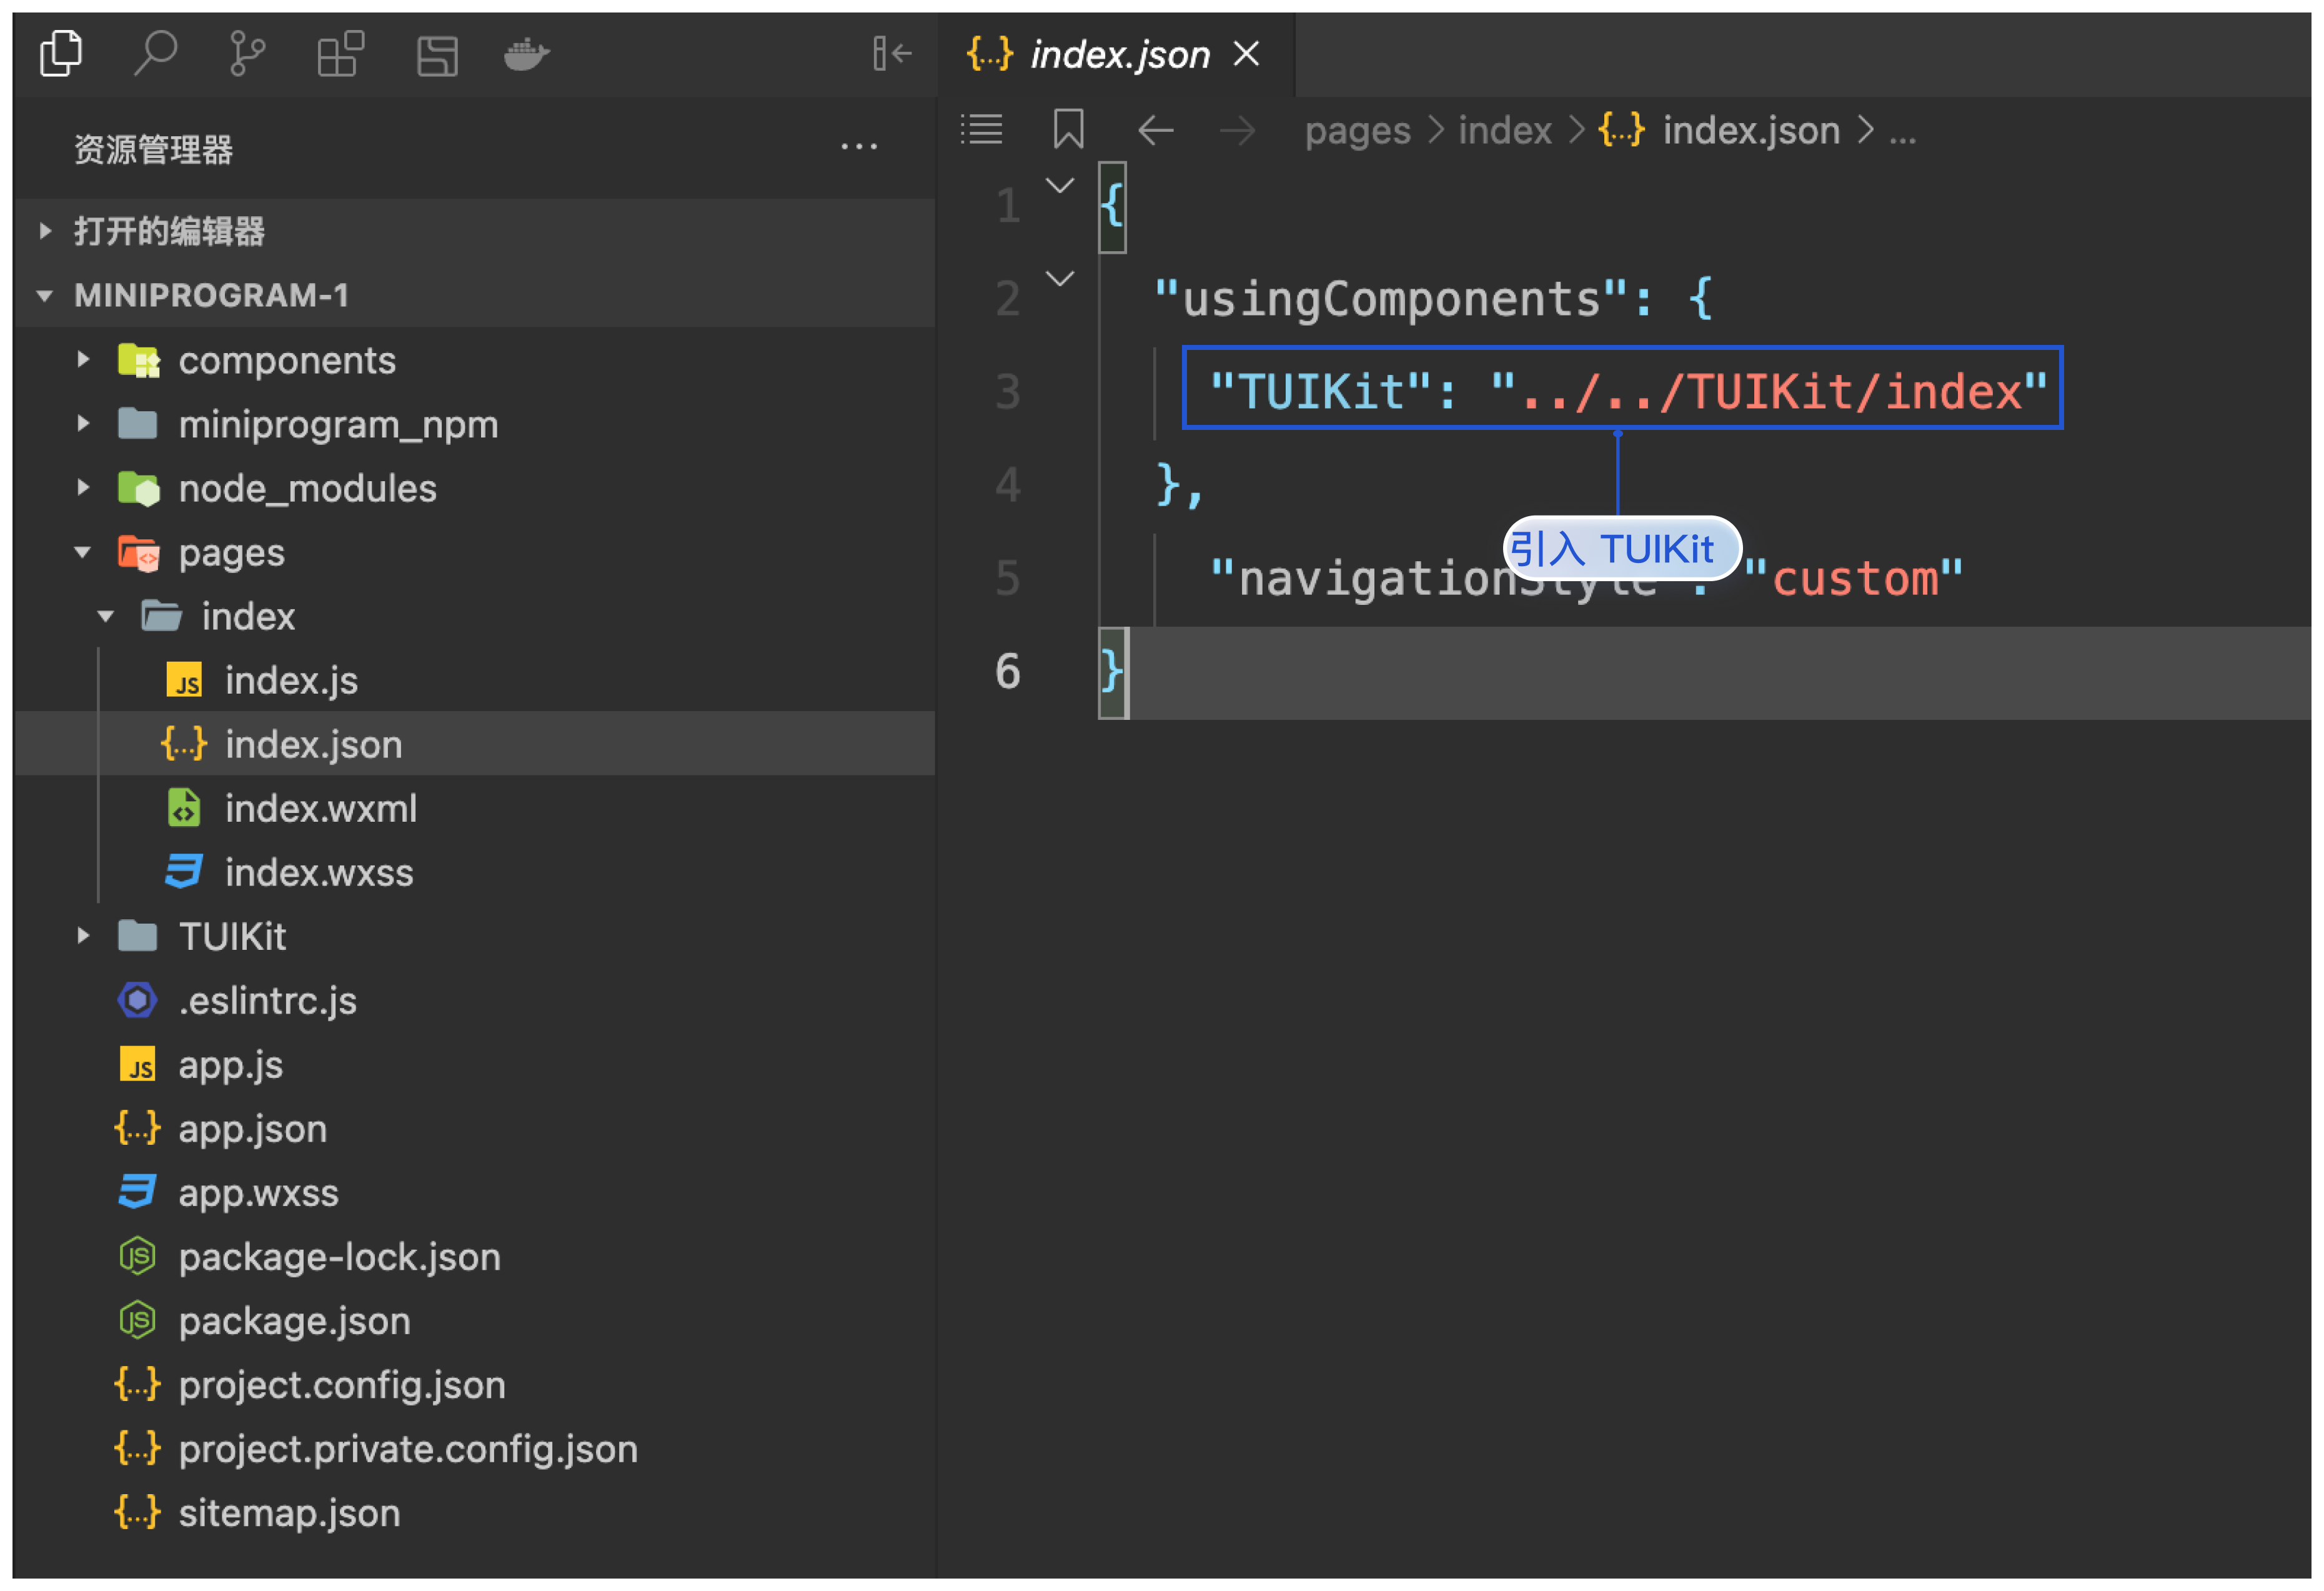
在 pages/index/index.json 中引入 TUIKit 组件,如图所示:
{"usingComponents": {"TUIKit": "../../TUIKit/index"},"navigationStyle": "custom"}
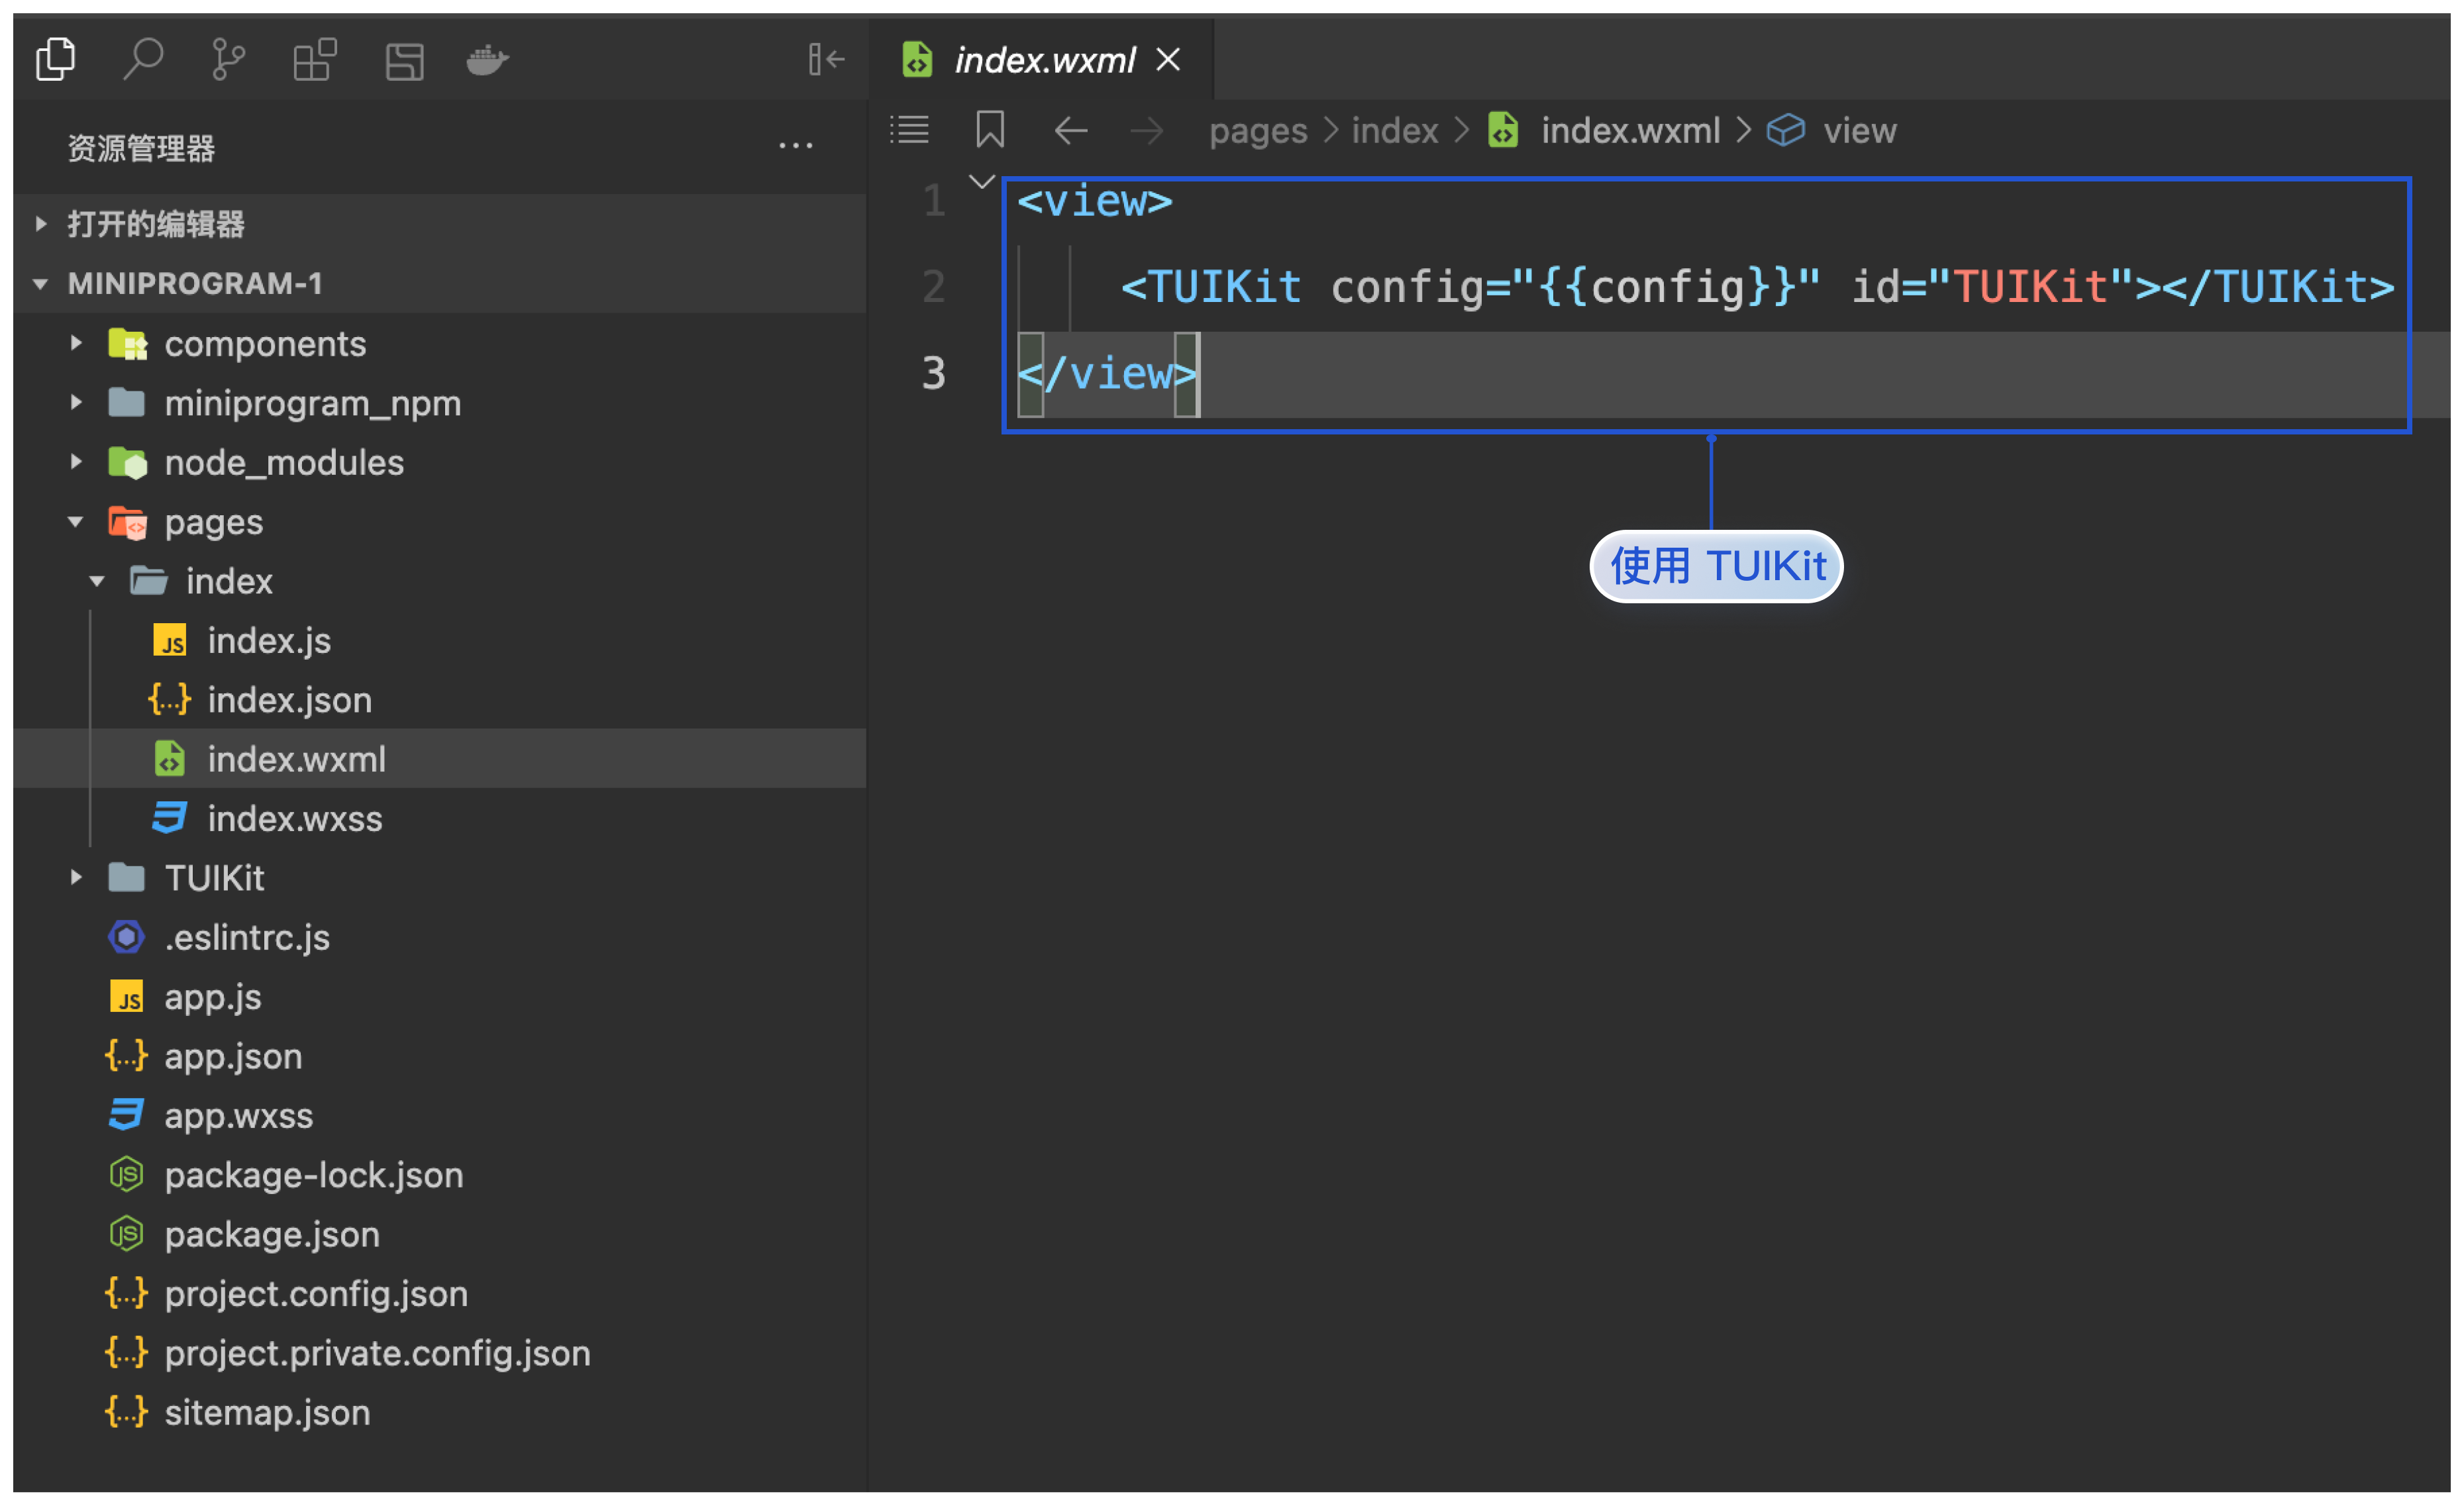
在 pages/index/index.wxml 中使用 TUIKit 组件,如图所示:
<view><TUIKit config="{{config}}" id="TUIKit"></TUIKit></view>
config 的参数如下表所示:
参数 | 类型 | 是否必填 | 含义 |
userID | String | 是 | 当前用户的 ID,字符串类型,只允许包含英文字母(a-z 和 A-Z)、数字(0-9)、连词符(-)和下划线(_) |
SDKAPPID | Number | 是 | 即时通信 IM 应用的 SDKAppID |
SECRETKEY | String | 是 | |
EXPIRETIME | Number | 否 | userSig 过期时间 |
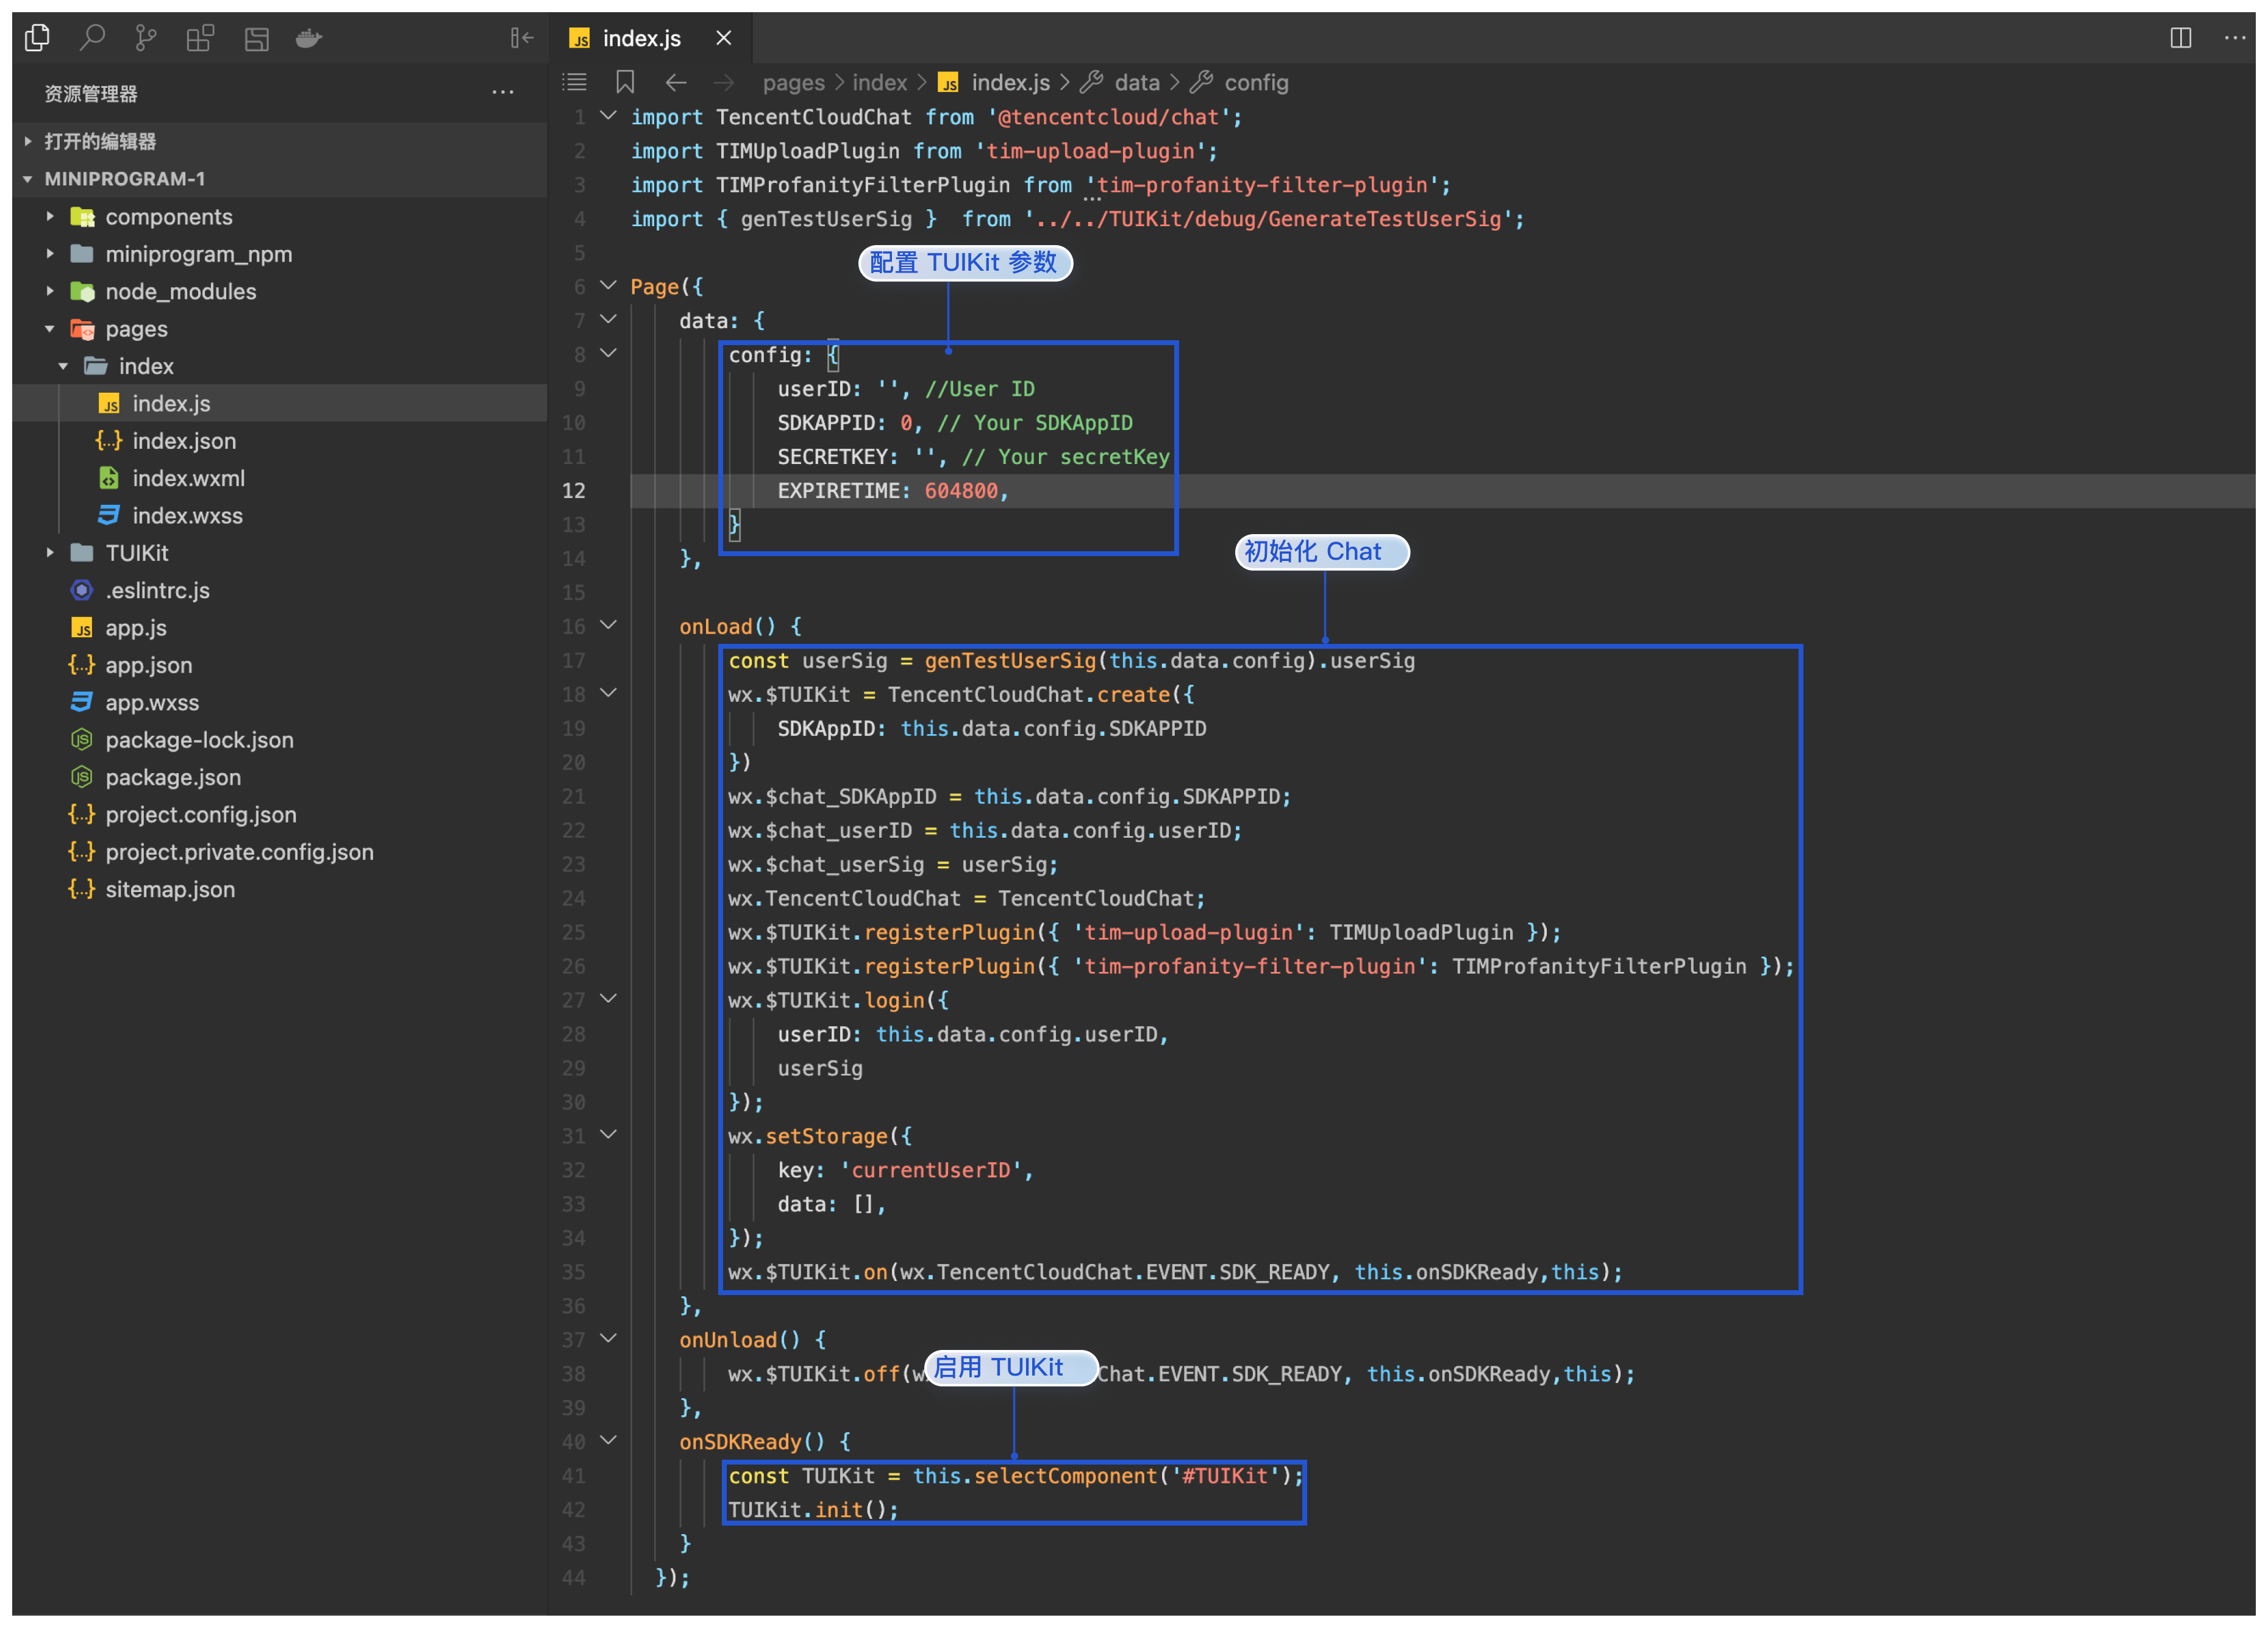
在 pages/index/index.js 中配置 TUIKit 参数、初始化 Chat、启用 TUIKit,如图所示:
import TencentCloudChat from '@tencentcloud/lite-chat/basic';import { TUILogin } from '@tencentcloud/tui-core-lite';import TUIChatEngine from '@tencentcloud/chat-uikit-engine-lite';Page({data: {config: {userID: '', //User IDSDKAPPID: 0, // Your SDKAppIDuserSig: '', // Your userSig}},onLoad() {this.login({...this.data.config,SDKAppID: this.data.config.SDKAPPID,})},onUnload() {TUILogin.logout();},handleSdkReady(event) {const TUIKit = this.selectComponent('#TUIKit');TUIKit.init();},onKickedOut() {wx.showToast({title: '您被踢下线',icon: 'error',});wx.reLaunch({url: './pages/TUI-Login/login',});},async login(config) {wx.TencentCloudChat = TencentCloudChat;const { SDKAppID, userID, userSig } = config;if (!userID || !userSig) return;wx.showLoading({ title: '登录中...', mask: true });try {await TUILogin.login({ SDKAppID, userID, userSig })wx.$TUIKit = TUILogin.chatawait TUIChatEngine.login({chat: wx.$TUIKit,sdkAppID: SDKAppID,userID,userSig,})this.handleSdkReady()wx.$chat_userID = userID;wx.$chat_userSig = userSig;wx.$chat_SDKAppID = SDKAppID;wx.setStorageSync('islogin', true);wx.$TUIKit.setLogLevel(0);wx.$TUIKit.on(wx.TencentCloudChat.EVENT.KICKED_OUT, this.onKickedOut);wx.hideLoading();} catch (error) {wx.hideLoading();throw error;}},});
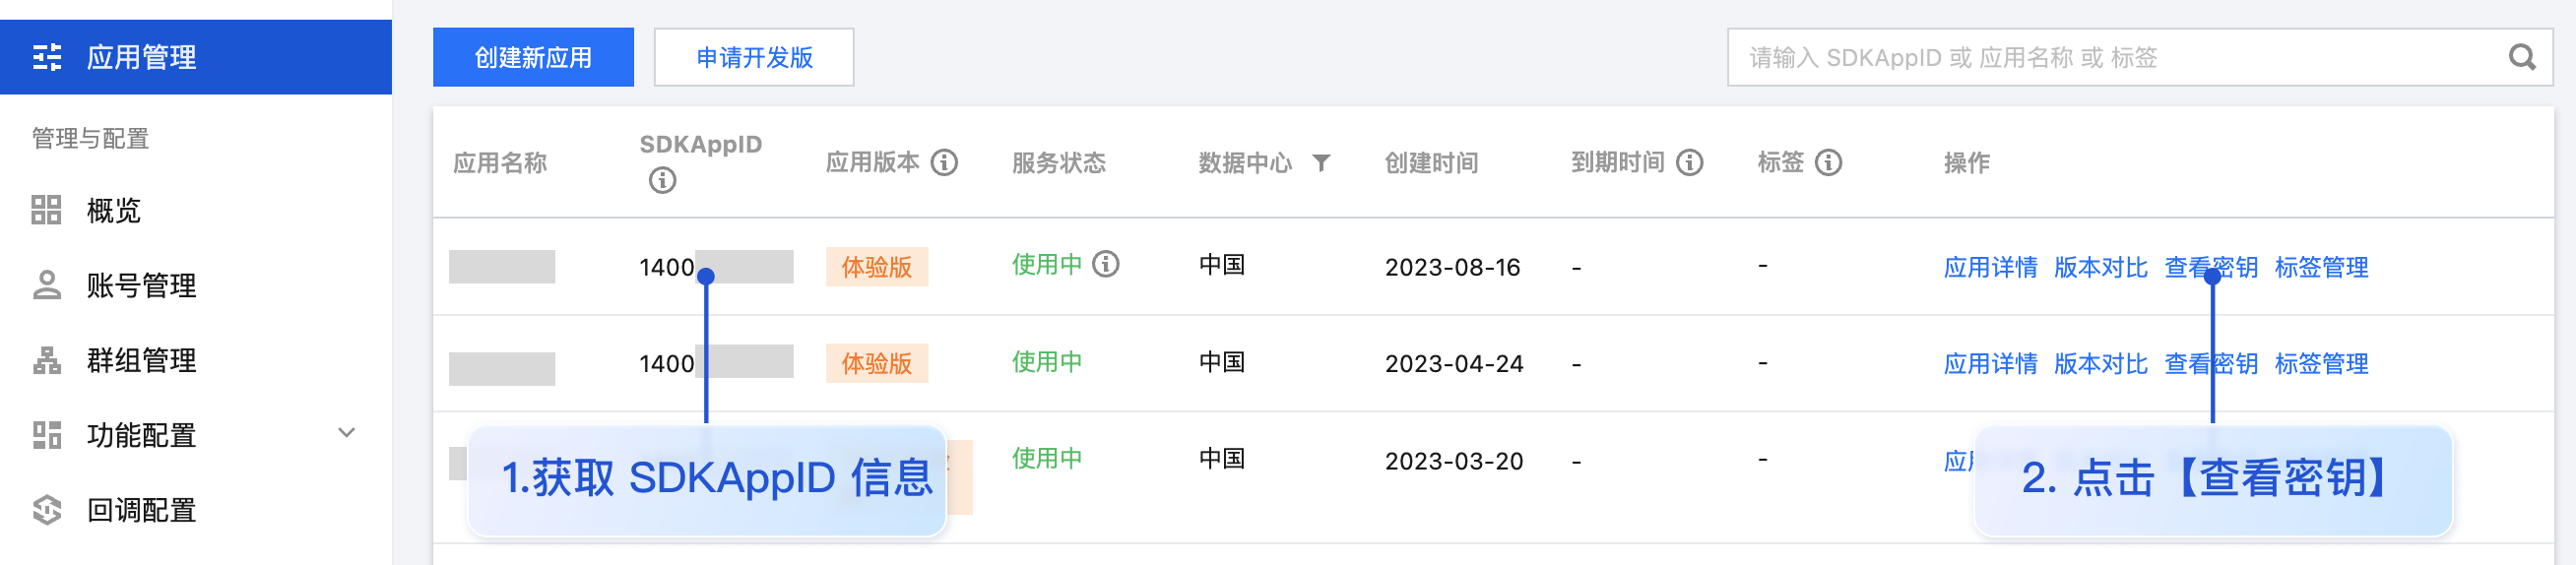
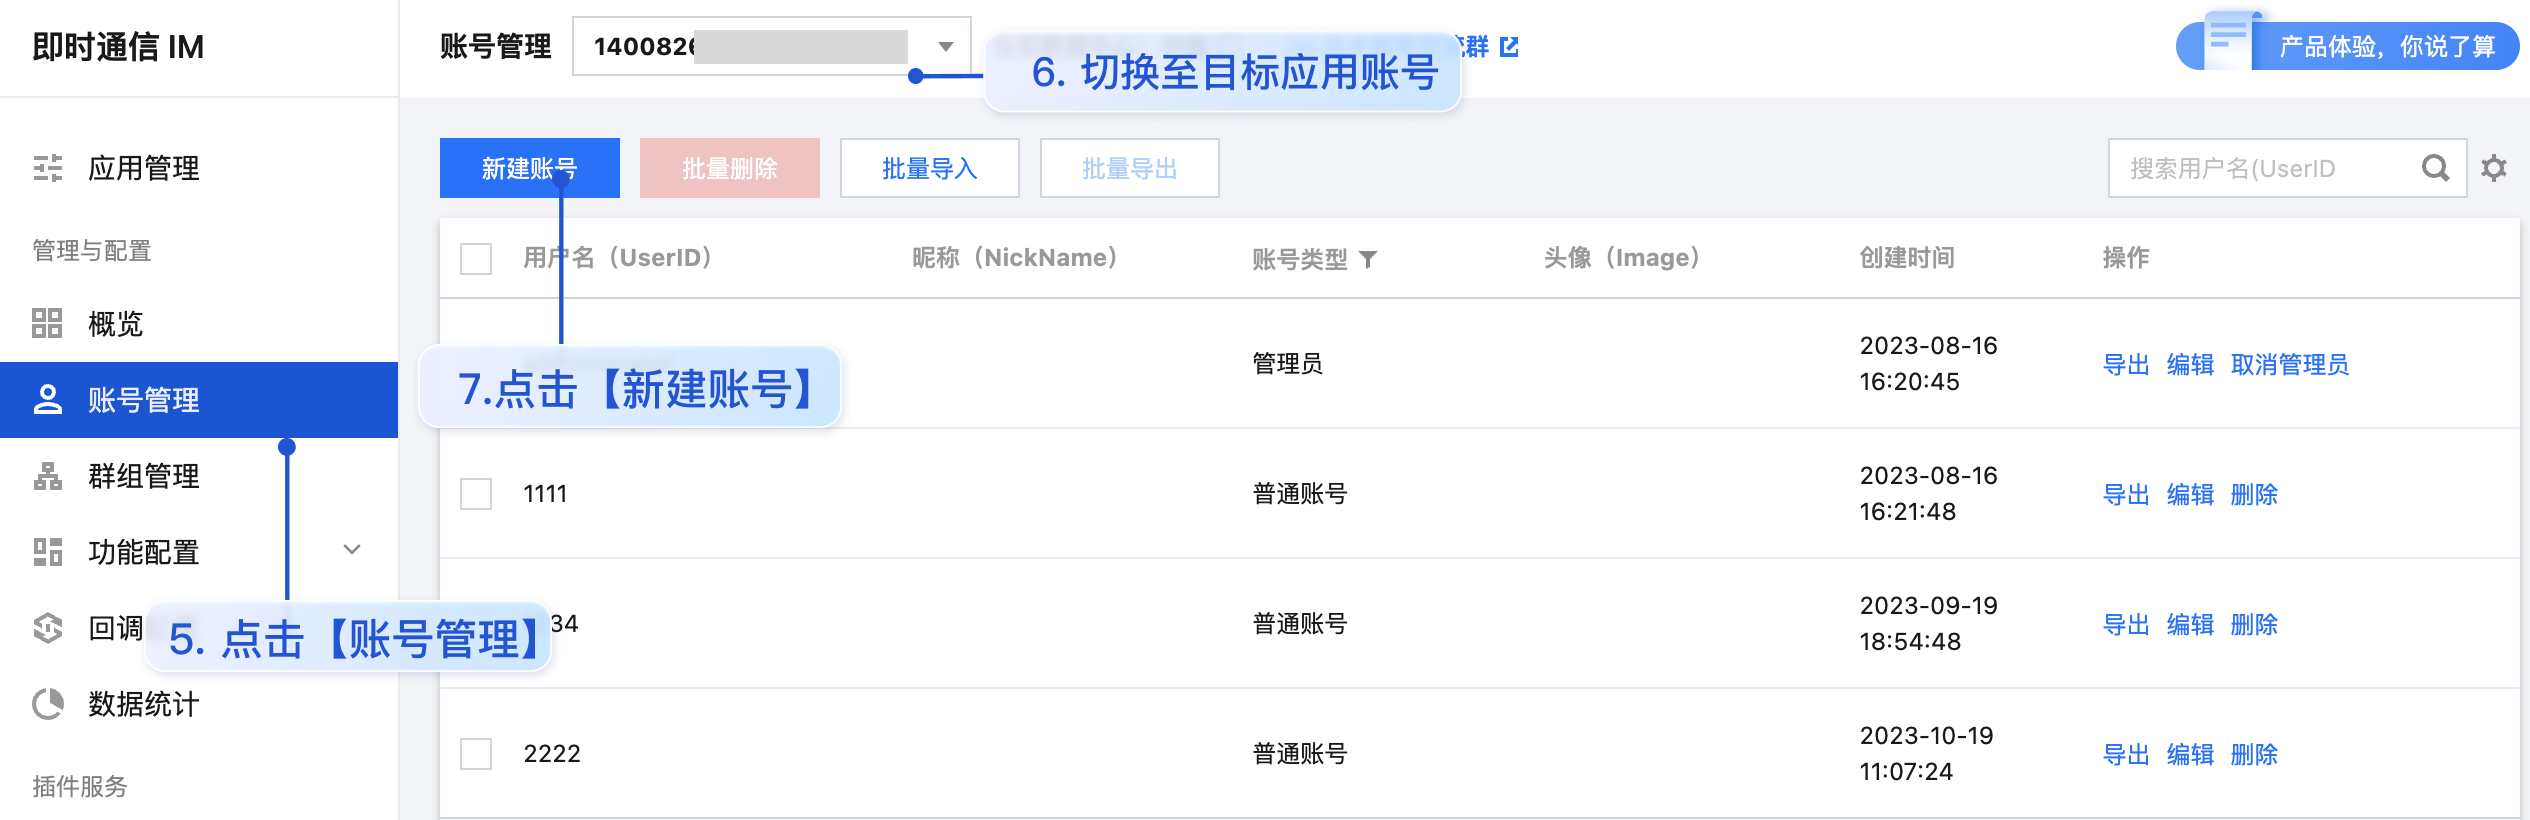
步骤3: 获取 SDKAppID 、SECRETKEY 与 userID

运行和测试
步骤1:运行
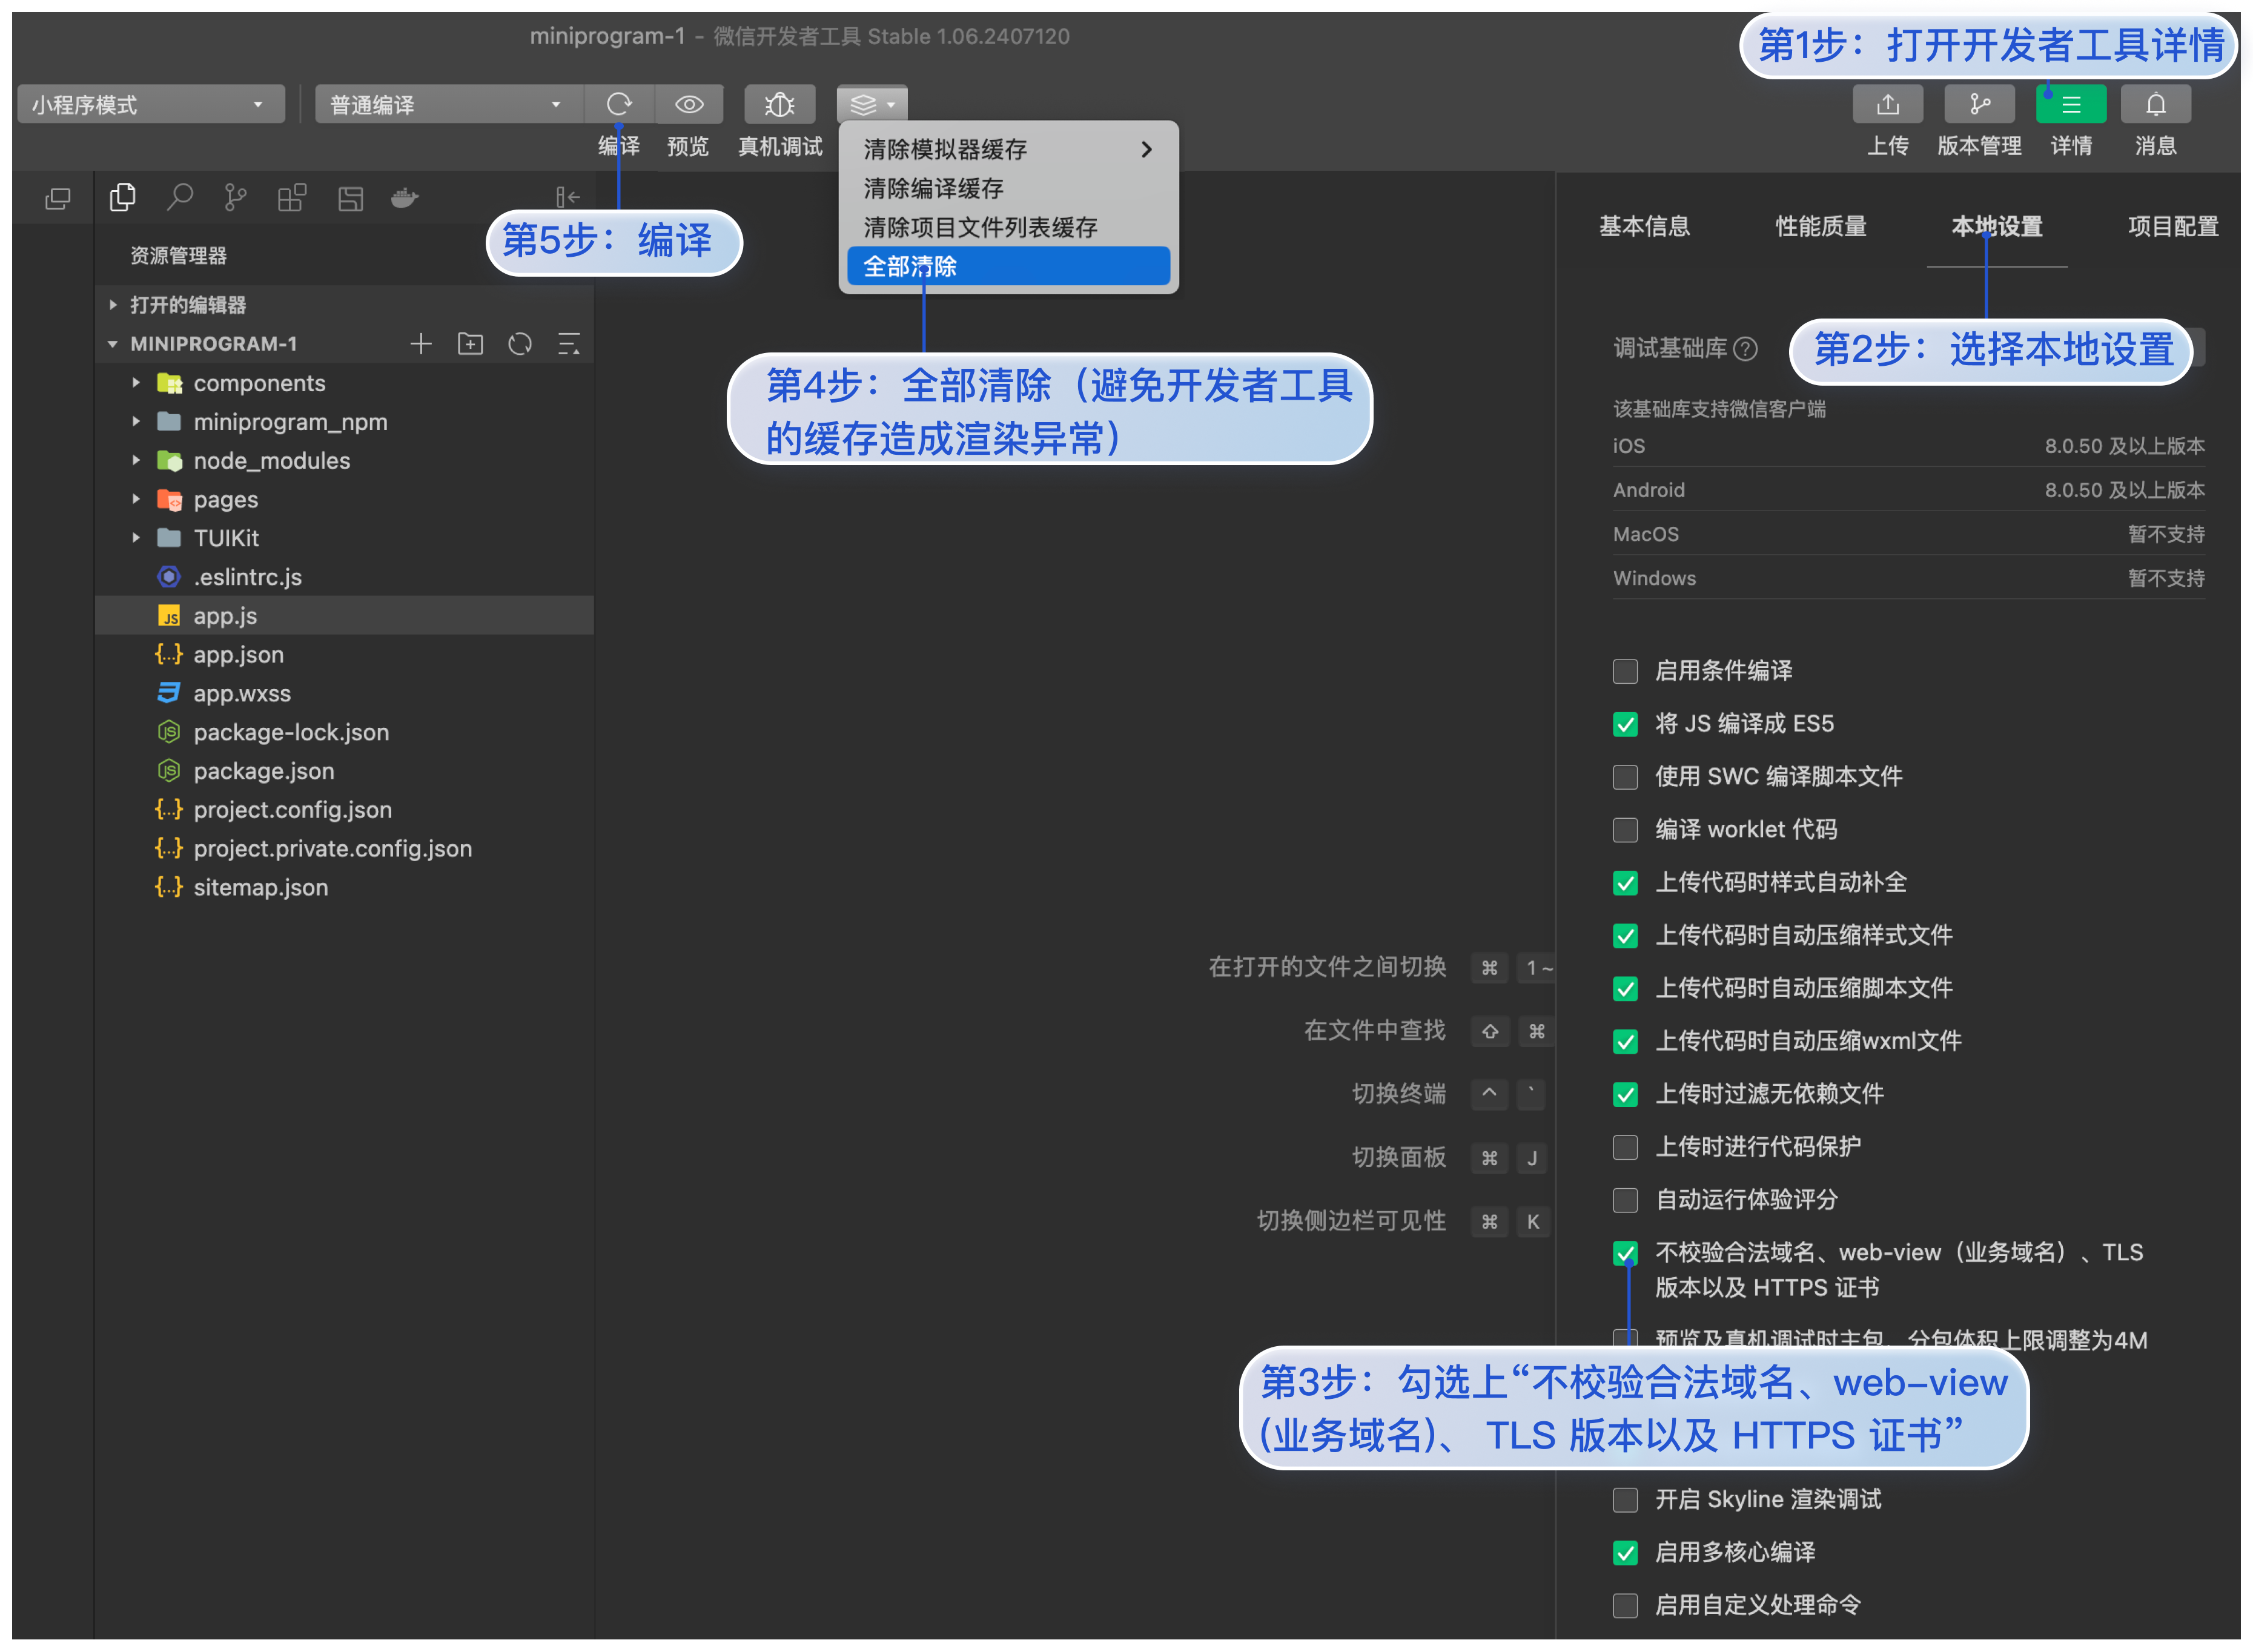
1. 本地设置里面勾选上“不校验合法域名、web-view (业务域名)、 TLS 版本以及 HTTPS 证书”。
2. 单击清缓存 > 全部清除。避免开发者工具的缓存造成渲染异常。
3. 单击编译。
具体实现如图所示:
步骤2:发送您的第一条消息
步骤3:小程序域名配置
注意:
请在微信公众平台 > 开发 > 开发管理 > 开发设置 > 服务器域名中进行域名配置:
将以下域名添加到 socket 合法域名:
域名 | 说明 | 是否必须 |
wss://wss.im.tencent.cn | Web IM 业务域名 | 必须 |
wss://wssv6.im.qcloud.com | Web IM 业务域名(v3.4.9 起支持) | 必须 |
wss://${SDKAppID}w4c.my-imcloud.com | v3.4.6起,SDK 支持独立域名,可更好地保障服务稳定性。 例如您的 SDKAppID 是 1400xxxxxx,则独立域名为: wss://1400xxxxxxw4c.my-imcloud.com | 必须 |
wss://wss.tim.qq.com | Web IM 业务域名 | 必须 |
wss://wss.im.qcloud.com | Web IM 业务域名 | 必须 |
将以下域名添加到 request 合法域名:
域名 | 说明 | 是否必须 |
https://web.sdk.qcloud.com | Web IM 业务域名 | 必须 |
https://boce-cdn.my-imcloud.com | Web IM 业务域名 | 必须 |
https://api.im.qcloud.com | Web IM 业务域名 | 必须 |
https://events.im.qcloud.com | Web IM 业务域名 | 必须 |
https://webim.tim.qq.com | Web IM 业务域名 | 必须 |
https://wss.im.qcloud.com | Web IM 业务域名 | 必须 |
https://wssv6.im.qcloud.com | Web IM 业务域名 | 必须 |
https://wss.tim.qq.com | Web IM 业务域名 | 必须 |
https://web.sdk.cloud.tencent.cn | Web IM 业务域名 | 必须 |
https://web.sdk.tencent.cn | Web IM 业务域名 | 必须 |
将以下域名添加到 uploadFile 合法域名:
域名 | 说明 | 是否必须 |
https://${SDKAppID}-cn.rich.my-imcloud.com | 从 2024年9月10日起,新增应用默认分配 COS 独立域名。 例如您的 SDKAppID 是 1400xxxxxx,则 COS 独立域名为: https://1400xxxxxx-cn.rich.my-imcloud.com | 必须 |
https://cn.rich.my-imcloud.com | 文件上传域名 | 必须 |
https://cn.imrich.qcloud.com | 文件上传域名 | 必须 |
https://cos.ap-shanghai.myqcloud.com | 文件上传域名 | 必须 |
https://cos.ap-shanghai.tencentcos.cn | 文件上传域名 | 必须 |
https://cos.ap-guangzhou.myqcloud.com | 文件上传域名 | 必须 |
将以下域名添加到 downloadFile 合法域名:
域名 | 说明 | 是否必须 |
https://${SDKAppID}-cn.rich.my-imcloud.com | 从 2024年9月10日起,新增应用默认分配 COS 独立域名。 例如您的 SDKAppID 是 1400xxxxxx,则 COS 独立域名为: https://1400xxxxxx-cn.rich.my-imcloud.com | 必须 |
https://cn.rich.my-imcloud.com | 文件下载域名 | 必须 |
https://cn.imrich.qcloud.com | 文件下载域名 | 必须 |
https://cos.ap-shanghai.myqcloud.com | 文件下载域名 | 必须 |
https://cos.ap-shanghai.tencentcos.cn | 文件下载域名 | 必须 |
https://cos.ap-guangzhou.myqcloud.com | 文件下载域名 | 必须 |
步骤4:集成音视频(可选)
步骤 4.1 开通小程序权限
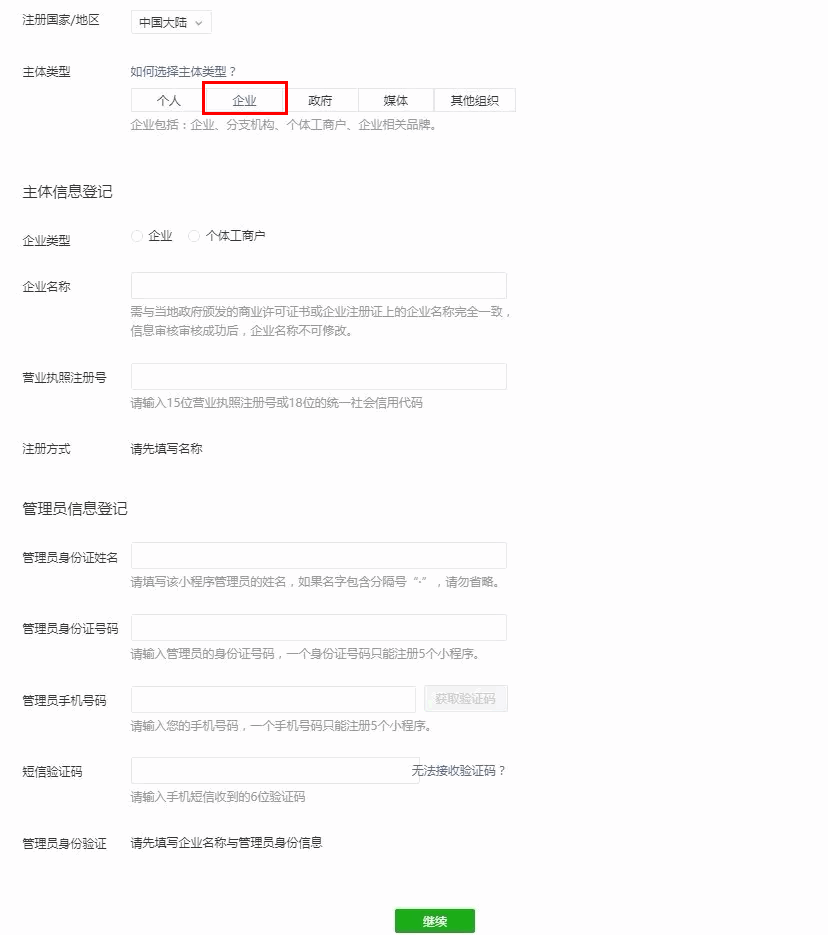
由于 TUICallKit 所使用的小程序标签有更苛刻的权限要求,因此集成 TUICallKit 的第一步就是要开通小程序的类目和标签使用权限,否则无法使用,这包括如下步骤:
小程序推拉流标签不支持个人小程序,只支持企业类小程序。需要在 注册 时填写主体类型为企业,如下图所示:
小程序推拉流标签使用权限暂时只开放给有限 类目。
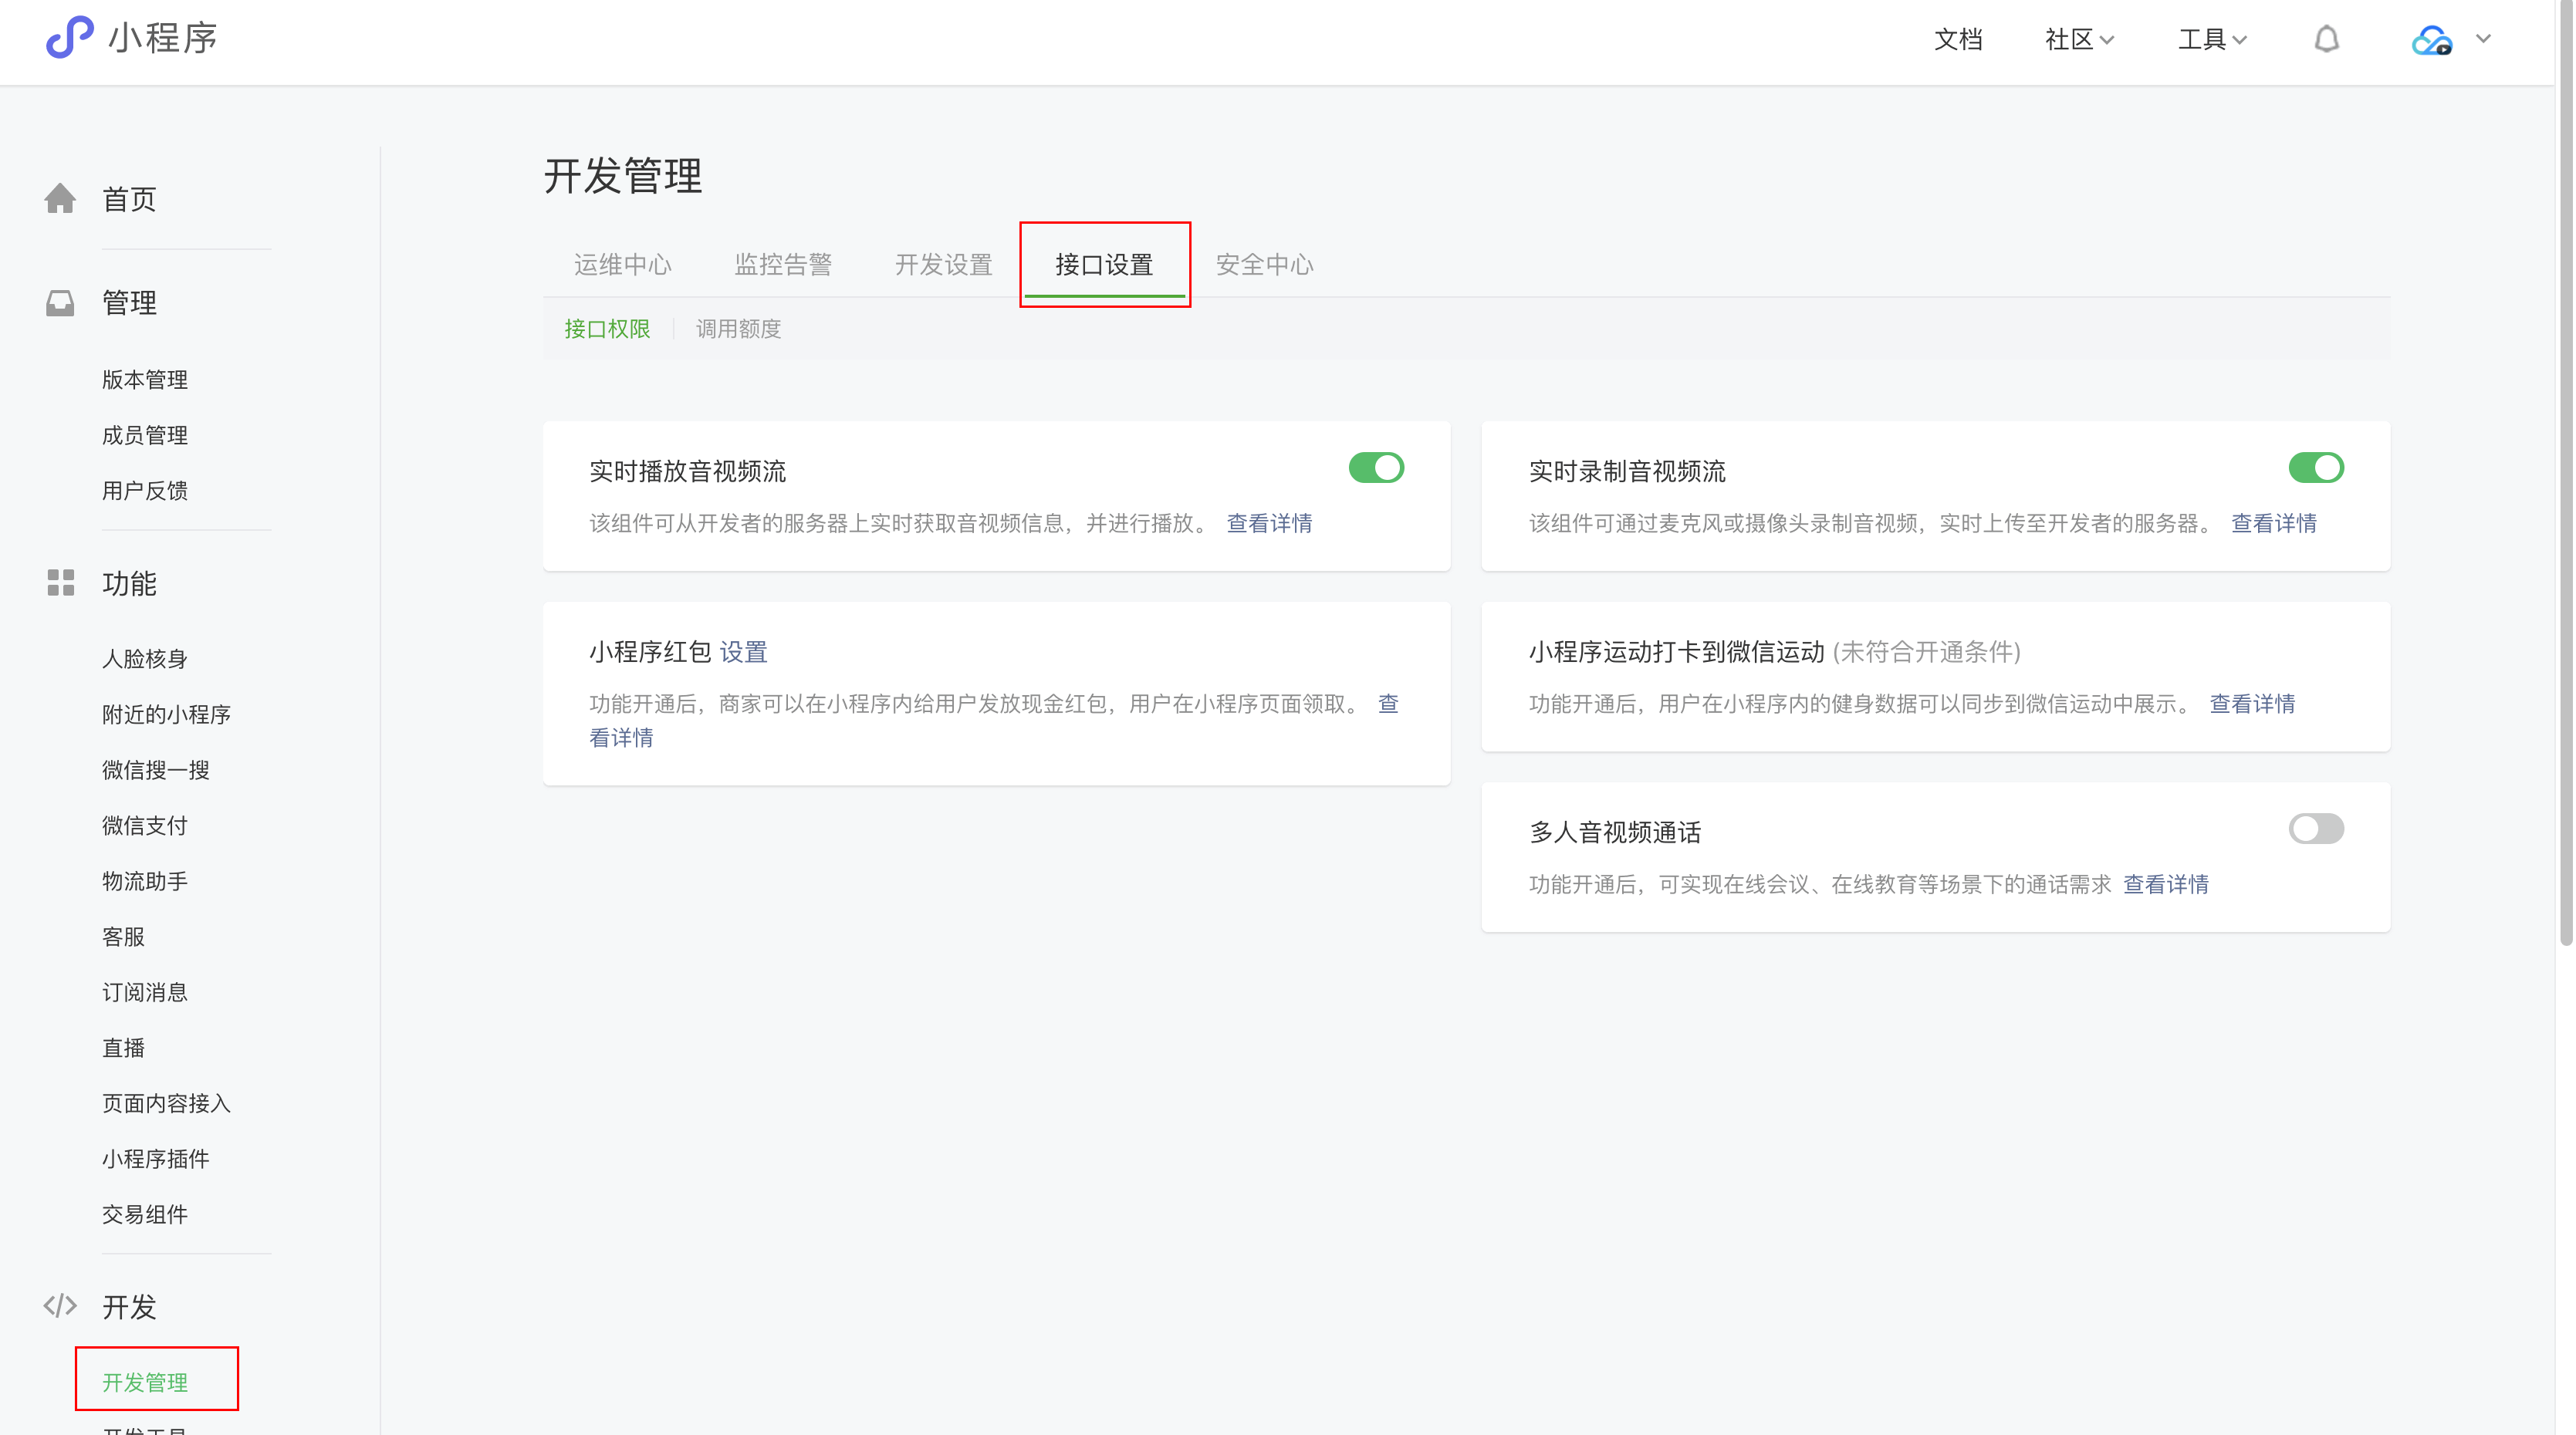
符合类目要求的小程序,需要在 微信公众平台 > 开发 > 开发管理 > 接口设置中自助开通该组件权限,如下图所示:
步骤 4.2 开通音视频通话能力
步骤 4.3 下载 TUICallKit 组件
通过 npm 方式下载 TUICallKit 组件,为了方便您后续的拓展,建议您将 TUICallKit 组件复制到自己项目的
TUIKit/components/TUICallKit 目录下:npm i @tencentcloud/call-uikit-wx
拷贝文件
xcopy node_modules\\@tencentcloud\\call-uikit-wx\\ .\\TUICallKit /i /excopy node_modules\\@tencentcloud\\call-engine-wx\\RTCCallEngine.wasm.br .\\static
mkdir -p ./TUICallKit && cp -r node_modules/@tencentcloud/call-uikit-wx/ ./TUICallKit && cp node_modules/@tencentcloud/call-engine-wx/RTCCallEngine.wasm.br ./static
注意:
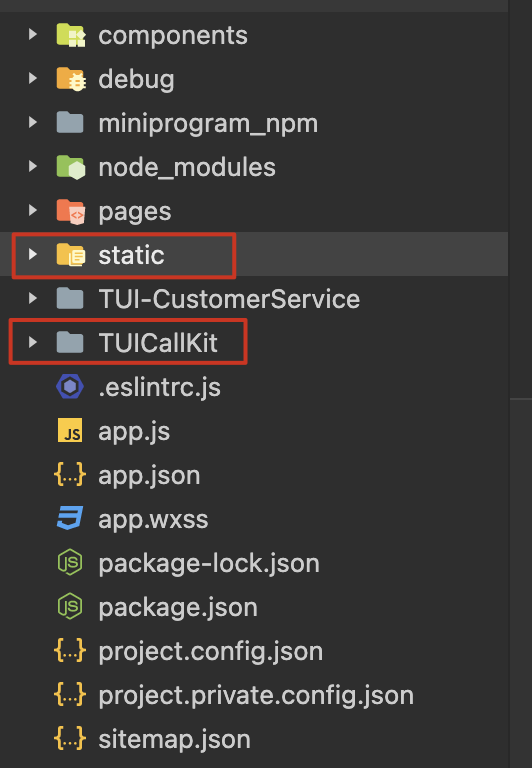
RTCCallEngine.wasm.br 需要放置到 static 目录下,如果脚本没有正常在项目根目录下创建 static 目录,可手动创建后再执行脚本。
成功后目录结构如图所示:
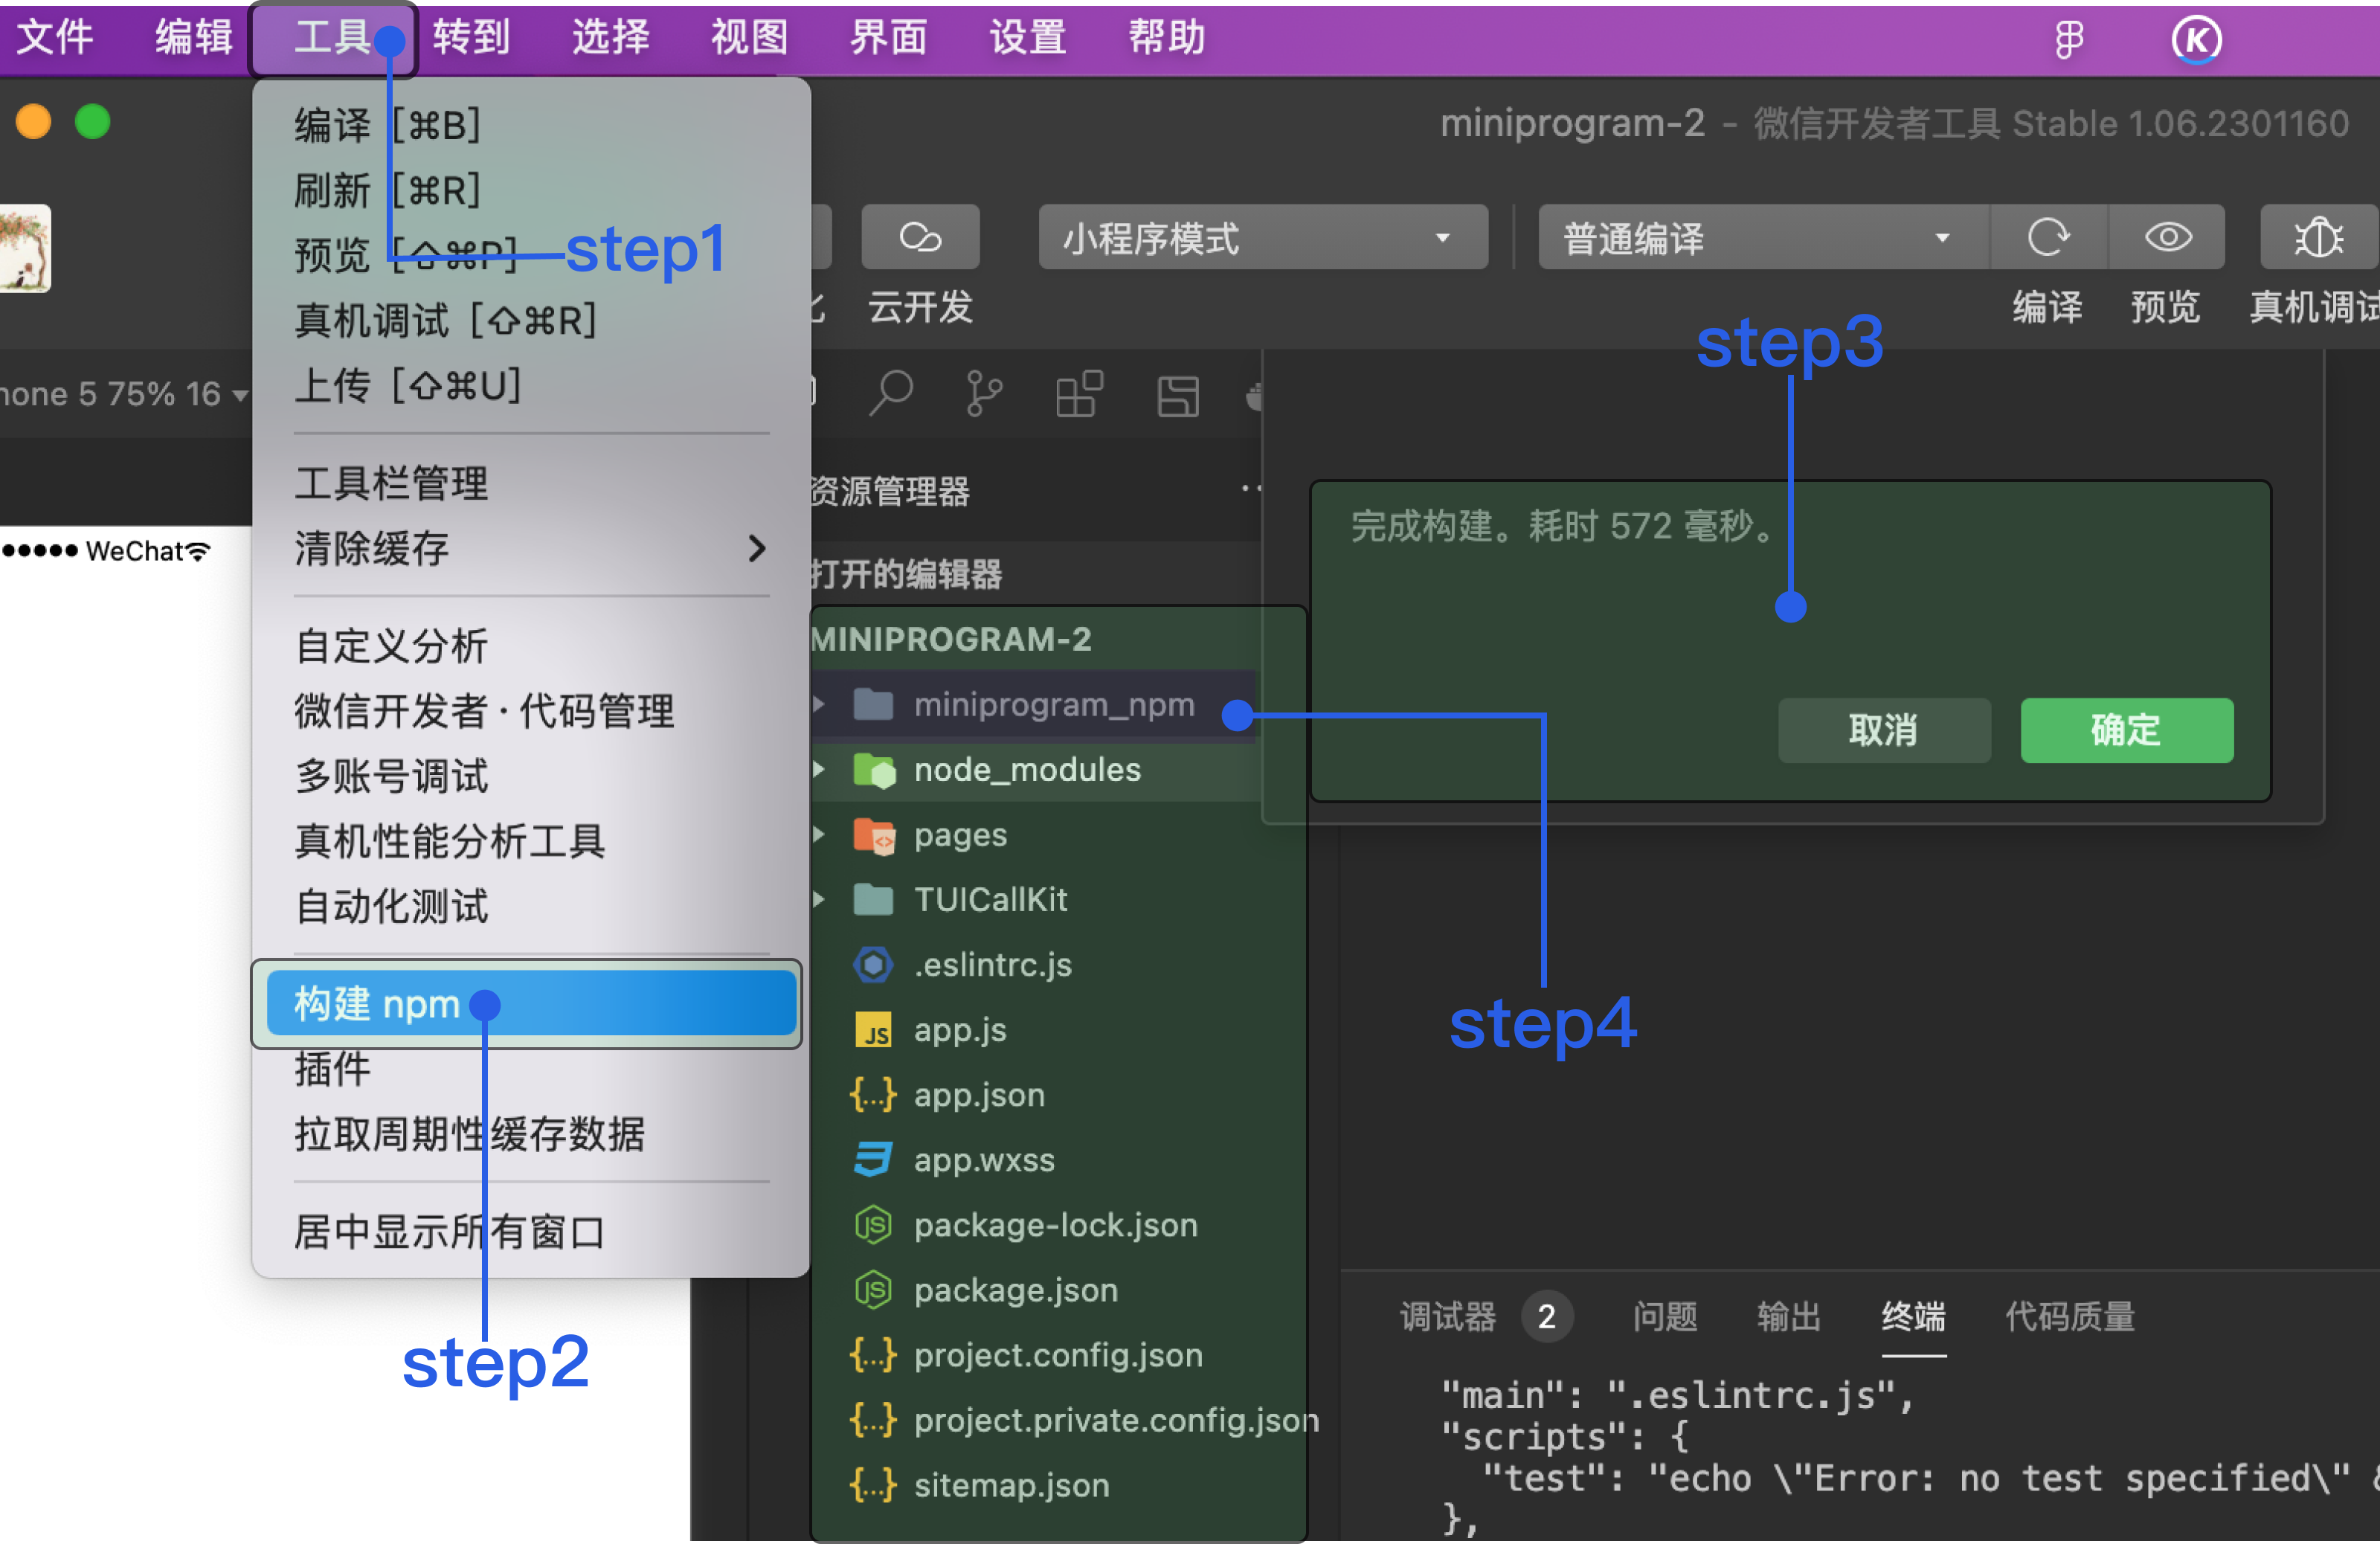
步骤 4.4 构建 npm
打开微信开发者工具单击 工具 > 构建 npm,新增 miniprogram_npm 目录。目录如下:
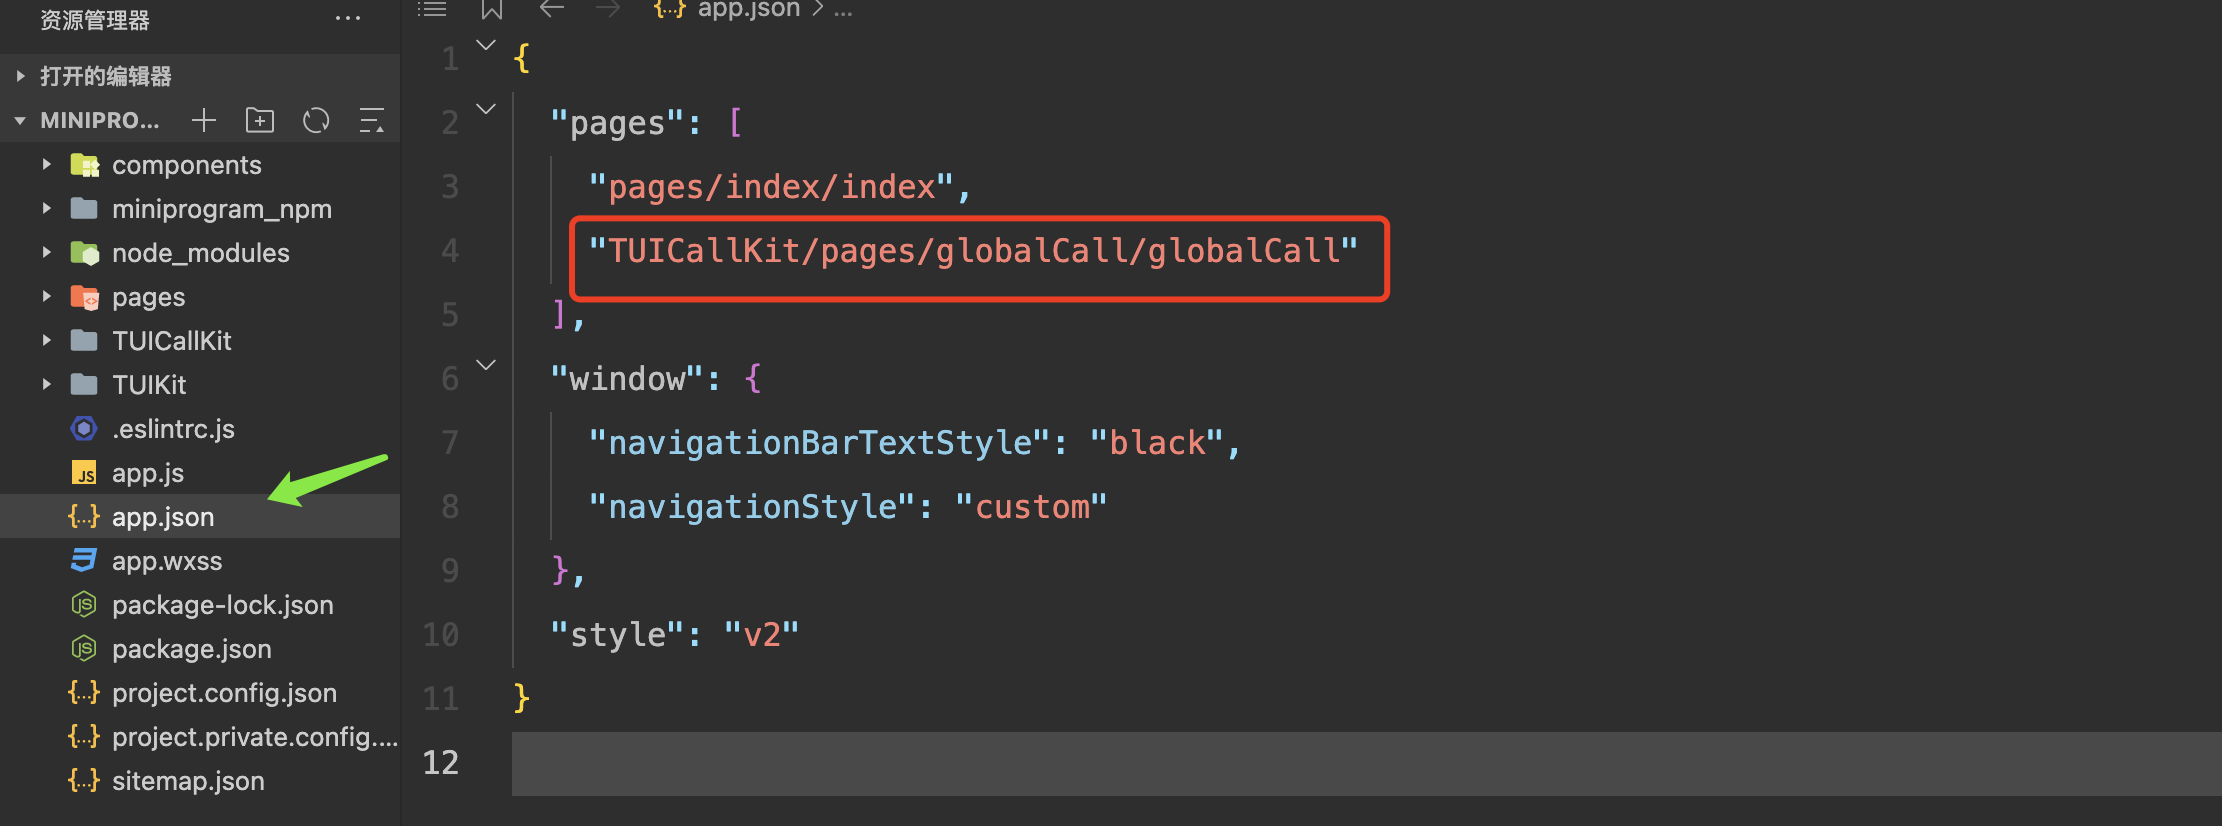
步骤 4.5 配置 app.json 文件
添加如下代码到 app.json 文件,新增全局监听页面。
"TUICallKit/pages/globalCall/globalCall"
注意:
微信开发者工具新的渲染引擎 skyline 和 live-pusher 存在兼容性问题,需要 app.json 中的 renderer 配置为 webview。
{"renderer": "webview",}
步骤 4.6 调用 TUICallKit 组件

1. 在集成 app.js 的页面中导入 CallManager 模块。
// 导入 CallManager 模块,使您的应用具有全局监听来电的能力import { CallManager } from './TUICallKit/TUICallService/serve/callManager';// 实例化wx.callManager = new CallManager();
2. 在 wx.$TUIKit.login 的成功回调里初始化 TUICallKit。注意以下代码中未填入 sdkAppID 和 userSig。
wx.callManager.init({sdkAppID: wx.$chat_SDKAppID,userID: wx.$chat_userID,userSig: userSig,globalCallPagePath: "TUICallKit/pages/globalCall/globalCall",tim: wx.$TUIKit});
步骤 4.7 进行您的第一次通话
常见问题
什么是 UserSig?
UserSig 是用户登录即时通信 IM 的密码,其本质是对 UserID 等信息加密后得到的密文。
如何生成 UserSig?
UserSig 签发方式是将 UserSig 的计算代码集成到您的服务端,并提供面向项目的接口,在需要 UserSig 时由您的项目向业务服务器发起请求获取动态 UserSig。更多详情请参见 服务端生成 UserSig。
注意:
本文示例代码采用的获取 UserSig 的方案是在客户端代码中配置 SECRETKEY,该方法中 SECRETKEY 很容易被反编译逆向破解,一旦您的密钥泄露,攻击者就可以盗用您的腾讯云流量,因此该方法仅适合本地跑通功能调试。 正确的 UserSig 签发方式请参见上文。
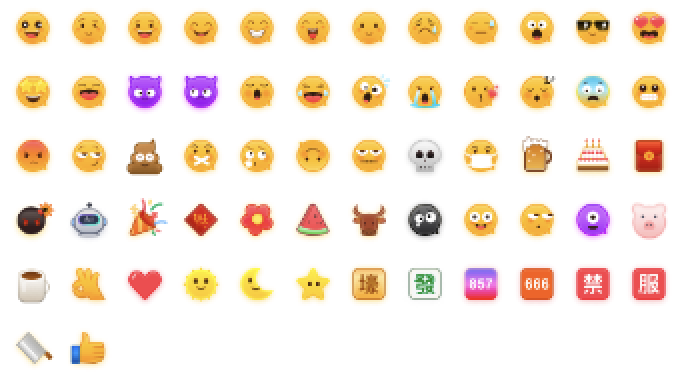
表情包的使用
为了尊重版权,IM Demo/TUIKit 工程中默认不包含大表情元素切图。在正式上线商用前,请您替换为自己设计或拥有版权的其他表情包。请注意,下图所示的默认小黄脸表情包版权属于腾讯云,您可以通过升级至 IM 企业版套餐 免费使用该表情包。