TUIKit 是基于 IM SDK 的一款 UI 组件库,可通过 UI 组件快速实现聊天、会话、搜索、关系链、群组等功能。本文介绍如何快速集成 TUIKit 并实现核心功能。
说明:
AI 助手使用说明
Vue2 & Vue3 版本 TUIKit
Vue2 & Vue3 版本 TUIKit 支持消息云端搜索、在线客服、表情回应功能!
在线体验消息云端搜索、在线客服、表情回应功能:Web & H5 Demo。
开通消息云端搜索插件: 插件市场 > 开通指引。
开通在线客服插件: 插件市场 > 开通指引。
使用表情回应功能:请参见 购买指引 购买旗舰版或企业版,并且升级 chat-uikit-vue 版本 ≥ 2.0.5,可以默认使用表情回应功能。
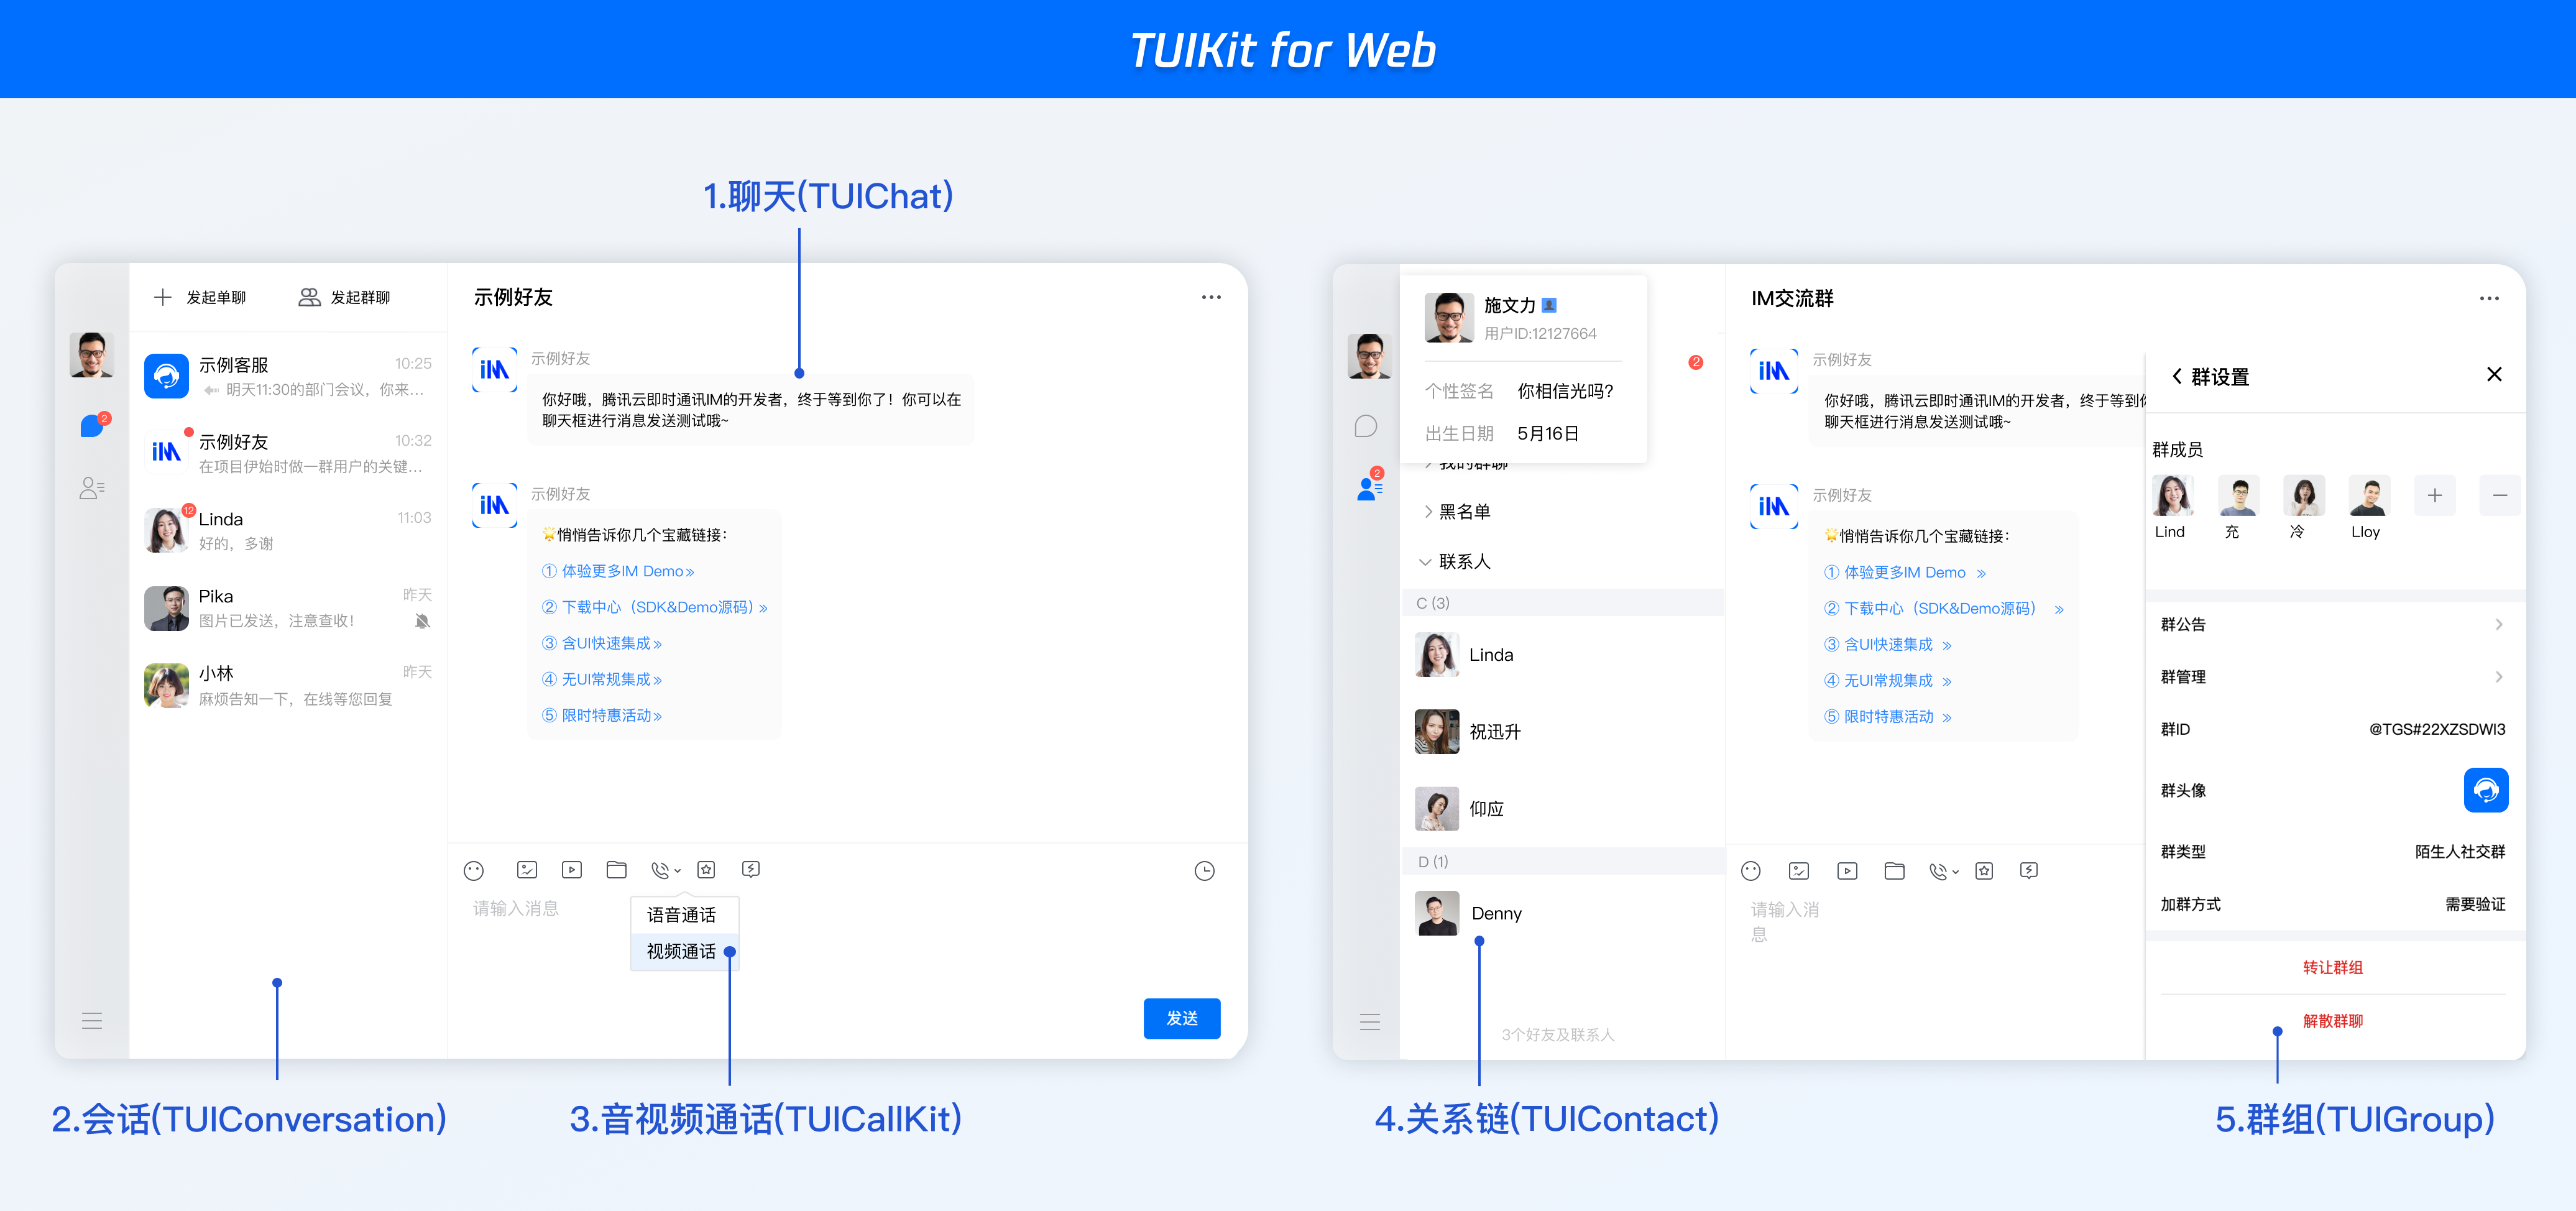
TUIKit Web 端界面效果如下图所示:
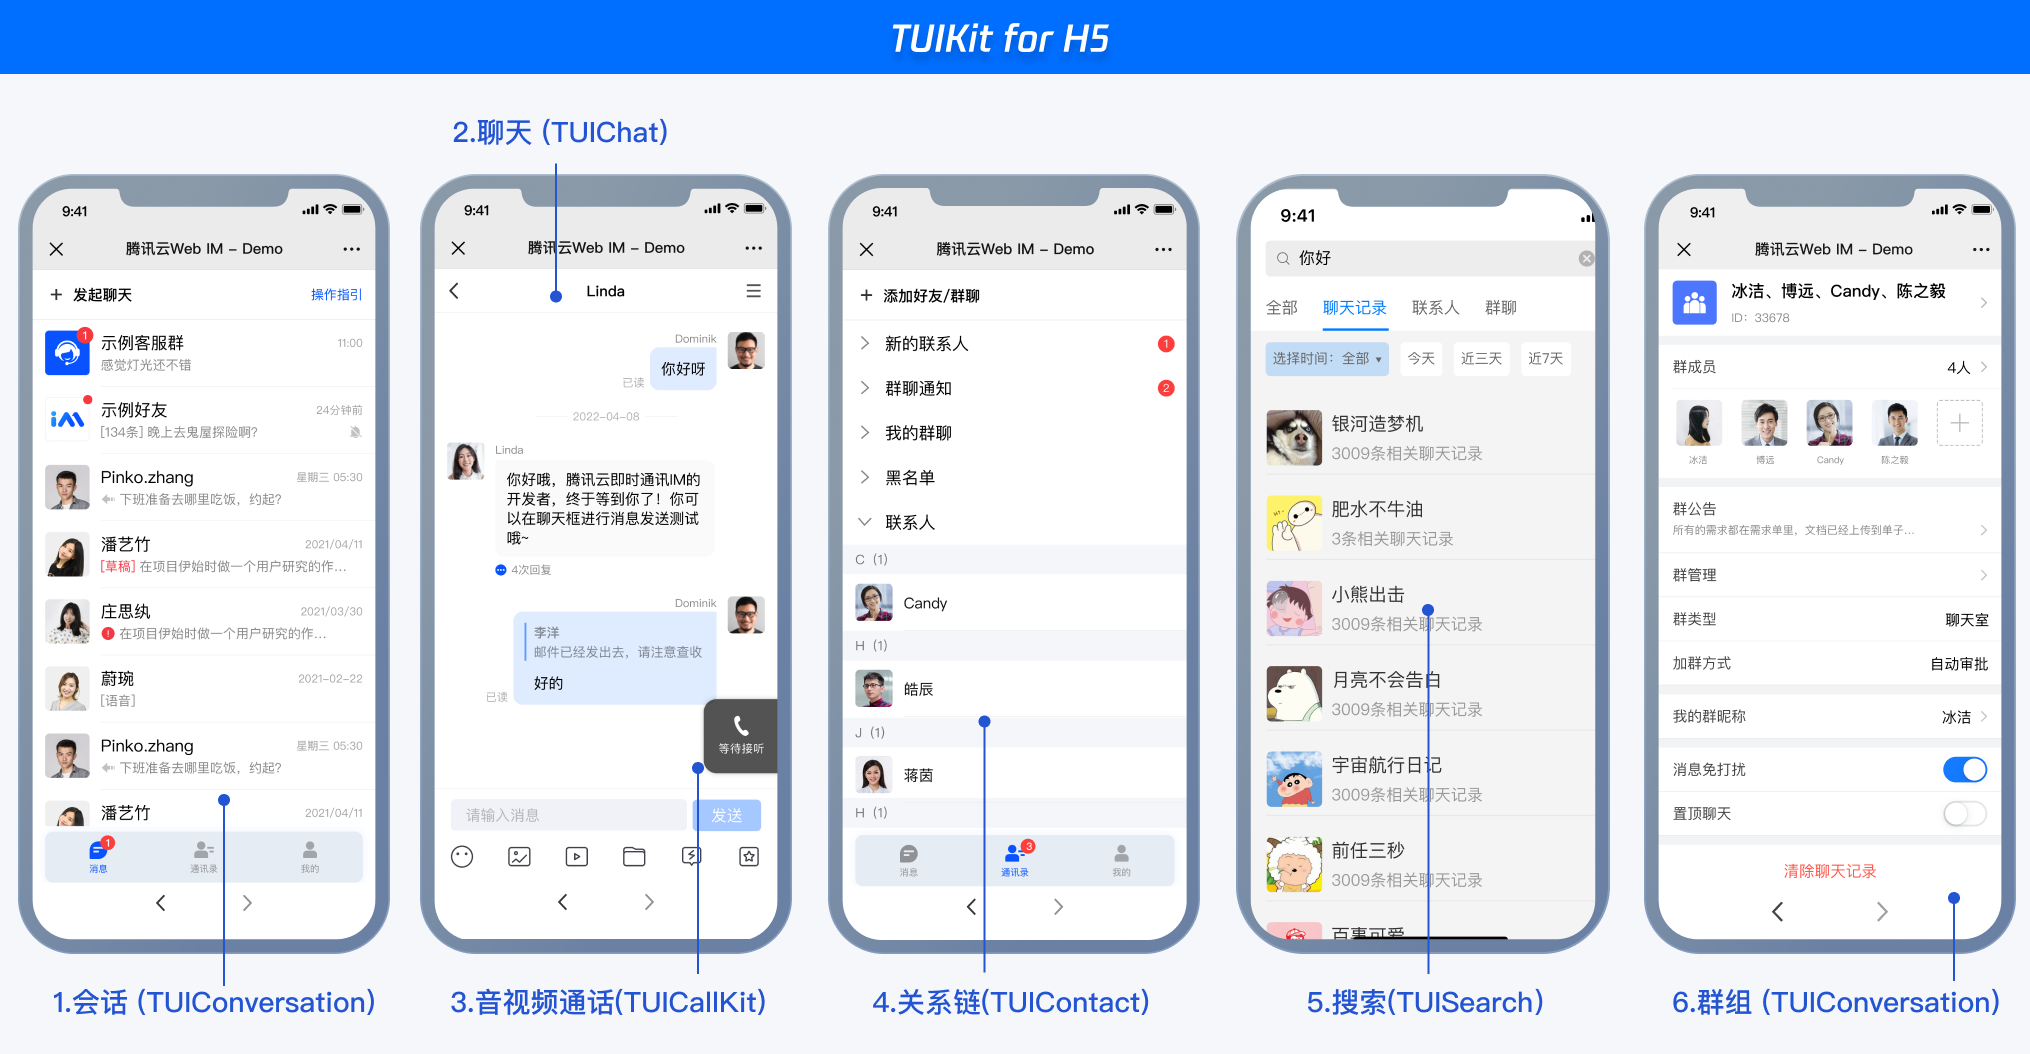
TUIKit H5 端界面效果如下图所示:
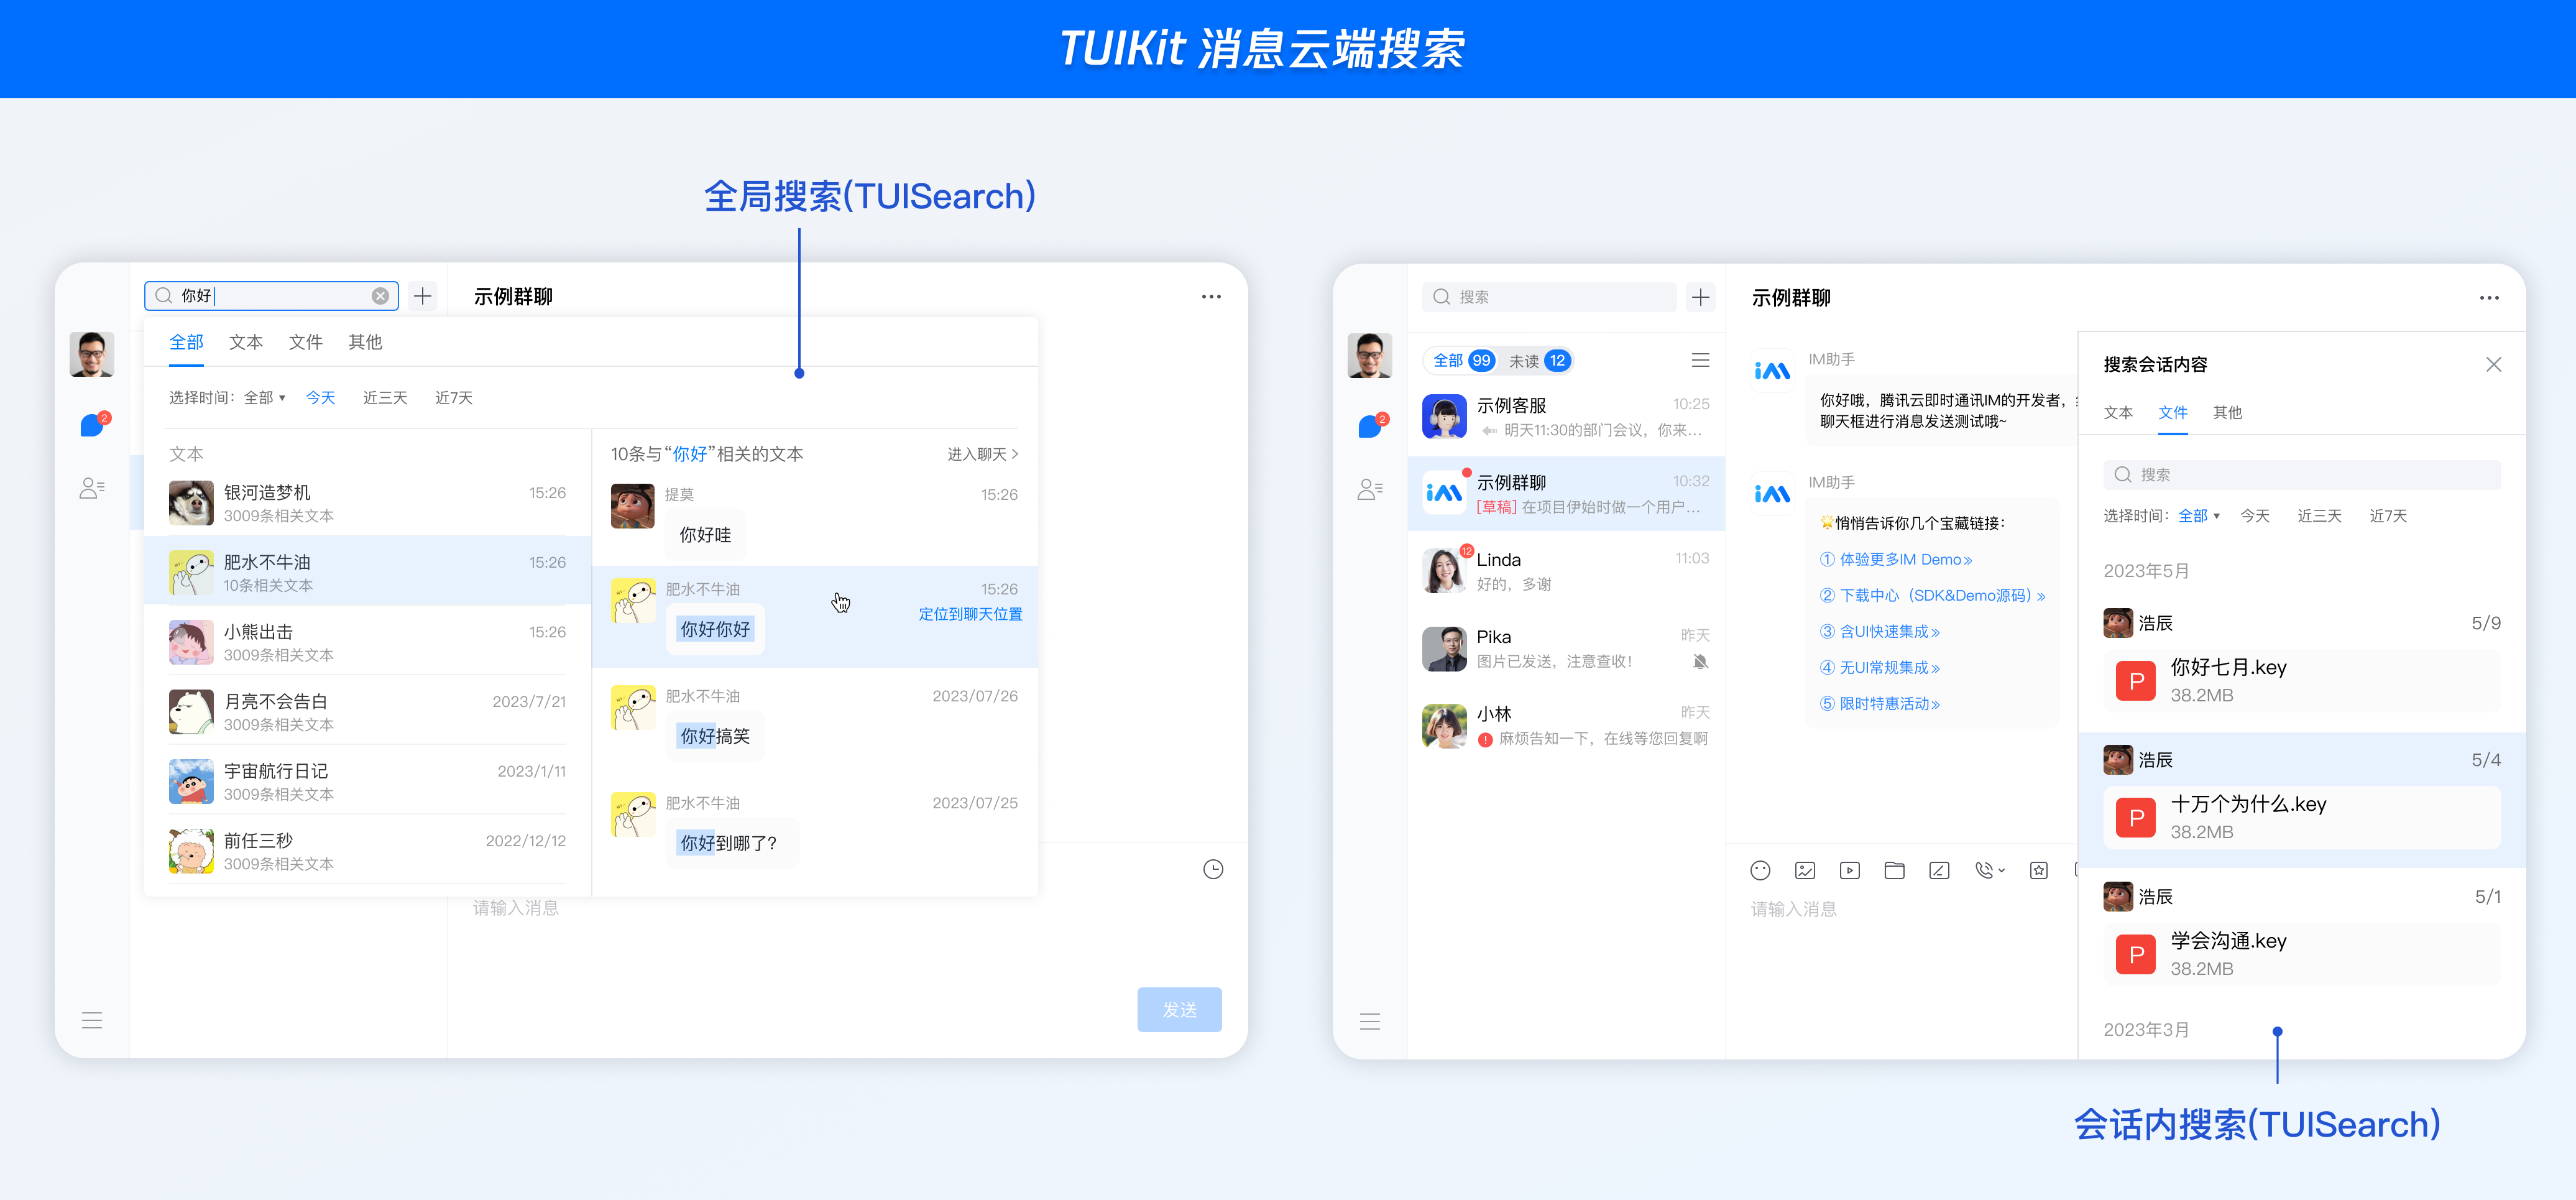
消息云端搜索功能界面效果如下图所示:
关键概念
TUIKit 主要分为 TUIChat、TUIConversation、TUIGroup、TUIContact、TUISearch 几个 UI 子组件,每个 UI 组件负责展示不同的内容。
1. TUIChat 提供会话页面,包括消息列表、聊天头部、输入框等。
2. TUIConversation 提供会话列表页面,包括会话列表、创建群聊、单聊等。
3. TUIGroup 提供群聊管理页面,包括群聊管理、群成员管理等。
4. TUIContact 提供联系人页面,包括联系人列表、好友申请等。
5. TUISearch 提供云端搜索页面。
前提条件
Vue ( 全面支持 Vue2 & Vue3 , 请您在下方接入时选择您所匹配的 Vue 版本接入指引进行接入)
TypeScript (如您是 js 项目, 请跳转至 常见问题- js 工程如何接入 TUIKit 组件 进行配置 ts 渐进式支持)
sass(sass 版本 ≤ 1.77.4,sass-loader 版本 ≤ 10.1.1)
node(node.js ≥ 18.0.0)
npm(版本请与 node 版本匹配)
接入步骤
步骤 1. 创建项目
TUIKit 支持使用 vite 或 vue-cli 创建项目工程,配置 Vue3 / Vue2 + TypeScript + sass。以下是几种项目工程搭建示例:
使用 vite 方式创建项目,按照下图选项配置 Vue + TypeScript 。
npm create vite@5

之后切换到项目目录,安装项目依赖:
cd chat-examplenpm install
安装 TUIKit 所需 sass 环境依赖:
npm i -D sass@1.77.0 sass-loader@10.1.1
在根目录文件
tsconfig.app.json 下增加以下编译规则:{..."compilerOptions": {..."verbatimModuleSyntax": false,}}
{..."compilerOptions": {..."importsNotUsedAsValues": "preserve",}}
说明:
如果您的
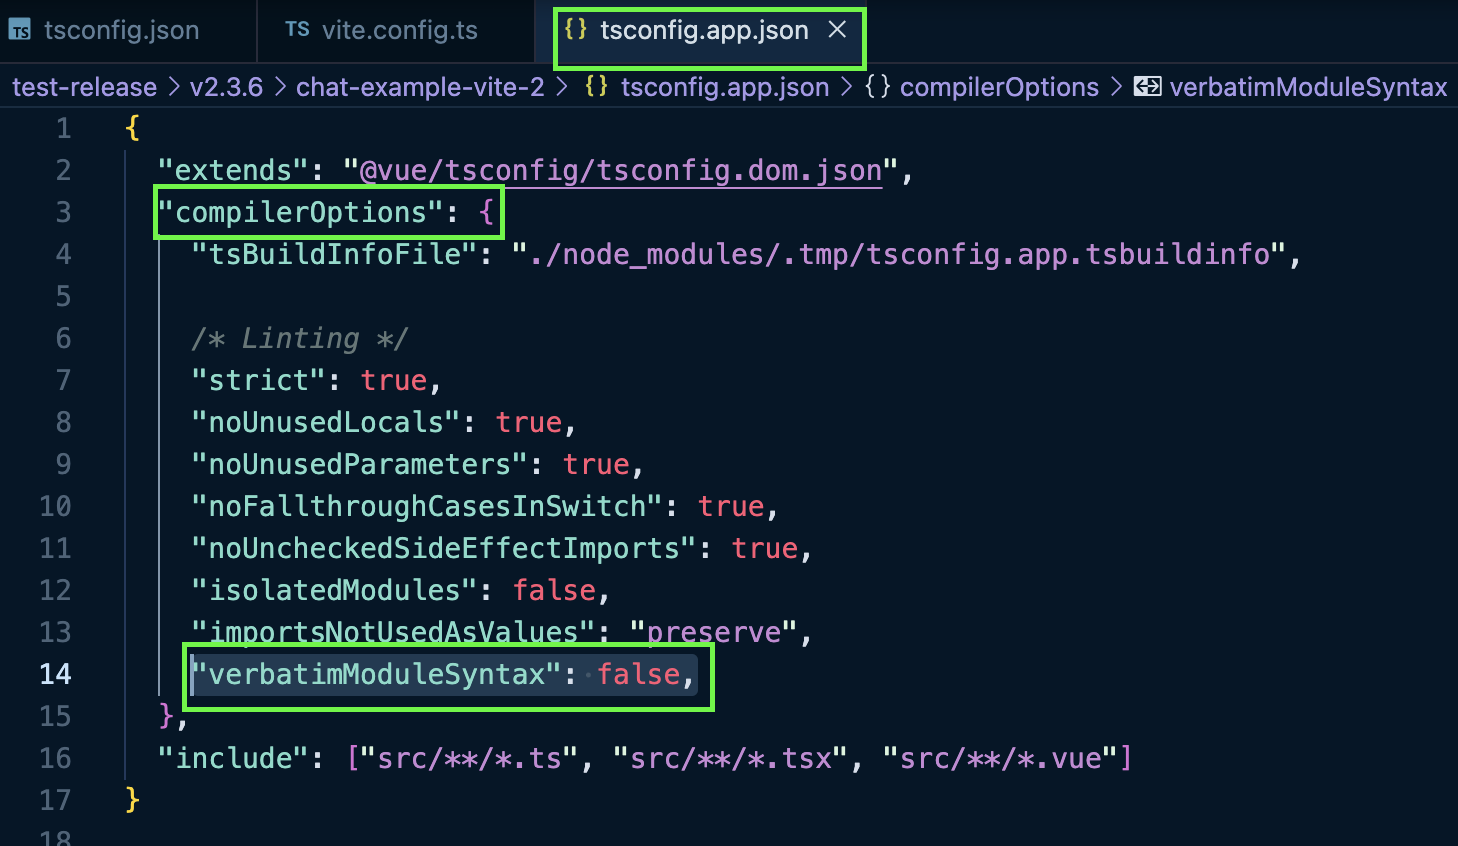
tsconfig.json 已有 references 配置,例如 vite 官方自动配置的 "./tsconfig.app.json","./tsconfig.node.json" 等,由于 references 的特性,导致 tsconfig.json 本身只是规则的引用文件,此时直接在 tsconfig.json 中配置以下规则无效。需要将规则添加至实际的 references 对应的文件中。以下是具体示例:错误写法 | 正确写法 |
当 tsconfig.json 文件中已有 references 相关配置时,直接在 tsconfig.json 中声明以下规则无效 | 当 tsconfig.json 文件中已有 references 相关配置时,需要在对应的 references 内部文件中声明以下规则。下文中是在 references 中配置的根目录 tsconfig.app.json 文件中配置以下规则。 |
 |  |
注意:
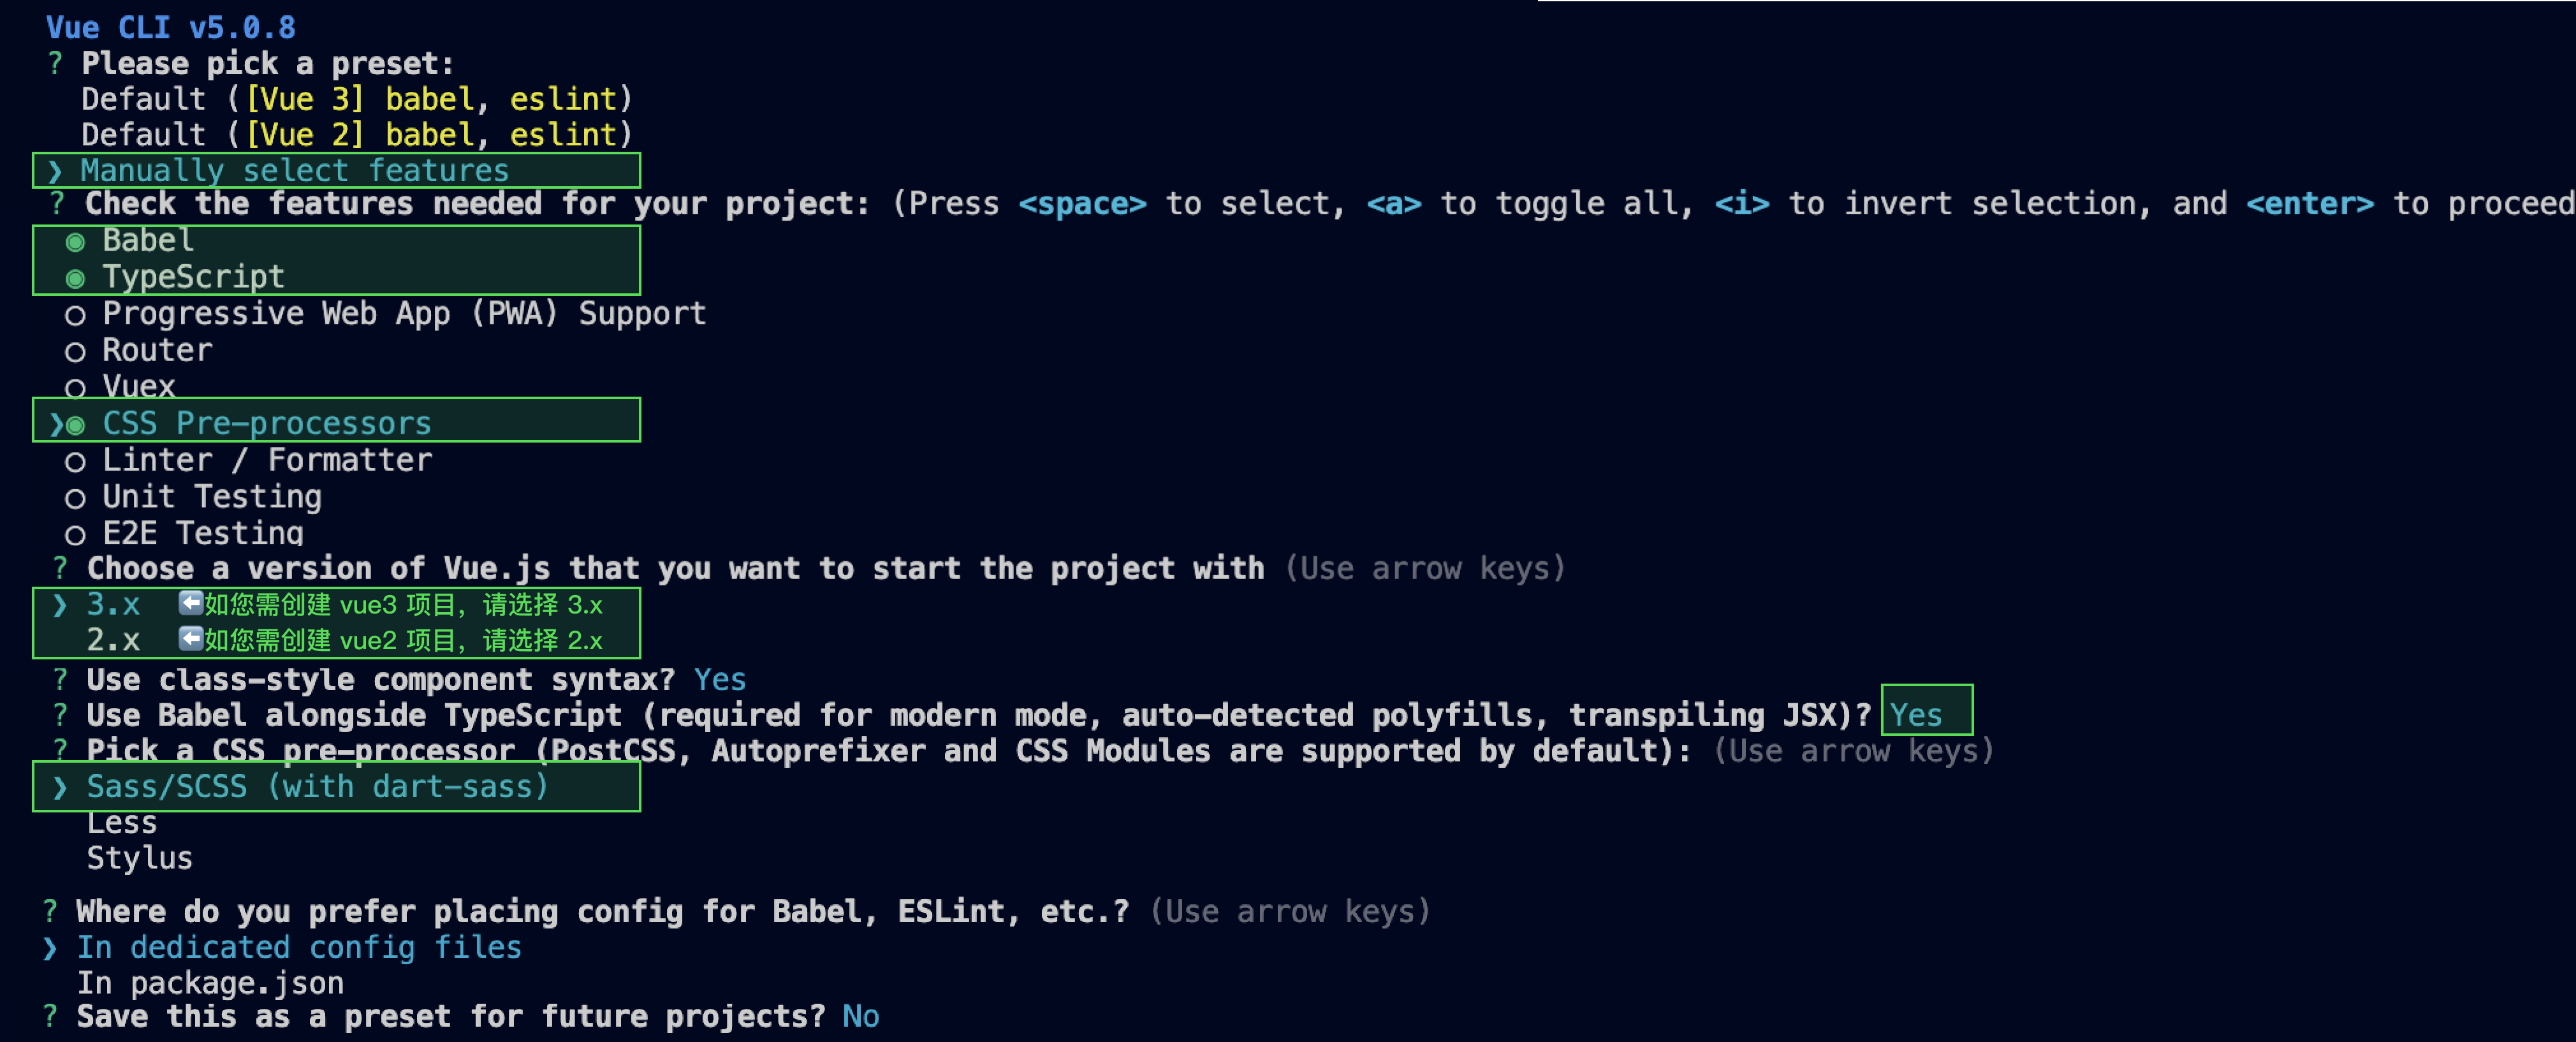
请您务必保证您的 @vue/cli 版本在 5.0.0 以上,您可使用以下示例代码升级您的 @vue/cli 版本至 v5.0.8。
使用 vue-cli 方式创建项目, 配置 Vue2 / Vue3 + TypeScript + sass。
如果您尚未安装 vue-cli 或者 vue-cli 版本低于 5.0.0 ,可以在 terminal 或 cmd 中采用如下方式进行安装:
npm install -g @vue/cli@5.0.8 sass@1.77.0 sass-loader@10.1.1
通过 vue-cli 创建项目,并选择下图中所选配置项。
vue create chat-example
请务必保证按照如下配置选择:
创建完成后,切换到项目所在目录:
cd chat-example
如果您是 vue2 项目,请根据您所使用的 Vue 版本进行以下相应的环境配置, vue3 项目请忽略。
npm i vue@2.7.9 vue-template-compiler@2.7.9
npm i @vue/composition-api unplugin-vue2-script-setup vue@2.6.14 vue-template-compiler@2.6.14
步骤 2. 下载 TUIKit 组件
npm i @tencentcloud/chat-uikit-vue@3
mkdir -p ./src/TUIKit && rsync -av --exclude={'node_modules','package.json','excluded-list.txt'} ./node_modules/@tencentcloud/chat-uikit-vue/ ./src/TUIKit
npm i @tencentcloud/chat-uikit-vue@3
xcopy .\\node_modules\\@tencentcloud\\chat-uikit-vue .\\src\\TUIKit /i /e /exclude:.\\node_modules\\@tencentcloud\\chat-uikit-vue\\excluded-list.txt
步骤3:引入 TUIKit 组件
在需要展示的页面,引入 TUIKit 的组件即可使用。
例如:在 App.vue 页面中实现以下代码,即可快速搭建聊天界面(以下示例代码同时支持 Web 端与 H5 端):
注意:
以下示例代码使用了 setup 语法,如果您的项目没有使用 setup 语法,请按照 Vue3/Vue2 的标准方式注册组件。
<template><div id="app"><TUIKit :SDKAppID="0" userID="xxx" userSig="xxx" /><TUICallKit class="callkit-container" :allowedMinimized="true" :allowedFullScreen="false" /></div></template><script lang="ts" setup>import { TUIKit } from './TUIKit';import { TUICallKit } from '@trtc/calls-uikit-vue';</script><style lang="scss"></style>
注释默认工程中的无效样式,您可以视情况删除无用的内容。
#app {/* max-width: 1280px; */margin: 0 auto;/* padding: 2rem; */text-align: center;}
<template><div id="app"><TUIKit :SDKAppID="0" userID="xxx" userSig="xxx" /><TUICallKit class="callkit-container" :allowedMinimized="true" :allowedFullScreen="false" /></div></template><script lang="ts" setup>import { TUIKit } from './TUIKit';import { TUICallKit } from '@trtc/calls-uikit-vue2';</script><style lang="scss"></style>
<template><div id="app"><TUIKit :SDKAppID="0" userID="xxx" userSig="xxx" /><TUICallKit class="callkit-container" :allowedMinimized="true" :allowedFullScreen="false" /></div></template><script lang="ts" setup>import { TUIKit } from './TUIKit';import { TUICallKit } from '@trtc/calls-uikit-vue2.6';</script><style lang="scss"></style>
1. 安装支持 composition-api 以及 script setup 的相关依赖,以及 vue2.6 相关依赖。
npm i @vue/composition-api unplugin-vue2-script-setup vue@2.6.14 vue-template-compiler@2.6.14
2. 在
main.ts/main.js 中引入 VueCompositionAPI。import VueCompositionAPI from "@vue/composition-api";Vue.use(VueCompositionAPI);
3. 在
vue.config.js 中增加,若没有该文件请新建。const ScriptSetup = require("unplugin-vue2-script-setup/webpack").default;module.exports = {parallel: false, // disable thread-loader, which is not compactible with this pluginconfigureWebpack: {plugins: [ScriptSetup({/* options */}),],},chainWebpack(config) {// disable type check and let `vue-tsc` handles itconfig.plugins.delete("fork-ts-checker");},};
4. 在
src/TUIKit/adapter-vue.ts 文件最后, 替换导出源:// 初始写法export * from "vue";// 替换为export * from "@vue/composition-api";
步骤 4. 获取 SDKAppID 、userID 、 userSig
设置
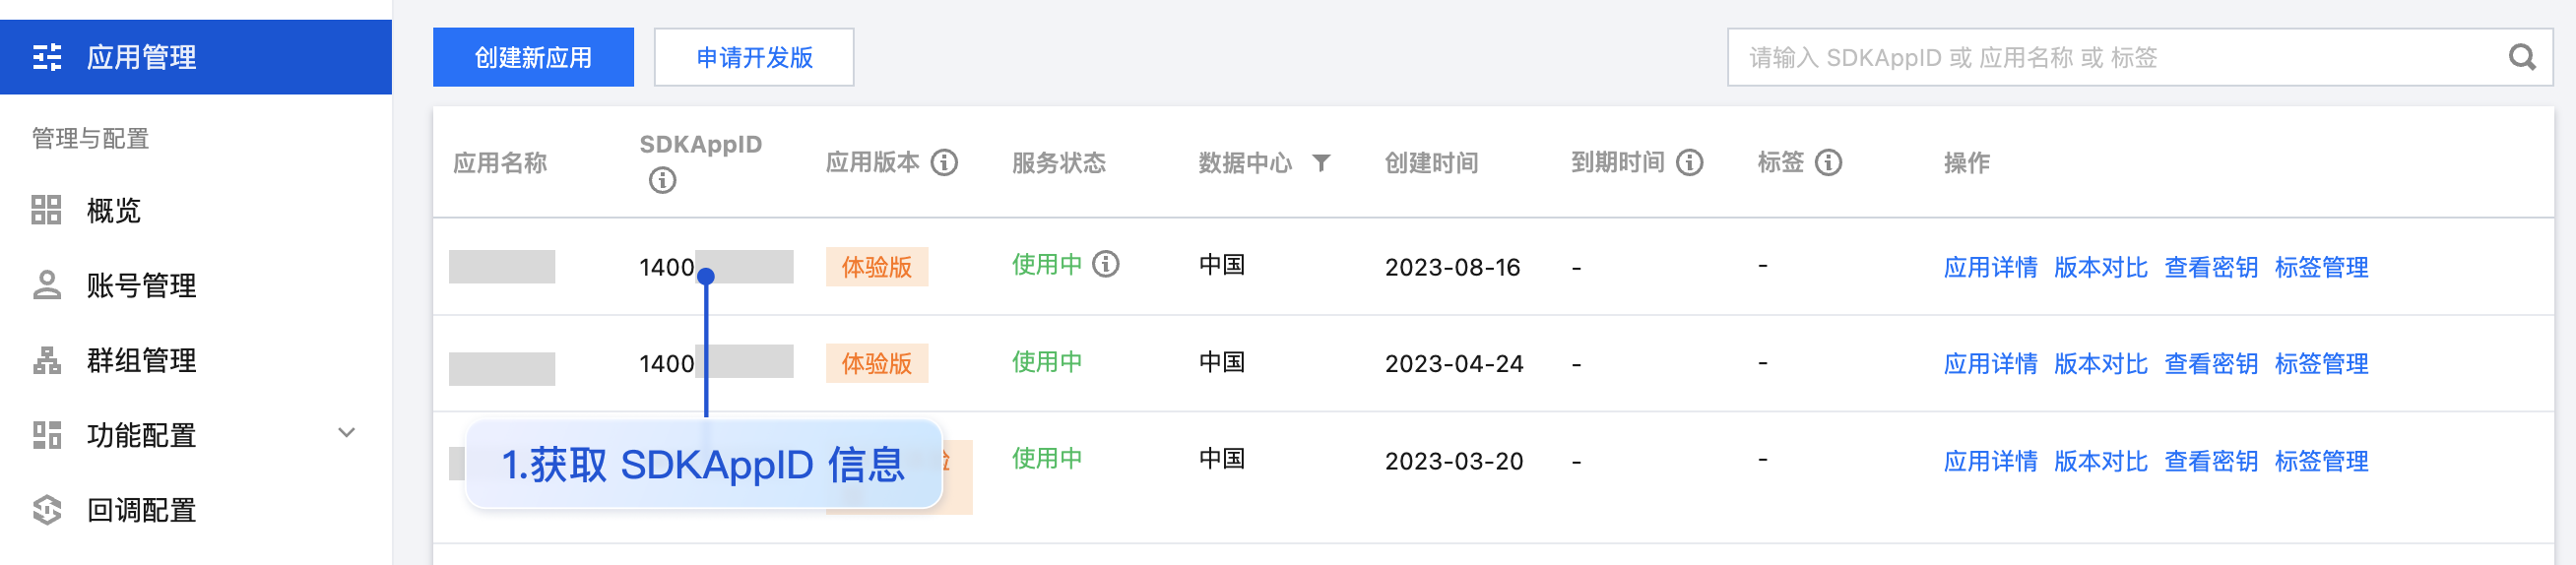
App.vue 中 TUIKit 组件的 props 属性 SDKAppID、userID、userSig 。SDKAppID 信息,可通过 即时通信 IM 控制台 获取:
userID 信息,可通过单击 即时通信 IM 控制台 -【账号管理】,切换至目标应用所在账号,即可创建账号并获取 userID。

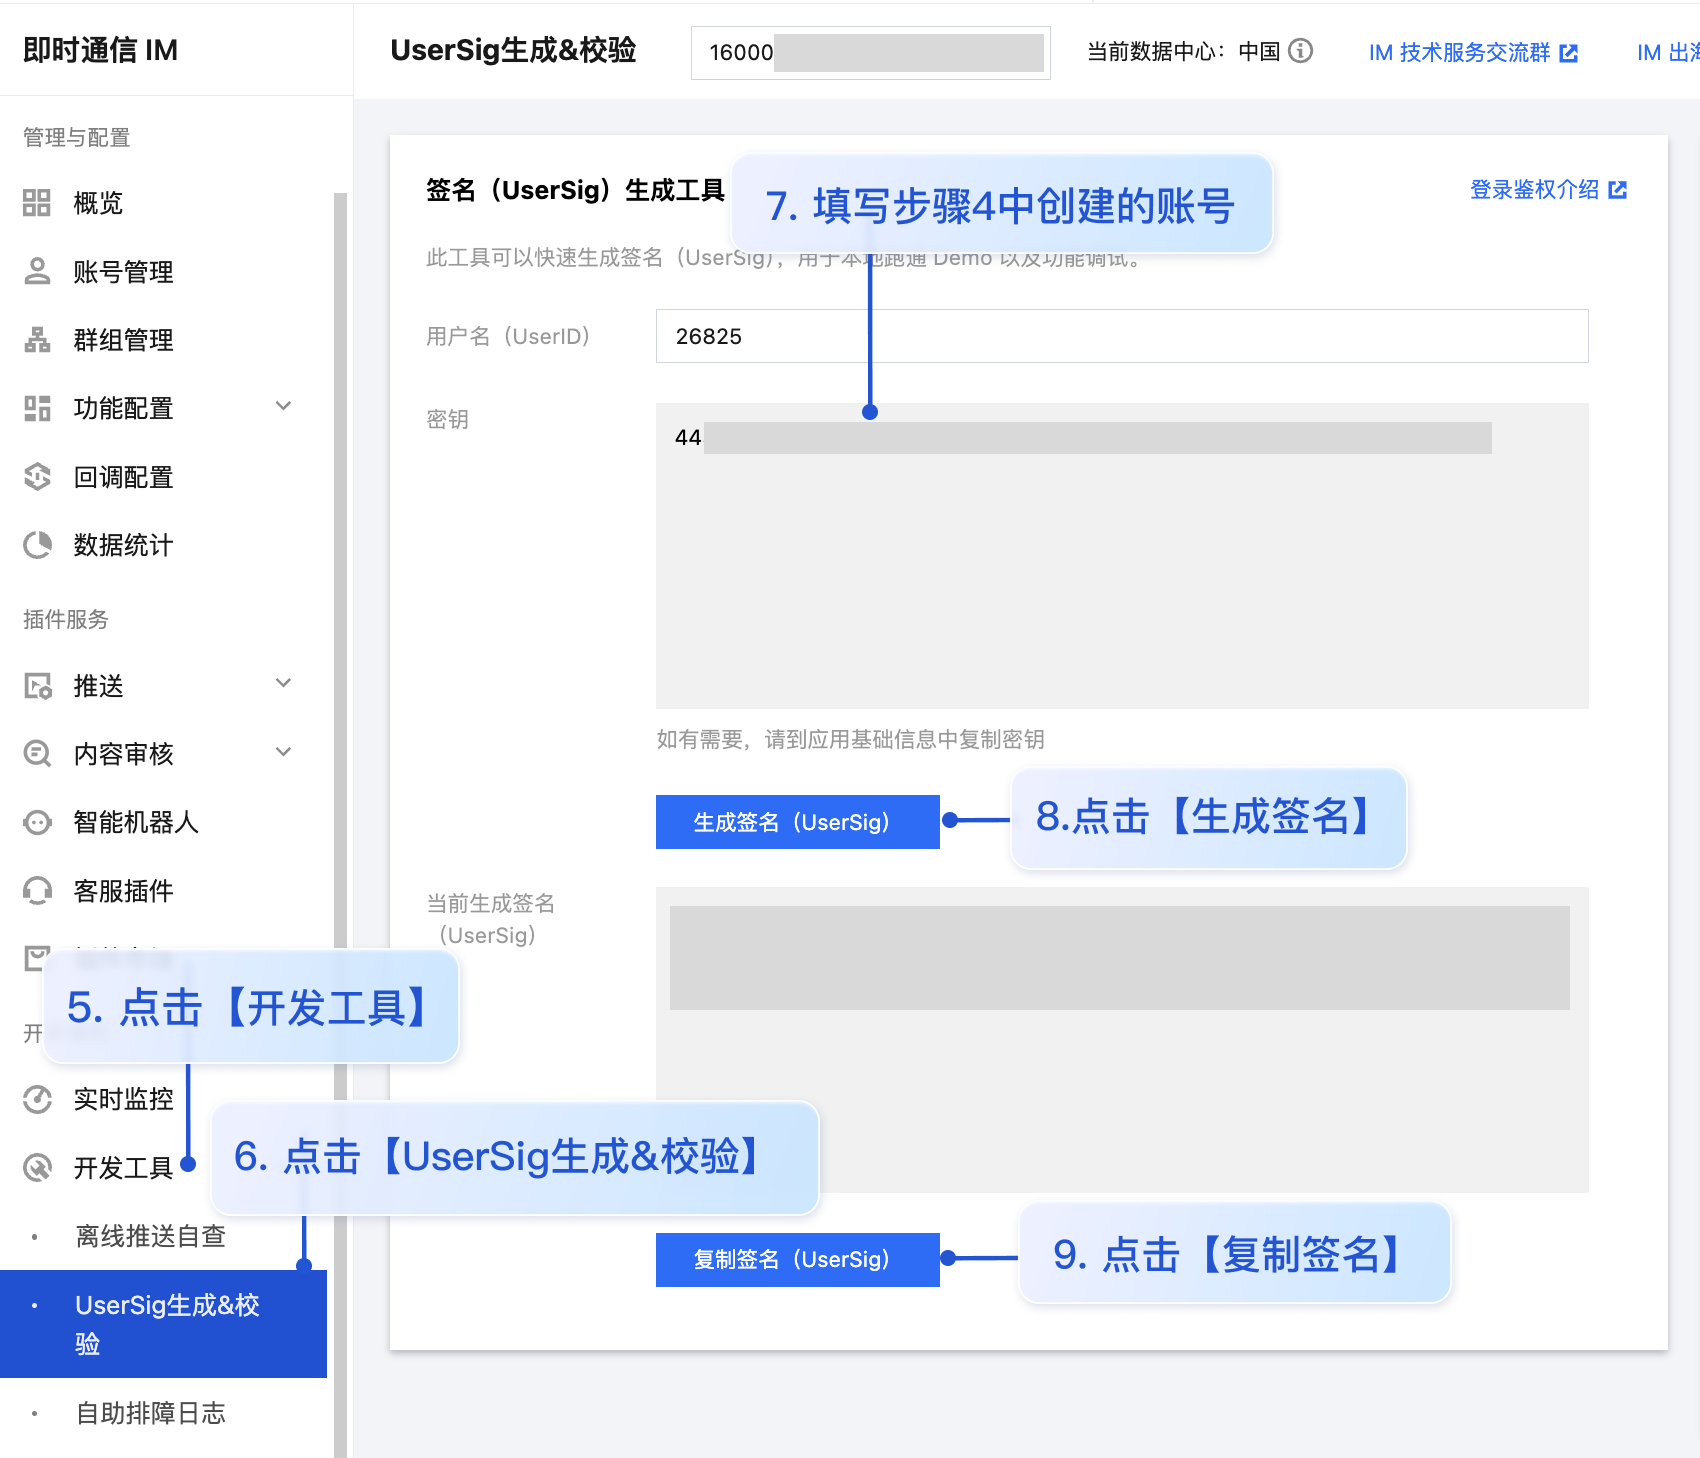
userSig 信息,可单击 即时通信 IM 控制台 > 开发工具 > UserSig 生成&校验,填写创建的 userID,即可生成 userSig。
步骤 5. 启动项目
执行以下命令启动项目:
npm run dev
说明:
由于 vue-cli 默认开启 webpack 全局 overlay 报错信息提示,为了您有更好的体验,建议您在 vue.config.js 或其他您工程中的 webpack 配置文件中关闭全局 overlay 报错提示。
module.exports = defineConfig({...// 新增关闭 overlay 配置代码devServer: {client: {overlay: false,},},});
module.exports = {...// 新增关闭 overlay 配置代码devServer: {overlay: false,},};
npm run serve
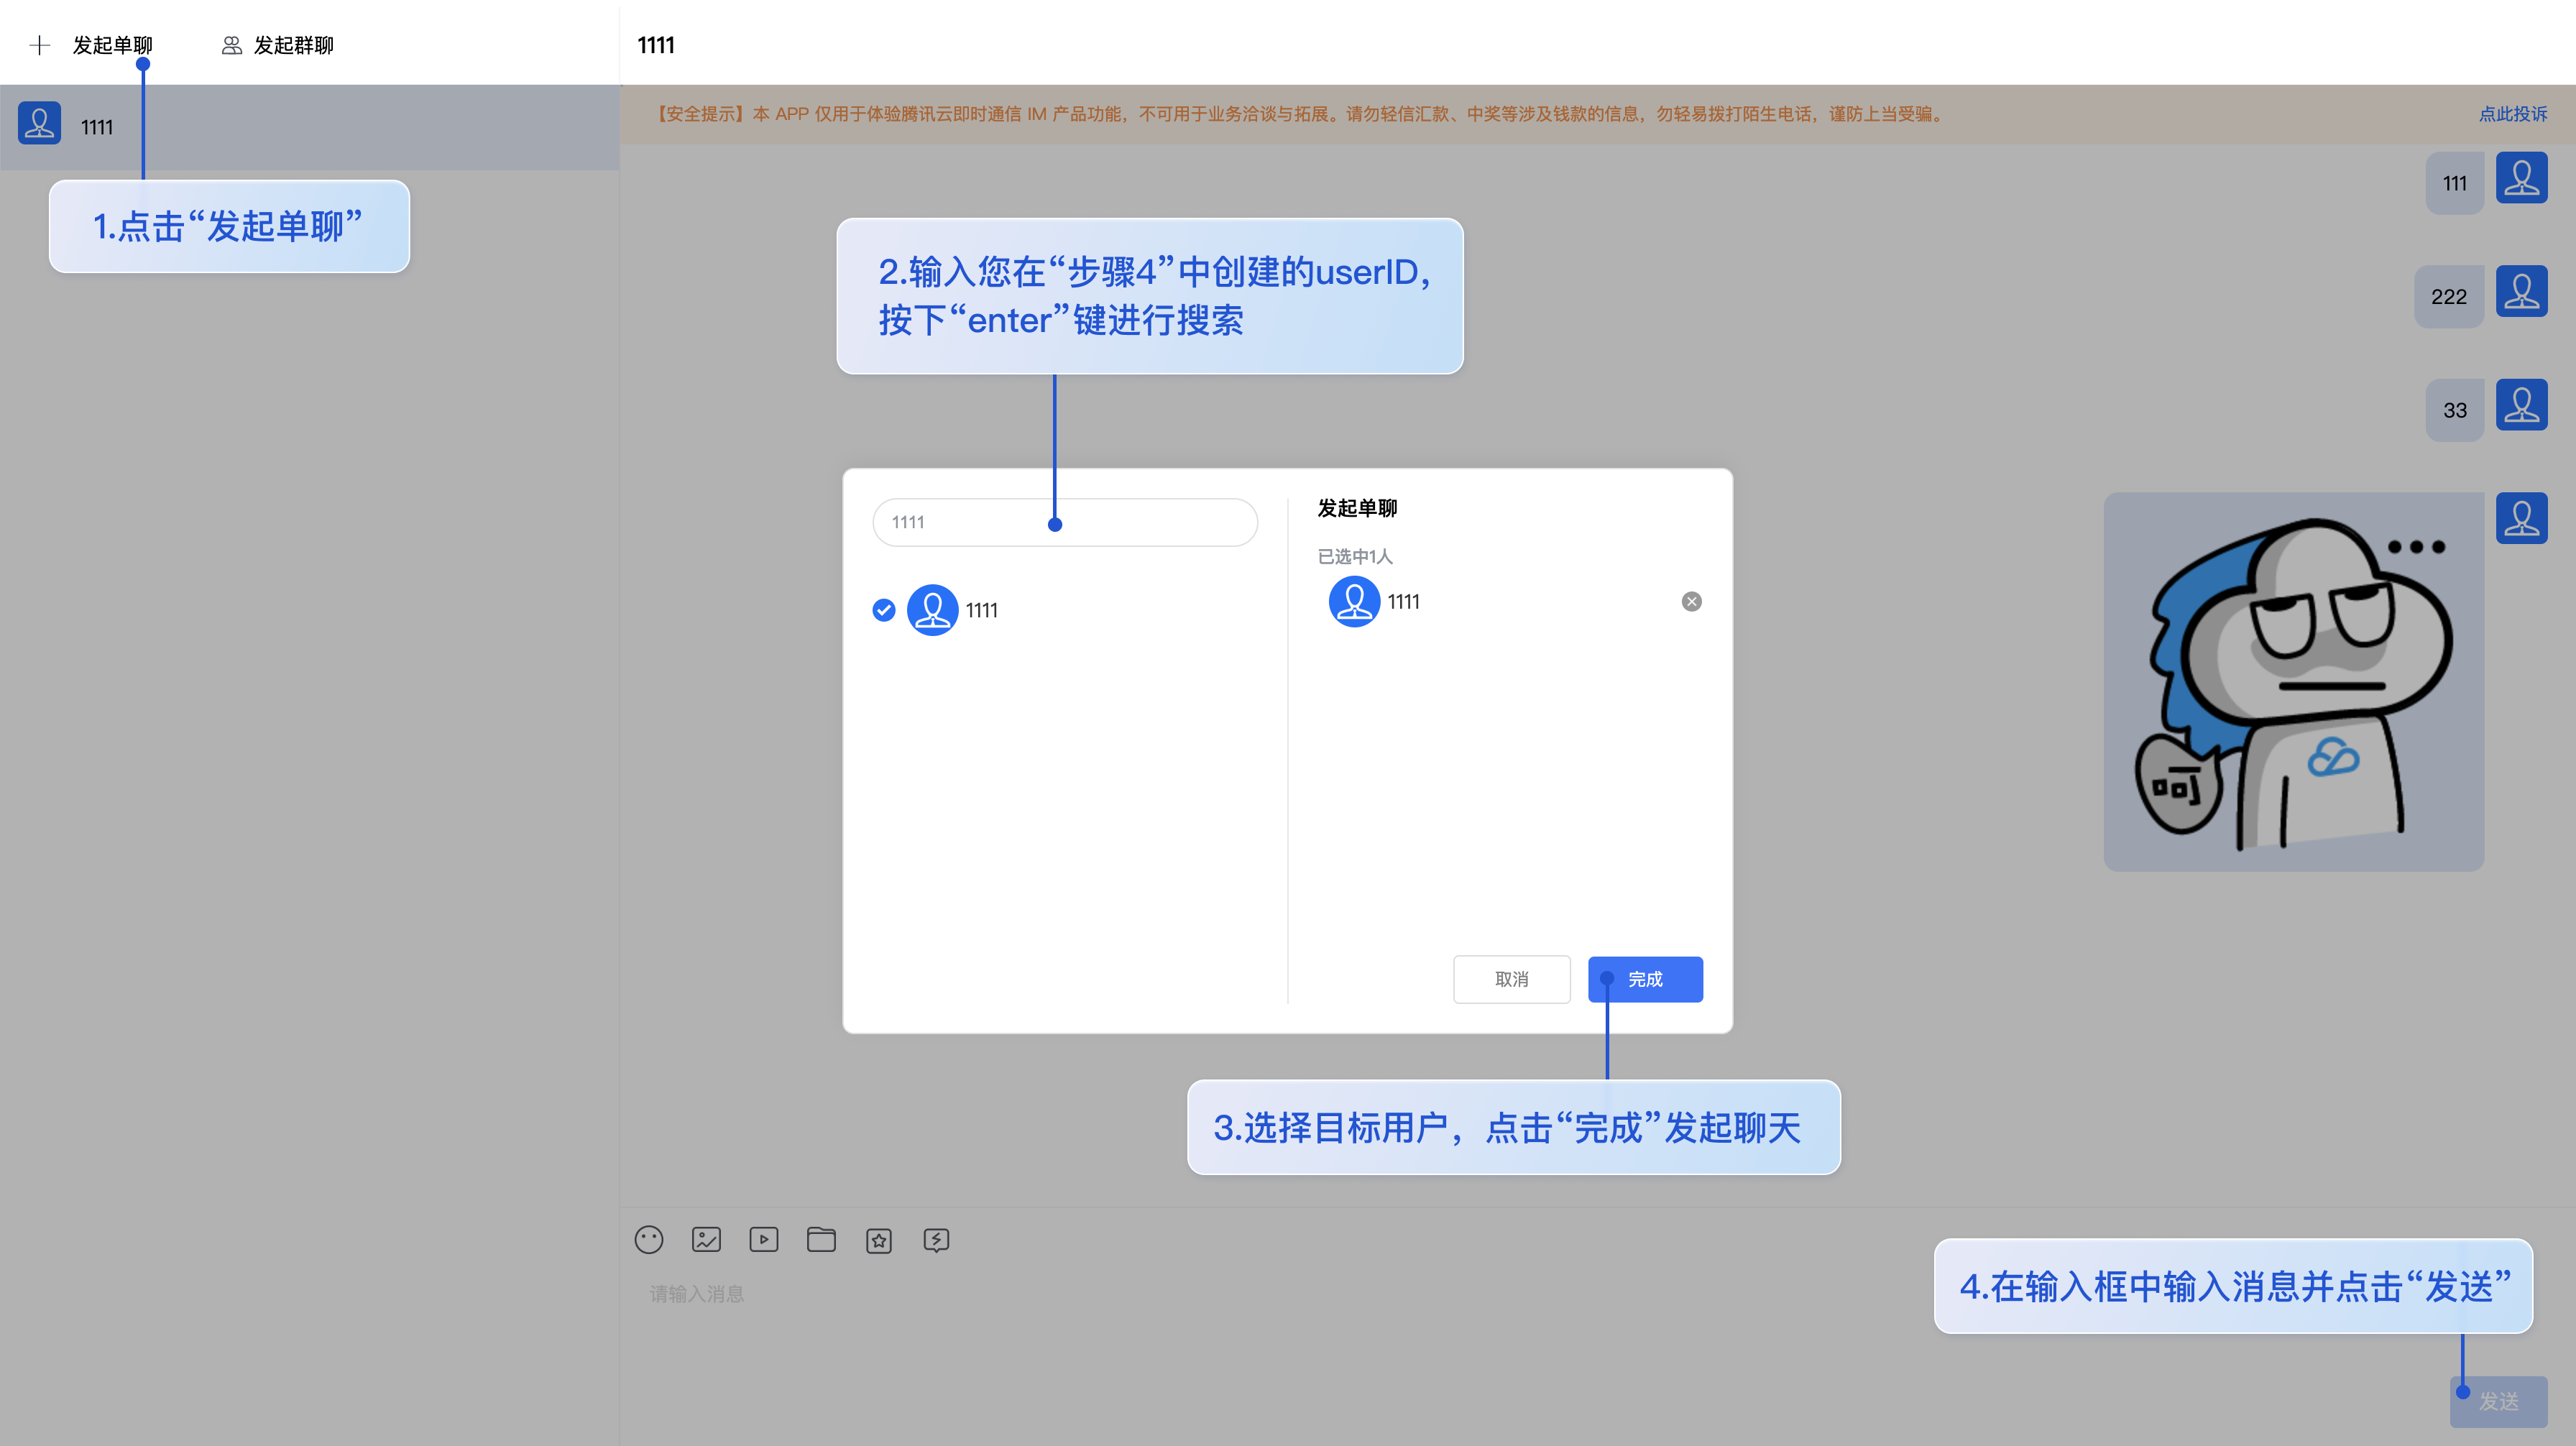
步骤 6. 发送您的第一条消息
1. 项目启动之后单击左上角发起单聊。
2. 进入发起单聊弹窗。在搜索栏输入 步骤4 中创建的 userID,选中后单击完成。
3. 在输入框中输入消息并单击发送。
4. Web 端 “发送您的第一条消息” 具体步骤示例:
H5 端 “发送您的第一条消息” 具体步骤示例:
步骤7:拨打您的第一通电话
生产环境部署指引
1. 部署生产环境时您需要通过服务端生成 userSig,详情请参见 生成 UserSig 。
2. 删除
App.vue 中 TUIKit 组件的 props 属性:SDKAppID、userID、userSig,代码修改如下:<template><div id="app"><TUIKit /><TUICallKit class="callkit-container" :allowedMinimized="true" :allowedFullScreen="false" /></div></template>
3. 在
main.ts/main.js 中引入登录模块,并进行登录。import { TUILogin } from '@tencentcloud/tui-core-lite';import { framework } from './TUIKit/adapter-vue';
TUILogin.login({SDKAppID: 0,userID: 'xxx',userSig: 'xxx',useUploadPlugin: true,framework,}).then(() => {}).catch((error) => {})
常见问题
音视频通话能力包未开通?音视频通话发起失败?
我只想集成聊天窗口,如何单独集成 TUIChat?如何直接打开指定单聊/群聊会话?
js 工程如何接入 TUIKit 组件?
TUIKit 仅支持 ts 环境运行,您可以通过渐进式配置 typescript 来使您项目中已有的 js 代码 与 TUIKit 中 ts 代码共存。
请在您 vue-cli 脚手架创建的工程根目录执行:
vue add typescript
之后按照如下进行配置项进行选择(为了保证能同时支持原有 js 代码 与 TUIKit 中 ts 代码,请您务必严格按照以下五个选项进行配置)
完成以上步骤后,请重新运行项目!
请在您 vite 创建的工程根目录执行:
npm install -D typescript
什么是 UserSig?如何生成 UserSig?
UserSig 是用户登录即时通信 IM 的密码,其本质是对 UserID 等信息加密后得到的密文。
UserSig 签发方式是将 UserSig 的计算代码集成到您的服务端,并提供面向项目的接口,在需要 UserSig 时由您的项目向业务服务器发起请求获取动态 UserSig。更多详情请参见 服务端生成 UserSig。
注意
本文示例代码采用的获取 UserSig 的方案是在客户端代码中配置 SECRETKEY,该方法中 SECRETKEY 很容易被反编译逆向破解,一旦您的密钥泄露,攻击者就可以盗用您的腾讯云流量,因此该方法仅适合本地跑通功能调试。 正确的 UserSig 签发方式请参见上文。
运行时报错:"TypeError: Cannot read properties of undefined (reading "getFriendList")"
若按照上述步骤接入后,运行时出现以下错误,请您务必删除 TUIKit 目录下的 node_modules 目录,以保证 TUIKit 的依赖唯一性,避免 TUIKit 多份依赖造成问题。

运行时报错:/chat-example/src/TUIKit/components/TUIChat /message-input/message-input-editor.vue .ts(8,23)TS1005: expected.

出现以上报错信息,是因为您安装的 @vue/cli 版本过低导致,请您务必保证您的 @vue/cli 版本在 5.0.0 及以上。升级方式如下:
npm install -g @vue/cli@5.0.8
运行时报错: Failed to resolve loader: sass-loader
出现以上报错信息,是因为您未安装 `sass` 环境导致,请执行以下命令进行
sass 环境安装:npm i -D sass sass-loader@10.1.1
ESLint 报错:error 'withDefaults' is not defined no-undef? 'defineProps' is not defined no-undef? 以及 ESLint 其他报错?
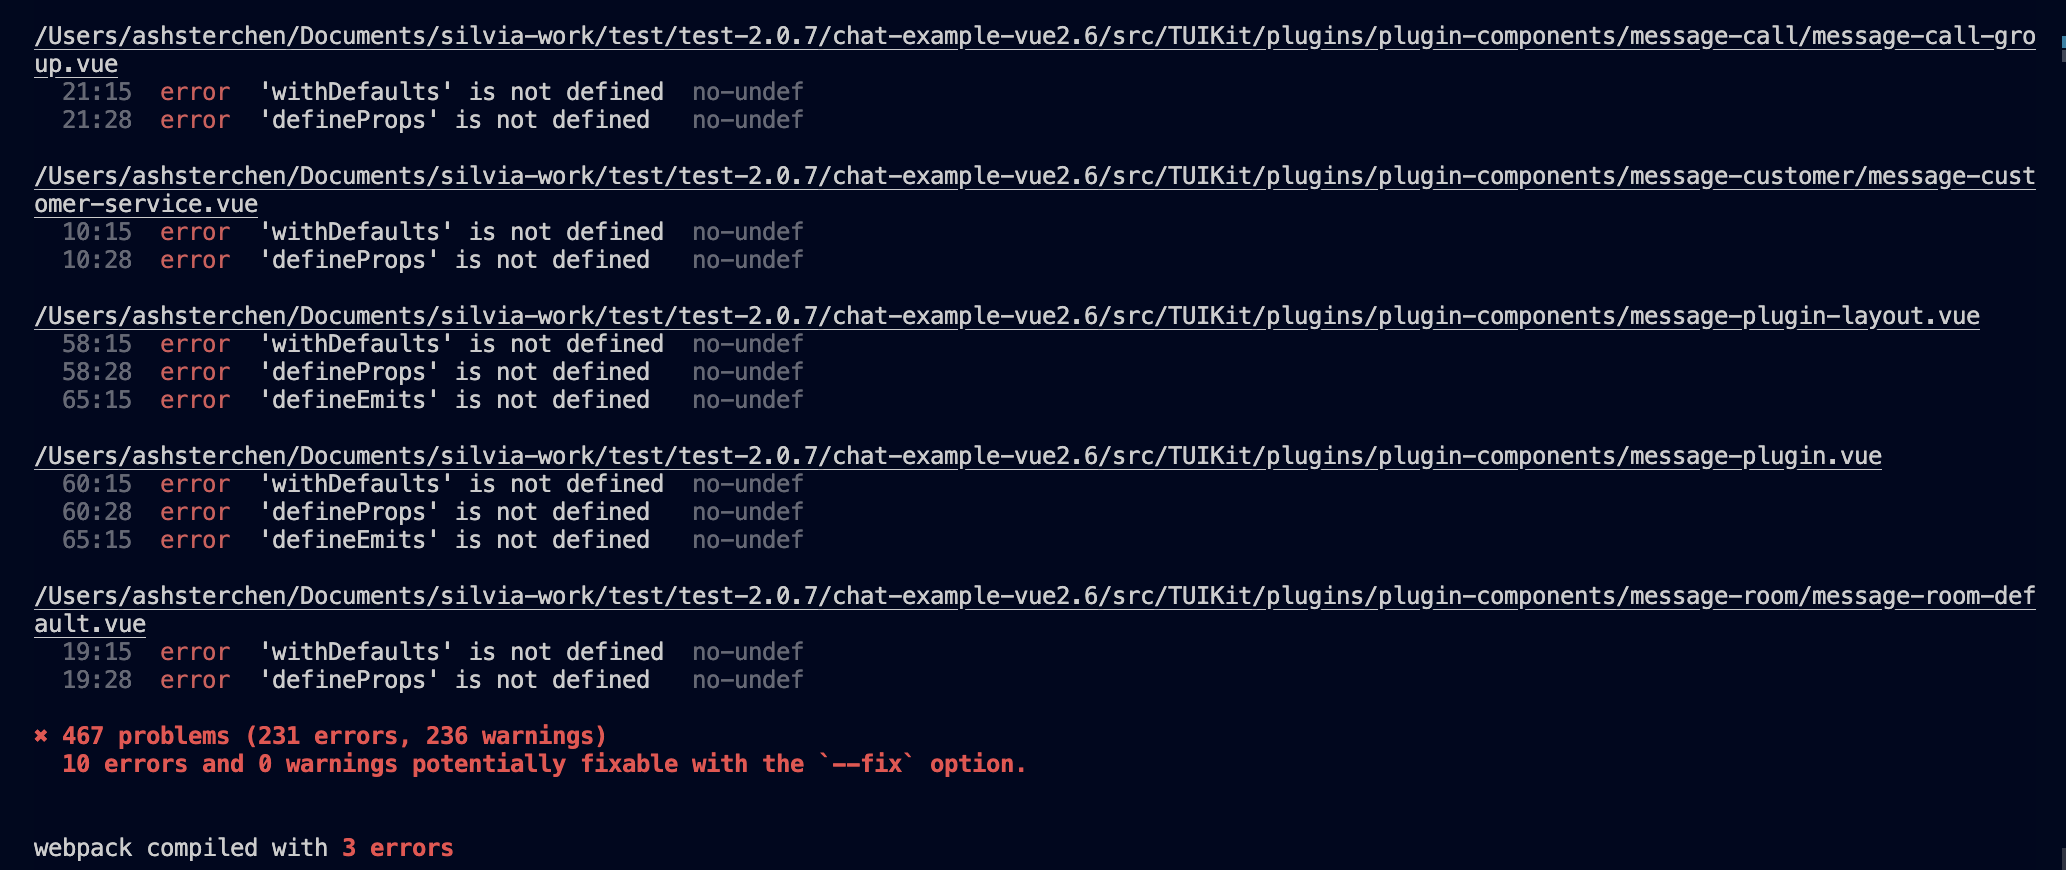
若 chat-uikit-vue 拷贝到 src 目录中与您本地项目代码风格不一致导致报错,可将本组件目录屏蔽,如在项目根目录增加 .eslintignore 文件:
# .eslintignoresrc/TUIKit
vue/cli 如何关闭 dev 模式下,webpack 全屏 overlay error 报错信息提示?
可以在您项目根目录的 vue.config.js 中进行关闭:
module.exports = defineConfig({...devServer: {client: {overlay: false,},},});
module.exports = {...devServer: {overlay: false,},};
出现 Component name "XXXX" should always be multi-word 怎么办?
IM TUIKit web 所使用的 ESLint 版本为 v6.7.2 ,对于模块名的驼峰式格式并不进行严格校验。
如果您出现此问题,您可以在 .eslintrc.js 文件中进行如下配置:
module.exports = {...rules: {...'vue/multi-word-component-names': 'warn',},};
出现 ERESOLVE unable to resolve dependency tree 怎么办?
npm install 的时候如果出现 ERESOLVE unable to resolve dependency tree ,表示依赖安装冲突,可采用以下方式进行安装:
npm install --legacy-peer-deps
运行报错如下'vue packages version mismatch',如何解决?
如果您是 vue2.7 项目,请在您项目根目录执行:
npm i vue@2.7.9 vue-template-compiler@2.7.9
如果您是 vue2.6 项目,请在您项目根目录执行:
npm i vue@2.6.14 vue-template-compiler@2.6.14
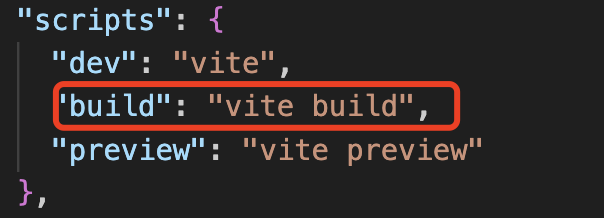
vite 项目 npm run build 之后 ts 报错?
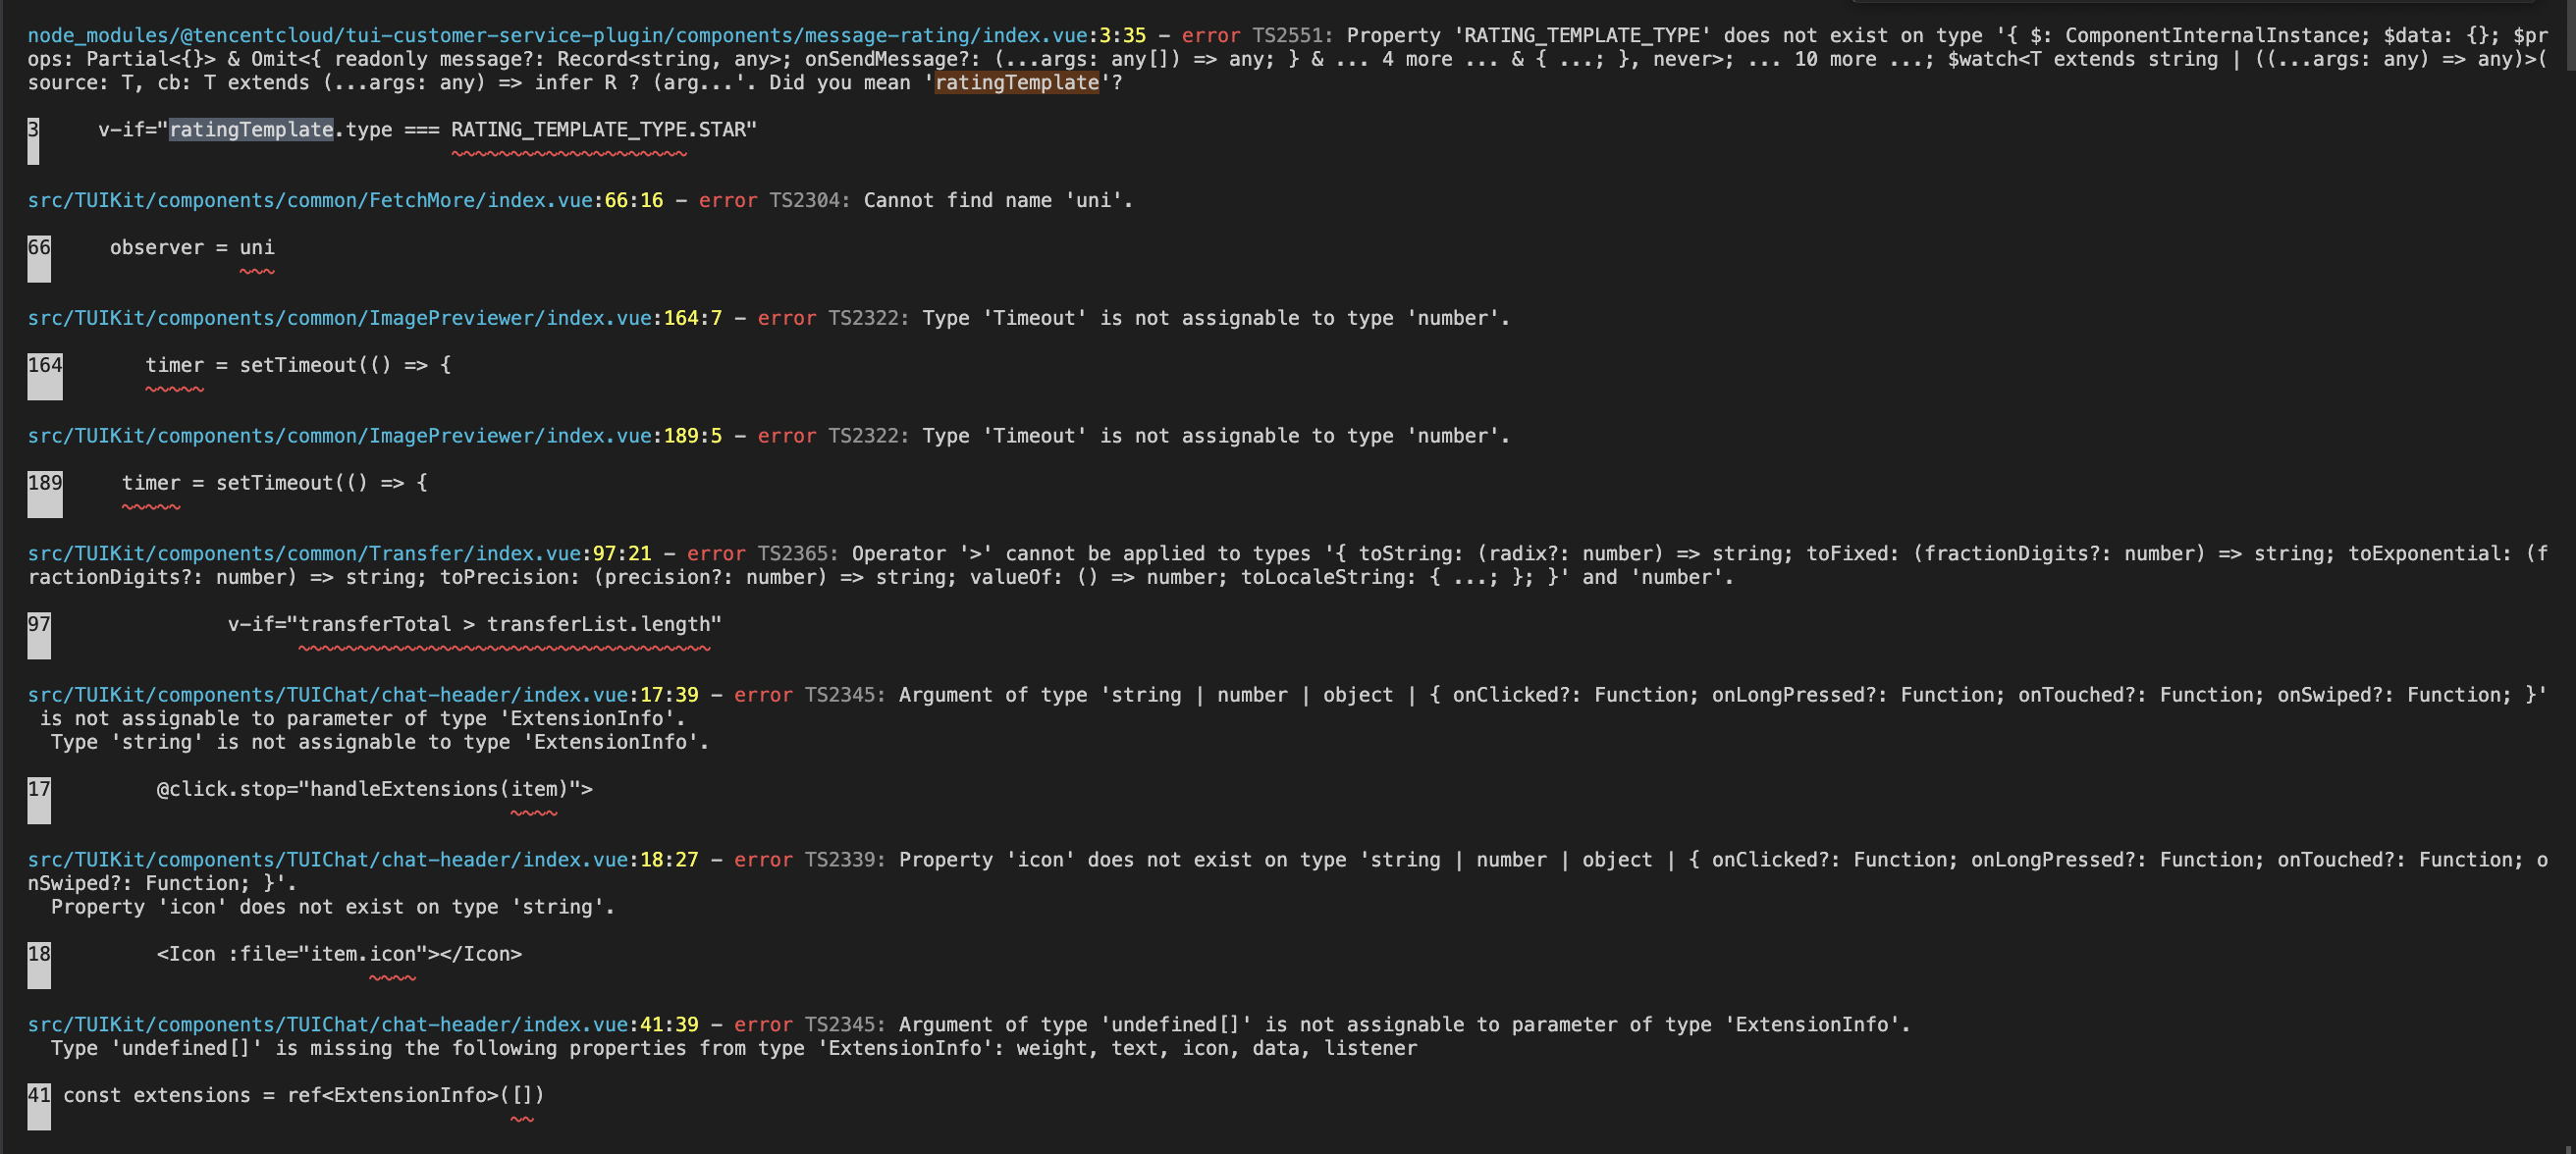
原因:package.json script 下 "build": "vue-tsc && vite build" 中的 vue-tsc 命令导致。
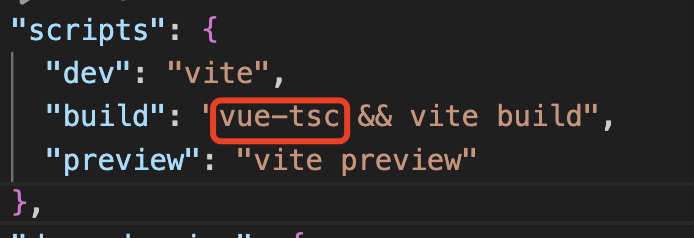
解决方案: 删除 vue-tsc 即可。 "build": "vite build"
使用 pnpm 下载缺少依赖?
pnpm 安装 @tencentcloud/chat-uikit-vue 后拷贝到 TUIKit 目录使用会存在内部依赖缺失问题,建议您优先选择 npm / yarn 方式安装。若您确实需要使用 pnpm 安装依赖,请在进行完上文接入步骤后:
1. 将
node_modules/@tencentcloud/chat-uikit-vue/package.json 中的依赖项拷贝到您自身项目根目录 package.json 中。2. 运行
pnpm i , 进行内部缺失依赖安装。H5 页面 iOS 低版本机型出现白屏?
您可以通过配置 polyfill 兼容低机型版本。(什么是 polyfill?polyfill 是一种用于解决浏览器兼容问题的技术。它用于模拟某些浏览器不支持的新特性,使得这些特性能在不支持的浏览器中正常工作。更多详情请参见 babel-polyfill。)
1. 安装 babel-polyfill:
npm i @babel/polyfill
2. 入口文件引入 'babel-polyfill':
import 'babel-polyfill';
3. 新增 babel.config.js 配置
module.exports = {presets: [['@vue/cli-plugin-babel/preset',{useBuiltIns: 'entry',corejs: 3,},],['@babel/preset-env',{targets: {browsers: ['iOS >= 11'],},useBuiltIns: 'entry',corejs: 3,},],],};
运行报错:Uncaught TypeError: marked__WEBPACK_IMPORTED_MODULE_0_ Marked is not a constructor
如果您运行过程中出现如下错误,说明您当前 Vue CLI 构建的项目环境版本较低,需要降低 uikit 中使用的 marked 版本至 5.1.2。
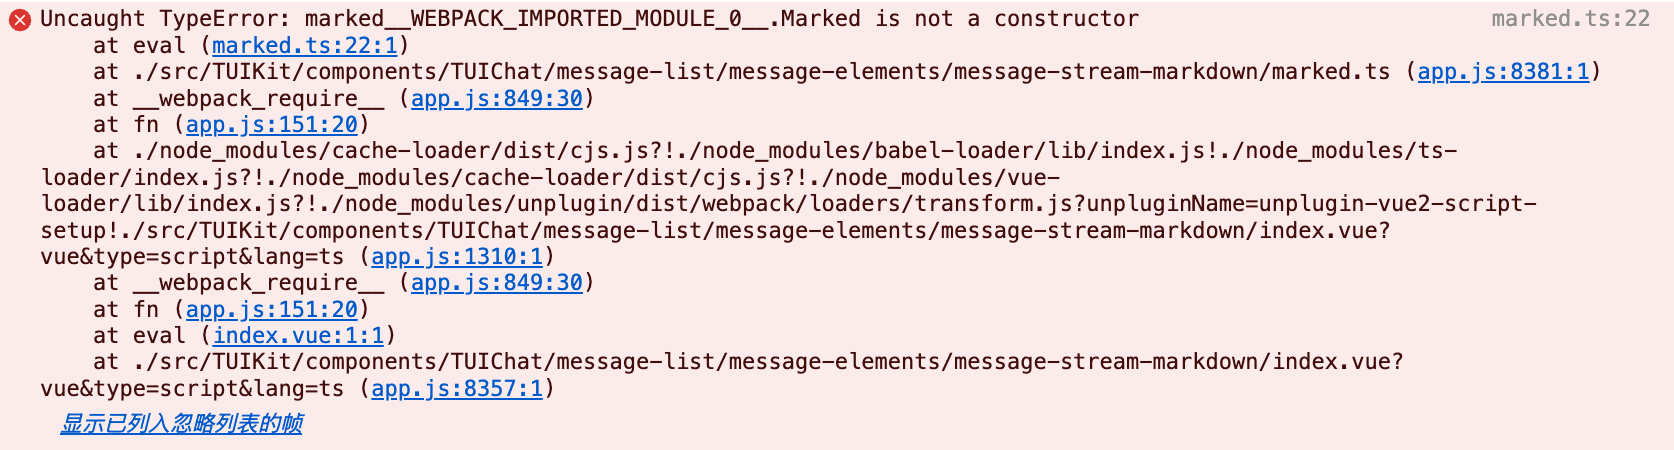
请在您项目的根目录使用以下脚本降低 marked 版本:
npm i marked@5.1.2 --legacy-peer-deps
编译报错 node_modules/marked/lib/marked.esm.js: Class private methods are not enabled.
如果您运行过程中出现如下错误,说明您当前使用的 marked 版本过低,请升级 marked 版本至 6.0.0。

请在您项目的 根目录 使用以下脚本升级 marked 版本:
npm i marked@6.0.0 --legacy-peer-deps
运行报错 Uncaught SyntaxError: The requested module xxx does not provide an export named 'Friend'
如果您的 vite 项目运行过程中出现以下报错,请参考以下方案:

在根目录文件
tsconfig.json 下增加以下编译规则,分为以下两种情况:1. 如果您的
tsconfig.json 没有 references 配置,直接在 tsconfig.json 中配置如下规则:{..."compilerOptions": {..."verbatimModuleSyntax": false,}}
{..."compilerOptions": {..."importsNotUsedAsValues": "preserve",}}
2. 如果您的
tsconfig.json 已有 references 配置,例如 vite 官方自动配置的 "./tsconfig.app.json","./tsconfig.node.json" 等,由于 references 的特性,导致 tsconfig.json 本身只是规则的引用文件,此时直接在 tsconfig.json 中配置以下规则无效。需要将规则添加至实际的references 对应的文件中。以下是具体示例:错误写法 | 正确写法 |
当 tsconfig.json 文件中已有 references 相关配置时,直接在 tsconfig.json 中声明以下规则无效 | 当 tsconfig.json 文件中已有 references 相关配置时,需要在对应的 references 内部文件中声明以下规则。下文中是在 references 中配置的根目录 tsconfig.app.json 文件中配置以下规则。 |
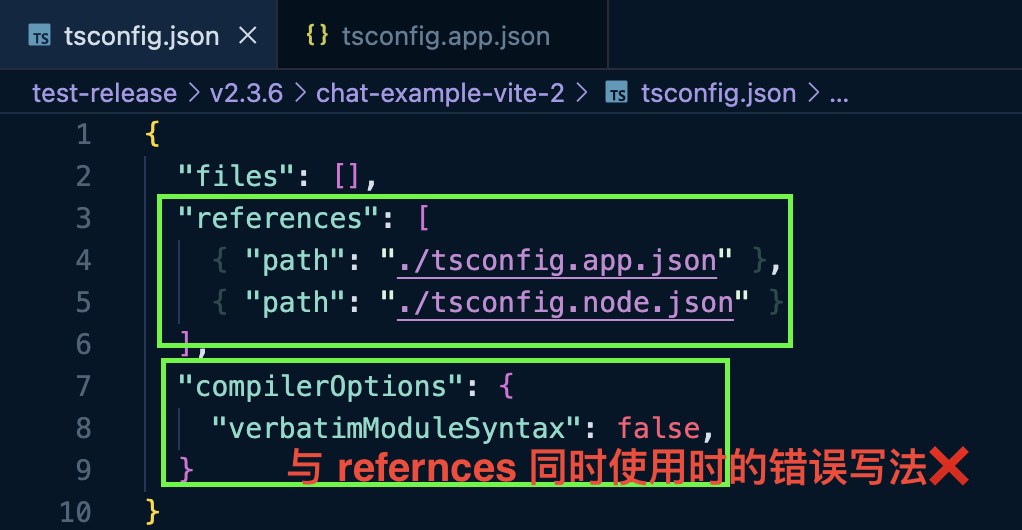 |  |
编译后 Sass warning:Deprecation Warning: The legacy JS API is deprecated and will be removed in Dart Sass 2.0.0.
如果您在运行后出现如下提示,请不要担心,这是 sass 大版本规则更新后的 warning 提示;该提醒并不会影响您的正常运行。
如果您想去除此类 warning 提示,请将 sass 版本降级至 1.77.4 及以下。
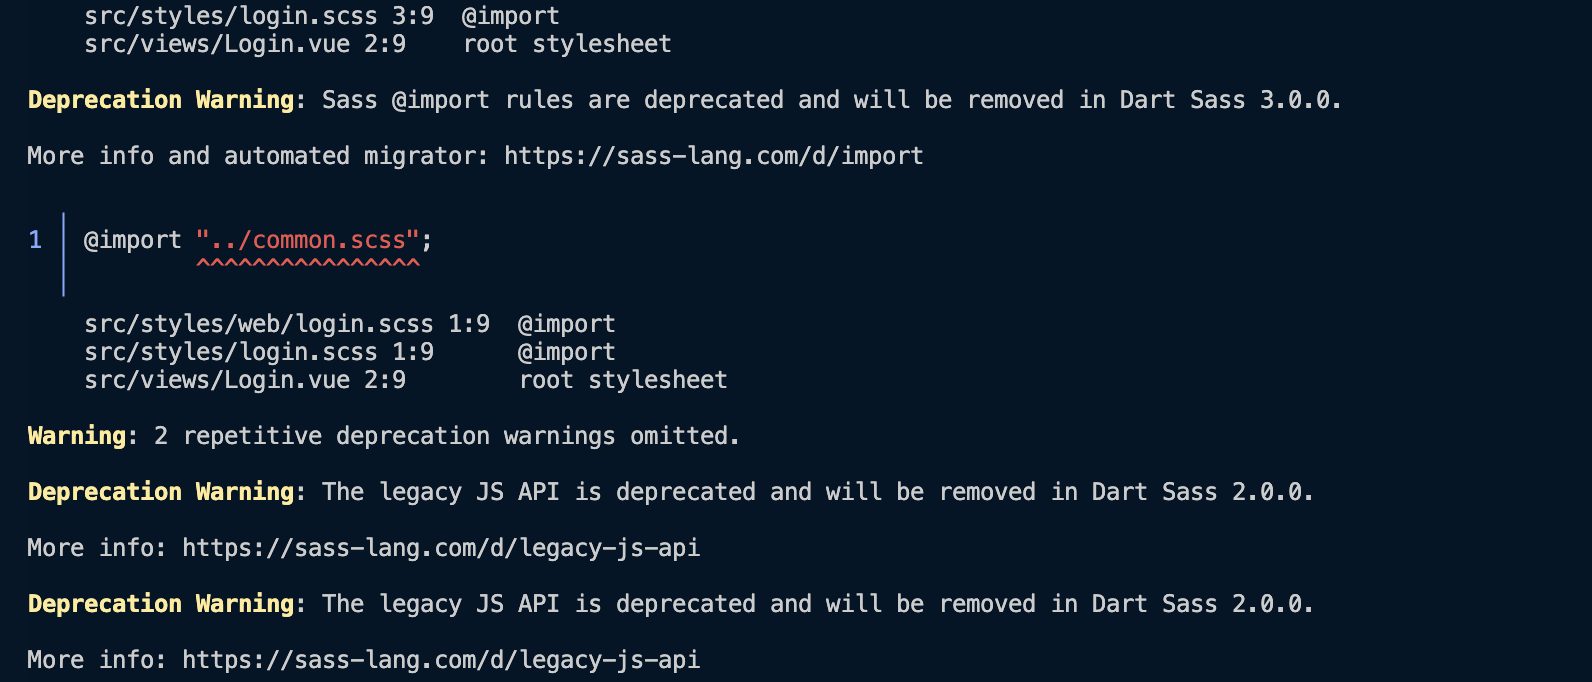
npm i -D sass@1.77.0 sass-loader@10.1.1
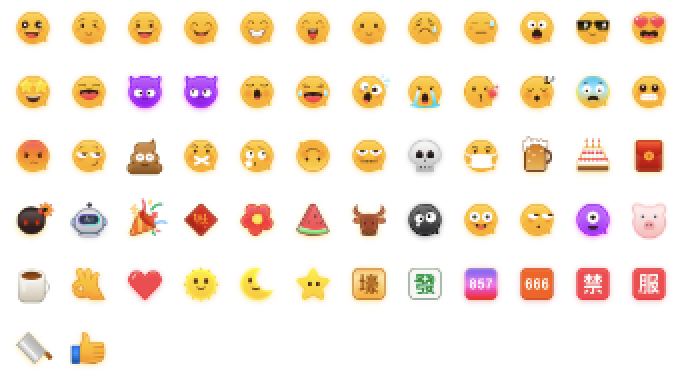
表情包的使用
为了尊重版权,IM Demo/TUIKit 工程中默认不包含大表情元素切图。在正式上线商用前,请您替换为自己设计或拥有版权的其他表情包。请注意,下图所示的默认小黄脸表情包版权属于腾讯云,您可以通过升级至 IM 企业版套餐 免费使用该表情包。
相关文档
Vue2 & Vue3 UIKit 相关:
集成音视频通话


