操作场景
本文档指导您如何在 Tomcat 服务器中安装 JKS 格式的 SSL 证书。
说明
本文档以证书名称
cloud.tencent.com 为例。Tomcat 版本以
tomcat-9.0.56 为例。当前服务器的操作系统为 CentOS 7 中文版,由于操作系统的版本不同,详细操作步骤略有区别。
安装 SSL 证书前,请您在 Tomcat 服务器上开启 “443” 端口,避免证书安装后无法启用 HTTPS。具体可参考 服务器如何开启443端口?
SSL 证书文件上传至服务器方法可参考 如何将本地文件拷贝到云服务器。
前提条件
已准备文件远程拷贝软件,例如 WinSCP(建议从官方网站获取最新版本)。
若您需部署到腾讯云云服务器,建议使用云服务器的文件上传功能。请参考 上传文件到云服务器。
已准备远程登录工具,例如 PuTTY 或者 Xshell(建议从官方网站获取最新版本)。
已在当前服务器中安装配置 Tomcat 服务。
安装 SSL 证书前需准备的数据如下:
名称 | 说明 |
服务器的 IP 地址 | 服务器的 IP 地址,用于 PC 连接到服务器。 |
用户名 | 登录服务器的用户名。 |
密码 | 登录服务器的密码。 |
注意
在腾讯云官网购买的云服务器,您可以登录 云服务器控制台 获取服务器 IP 地址、用户名及密码。
当您申请 SSL 证书时选择 “粘贴 CSR” 方式,或购买的品牌证书为 Wotrus,则不提供 JKS 证书文件的下载,需要您通过手动转换格式的方式生成密钥库。其操作方法如下:
访问 转换工具。
将 Nginx 文件夹中的证书文件和私钥文件上传至转换工具中,并填写密钥库密码,单击提交,转换为 jks 格式证书。
当前 Tomcat 服务默认安装在 /usr 目录下,例如,Tomcat 文件夹名称为 Tomcat-9.0.56,则其配置文件目录为:/usr/Tomcat-9.0.56/conf。
当您申请 SSL 证书时选择 “粘贴 CSR” 方式,或购买的品牌证书为 Wotrus,则不提供 JKS 证书文件的下载,需要您通过手动转换格式的方式生成密钥库。其操作方法如下:
访问 转换工具。
将 Nginx 文件夹中的证书文件和私钥文件上传至转换工具中,并填写密钥库密码,单击提交,转换为 jks 格式证书。
当前 Tomcat 服务默认安装在 /usr 目录下,例如,Tomcat 文件夹名称为 Tomcat-9.0.56,则其配置文件目录为:
/usr/Tomcat-9.0.56/conf。操作步骤
证书安装
1. 请在 SSL 证书管理控制台 中选择您需要安装的证书并单击下载。
2. 在弹出的 “证书下载” 窗口中,服务器类型选择 JKS,单击下载并解压缩
cloud.tencent.com 证书文件包到本地目录。
解压缩后,可获得相关类型的证书文件。其中包含 cloud.tencent.com_jks 文件夹:文件夹名称:
cloud.tencent.com_jks文件夹内容:
cloud.tencent.com.jks 密钥库keystorePass.txt 密码文件(若已设置私钥密码,则无 keystorePass.txt 密码文件)3. 使用 WinSCP(即本地与远程计算机间的复制文件工具)登录 Tomcat 服务器。将已获取到的
cloud.tencent.com.jks 密钥库文件从本地目录拷贝至 Tomcat 配置文件目录 /usr/Tomcat-9.0.56/conf。4. 编辑在
/usr/Tomcat-9.0.56/conf 目录下的 server.xml 文件。添加如下内容:<Connector port="443" protocol="HTTP/1.1" SSLEnabled="true"maxThreads="150" scheme="https" secure="true"#证书保存的路径keystoreFile="Tomcat 安装目录/conf/cloud.tencent.com.jks"#密钥库密码keystorePass="******"clientAuth="false"/>
配置文件的主要参数说明如下:
keystoreFile:密钥库文件的存放位置,可以指定绝对路径,也可以指定相对于 <CATALINA_HOME> (Tomcat 安装目录)环境变量的相对路径。如果此项没有设定,默认情况下,Tomcat 将从当前操作系统用户的用户目录下读取名为 “.keystore” 的文件。
keystorePass:密钥库密码,指定 keystore 的密码。申请证书时若设置了私钥密码,请填写私钥密码;若申请证书时未设置私钥密码,请填写 Tomcat 文件夹中 keystorePass.txt 文件的密码。
clientAuth:如果设为 true,表示 Tomcat 要求所有的 SSL 客户出示安全证书,对 SSL 客户进行身份验证。
详细
server.xml 文件请参考如下内容:注意
不建议您直接复制 server.xml 文件内容,避免格式有误。
<?xml version="1.0" encoding="UTF-8"?><Server port="8005" shutdown="SHUTDOWN"><Listener className="org.apache.catalina.startup.VersionLoggerListener" /><Listener className="org.apache.catalina.core.AprLifecycleListener" SSLEngine="on" /><Listener className="org.apache.catalina.core.JreMemoryLeakPreventionListener" /><Listener className="org.apache.catalina.mbeans.GlobalResourcesLifecycleListener" /><Listener className="org.apache.catalina.core.ThreadLocalLeakPreventionListener" /><GlobalNamingResources><Resource name="UserDatabase" auth="Container"type="org.apache.catalina.UserDatabase"description="User database that can be updated and saved"factory="org.apache.catalina.users.MemoryUserDatabaseFactory"pathname="conf/tomcat-users.xml" /></GlobalNamingResources><Service name="Catalina"><Connector port="80" protocol="HTTP/1.1" connectionTimeout="20000" redirectPort="8443" /><Connector port="443" protocol="HTTP/1.1"maxThreads="150" SSLEnabled="true" scheme="https" secure="true"clientAuth="false"keystoreFile="Tomcat 安装目录/conf/cloud.tencent.com.jks"keystorePass="******" /><Connector port="8009" protocol="AJP/1.3" redirectPort="8443" /><Engine name="Catalina" defaultHost="cloud.tencent.com"><Realm className="org.apache.catalina.realm.LockOutRealm"><Realm className="org.apache.catalina.realm.UserDatabaseRealm"resourceName="UserDatabase"/></Realm><Host name="cloud.tencent.com" appBase="webapps"unpackWARs="true" autoDeploy="true" ><Context path="" docBase ="Knews" /><Valve className="org.apache.catalina.valves.AccessLogValve" directory="logs"prefix="localhost_access_log" suffix=".txt"pattern="%h %l %u %t "%r" %s %b" /></Host></Engine></Service></Server>
5. 确认 Tomcat 服务器是否启动。
若已启动,您需要在 Tomcat 安装目录
bin 目录下(例如:/usr/Tomcat-9.0.56/bin)依次执行以下命令,关闭和重启 Tomcat 服务。./shutdown.sh (关闭 Tomcat 服务)./startup.sh (启动 Tomcat 服务)
若未启动,您需要在 Tomcat 安装目录
bin 目录下(例如:/usr/Tomcat-9.0.56/bin)执行以下命令,启动 Tomcat 服务。./startup.sh
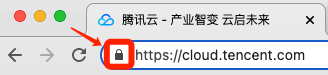
6. 若启动成功,即可使用
https://cloud.tencent.com 进行访问。如果浏览器地址栏显示安全锁标识,则说明证书安装成功。如下图所示:
如果网站访问异常,可参考以下常见问题解决方案进行处理:
HTTP 自动跳转 HTTPS 的安全配置(可选)
如果您需要将 HTTP 请求自动重定向到 HTTPS,您可以通过以下操作设置:
1. 编辑 Tomcat 安装目录
conf 目录下(例如:/usr/Tomcat-9.0.56/conf)的 web.xml 文件,并找到 </welcome-file-list> 标签。2. 请在结束标签 </welcome-file-list> 后面换行,并添加以下内容:
<login-config><!-- Authorization setting for SSL --><auth-method>CLIENT-CERT</auth-method><realm-name>Client Cert Users-only Area</realm-name></login-config><security-constraint><!-- Authorization setting for SSL --><web-resource-collection><web-resource-name>SSL</web-resource-name><url-pattern>/*</url-pattern></web-resource-collection><user-data-constraint><transport-guarantee>CONFIDENTIAL</transport-guarantee></user-data-constraint></security-constraint>
3. 编辑 Tomcat 安装目录
conf 目录下(例如:/usr/Tomcat-9.0.56/conf)的 server.xml 文件,将 redirectPort 参数修改为 SSL 的 connector 的端口,即443端口。如下所示:<Connector port="80" protocol="HTTP/1.1"connectionTimeout="20000"redirectPort="443" />
说明
此修改操作可将非 SSL 的 connector 跳转到 SSL 的 connector 中。
4. 在 Tomcat 安装目录
/bin 目录下(例如:/usr/Tomcat-9.0.56/bin)执行以下命令,关闭 Tomcat 服务。./shutdown.sh
5. 执行以下命令,确认配置是否存在问题。
./configtest.sh
若存在,请您重新配置或者根据提示修改存在问题。
若不存在,请执行下一步。
6. 执行以下命令,启动 Tomcat 服务,即可使用
https://cloud.tencent.com 进行访问。./startup.sh


