操作场景
本文档指导您如何在 Nginx 服务器中安装国密标准 SSL 证书。
说明:
Nginx 版本以
nginx/1.18.0 为例。本文档以证书名称
cloud.tencent.com 为例。当前服务器的操作系统为 CentOS 7,由于操作系统的版本不同,详细操作步骤略有区别。
安装 SSL 证书前,请您在 Nginx 服务器上开启 “443” 端口,避免证书安装后无法启用 HTTPS,具体请参见 服务器如何开启443端口?
SSL 证书文件上传至服务器方法请参见 如何将本地文件拷贝到云服务器。
前提条件
已准备远程文件拷贝软件,例如 WinSCP(建议从官方网站获取最新版本)。
若您需部署到腾讯云云服务器,建议使用云服务器的文件上传功能。详情请参见 上传文件到云服务器。
已准备远程登录工具,例如 PuTTY 或者 Xshell(建议从官方网站获取最新版本)。
已购买国密标准(SM2)SSL 证书。
安装 SSL 证书前需准备的数据如下:
名称 | 说明 |
服务器的 IP 地址 | 服务器的 IP 地址,用于 PC 连接到服务器。 |
用户名 | 登录服务器的用户名。 |
密码 | 登录服务器的密码。 |
说明:
操作步骤
注意:
环境配置
说明:
国密标准 SSL 证书安装在 Nginx 服务器上,Nginx 服务器需具备相关环境支持模块。下文将指导您编译配置支持国密标准 SSL 证书的 Nginx 服务器。
下述步骤中的目录皆是测试环境的目录,具体路径请根据您的实际环境与需求进行确定。
1. 远程登录 Nginx 服务器。例如,使用 PuTTY 工具 登录。
2. 安装编译工具:如果您的系统是全新的,请先在服务器上安装 C++ 开发环境、pcre-devel、zlib-devel 软件为编译提供环境支持。您可以使用如下命令进行安装。
#安装 C++ 开发环境yum install -y gcc gcc-c++#安装 pcre-develyum install pcre-devel -y#安装 zlib-develyum install zlib-devel -y
3. 下载并编译安装 Nginx:您可以通过在服务器上按以下顺序输入命令,下载 Nginx 国密版和国密模块至服务器并编译安装,由于操作系统的版本不同,详细操作步骤略有区别。
注意:
以
nginx-1.18.0 为例,目录为 /usr/local,请根据您的实际环境与需求进行确定。国密模块文件名
wotrus_ssl.tar.gz 在解压与安装中请勿修改,否则可能会导致安装错误。#切换至 /usr/local/ 目录下cd /usr/local/#下载 nginx-1.18.0wget -c http://nginx.org/download/nginx-1.18.0.tar.gz#下载国密SM2模块wget -c https://www.wotrus.com/download/wotrus_ssl.tar.gz#解压已下载的 nginx-1.18.0 压缩包tar -zvxf nginx-1.18.0.tar.gz#解压已下载的国密SM2模块压缩包tar -zvxf wotrus_ssl.tar.gz#进入解压后的 nginx-1.18.0 文件夹cd nginx-1.18.0/#指定编译目录路径与编译模块。如需其他模块可自行增加./configure --prefix=/usr/local/nginx --with-http_stub_status_module --with-stream --with-http_ssl_module --with-stream_ssl_module --with-openssl=/usr/local/wotrus_ssl2.0#编译安装 Nginxmake && make install
4. 如果编译执行过程中出现
make[1]: *** [/usr/local/wotrus_ssl2.0/.openssl/include/openssl/ssl.h] Error 127 错误。则需要进入 nginx-1.18.0/auto/lib/openssl 目录,编辑 conf 文件。需修改如下内容:CORE_INCS="$CORE_INCS $OPENSSL/.openssl/include"CORE_DEPS="$CORE_DEPS $OPENSSL/.openssl/include/openssl/ssl.h"CORE_LIBS="$CORE_LIBS $OPENSSL/.openssl/lib/libssl.a"CORE_LIBS="$CORE_LIBS $OPENSSL/.openssl/lib/libcrypto.a"
修改为:
CORE_INCS="$CORE_INCS $OPENSSL/include"CORE_DEPS="$CORE_DEPS $OPENSSL/include/openssl/ssl.h"CORE_LIBS="$CORE_LIBS $OPENSSL/lib/libssl.a"CORE_LIBS="$CORE_LIBS $OPENSSL/lib/libcrypto.a"
5. 保存文件后,需先执行
make clean 清除编译配置,再重新进入 nginx-1.18.0 文件夹执行 ./configure --prefix=/usr/local/nginx --with-http_stub_status_module --with-stream --with-http_ssl_module --with-stream_ssl_module --with-openssl=/usr/local/wotrus_ssl2.0与 make && make install。国密标准证书安装
1. 已在 SSL 证书控制台 中下载并解压缩
cloud.tencent.com 证书文件包到本地目录。
解压缩后,可获得相关类型的证书文件。 其中包含 Nginx 目录和 CSR 文件:文件夹名称:cloud.tencent.com_nginx
文件夹内容:
cloud.tencent.com_sign_bundle.crt 证书公钥cloud.tencent.com_sign_bundle.pem证书公钥cloud.tencent.com_encrypt_bundle.crt 证书公钥cloud.tencent.com.key 私钥文件CSR 文件内容:
cloud.tencent.com_sign.csr 文件cloud.tencent.com_encrypt.csr 文件说明:
CSR 文件是申请证书时由您上传或系统在线生成的,提供给 CA 机构。安装时可忽略该文件。
2. 使用 “WinSCP”(即本地与远程计算机间的复制文件工具)登录 Nginx 服务器。
3. 进入
/usr/local/nginx/conf 目录,新建 sm2 目录,将已获取到的 cloud.tencent.com_sign_bundle.crt 证书文件、cloud.tencent.com_encrypt_bundle.crt 证书文件、cloud.tencent.com.key 私钥文件从本地目录拷贝到该 sm2 目录下。4. 进入
/usr/local/nginx/conf 目录,编辑 nginx.conf 文件,添加如下配置:server {listen 443 ssl;server_name cloud.tencent.com;ssl_certificate /usr/local/nginx/conf/sm2/cloud.tencent.com_sign_bundle.crt;ssl_certificate_key /usr/local/nginx/conf/sm2/cloud.tencent.com.key;ssl_certificate /usr/local/nginx/conf/sm2/cloud.tencent.com_encrypt_bundle.crt;ssl_certificate_key /usr/local/nginx/conf/sm2/cloud.tencent.com.key;#先配置签名证书,再配置加密证书,签名加密证书私钥key为同一个!ssl_session_timeout 5m;ssl_protocols TLSv1.1 TLSv1.2 TLSv1.3;ssl_ciphers ECC-SM4-SM3:ECDH:AESGCM:HIGH:MEDIUM:!RC4:!DH:!MD5:!aNULL:!eNULL;ssl_prefer_server_ciphers on;location / {root html;index index.html index.htm;}}
说明:
以上配置内容仅为参考,具体的证书名称,证书目录,
location 等配置请根据实际环境配置。5. 请您通过执行以下命令验证配置文件问题。
/usr/local/nginx/sbin/nginx -t
若提示 test is successful,则表示配置正常,可以启动 Nginx 服务器。
若提示 test failed,请您重新配置或者根据提示修改存在问题。
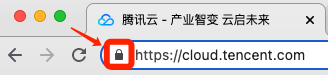
6. 重新启动 Nginx 服务器,即可使用
https://cloud.tencent.com 进行访问。如果浏览器地址栏显示安全锁标识,则说明证书安装成功。如下图所示:
如果网站访问异常,可参考以下常见问题解决方案进行处理:
国际标准证书与国密标准证书双安装(可选)
若您需要通过国际标准证书与国密标准证书双证书安装的方式解决浏览器兼容性问题,您可以通过以下操作设置:
说明:
1. 使用 “WinSCP”(即本地与远程计算机间的复制文件工具),将已获取到的国际标准证书压缩包中 Nginx 文件夹的
root_bundle.crt 证书文件、cloud.tencent.com.key 私钥文件从本地目录拷贝到 Nginx 服务器的/usr/local/nginx/conf/sm2 目录下。 2. 编辑
/usr/local/nginx/conf 目录下的 nginx.conf 文件。3. 请在
cloud.tencent.com 下面换行,并添加如下内容:ssl_certificate /usr/local/nginx/conf/sm2/cloud.tencent.com_bundle.crt;ssl_certificate_key /usr/local/nginx/conf/sm2/cloud.tencent.com.key;
说明:
以上配置内容仅为参考,具体的证书名称,证书目录,请根据实际环境配置。
4. 您通过执行以下命令验证配置文件问题。
/usr/local/nginx/sbin/nginx -t
若提示 test is successful,则表示配置正常,可以启动 Nginx 服务器。
若提示 test failed,请您重新配置或者根据提示修改存在问题。
5. 重新启动 Nginx 服务器,即可解决浏览器兼容问题。


