本文将介绍如何快速接入 TUICallKit 组件。您可以在 10 分钟内完成以下关键步骤,最终获得一个功能完备的音视频通话界面。
准备工作
环境要求
Node.js version 16+.
Modern browser, supporting WebRTC APIs.
npm 包集成
Vue3 开发环境,集成 @trtc/calls-uikit-vue npm 包。
Vue2.7 开发环境:集成 @trtc/calls-uikit-vue2 npm 包。
Vue2.6 开发环境:集成 @trtc/calls-uikit-vue2.6 + @vue/composition-api npm 包。
源码集成
Vue3 + TypeScript 开发环境:从 @trtc/calls-uikit-vue npm 包拷贝源码。
Vue2.7 + TypeScript 开发环境:从 @trtc/calls-uikit-vue2 npm 包拷贝源码。
Vue2.6 + TypeScript 开发环境:从 @trtc/calls-uikit-vue2.6 npm 包拷贝源码。
需要:Vue2.6 + unplugin-vue2-script-setup + @vue/composition-api 。
注意:
1. HBuilderX 中选择 vue2 时,使用的是 vue2.6,因此需要使用:@trtc/calls-uikit-vue2.6。
2. HBuilderX 中选择 vue3 时,使用的是 vue3,因此需要使用:@trtc/calls-uikit-vue。
开通服务
创建项目
如果已有项目可忽略这一步。使用 Vite 创建一个新的名称为 call-demo 的 Vue3 项目。
说明:
高版本 Vite 需要使用最新的 Node.js 版本。
npm create vite@latest

快速接入
步骤1:下载 TUICallKit 组件
说明:
1. 下载 @trtc/calls-uikit-vue 组件。在已有项目或上面创建的 call-demo 项目中。
npm install @trtc/calls-uikit-vue
npm install @trtc/calls-uikit-vue2
npm install @trtc/calls-uikit-vue2.6 @vue/composition-api
npm i -D unplugin-vue2-script-setup
2. 将
debug 目录复制到您的项目目录 src/debug,本地生成 userSig 时需要使用。cp -r node_modules/@trtc/calls-uikit-vue/debug ./src
xcopy node_modules\\@trtc\\calls-uikit-vue\\debug .\\src\\debug /i /e
cp -r node_modules/@trtc/calls-uikit-vue2/debug ./src
xcopy node_modules\\@trtc\\calls-uikit-vue2\\debug .\\src\\debug /i /e
cp -r node_modules/@trtc/calls-uikit-vue2.6/debug ./src
xcopy node_modules\\@trtc\\calls-uikit-vue2.6\\debug .\\src\\debug /i /e
步骤2:引入 TUICallKit 组件
说明:
TUICallKit 组件需要放到一个 DOM 节点里,用于控制 TUICallKit 的位置、宽高等样式。
1. 引入 <TUICallKit />,该组件包含通话时的完整 UI 交互。下面示例是 call-demo 的
src/App.vue 中。<template><div><span> caller's ID: </span><input type="text" v-model="callerUserID"><button @click="init"> step1. init </button> <br><span> callee's ID: </span><input type="text" v-model="calleeUserID"><button @click="call"> step2. call </button><!--【1】Import the TUICallKit component: Call interface UI --><TUICallKit style="width: 650px; height: 500px " /></div></template>
2. 调用 TUICallKitAPI.init API 登录组件,需要在代码中
填写 SDKAppID、SecretKey 两个参数。您可以选择在
src/App.vue 文件引入示例代码,示例代码采用的是 Vue3 Composition API 写法。<script setup>import { ref } from 'vue';import { TUICallKit, TUICallKitAPI, CallMediaType } from "@trtc/calls-uikit-vue";import * as GenerateTestUserSig from "./debug/GenerateTestUserSig-es"; // Refer to Step 3const SDKAppID = 0; // TODO: Replace with your SDKAppID (Notice: SDKAppID is of type number)const SecretKey = 'xx'; // TODO: Replace with your SecretKeyconst callerUserID = ref('');const calleeUserID = ref('');//【2】Initialize the TUICallKit componentconst init = async () => {const { userSig } = GenerateTestUserSig.genTestUserSig({userID: callerUserID.value,SDKAppID,SecretKey: SecretKey,});await TUICallKitAPI.init({userID: callerUserID.value,userSig,SDKAppID,// tim: this.tim // 如果工程中已有 tim 实例,需在此处传入});alert('TUICallKit init succeed');}</script><style scoped>.demo-wrapper { max-width: 680px; margin: 40px auto; padding: 0 20px; font-family: system-ui, -apple-system, sans-serif; } .demo-card { background: #fff; border-radius: 16px; box-shadow: 0 4px 24px rgba(0,0,0,0.08); padding: 32px; margin-bottom: 24px; } .demo-title { margin: 0 0 28px; font-size: 22px; font-weight: 600; color: #1a1a2e; text-align: center; } .form-row { margin-bottom: 18px; } .form-row:last-of-type { margin-bottom: 0; } .form-label { display: block; font-size: 14px; font-weight: 600; color: #6b7280; letter-spacing: 0.5px; margin-bottom: 8px; } .form-controls { display: flex; gap: 10px; } .form-input { flex: 1; height: 42px; padding: 0 14px; border: 1.5px solid #e5e7eb; border-radius: 10px; font-size: 15px; color: #1a1a2e; background: #fafafa; outline: none; transition: border-color .2s, box-shadow .2s; } .form-input:focus { border-color: #6366f1; box-shadow: 0 0 0 3px rgba(99,102,241,0.15); background: #fff; } .form-input::placeholder { color: #c0c4cc; } .btn { height: 42px; padding: 0 20px; border: none; border-radius: 10px; font-size: 14px; font-weight: 600; cursor: pointer; white-space: nowrap; transition: transform .15s, box-shadow .2s, background .2s; } .btn:active { transform: scale(0.97); } .btn-primary { background: linear-gradient(135deg, #6366f1, #818cf8); color: #fff; box-shadow: 0 2px 8px rgba(99,102,241,0.3); } .btn-primary:hover { background: linear-gradient(135deg, #4f46e5, #6366f1); box-shadow: 0 4px 14px rgba(99,102,241,0.4); } .btn-success { background: linear-gradient(135deg, #10b981, #34d399); color: #fff; box-shadow: 0 2px 8px rgba(16,185,129,0.3); } .btn-success:hover { background: linear-gradient(135deg, #059669, #10b981); box-shadow: 0 4px 14px rgba(16,185,129,0.4); } .callkit-area { background: #fff; border-radius: 16px; box-shadow: 0 4px 24px rgba(0,0,0,0.08); overflow: hidden; }</style>
import { TUICallKit, TUICallKitAPI, CallMediaType } from "@trtc/calls-uikit-vue2";import * as GenerateTestUserSig from "./debug/GenerateTestUserSig-es";export default {name: 'App',data() {return {callerUserID: '',calleeUserID: '',SDKAppID: 0, // TODO: Replace with your SDKAppIDSecretKey: 'xx', // TODO: Replace with your SecretKey};},components: {TUICallKit},methods: {//【2】Initialize the TUICallKit componentasync init() {try {const { userSig } = GenerateTestUserSig.genTestUserSig({userID: this.callerUserID,SDKAppID: Number(this.SDKAppID),SecretKey: this.SecretKey,});await TUICallKitAPI.init({SDKAppID: Number(this.SDKAppID),userID: this.callerUserID,userSig,// tim: this.tim // 如果工程中已有 tim 实例,需在此处传入});alert("[TUICallKit] Initialization succeeds.");} catch (error) {alert(`[TUICallKit] Initialization failed. Reason: ${error}`);}},}}
1.
main.ts 文件注册 @vue/composition-api 。import Vue from 'vue'import VueCompositionAPI from '@vue/composition-api'Vue.use(VueCompositionAPI)
2. 将下面代码直接复制引用在
App.vue 文件中。import { TUICallKit, TUICallKitAPI, CallMediaType } from "@trtc/calls-uikit-vue2.6";import * as GenerateTestUserSig from "./debug/GenerateTestUserSig-es";export default {name: 'App',data() {return {callerUserID: '',calleeUserID: '',SDKAppID: 0, // TODO: Replace with your SDKAppIDSecretKey: 'xx', // TODO: Replace with your SecretKey};},components: {TUICallKit},methods: {//【2】Initialize the TUICallKit componentasync init() {try {const { userSig } = GenerateTestUserSig.genTestUserSig({userID: this.callerUserID,SDKAppID: Number(this.SDKAppID),SecretKey: this.SecretKey,});await TUICallKitAPI.init({SDKAppID: Number(this.SDKAppID),userID: this.callerUserID,userSig,// tim: this.tim // 如果工程中已有 tim 实例,需在此处传入});alert("[TUICallKit] Initialization succeeds.");} catch (error) {alert(`[TUICallKit] Initialization failed. Reason: ${error}`);}},}}
参数 | 类型 | 说明 |
userID | String | 用户的唯一标识符,由您定义,只允许包含大小写英文字母(a-z A-Z)、数字(0-9)及下划线和连词符。 |
SDKAppID | Number | |
SDKSecretKey | String | |
userSig | String | 一种安全保护签名,用于对用户进行登录鉴权认证,确认用户是否真实,阻止恶意攻击者盗用您的云服务使用权。 |
userSig 说明:
开发环境:如果您正在本地跑通 Demo、开发调试,可以采用 debug 文件中的
genTestUserSig(参考步骤3.2)函数生成 userSig。该方法中 SDKSecretKey 很容易被反编译逆向破解,一旦您的密钥泄露,攻击者就可以盗用您的腾讯云流量。生产环境:如果您的项目要发布上线,请采用 服务端生成 UserSig 的方式。
步骤3:设置昵称和头像(可选)
try {await TUICallKitAPI.setSelfInfo({nickName: "jack",avatar: "http://xxx",});} catch (error: any) {alert(`[TUICallKit] Failed to call the setSelfInfo API. Reason: ${error}`);}
注意:
因为用户隐私限制,非好友之间的通话,被叫的昵称和头像更新可能会有延迟,一次通话成功后就会顺利更新。
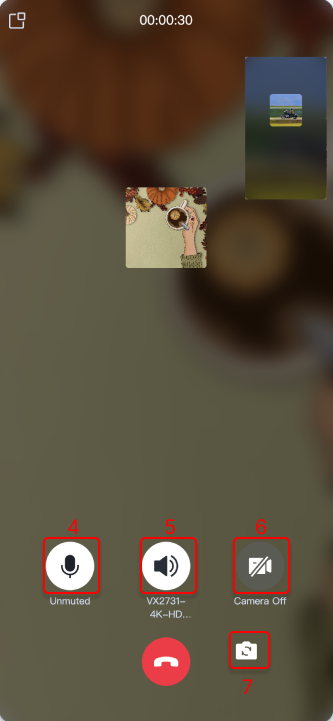
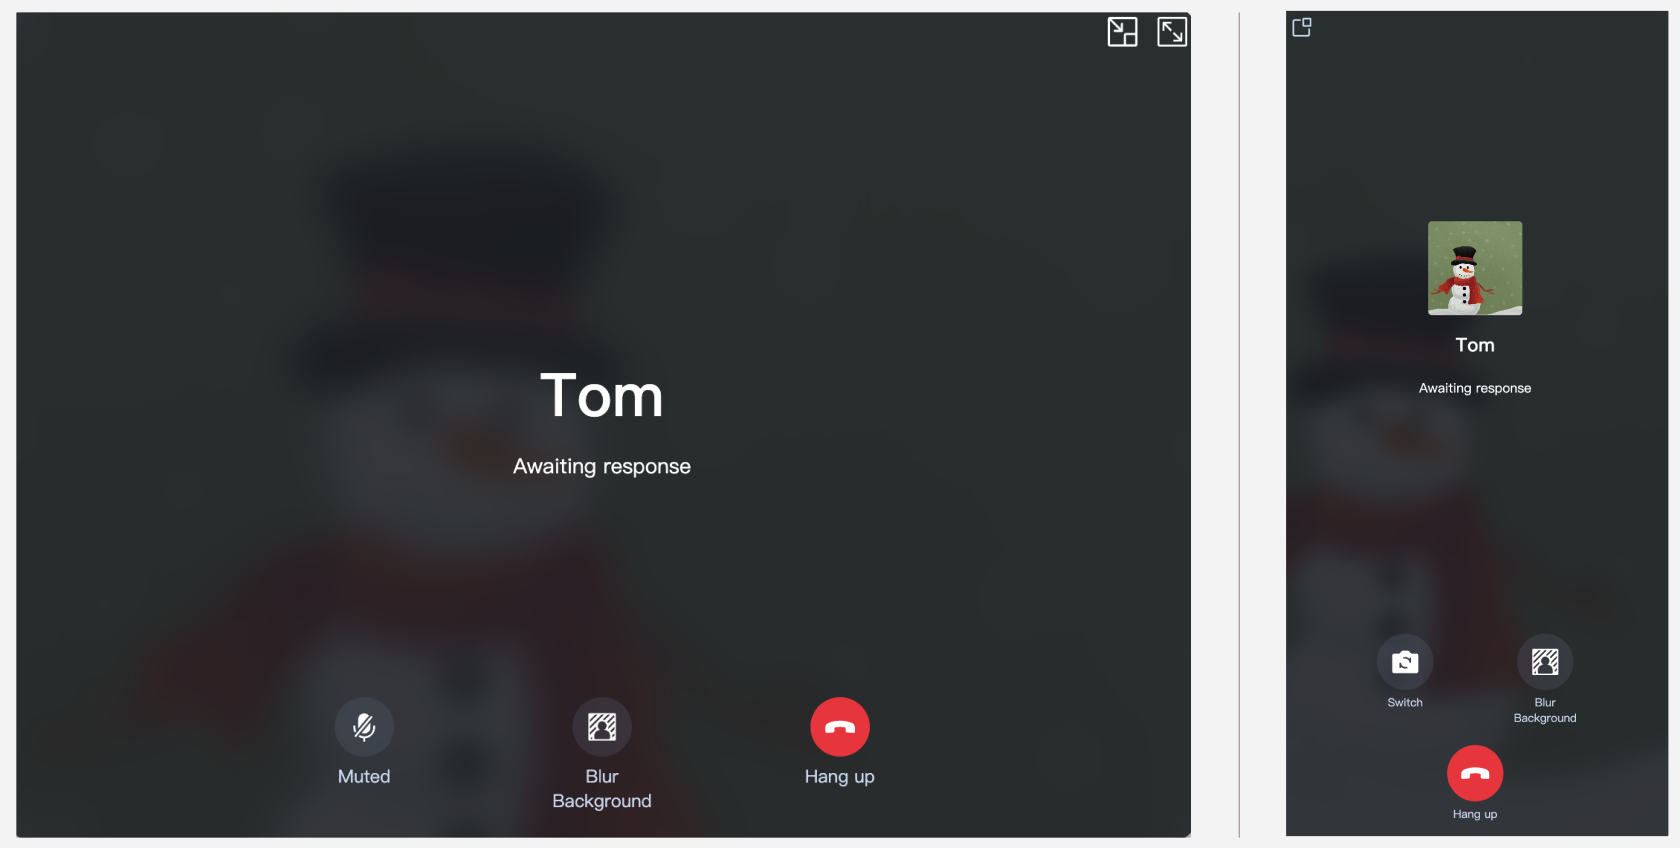
步骤4:发起通话
拨打方可以通过调用 calls 函数,并指定通话类型和被叫方的 userID,来发起语音或视频通话。
calls 接口同时支持一对一通话和多人通话。当 userIDList 中包含一个 userID 时,为一对一通话;当 userIDList 包含多个 userID 时,则为多人通话。1. 调用 TUICallKitAPI.calls API 拨打通话。
//【3】Make a 1v1 video callconst call = async () => {await TUICallKitAPI.calls({userIDList: [calleeUserID.value],type: CallMediaType.VIDEO,});};
//【3】Make a 1v1 video callasync call () {await TUICallKitAPI.calls({userIDList: [this.calleeUserID],type: CallMediaType.VIDEO,});}
//【3】Make a 1v1 video callasync call () {await TUICallKitAPI.calls({userIDList: [this.calleeUserID],type: CallMediaType.VIDEO,});}
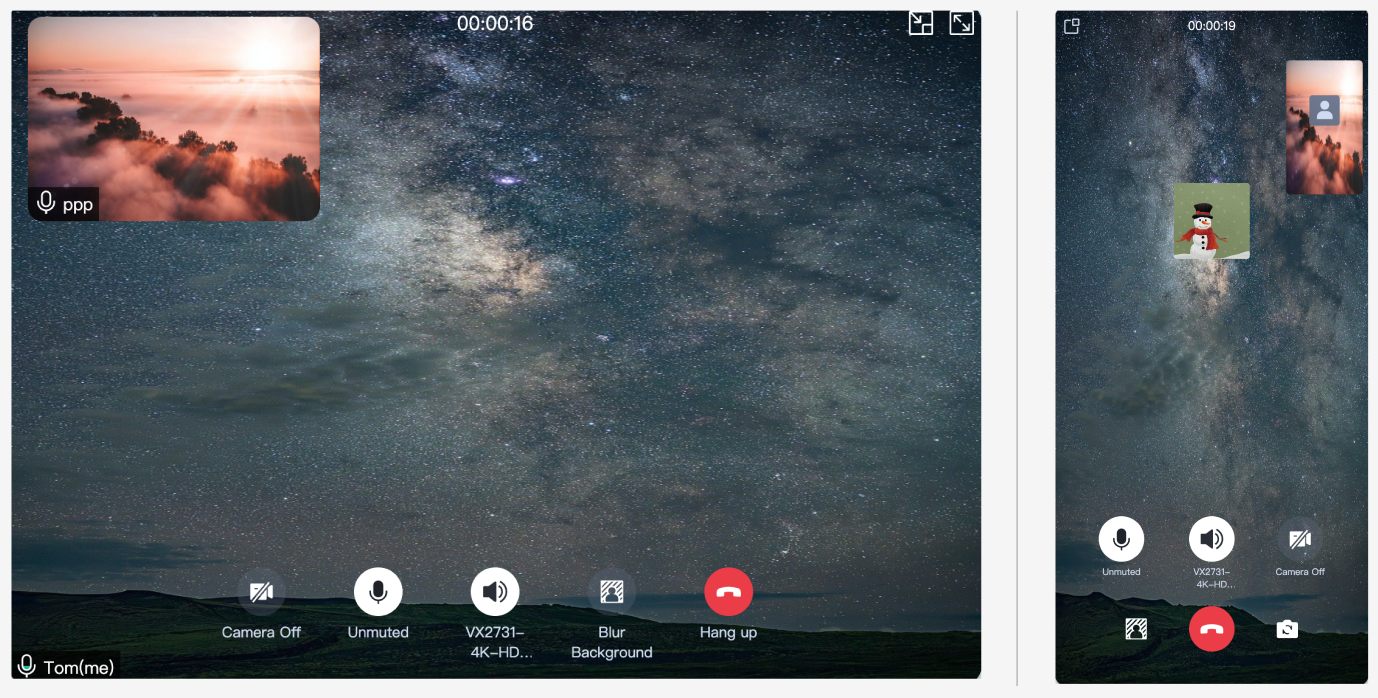
2. 运行项目。
注意:
3. 打开两个浏览器页面,输入不同的 userID(由您定义) 单击
step1. init 登录(主叫方和被叫方)。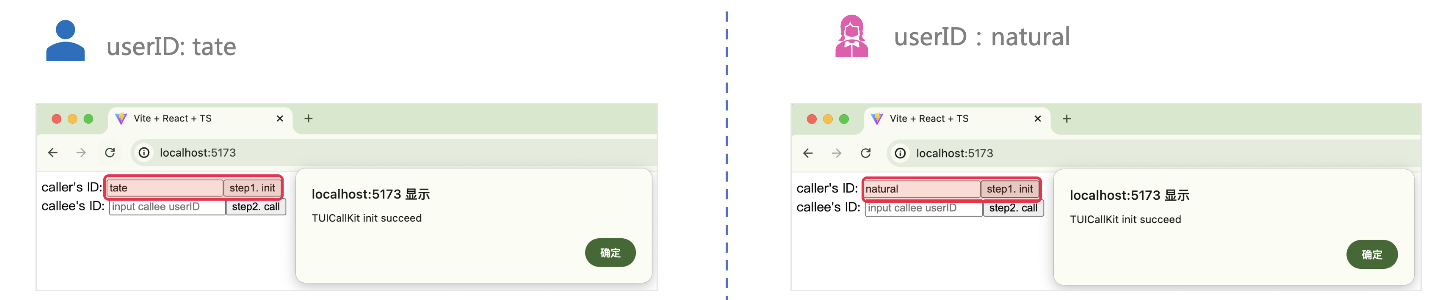
4. 两个 userID 都登录成功后,单击
step2. call 拨打通话,如果您有通话问题,参见 常见问题。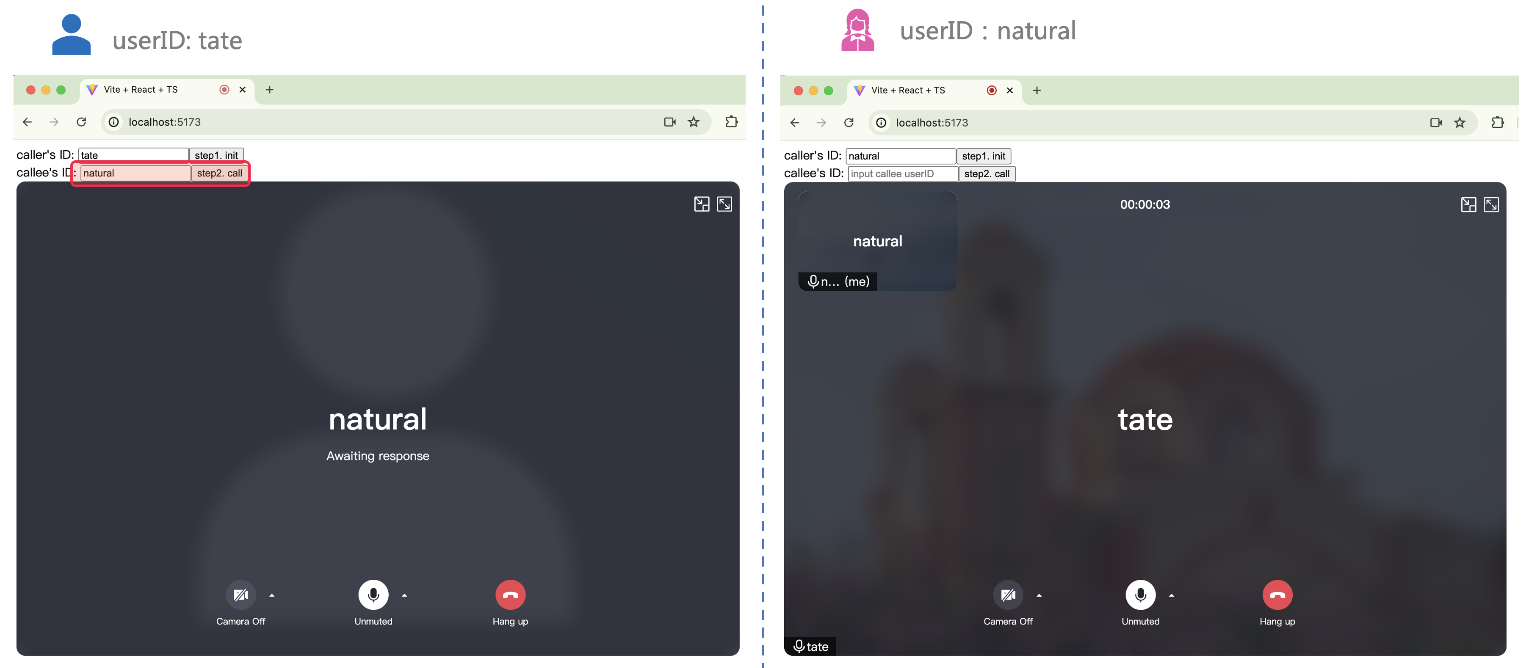
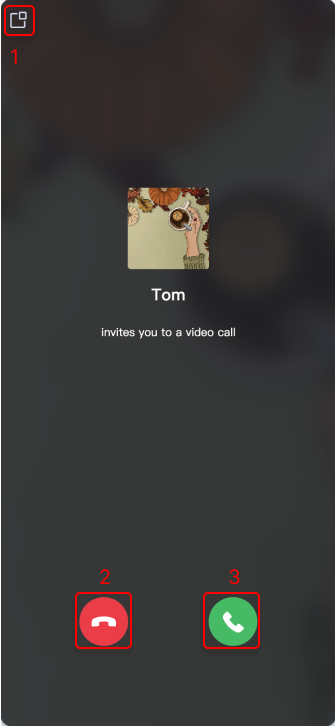
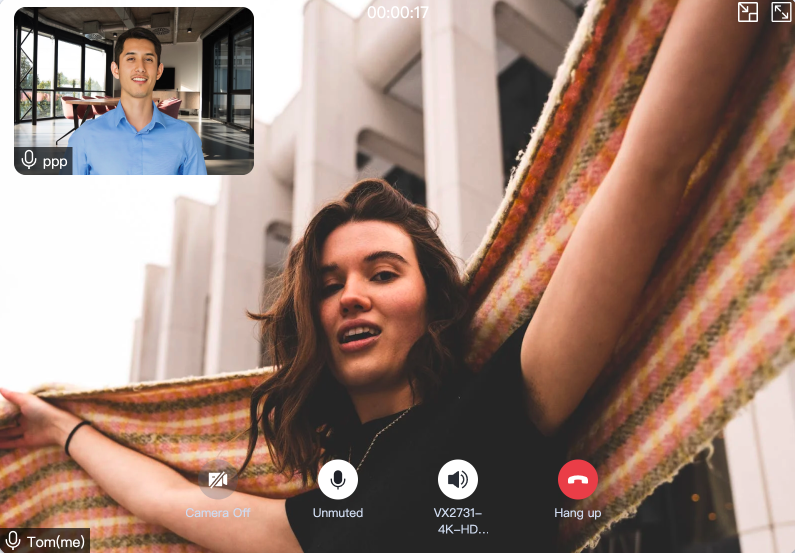
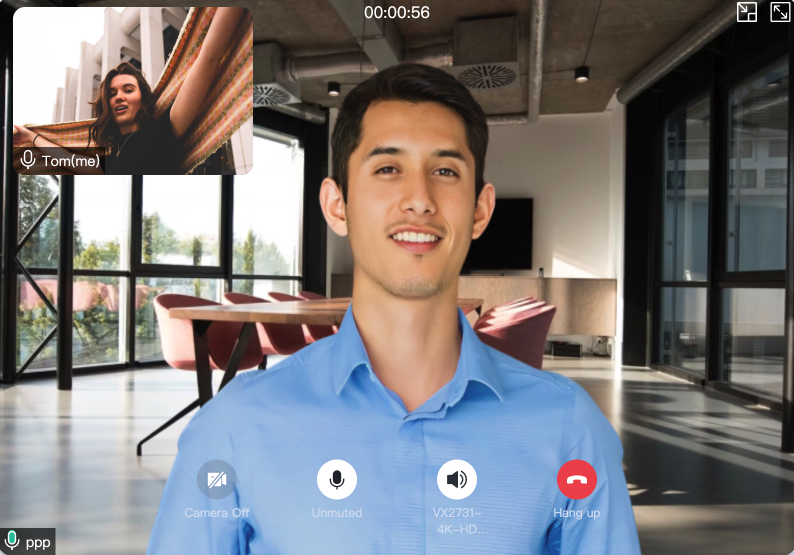
步骤5:接听通话
接听端完成登录后,拨打端发起通话,接收端就可以收到通话邀请,同时伴随铃声。
更多功能
AI 转录与翻译
说明:
v4.4.5 版本及以上支持。
您可以通过调用
enableAITranscriber 开启/关闭 AI 转录与翻译功能。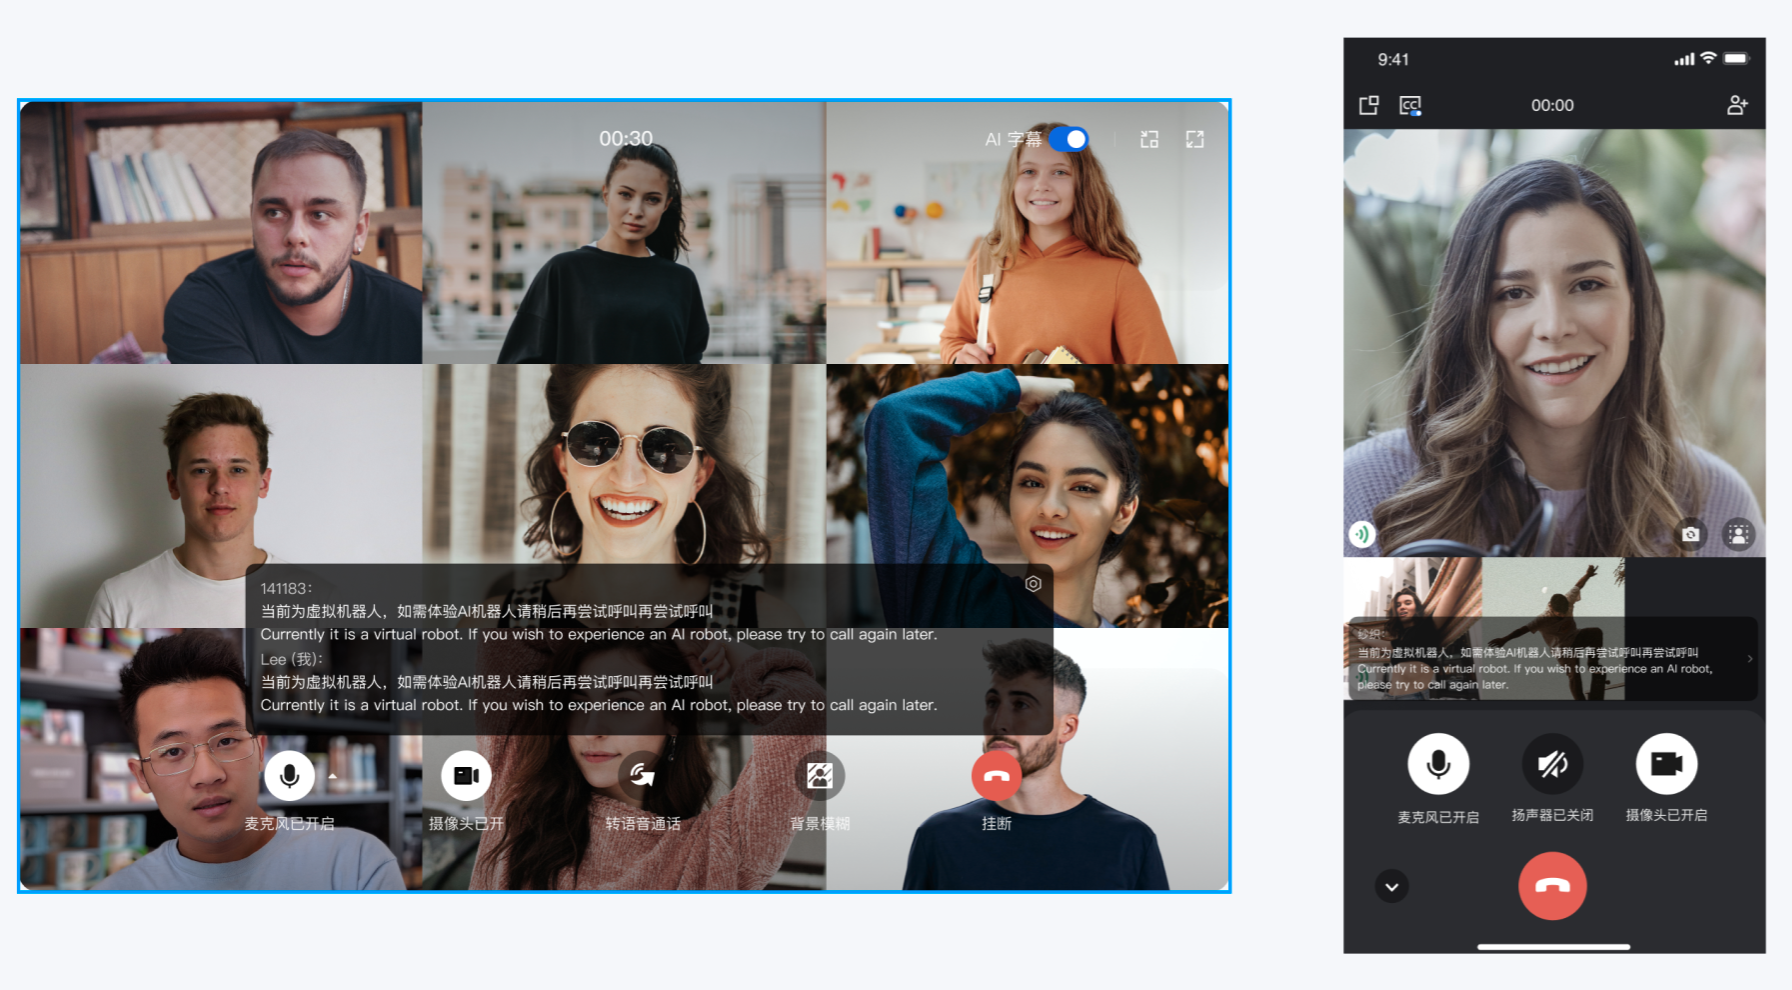
注意:
该功能默认为关闭状态。如需开启,请在发起通话前调用
enableAITranscriber(true)。enableAITranscriber
TUICallKitAPI.enableAITranscriber(true)
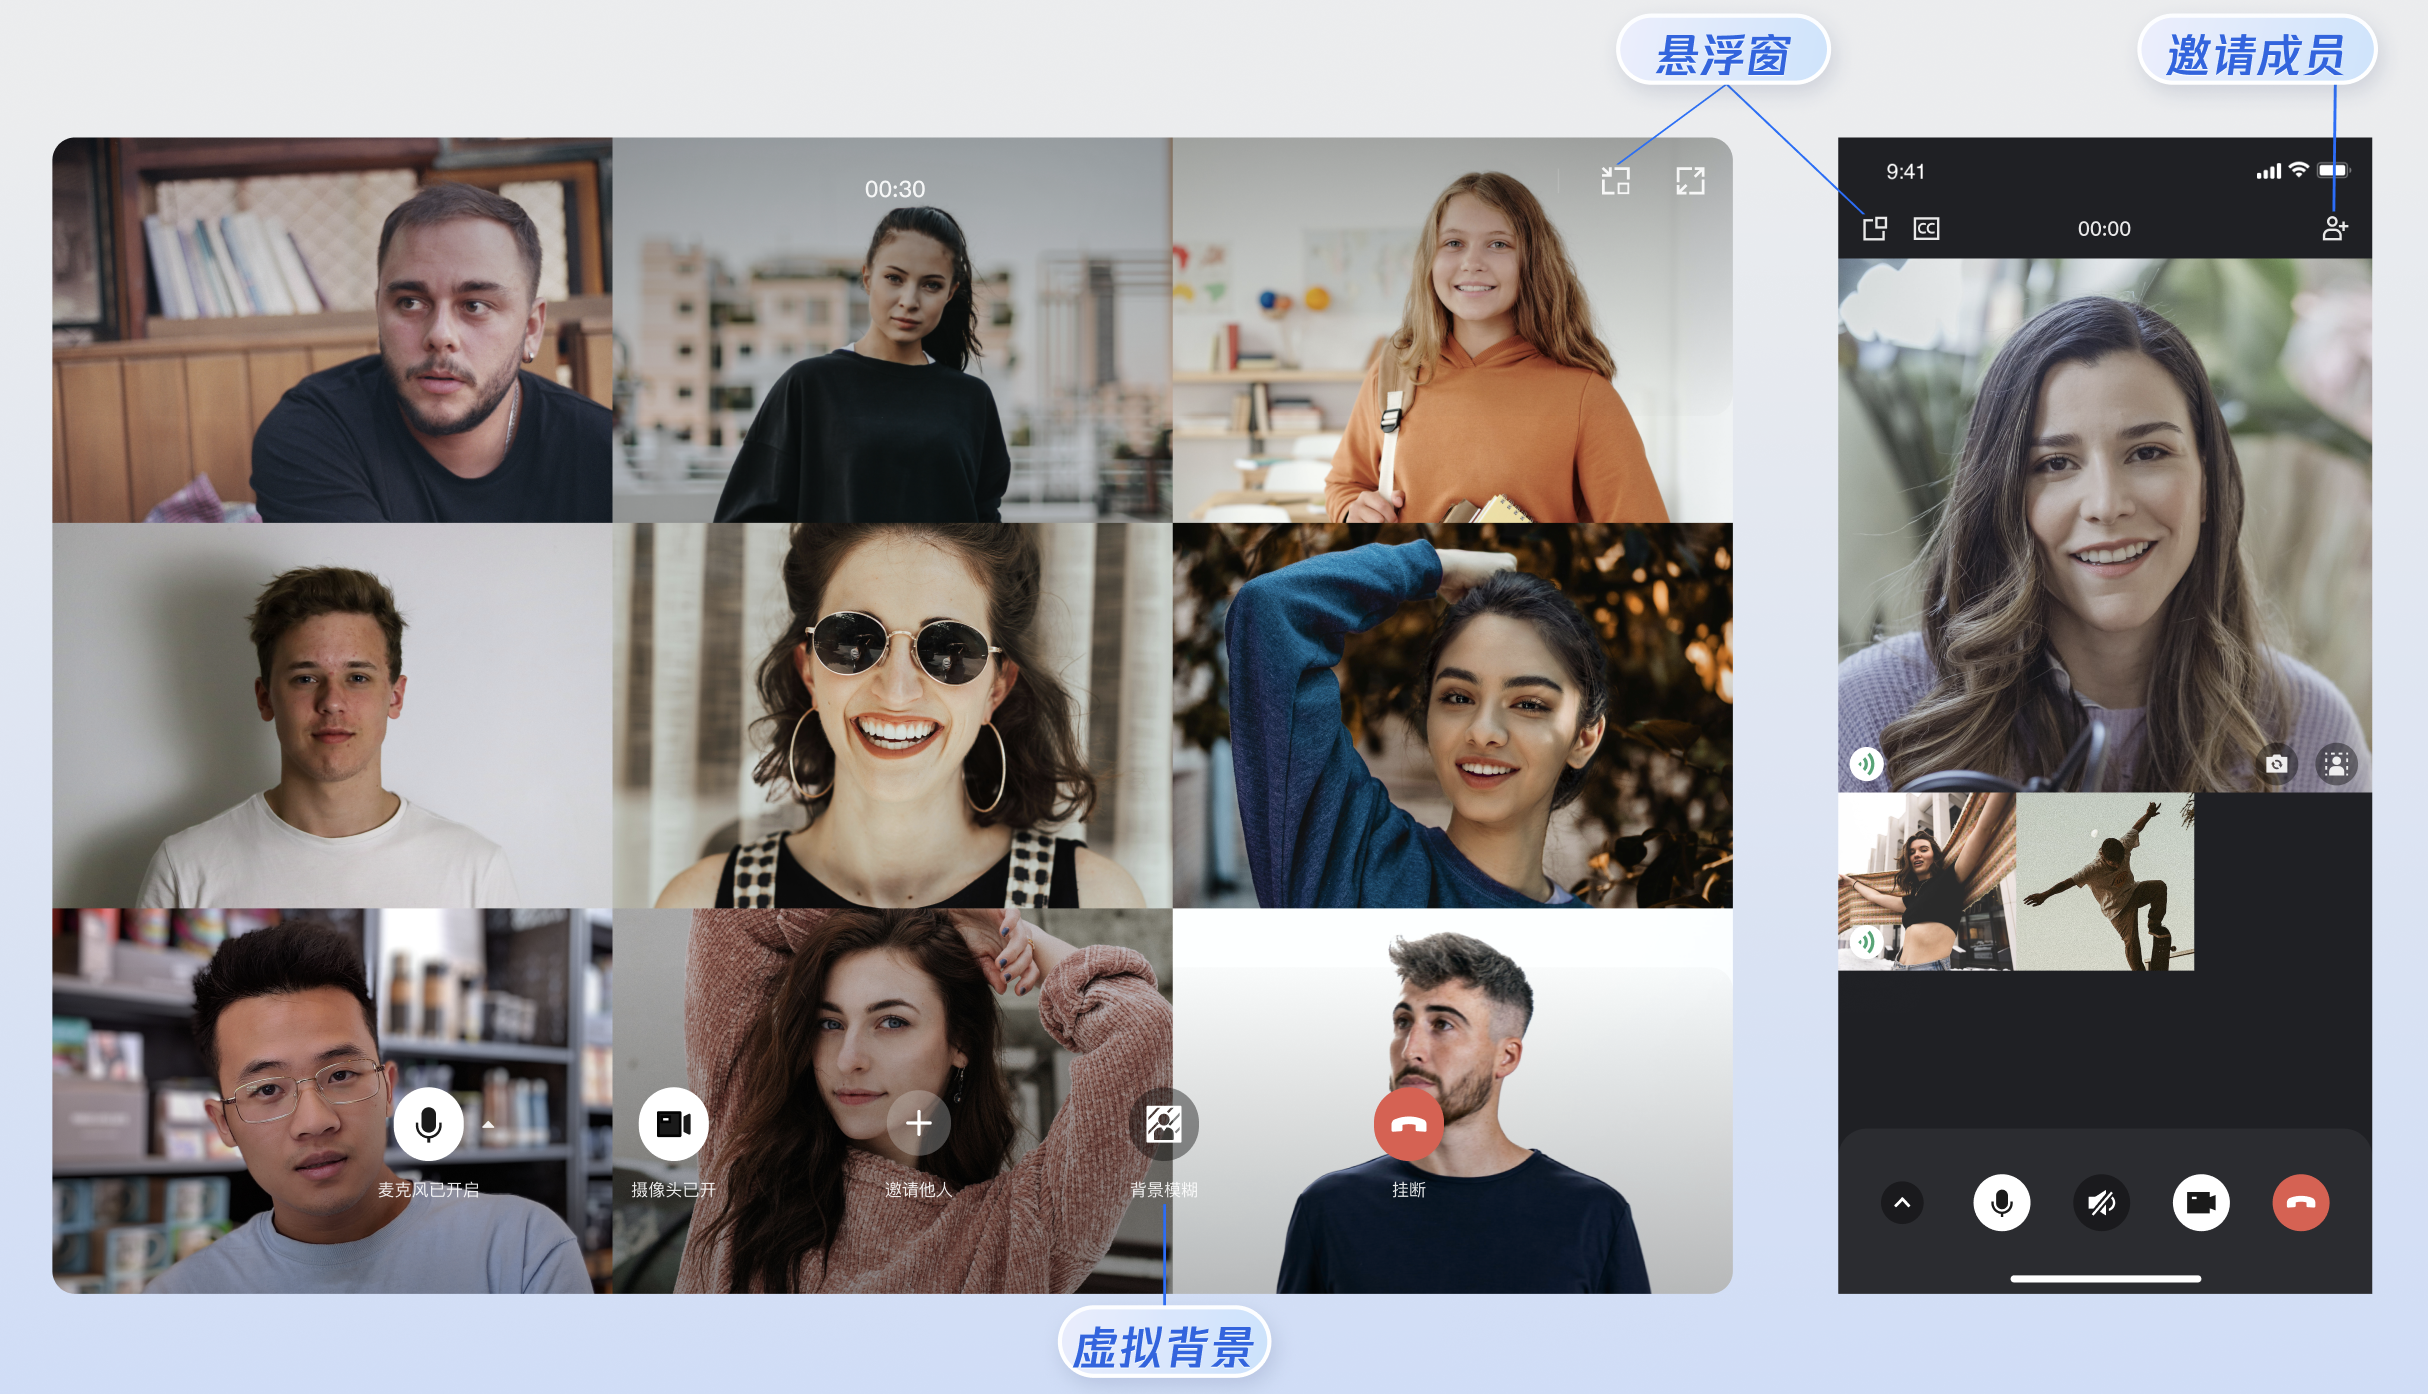
开启悬浮窗功能
您可以通过调用 enableFloatWindow 开启/关闭悬浮窗功能,在初始化 TUICallKit 组件时启用该功能,默认状态为关闭(false)。可通过点击通话界面左上角的悬浮窗按钮,将通话界面缩小为悬浮窗形式。
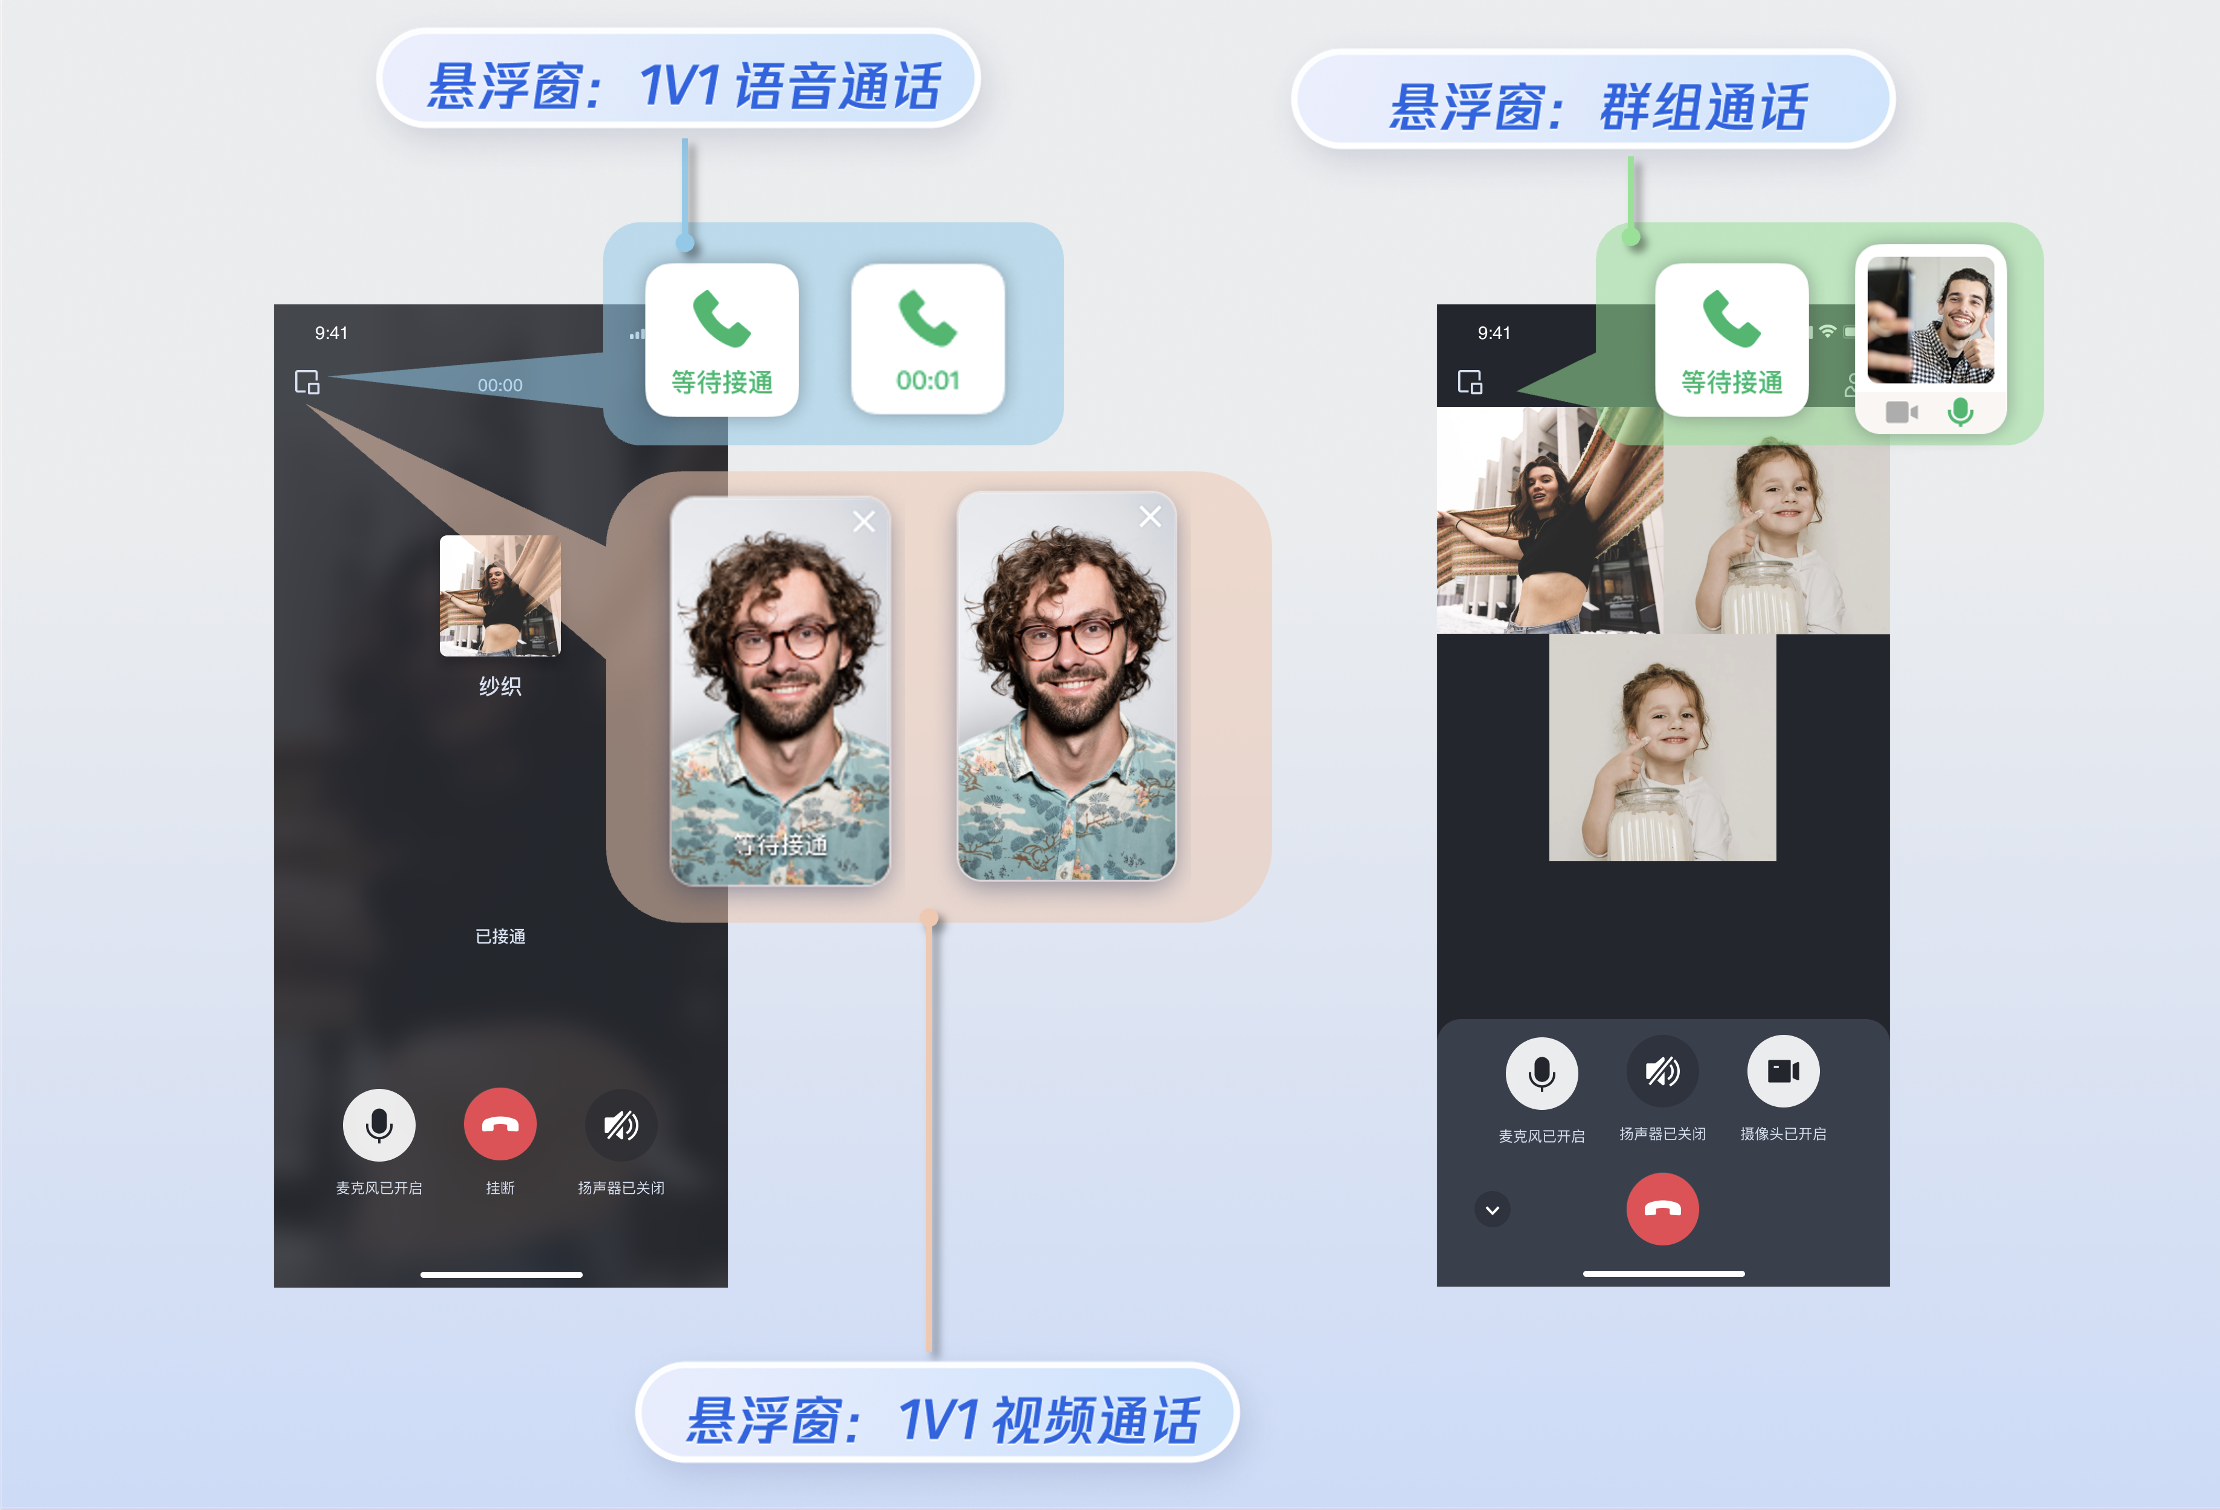
调用
enableFloatWindow(enable: boolean) API 开启/关闭悬浮窗。TUICallKitAPI.enableFloatWindow(true)
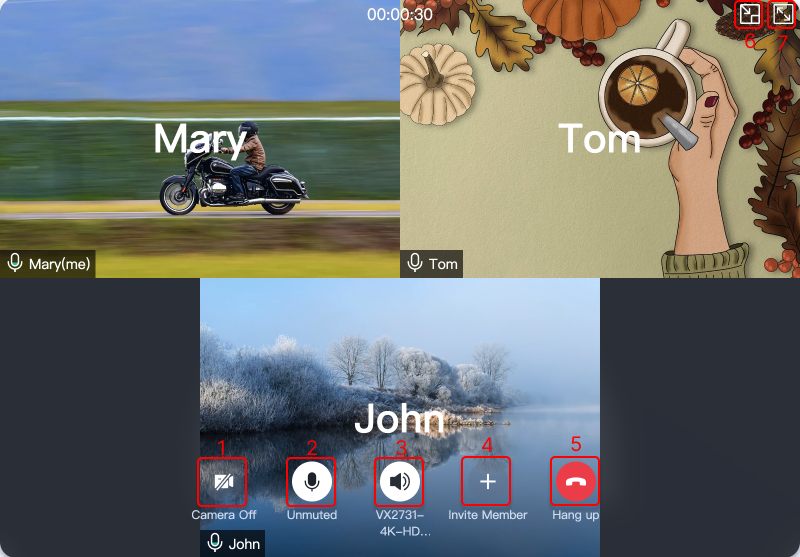
多人通话
主叫方使用
calls 方法发起通话时,若被叫用户列表超过一人,则自动视为群组通话。其他成员可通过 join 方法加入该多人通话。发起多人通话:使用
calls 方法发起通话时,若被叫用户列表(userIDList)超过一人,则自动视为群组通话。calls
try {const params = {userIDList: ['user1', 'user2'],type: TUICallType.VIDEO,}await TUICallKitAPI.calls(params);} catch (error: any) {alert(`[TUICallKit] groupCall failed. Reason:${error}`);}
参数 | 类型 | 说明 |
userIDList | List<String> | 目标用户的 userId 列表。 |
type | 通话的媒体类型,例如视频通话、语音通话。 |
加入多人通话:可使用
join 方法加入指定的群组通话。join
try {await TUICallKitAPI.join({callId: 'xxx'});} catch (error: any) {alert(`[TUICallKit] join failed. Reason: ${error}`);}
参数 | 类型 | 说明 |
callId | String | 此次通话的唯一标识。 |
语言设置
设置支持的语言
支持的语言:目前支持简体中文、英文、日文。
切换语言:TUICallKit 会优先获取浏览器语言,如果是中文,英文或者日文中的一种,则以浏览器语言为主,否则使用英文。如果想切换语言,可以使用 setLanguage 接口。以设置语言为英文示例代码如下:
setLanguage
import { TUICallKitAPI } from '@trtc/calls-uikit-vue';TUICallKitAPI.setLanguage("zh-cn"); // "en" | "zh-cn" | "ja_JP"
参数 | 类型 | 说明 |
language | String | 设置的语言: "zh-cn":中文简体。 "en":英文。 "ja_JP":日文。 |
说明:
铃声设置
您可通过以下方式设置默认铃声、来电静音模式。
设置默认铃声(方式1):通过 setCallingBell 接口设置被叫端收到的来电铃声。
注意:
仅限传入本地 MP3 格式的文件地址,确保该文件是可以访问的。
如需恢复默认铃声 filePath 传空即可。
使用 ES6 import 方式引入铃声文件。
import filePath from './static/ring.mp3';try {await TUICallKitAPI.setCallingBell(filePath?: string);} catch (error: any) {alert(`[TUICallKit] setCallingBell API failed. Reason: ${error}`);}
设置默认铃声(方式2):如果您通过源码集成 TUICallKit 组件,可通过替换铃声文件来达到替换铃声的目的。
文件名 | 用途 |
phone_dialing.mp3 | 发起呼叫时的铃音 |
phone_ringing.mp3 | 接到呼叫时的铃音 |
来电静音模式:您可以通过 enableMuteMode 设置静音模式。
try {await TUICallKitAPI.enableMuteMode(enable: boolean);} catch (error: any) {alert(`[TUICallKit] enableMuteMode API failed. Reason: ${error}`);}
自定义您的 UI
替换图标按钮
替换图标需要先源码引入,将组件拷贝到您的项目中(源码为 TypeScript 版本)。
注意:
替换图标适用于 Vue + TypeScript 项目且 CallKit 版本号 ≥ 3.2.2,若您采用其他语言或者技术栈,请使用自实现 UI 方案。
1. 下载源码
npm install @trtc/calls-uikit-vue
npm install @trtc/calls-uikit-vue2
npm install @trtc/calls-uikit-vue2.6
2. 将源码拷贝到自己的项目中,以拷贝到
src/components/ 目录为例:mkdir -p ./src/components/TUICallKit && cp -r ./node_modules/@trtc/calls-uikit-vue/* ./src/components/TUICallKit
mkdir -p ./src/components/TUICallKit && cp -r ./node_modules/@trtc/calls-uikit-vue2/* ./src/components/TUICallKit
xcopy .\\node_modules\\@trtc\\calls-uikit-vue .\\src\\components\\TUICallKit /i /e
xcopy .\\node_modules\\@trtc\\calls-uikit-vue2 .\\src\\components\\TUICallKit /i /e
mkdir -p ./src/components/TUICallKit && cp -r ./node_modules/@trtc/calls-uikit-vue2.6/* ./src/components/TUICallKit
xcopy .\\node_modules\\@tencentcloud\\call-uikit-vue2.6 .\\src\\components\\TUICallKit /i /e
3. 修改引入路径
import { TUICallKit, TUICallKitAPI, CallMediaType } from "./components/TUICallKit/src/index";
4.
解决源码拷贝可能导致的报错
如果您在使用 TUICallKit 组件时遇到了报错,请不要担心,大多数情况下这是由于 ESLint 和 TSConfig 配置不一致造成的。您可以查阅文档,按照要求正确配置即可。如果您需要帮助,请随时联系我们,我们将确保您能够成功地使用此组件。以下是几个常见的问题:
若 TUICallKit 与您项目的代码风格不一致导致报错,可将本组件目录屏蔽,如在项目根目录增加
.eslintignore 文件,如:# .eslintignoresrc/components/TUICallKit
1. 如遇 Cannot find module '../package.json' 报错,是因为 TUICallKit 内引用了 JSON 文件,可在 tsconfig.json 中添加相关配置,示例:
{"compilerOptions": {"resolveJsonModule": true}}
2. 如遇 Uncaught SyntaxError: Invalid or unexpected token 报错,是因为 TUICallKit 使用了装饰器,可在 tsconfig.json 中添加相关配置,示例:
{"compilerOptions": {"experimentalDecorators": true}}
5. 修改 TUICallKit/Components/assets 文件夹下的图标组件
注意:
为了确保整个应用中的图标色调风格保持一致,请在替换时保持图标文件的名字不变。
序号 | 资源路径 | 说明 |
1 | /TUICallKit/Components/assets/button/camera-close.svg | 关闭摄像头图标 |
2 | /TUICallKit/Components/assets/button/microphone-open.svg | 打开麦克风图标 |
3 | /TUICallKit/Components/assets/button/speaker-open.svg | 打开扬声器图标 |
4 | /TUICallKit/Components/assets/button/desktop/inviteUser.svg | 通话过程中邀请用户图标 |
5 | /TUICallKit/Components/assets/button/hangup.svg | 挂断通话图标 |
6 | /TUICallKit/Components/assets/button/desktop/minimize.svg | 悬浮窗切换图标 |
7 | /TUICallKit/Components/assets/button/desktop/fullScreen.svg | 切换全屏图标 |
序号 | 资源路径 | 说明 |
1 | /TUICallKit/Components/assets/button/mobile/minimize.svg | 悬浮窗切换图标 |
2 | /TUICallKit/Components/assets/button/hangup.svg | 挂断通话图标 |
3 | /TUICallKit/Components/assets/button/accept.svg | 接听通话图标 |
4 | /TUICallKit/Components/assets/button/microphone-open.svg | 打开麦克风图标 |
5 | /TUICallKit/Components/assets/button/speaker-open.svg | 打开扬声器图标 |
6 | /TUICallKit/Components/assets/button/camera-close.svg | 关闭摄像头图标 |
7 | /TUICallKit/Components/assets/button/switchCamera.svg | 切换前后摄像头图标 |
隐藏按钮
注意:
v3.2.9+ 支持。
以隐藏摄像头按钮为例。
import { TUICallKitAPI, FeatureButton } from "@trtc/calls-uikit-vue";TUICallKitAPI.hideFeatureButton(FeatureButton.Camera);
import { TUICallKitAPI, FeatureButton } from "@trtc/calls-uikit-vue2";TUICallKitAPI.hideFeatureButton(FeatureButton.Camera);
import { TUICallKitAPI, FeatureButton } from "@trtc/calls-uikit-vue2.6";TUICallKitAPI.hideFeatureButton(FeatureButton.Camera);
自定义通话背景图
通话背景图会在语音通话或者视频通话关闭摄像头后出现,通过调用 setLocalViewBackgroundImage 修改本地用户通话界面背景图,setRemoteViewBackgroundImage 修改远端用户通话界面背景图。
注意:
v3.2.9+ 支持。
import { TUICallKitAPI } from "@trtc/calls-uikit-vue";TUICallKitAPI.setLocalViewBackgroundImage('http://xxx.png');TUICallKitAPI.setRemoteViewBackgroundImage('remoteUserId', 'http://xxx.png');
import { TUICallKitAPI } from "@trtc/calls-uikit-vue2";TUICallKitAPI.setLocalViewBackgroundImage('http://xxx.png');TUICallKitAPI.setRemoteViewBackgroundImage('remoteUserId', 'http://xxx.png');
import { TUICallKitAPI } from "@trtc/calls-uikit-vue2.6";TUICallKitAPI.setLocalViewBackgroundImage('http://xxx.png');TUICallKitAPI.setRemoteViewBackgroundImage('remoteUserId', 'http://xxx.png');
设置布局
注意:
仅 1V1 视频通话可用,v3.3.0+ 支持。
1. LocalInLargeView layout,本地用户在大窗:
2. RemoteInLargeView layout,远端用户在大窗:
import { TUICallKitAPI, LayoutMode } from "@trtc/calls-uikit-vue";TUICallKitAPI.setLayoutMode(LayoutMode.LocalInLargeView);
import { TUICallKitAPI, LayoutMode } from "@trtc/calls-uikit-vue2";TUICallKitAPI.setLayoutMode(LayoutMode.LocalInLargeView);
import { TUICallKitAPI, LayoutMode } from "@trtc/calls-uikit-vue2.6";TUICallKitAPI.setLayoutMode(LayoutMode.LocalInLargeView);
设置摄像头初始状态
以默认关闭摄像头为例:
import { TUICallKitAPI } from "@trtc/calls-uikit-vue";TUICallKitAPI.setCameraDefaultState(false);
import { TUICallKitAPI } from "@trtc/calls-uikit-vue2";TUICallKitAPI.setCameraDefaultState(false);
import { TUICallKitAPI } from "@trtc/calls-uikit-vue2.6";TUICallKitAPI.setCameraDefaultState(false);


