在腾讯云云服务器CVM中使用Cellpose-SAM进行高效细胞分割
原创
在腾讯云云服务器CVM中使用Cellpose-SAM进行高效细胞分割
原创
buzzfrog
发布于 2025-08-31 23:04:16
发布于 2025-08-31 23:04:16
细胞分割是生物医学图像分析中的关键任务,而Cellpose-SAM结合了两种先进模型的优势,为研究人员提供了更强大的分割工具。本文将介绍如何使用Cellpose-SAM进行推理,并提供一个完整的代码示例。
什么是Cellpose-SAM?
Cellpose是一个基于深度学习的通用细胞分割算法,能够准确识别各种类型的细胞。而SAM(Segment Anything Model)是Meta AI开发的通用分割模型,具有强大的零样本分割能力。Cellpose-SAM结合了两者的优势,先用Cellpose进行初步检测,再用SAM进行精细分割,从而获得更准确的结果。
下面详述在腾讯云云服务器CVM中使用docker以及Cellpose-SAM进行推理的过程。
腾讯云云服务器CVM购买
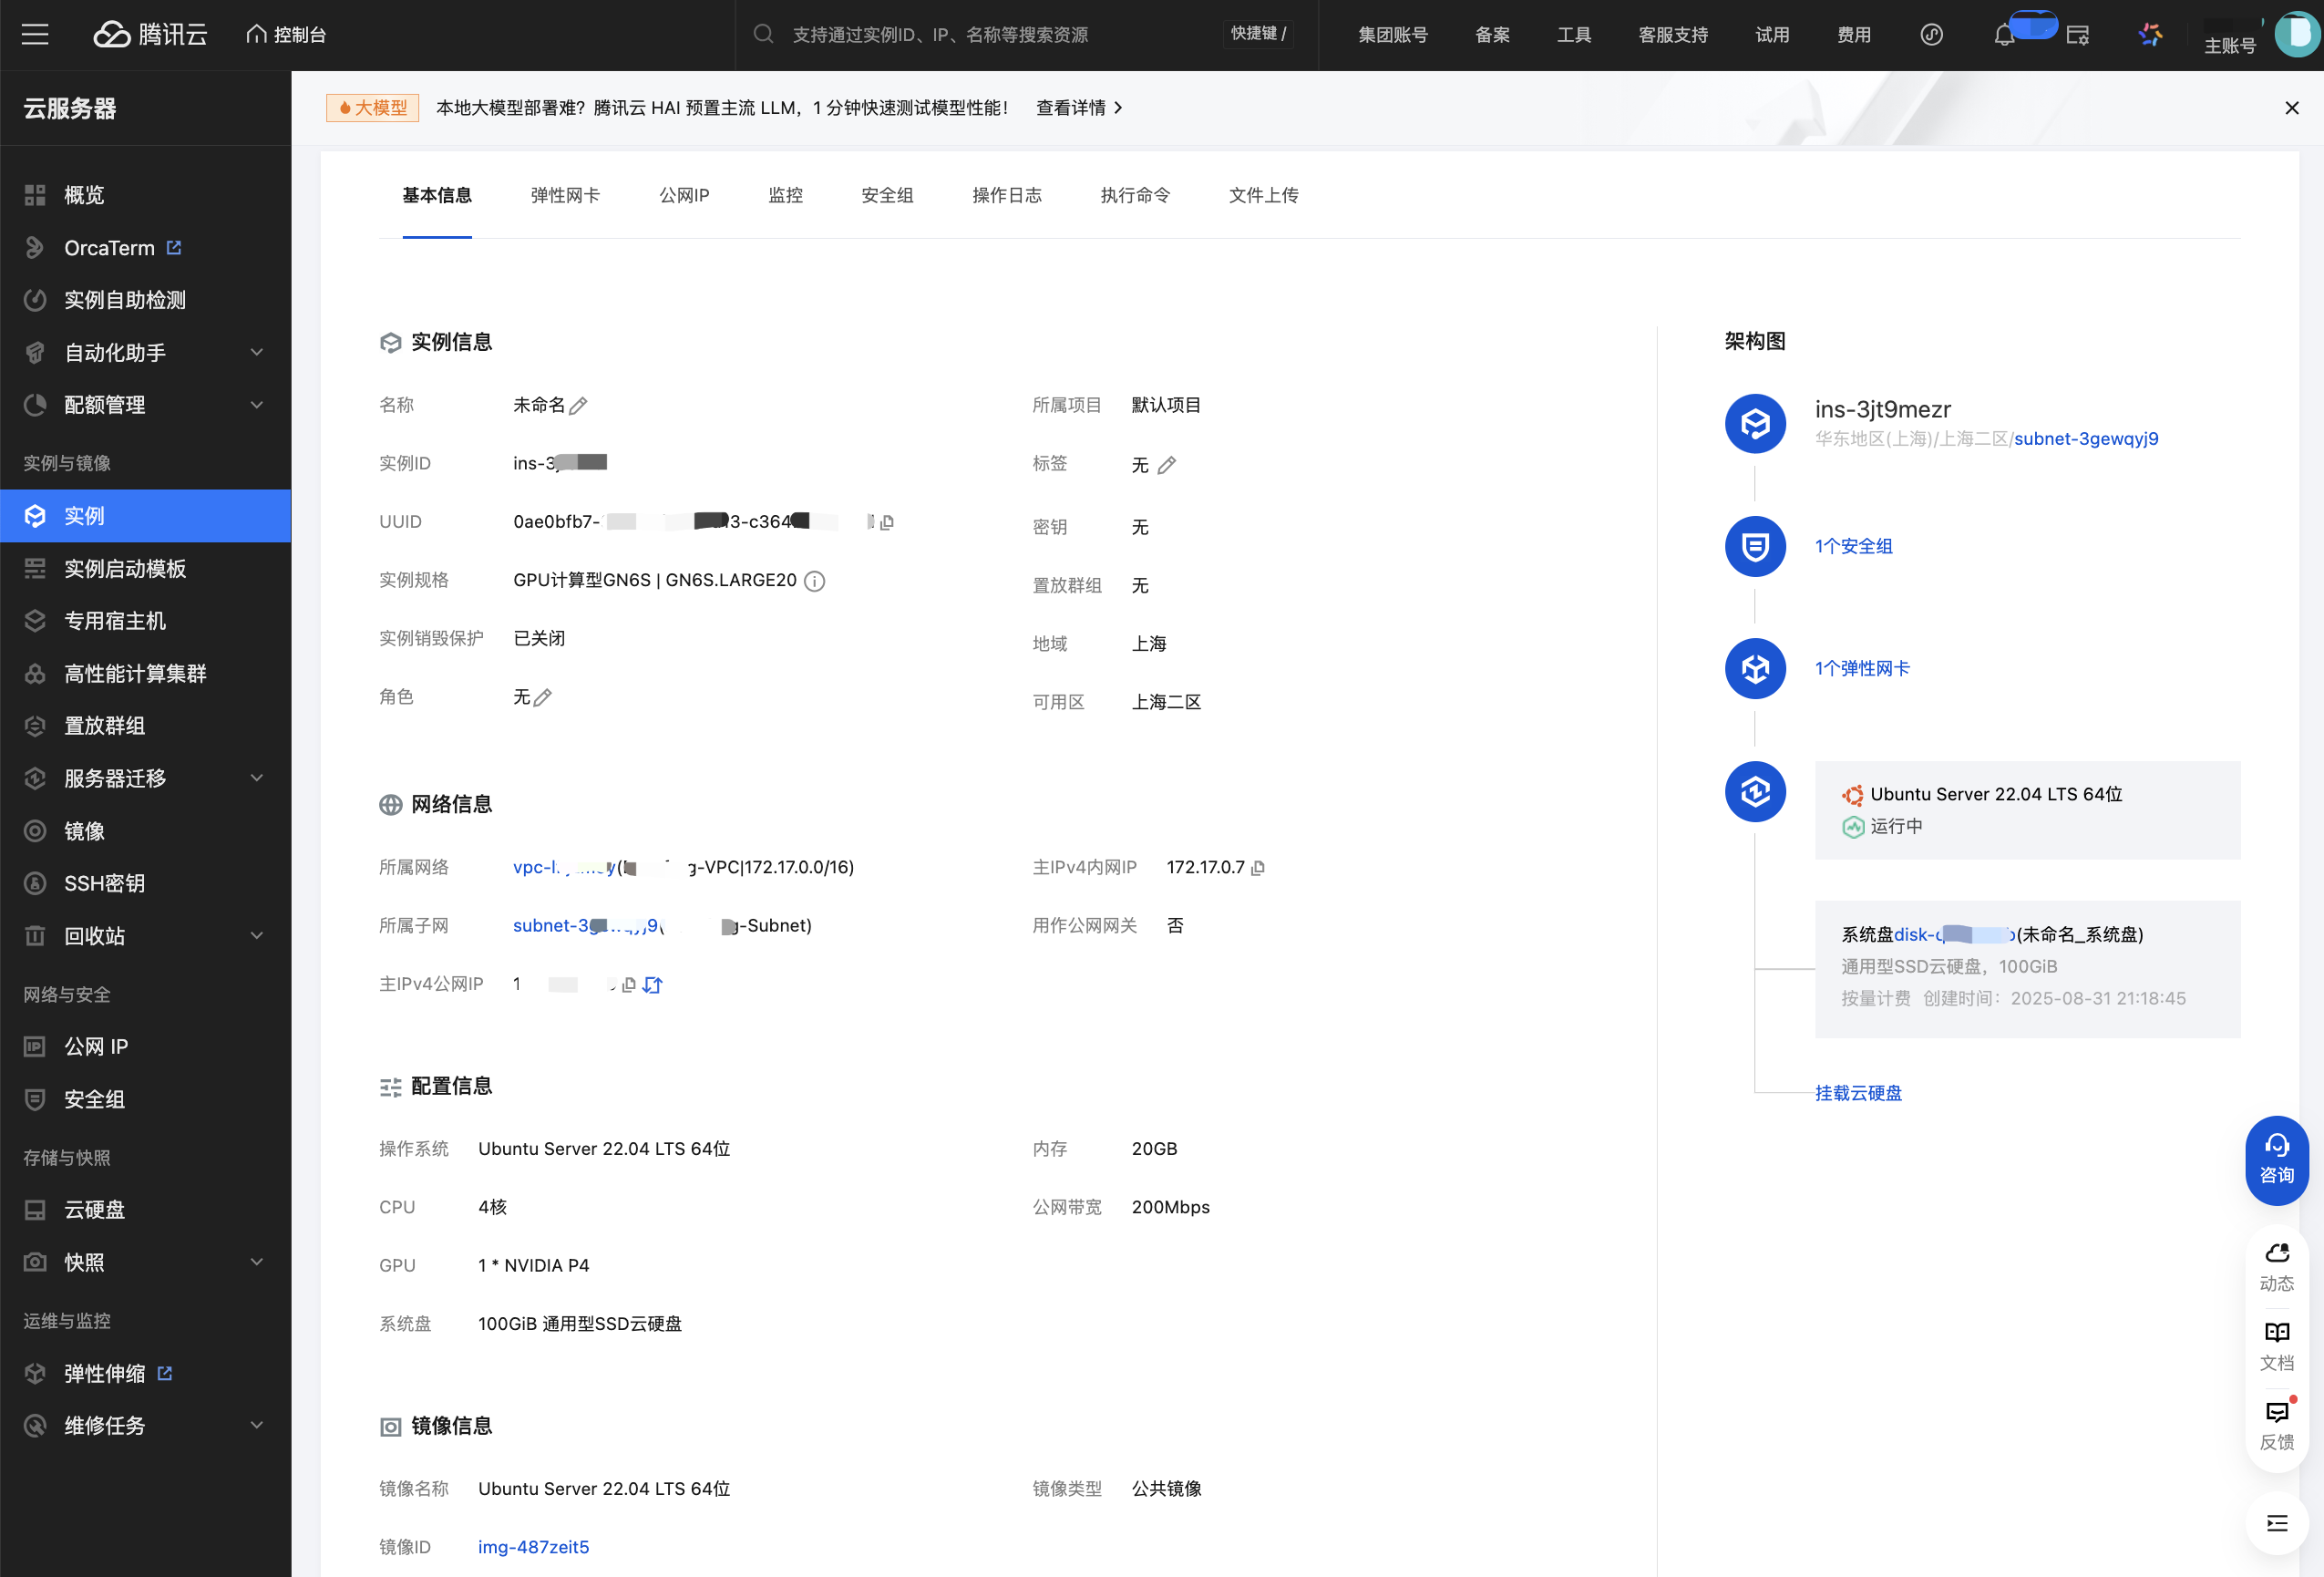
云服务器CVM配置信息
我租的是这一款,使用的是ubuntu20.04操作系统,在购买过程中需要安装GPU相关的驱动。
环境设置
首先,我们需要安装必要的依赖:
sudo apt update

sudo apt install docker.io

sudo usermod -aG docker ubuntu

curl -fsSL https://nvidia.github.io/libnvidia-container/gpgkey | sudo gpg --dearmor -o /usr/share/keyrings/nvidia-container-toolkit-keyring.gpg \
  && curl -s -L https://nvidia.github.io/libnvidia-container/stable/deb/nvidia-container-toolkit.list | \
    sed 's#deb https://#deb [signed-by=/usr/share/keyrings/nvidia-container-toolkit-keyring.gpg] https://#g' | \
    sudo tee /etc/apt/sources.list.d/nvidia-container-toolkit.list

sudo apt-get update

export NVIDIA_CONTAINER_TOOLKIT_VERSION=1.17.8-1
sudo apt-get install -y \
    nvidia-container-toolkit=${NVIDIA_CONTAINER_TOOLKIT_VERSION} \
    nvidia-container-toolkit-base=${NVIDIA_CONTAINER_TOOLKIT_VERSION} \
    libnvidia-container-tools=${NVIDIA_CONTAINER_TOOLKIT_VERSION} \
    libnvidia-container1=${NVIDIA_CONTAINER_TOOLKIT_VERSION}

sudo nvidia-ctk runtime configure --runtime=docker

sudo systemctl restart docker

docker pull pytorch/pytorch:2.8.0-cuda12.8-cudnn9-devel
docker run -it -d --name cellpose --gpus all pytorch/pytorch:2.8.0-cuda12.8-cudnn9-devel
docker exec -it cellpose bash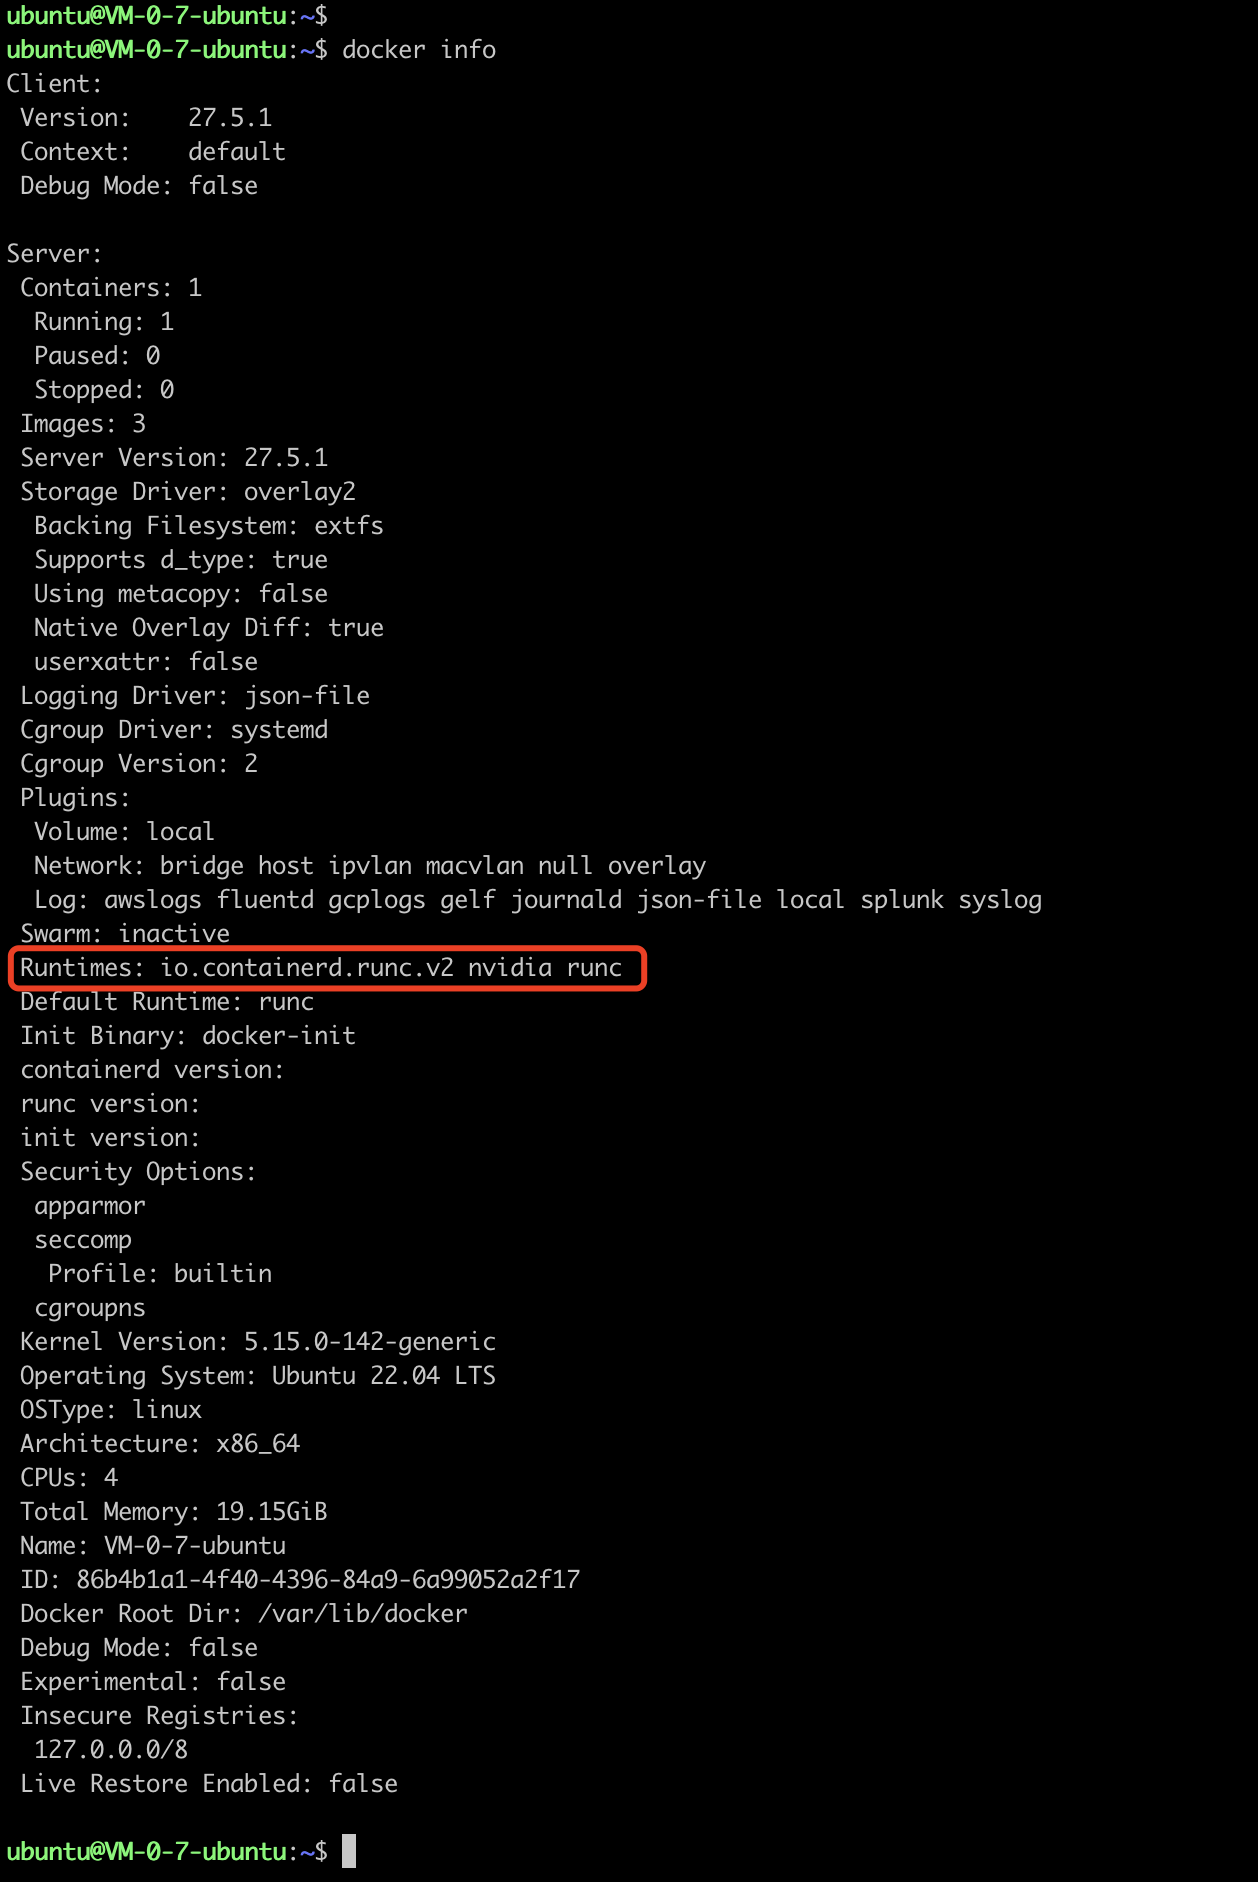
docker info信息
进入镜像后,可以安装相关依赖性。
pip3 install cellpose --no-deps
pip3 install scipy --no-deps
pip3 install opencv-python-headless --no-deps
pip3 install tifffile --no-deps
pip3 install fastremap --no-deps
pip3 install fill_voids --no-deps
pip3 install natsort --no-deps
pip3 install roifile --no-deps
pip3 install segment_anything --no-deps
pip3 install matplotlib --no-deps
pip3 install pyparsing --no-deps
pip3 install cycler --no-deps
pip3 install dateutil --no-deps
pip3 install python-dateutil --no-deps
pip3 install dateutil --no-deps
pip3 install kiwisolver --no-deps
pip3 install scikit-image -i https://pypi.tuna.tsinghua.edu.cn/simple
代码实现
以下是一个完整的Cellpose-SAM推理脚本cellpose_infer.py:
import torch
import argparse
import os
import numpy as np
from cellpose import io, models, plot, utils
import matplotlib.pyplot as plt
import cv2

def generate_cell_mask_with_sam(input_image_path, mask_path, outlines_path, overlay_path, flows_path,
                               flow_threshold=0.4, cellprob_threshold=0.0, tile_norm_blocksize=0):
    """
    使用Cellpose-SAM模型生成细胞分割掩码,并保存结果

    参数:
        input_image_path (str): 输入图像文件路径
        mask_path (str): 输出掩码文件路径
        outlines_path (str): 输出轮廓文件路径
        overlay_path (str): 输出叠加文件路径
        flows_path (str): 输出流场文件路径
        flow_threshold (float): 流场阈值,控制分割的严格程度,默认0.4
        cellprob_threshold (float): 细胞概率阈值,默认0.0
        tile_norm_blocksize (int): 归一化时的块大小,0表示不进行分块归一化
    """

    # 读取输入图像
    img = io.imread(input_image_path)

    # 初始化Cellpose-SAM模型
    gpu = torch.cuda.is_available()

    # 使用Cellpose-SAM模型
    model = models.CellposeSamModel(gpu=gpu)

    # 使用模型对图像进行评估
    masks, flows, styles = model.eval(
        img,
        flow_threshold=flow_threshold,
        cellprob_threshold=cellprob_threshold
    )

    # 生成轮廓和叠加图像
    outlines = utils.masks_to_outlines(masks)
    outX, outY = np.nonzero(outlines)

    # 处理彩色和灰度图像
    if len(img.shape) == 3 and img.shape[2] == 3:
        outlined_img = img.copy()
        outlined_img[outX, outY] = np.array([255, 0, 0])  # 红色轮廓
    else:
        # 如果是灰度图像,先转换为RGB
        if len(img.shape) == 2:
            outlined_img = np.stack([img] * 3, axis=-1)
        else:
            outlined_img = img.copy()
        outlined_img[outX, outY] = np.array([255, 0, 0])  # 红色轮廓

    # 创建掩码叠加图像
    overlay_img = plot.mask_overlay(img, masks)

    # 保存结果
    io.imsave(mask_path, masks)
    io.imsave(outlines_path, outlined_img)
    io.imsave(overlay_path, overlay_img)

    # 保存流场信息
    if flows is not None and len(flows) > 0:
        io.imsave(flows_path, flows[0])


def main():
    """
    主函数,处理命令行参数并调用分割函数
    """
    parser = argparse.ArgumentParser(description='Generate cell masks using Cellpose-SAM.')

    parser.add_argument('--input_image_path', required=True, help='Path to the input image file.')
    parser.add_argument('--output_dir', required=True, help='Dir to save the output files.')
    parser.add_argument('--flow_threshold', type=float, default=0.4,
                       help='Flow threshold value for segmentation, default=0.4.')
    parser.add_argument('--cellprob_threshold', type=float, default=0.0,
                       help='Cell probability threshold, default=0.0.')
    parser.add_argument('--tile_norm_blocksize', type=int, default=0,
                       help='Block size for normalization, 0 means no tiling.')
    parser.add_argument('--use_sam_refinement', action='store_true',
                       help='Whether to use SAM for refinement of Cellpose results.')

    args = parser.parse_args()

    # 检查输出目录是否存在,如果不存在则创建
    if not os.path.isdir(args.output_dir):
        os.makedirs(args.output_dir, exist_ok=True)

    # 从输入路径提取基本文件名
    base_name = os.path.basename(os.path.splitext(args.input_image_path)[0])

    # 创建输出文件路径
    mask_path = os.path.join(args.output_dir, base_name + "_mask.png")
    outlines_path = os.path.join(args.output_dir, base_name + "_outlines.png")
    overlay_path = os.path.join(args.output_dir, base_name + "_overlay.png")
    flows_path = os.path.join(args.output_dir, base_name + "_flows.png")

    # 调用细胞分割函数
    generate_cell_mask_with_sam(
        input_image_path=args.input_image_path,
        mask_path=mask_path,
        outlines_path=outlines_path,
        overlay_path=overlay_path,
        flows_path=flows_path,
        flow_threshold=args.flow_threshold,
        cellprob_threshold=args.cellprob_threshold,
        tile_norm_blocksize=args.tile_norm_blocksize
    )

if __name__ == "__main__":
    main()
如何使用
- 准备图像数据:将您的细胞图像保存在合适的目录中。
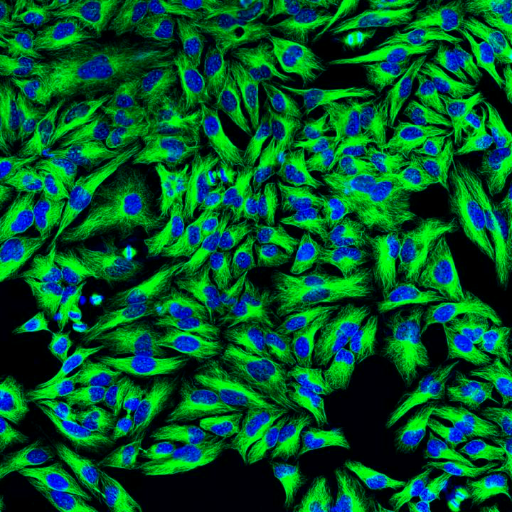
原始细胞图片
- 运行推理:使用以下命令运行脚本:
python3 cellpose_infer.py \
    --input_image_path /path/to/your/image.png \
    --output_dir /path/to/output/directory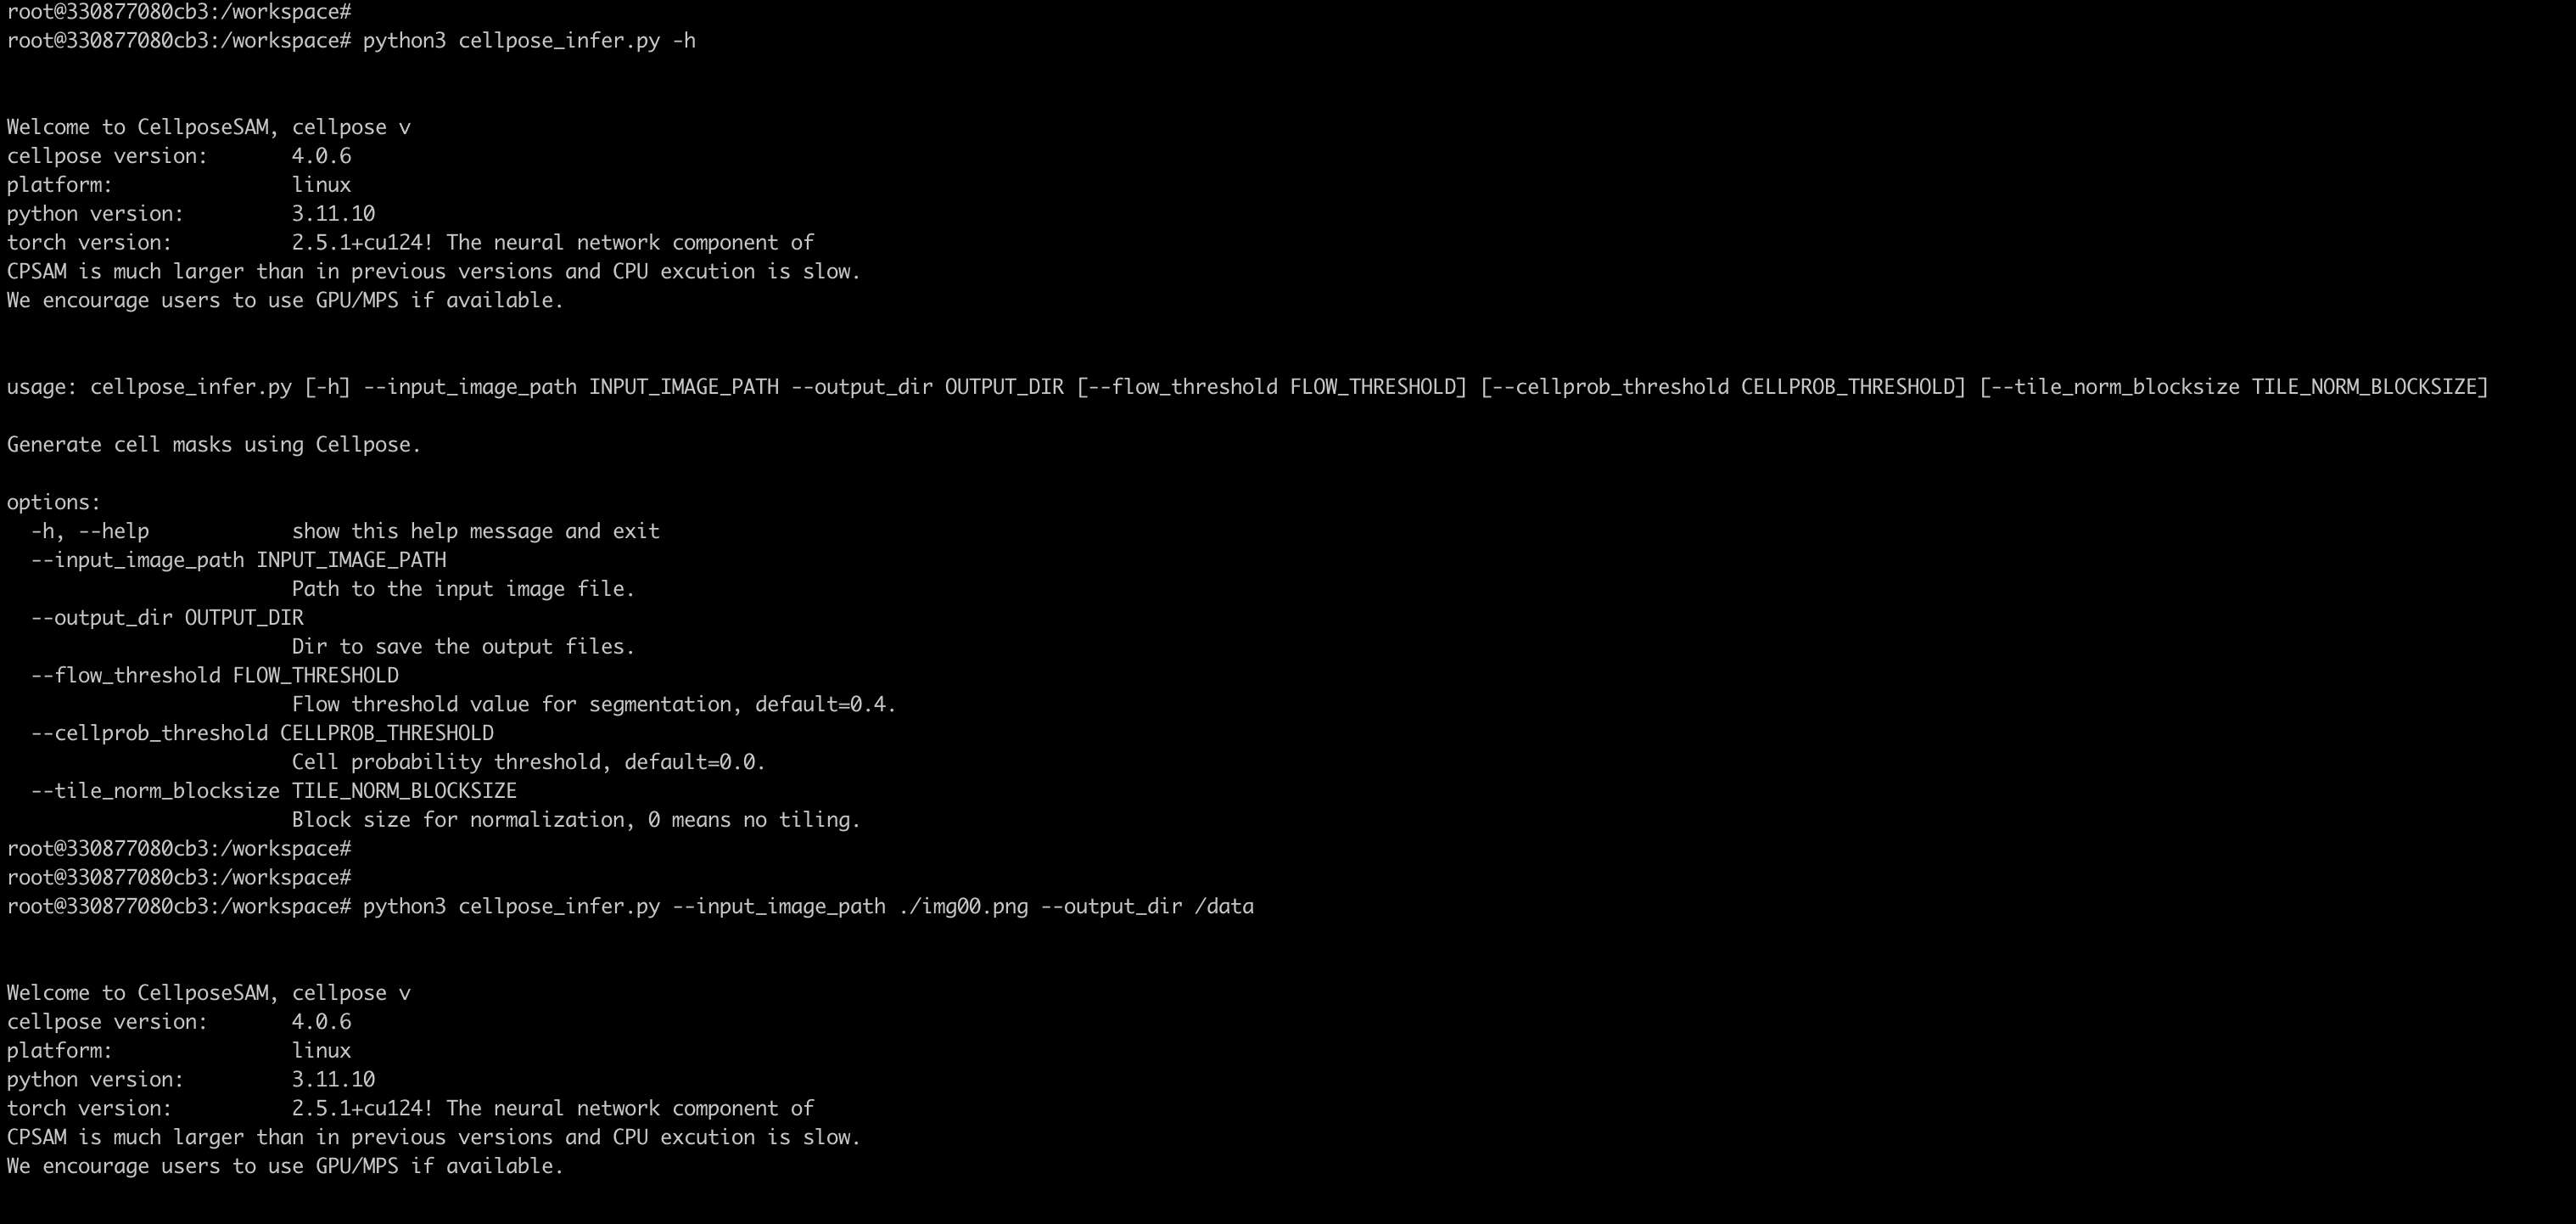
运行推理
- 参数说明:
flow_threshold: 控制分割的严格程度,值越高,分割越保守cellprob_threshold: 细胞概率阈值,正值使模型更保守,负值使模型更积极
结果解析
脚本将生成四种输出文件:
- 掩码文件 (
_mask.png): 包含每个细胞的二进制掩码
掩码图片
为什么是纯黑图片?请参考 《Cellpose掩码图像显示全黑的原因与解决方法》
- 轮廓文件 (
_outlines.png): 使用红线在原图上绘制细胞轮廓

轮廓图片
- 叠加文件 (
_overlay.png): 将掩码叠加在原图上
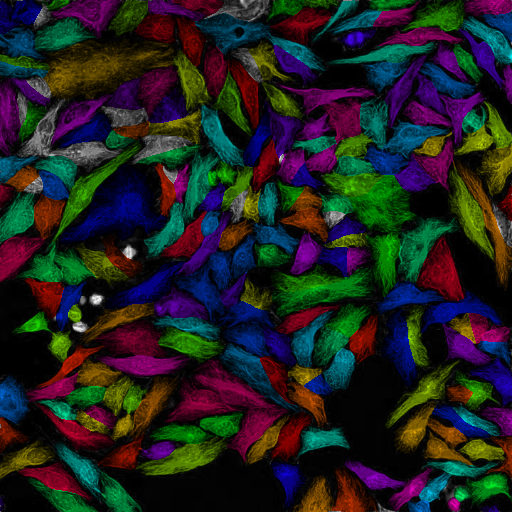
叠加图片
- 流场文件 (
_flows.png): 显示Cellpose的流场预测
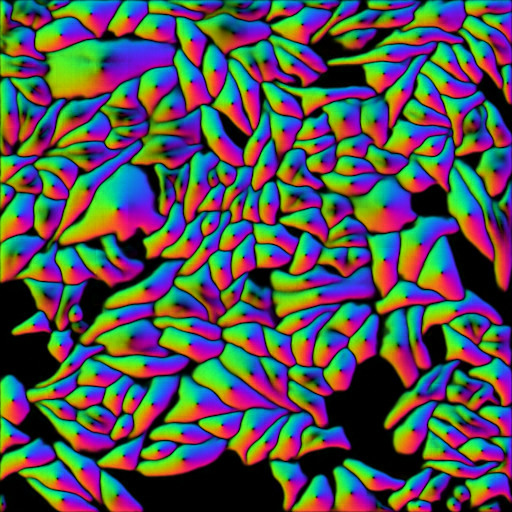
流场文件
性能优化建议
- 使用GPU加速:确保安装了CUDA版本的PyTorch以获得最佳性能
- 批量处理:对于大量图像,可以考虑实现批量处理功能
- 内存管理:对于大图像,可以使用
tile_norm_blocksize参数进行分块处理
常见问题解决
- 内存不足:减小图像尺寸或使用分块处理
- 分割效果不佳:调整
flow_threshold和cellprob_threshold参数 - 模型加载失败:检查网络连接,确保能下载预训练模型
结论
Cellpose-SAM提供了一个强大的细胞分割解决方案,结合了Cellpose的准确性和SAM的精细化能力。通过本文提供的代码和指南,您可以轻松开始使用这一先进工具进行细胞图像分析。
如果您在使用过程中遇到任何问题,欢迎在评论区留言讨论!
原创声明:本文系作者授权腾讯云开发者社区发表,未经许可,不得转载。
如有侵权,请联系 cloudcommunity@tencent.com 删除。
原创声明:本文系作者授权腾讯云开发者社区发表,未经许可,不得转载。
如有侵权,请联系 cloudcommunity@tencent.com 删除。
评论
登录后参与评论
推荐阅读
目录
腾讯云开发者

Copyright © 2013 - 2026 Tencent Cloud. All Rights Reserved. 腾讯云 版权所有
深圳市腾讯计算机系统有限公司 ICP备案/许可证号:粤B2-20090059 ![]() 粤公网安备44030502008569号
粤公网安备44030502008569号
腾讯云计算(北京)有限责任公司 京ICP证150476号 | 京ICP备11018762号