将微前端做到极致-无界方案
将微前端做到极致-无界方案
微前端已经是一个非常成熟的领域了,但开发者不管采用哪个现有方案,在适配成本、样式隔离、运行性能、页面白屏、子应用通信、子应用保活、多应用激活、vite 框架支持、应用共享等用户核心诉求都或存在问题,或无法提供支持。本文提供一种基于 iframe 的全新微前端方案,完善的解决了这些核心诉求。
为什么还要造微前端框架
目前较成熟的微前方案有 qiankun、micro-app、EMP 方案,下面分别分析这三个微前端方案:
qiankun 方案
qiankun 方案是基于 single-spa 的微前端方案。
特点
- html entry 的方式引入子应用,相比 js entry 极大的降低了应用改造的成本;
- 完备的沙箱方案,js 沙箱做了 SnapshotSandbox、LegacySandbox、ProxySandbox 三套渐进增强方案,css 沙箱做了 strictStyleIsolation、experimentalStyleIsolation 两套适用不同场景的方案;
- 做了静态资源预加载能力;
不足
- 适配成本比较高,工程化、生命周期、静态资源路径、路由等都要做一系列的适配工作;
- css 沙箱采用严格隔离会有各种问题,js 沙箱在某些场景下执行性能下降严重;
- 无法同时激活多个子应用,也不支持子应用保活;
- 无法支持 vite 等 esmodule 脚本运行;
micro-app 方案
micro-app 是基于 webcomponent + qiankun sandbox 的微前端方案。
特点
- 使用 webcomponet 加载子应用相比 single-spa 这种注册监听方案更加优雅;
- 复用经过大量项目验证过 qiankun 的沙箱机制也使得框架更加可靠;
- 组件式的 api 更加符合使用习惯,支持子应用保活;
- 降低子应用改造的成本,提供静态资源预加载能力;
不足
- 接入成本较 qiankun 有所降低,但是路由依然存在依赖;
- 多应用激活后无法保持各子应用的路由状态,刷新后全部丢失;
- css 沙箱依然无法绝对的隔离,js 沙箱做全局变量查找缓存,性能有所优化;
- 支持 vite 运行,但必须使用 plugin 改造子应用,且 js 代码没办法做沙箱隔离;
- 对于不支持 webcompnent 的浏览器没有做降级处理;
EMP 方案
EMP 方案是基于 webpack 5 module federation 的微前端方案。
特点
- webpack 联邦编译可以保证所有子应用依赖解耦;
- 应用间去中心化的调用、共享模块;
- 模块远程 ts 支持;
不足
- 对 webpack 强依赖,老旧项目不友好;
- 没有有效的 css 沙箱和 js 沙箱,需要靠用户自觉;
- 子应用保活、多应用激活无法实现;
- 主、子应用的路由可能发生冲突;
结论
qiankun 方案对 single-spa 微前端方案做了较大的提升同时也遗留下来了不少问题长时间没有解决; micro-app 方案对 qiankun 方案做了较多提升但基于 qiankun 的沙箱也相应会继承其存在的问题; EMP 方案基于 webpack 5 联邦编译则约束了其使用范围; 目前的微前端方案在用户的核心诉求上都没有很好的满足,有很大的优化提升空间。
无界方案
无界微前端方案基于 webcomponent 容器 + iframe 沙箱,能够完善的解决适配成本、样式隔离、运行性能、页面白屏、子应用通信、子应用保活、多应用激活、vite 框架支持、应用共享等用户的核心诉求。
文档地址,demo 地址:https://wujie-micro.github.io/demo-main-vue/home,git 地址:https://github.com/Tencent/wujie
下面就成本、速度、隔离、功能等多个方面进行阐述。
成本低
无界微前端的成本非常低,主要体现在主应用的使用成本、子应用的适配成本两个方面。
主应用使用成本
主应用使用无界不需要学习额外的知识,无界提供基于 vue 封装的 wujie-vue 和基于 react 封装的 wujie-react,用户可以当初普通组件一样加载子应用,以 wujie-vue 举例:
 <WujieVue
   width="100%"
   height="100%"
   name="xxx"
   url="xxx"
   :sync="true"
   :fiber="true"
   :degrade="false"
   :fetch="fetch"
   :props="props"
   :plugins="plugins"
   :beforeLoad="beforeLoad"
   :beforeMount="beforeMount"
   :afterMount="afterMount"
   :beforeUnmount="beforeUnmount"
   :afterUnmount="afterUnmount"
 ></WujieVue>
子应用加载和普通 vue 组件加载并无二致,所有配置都收敛到组件的属性上。
子应用适配成本
子应用首先需要做支持跨域请求改造,这个是所有微前端框架运行的前提,除此之外子应用可以不做任何改造就可以在无界框架中运行,不过此时运行的方式是重建模式。
子应用在无界中会根据是否保活、是否做了生命周期适配进入不同的运行模式:

其中保活模式、单例模式、重建模式适用于不同的业务场景,就算复杂点的单例模式用户也只是需要做一点简单的生命周期改造工作,可以说子应用适配成本极低。
速度快
无界微前端非常快,主要体现在首屏打开快、运行速度快两个方面。
首屏打开快
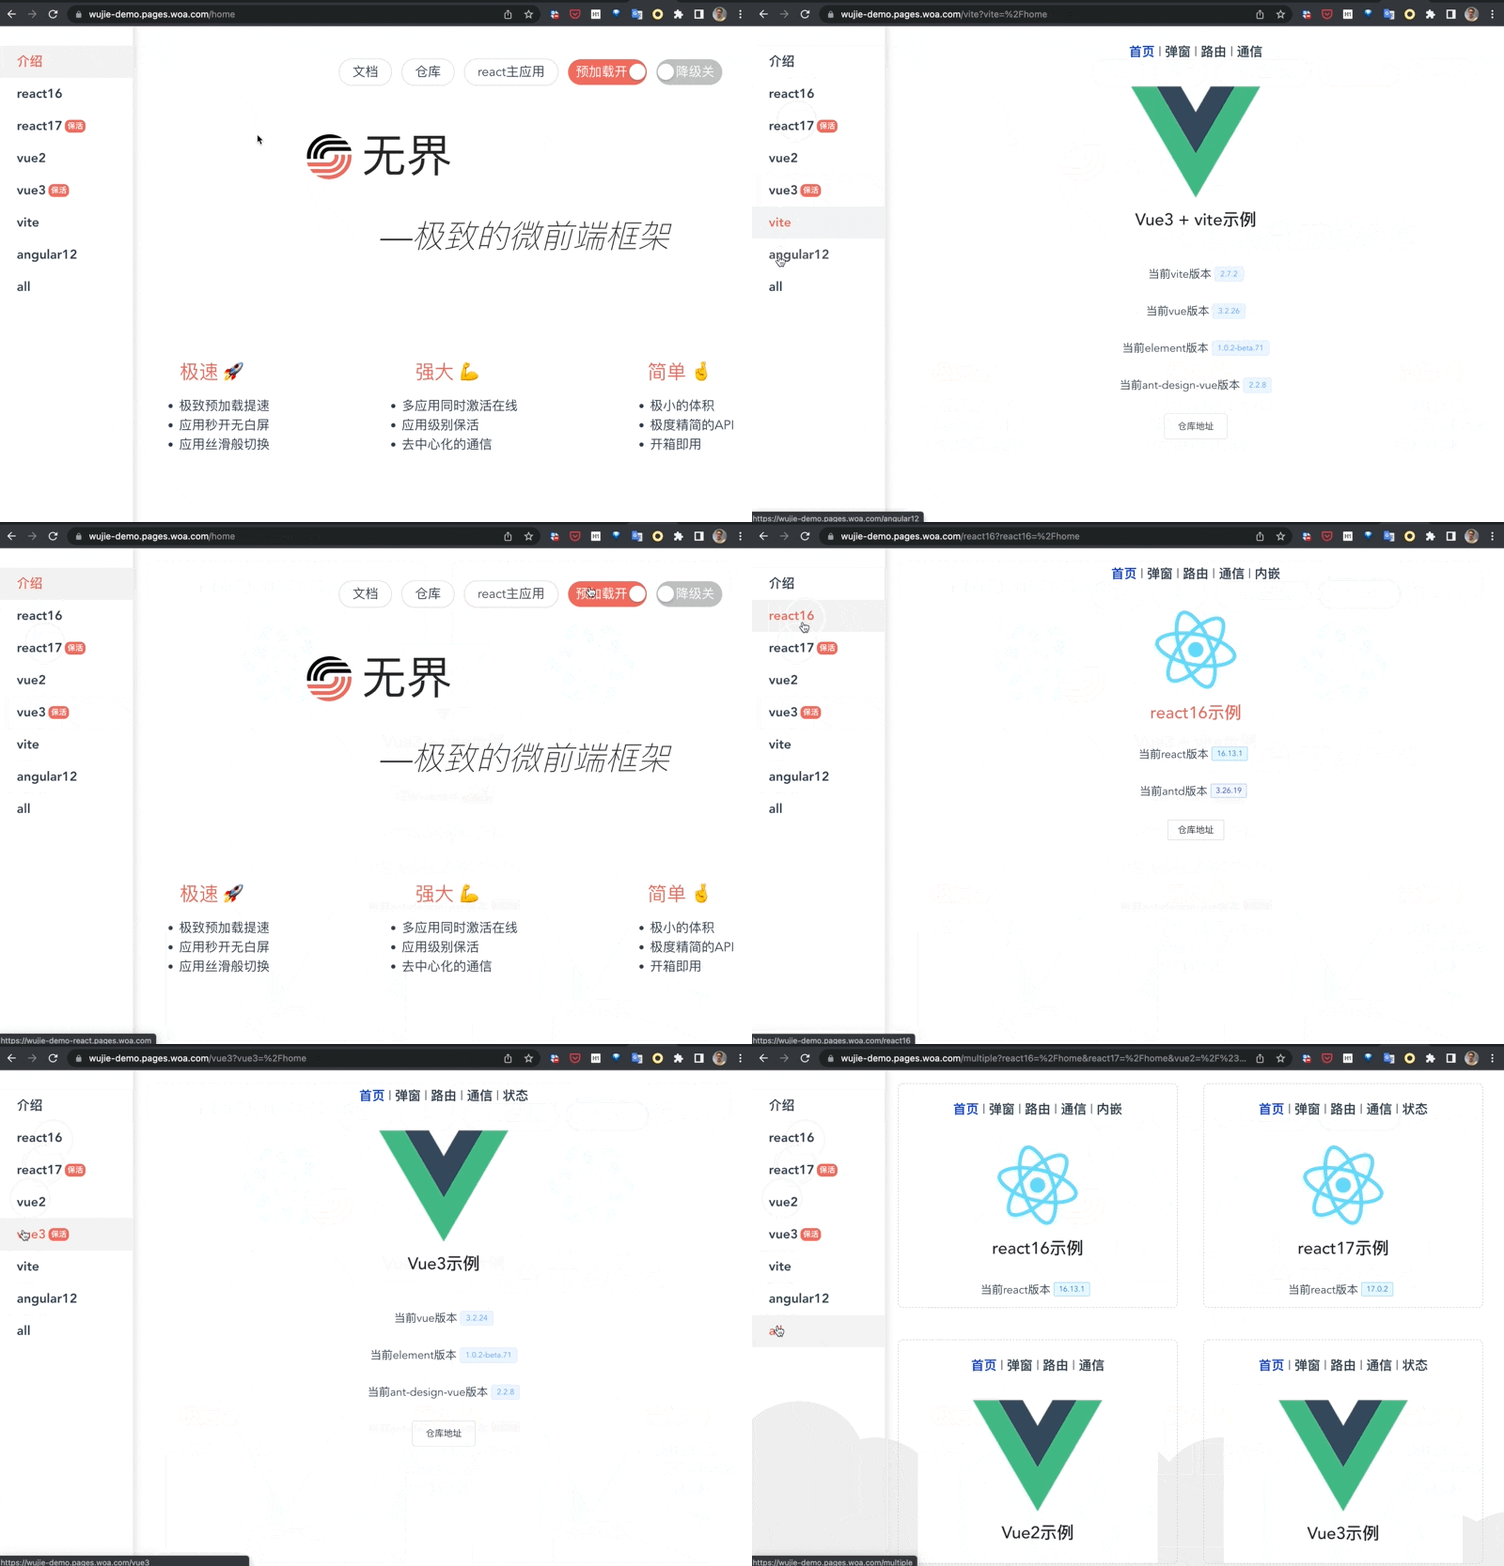
目前大部分微前端只能做到静态资源预加载,但是就算子应用所有资源都预加载完毕,等到子应用打开时页面仍然有不短的白屏时间,这部分白屏时间主要是子应用 js 的解析和执行。
无界微前端不仅能够做到静态资源的预加载,还可以做到子应用的预执行。
预执行会阻塞主应用的执行线程,所以无界提供 fiber 执行模式,采取类似 react fiber 的方式间断执行 js,每个 js 文件的执行都包裹在 requestidlecallback 中,每执行一个 js 可以返回响应外部的输入,但是这个颗粒度是 js 文件,如果子应用单个 js 文件过大,可以通过拆包的方式降低体积达到 fiber 执行模式效益最大化。
运行速度快
子应用的 js 在 iframe 内运行,由于 iframe 是一个天然的 js 运行沙箱,所以无需采用 with (fakewindow) 这种方式来指定子应用的执行上下文,从而避免由于采用 with 语句执行子应用代码而导致的性能下降,整体的运行性能和原生性能差别不大。
原生隔离
无界微前端实现了 css 沙箱和 js 沙箱的原生隔离,子应用不用担心污染问题。
css 沙箱隔离
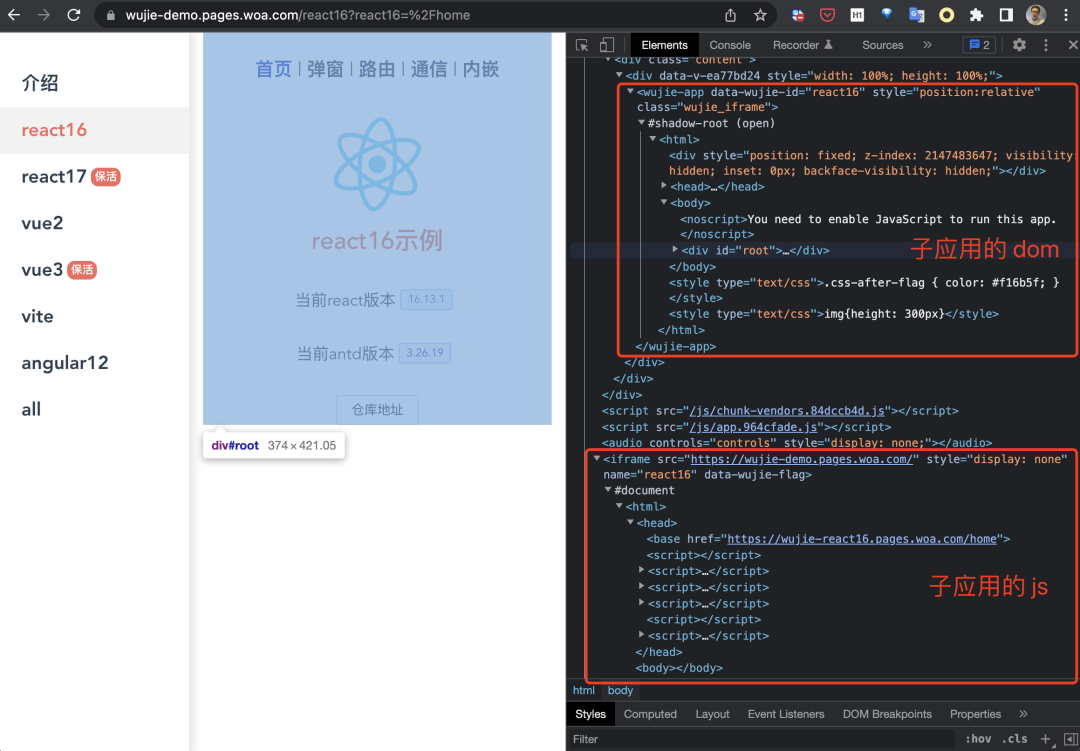
无界将子应用的 dom 放置在 webcomponent + shadowdom 的容器中,除了可继承的 css 属性外实现了应用之间 css 的原生隔离。
js 沙箱隔离
无界将子应用的 js 放置在 iframe(js-iframe)中运行,实现了应用之间 window、document、location、history 的完全解耦和隔离。
js 沙箱和 css 沙箱连接
无界在底层采用 proxy + Object.defineproperty 的方式将 js-iframe 中对 dom 操作劫持代理到 webcomponent shadowRoot 容器中,开发者无感知也无需关心。
功能强大
无界微前端的功能非常强大,支持子应用保活、子应用内嵌、多应用激活、去中心化通信、生命周期、插件系统、vite 框架支持、兼容 IE9、应用共享。
子应用保活
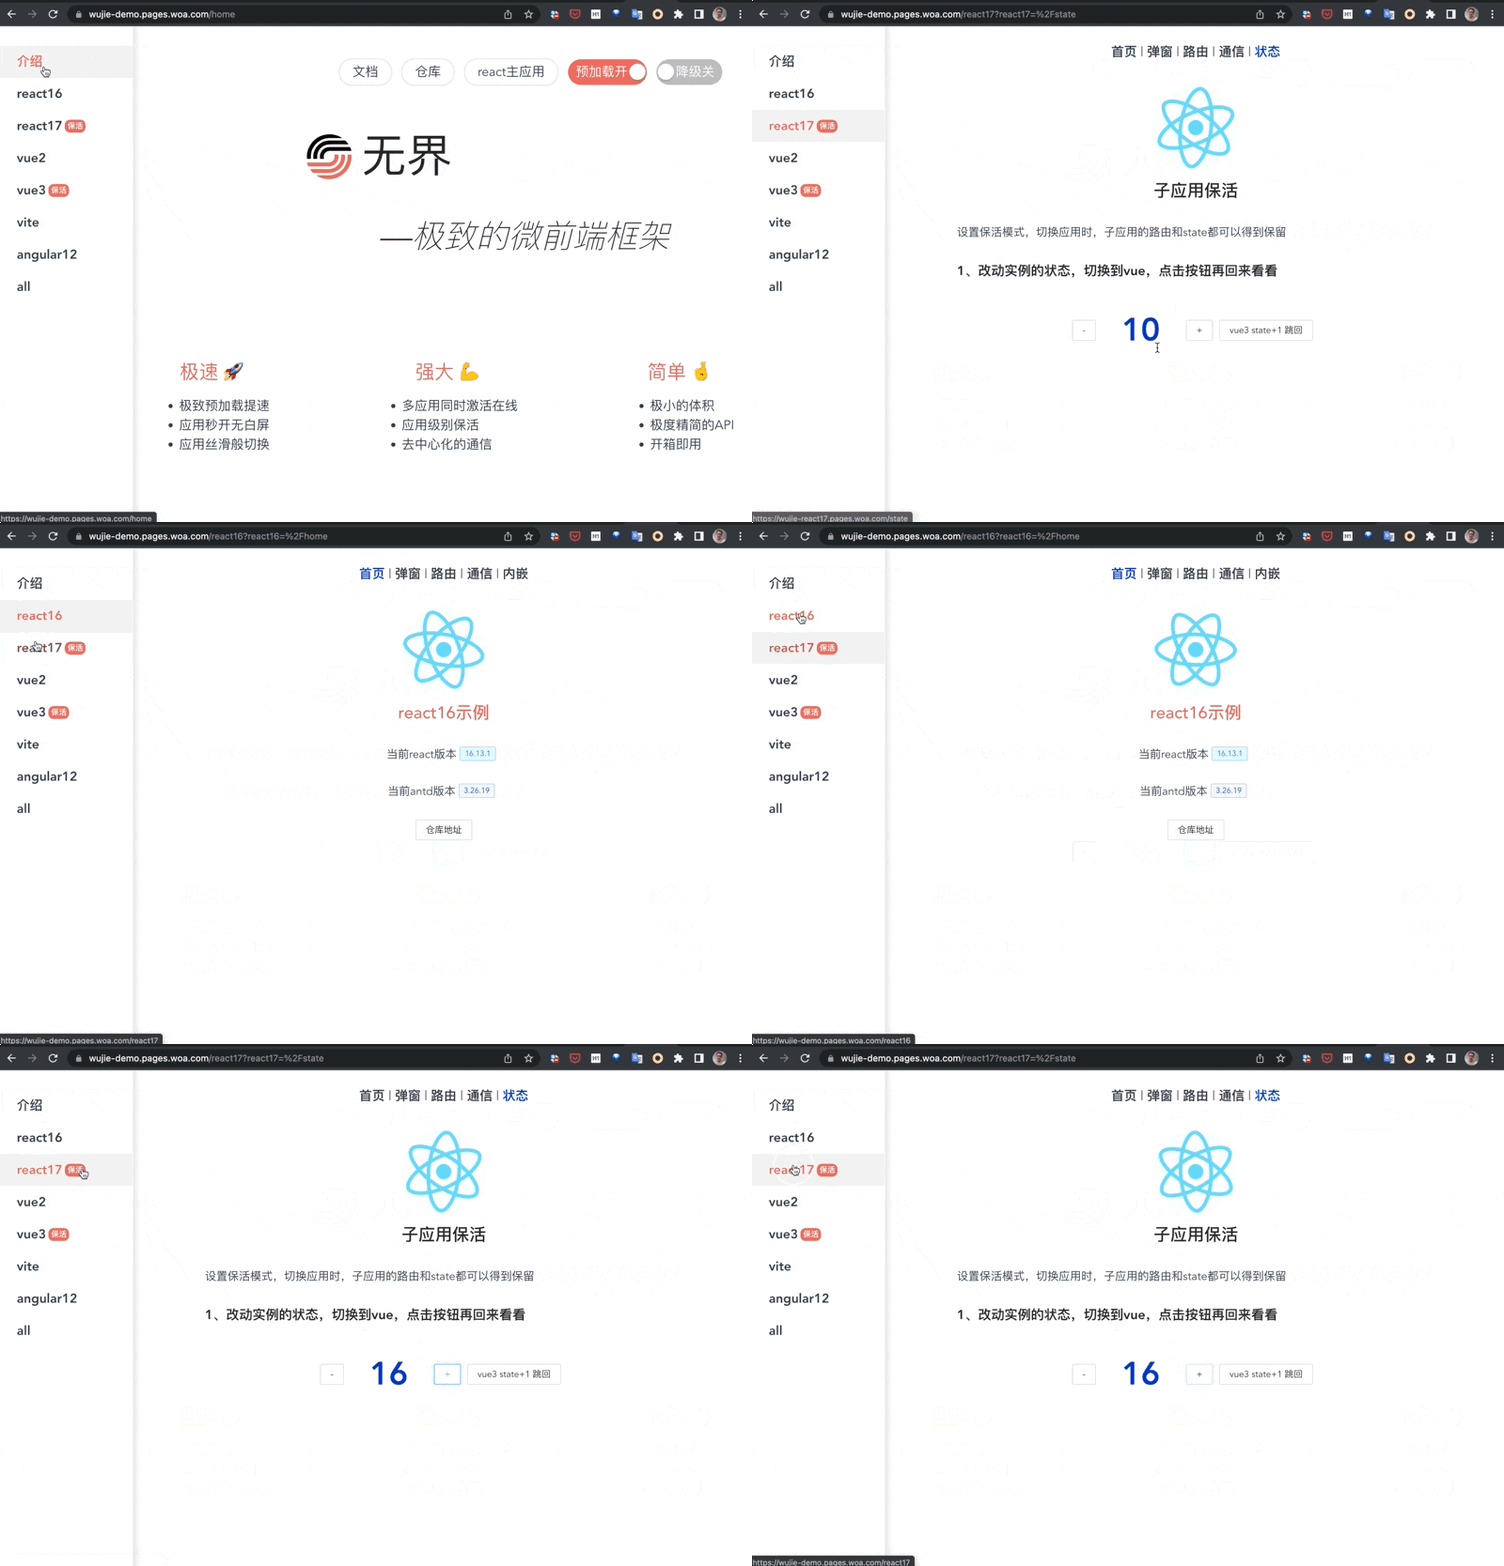
当子应用设置为保活模式,切换子应用后仍然可以保持子应用的状态和路由不会丢失。
子应用嵌套
无界支持子应用多层嵌套,嵌套的应用和正常应用一致,支持预加载、保活、同步、通信等能力,需要注意的是内嵌的子应用 name 也需要保持唯一性,否则将复用之前渲染出来的应用

多应用激活
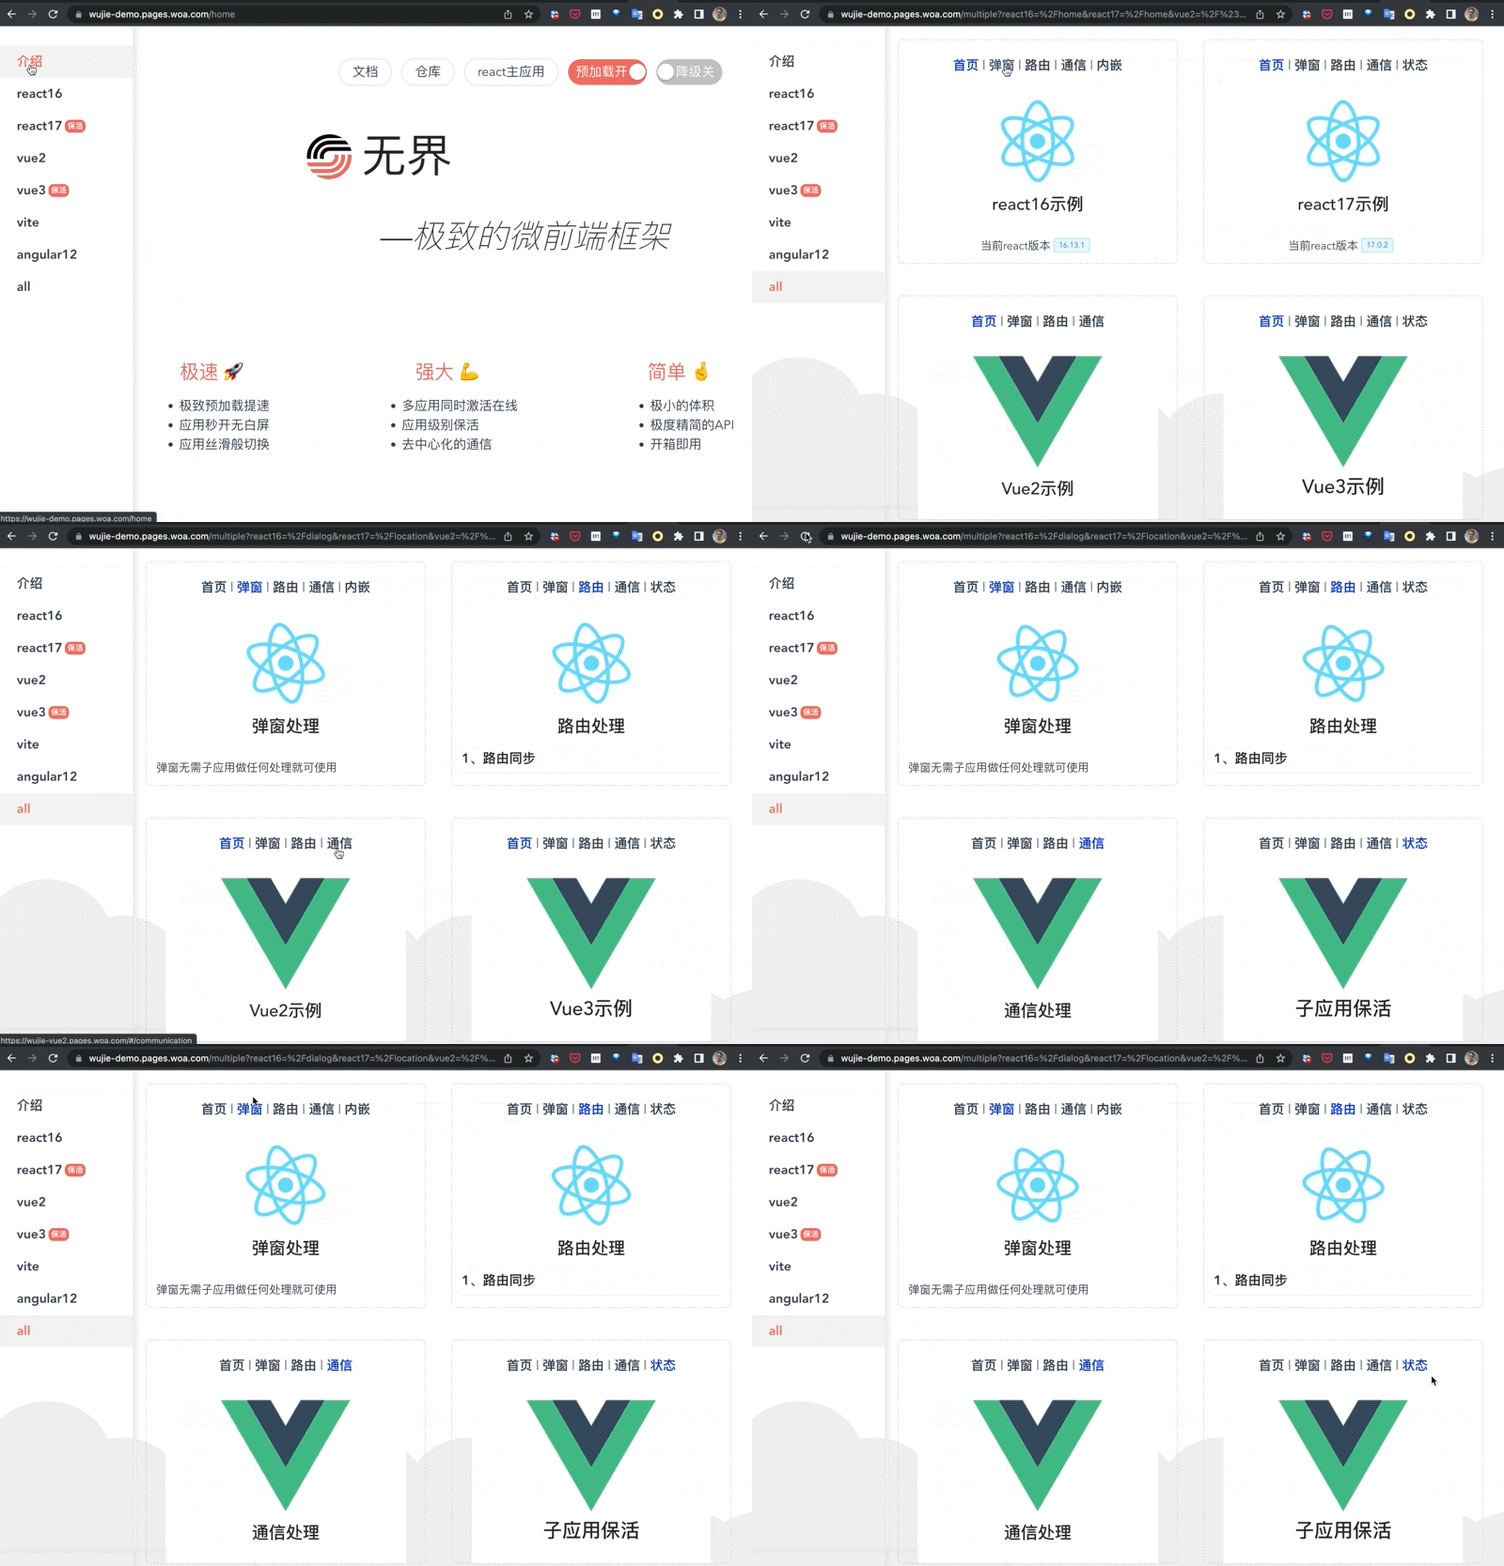
无界支持一个页面同时激活多个子应用并且保持这些子应用路由同步的能力。
去中心化通信
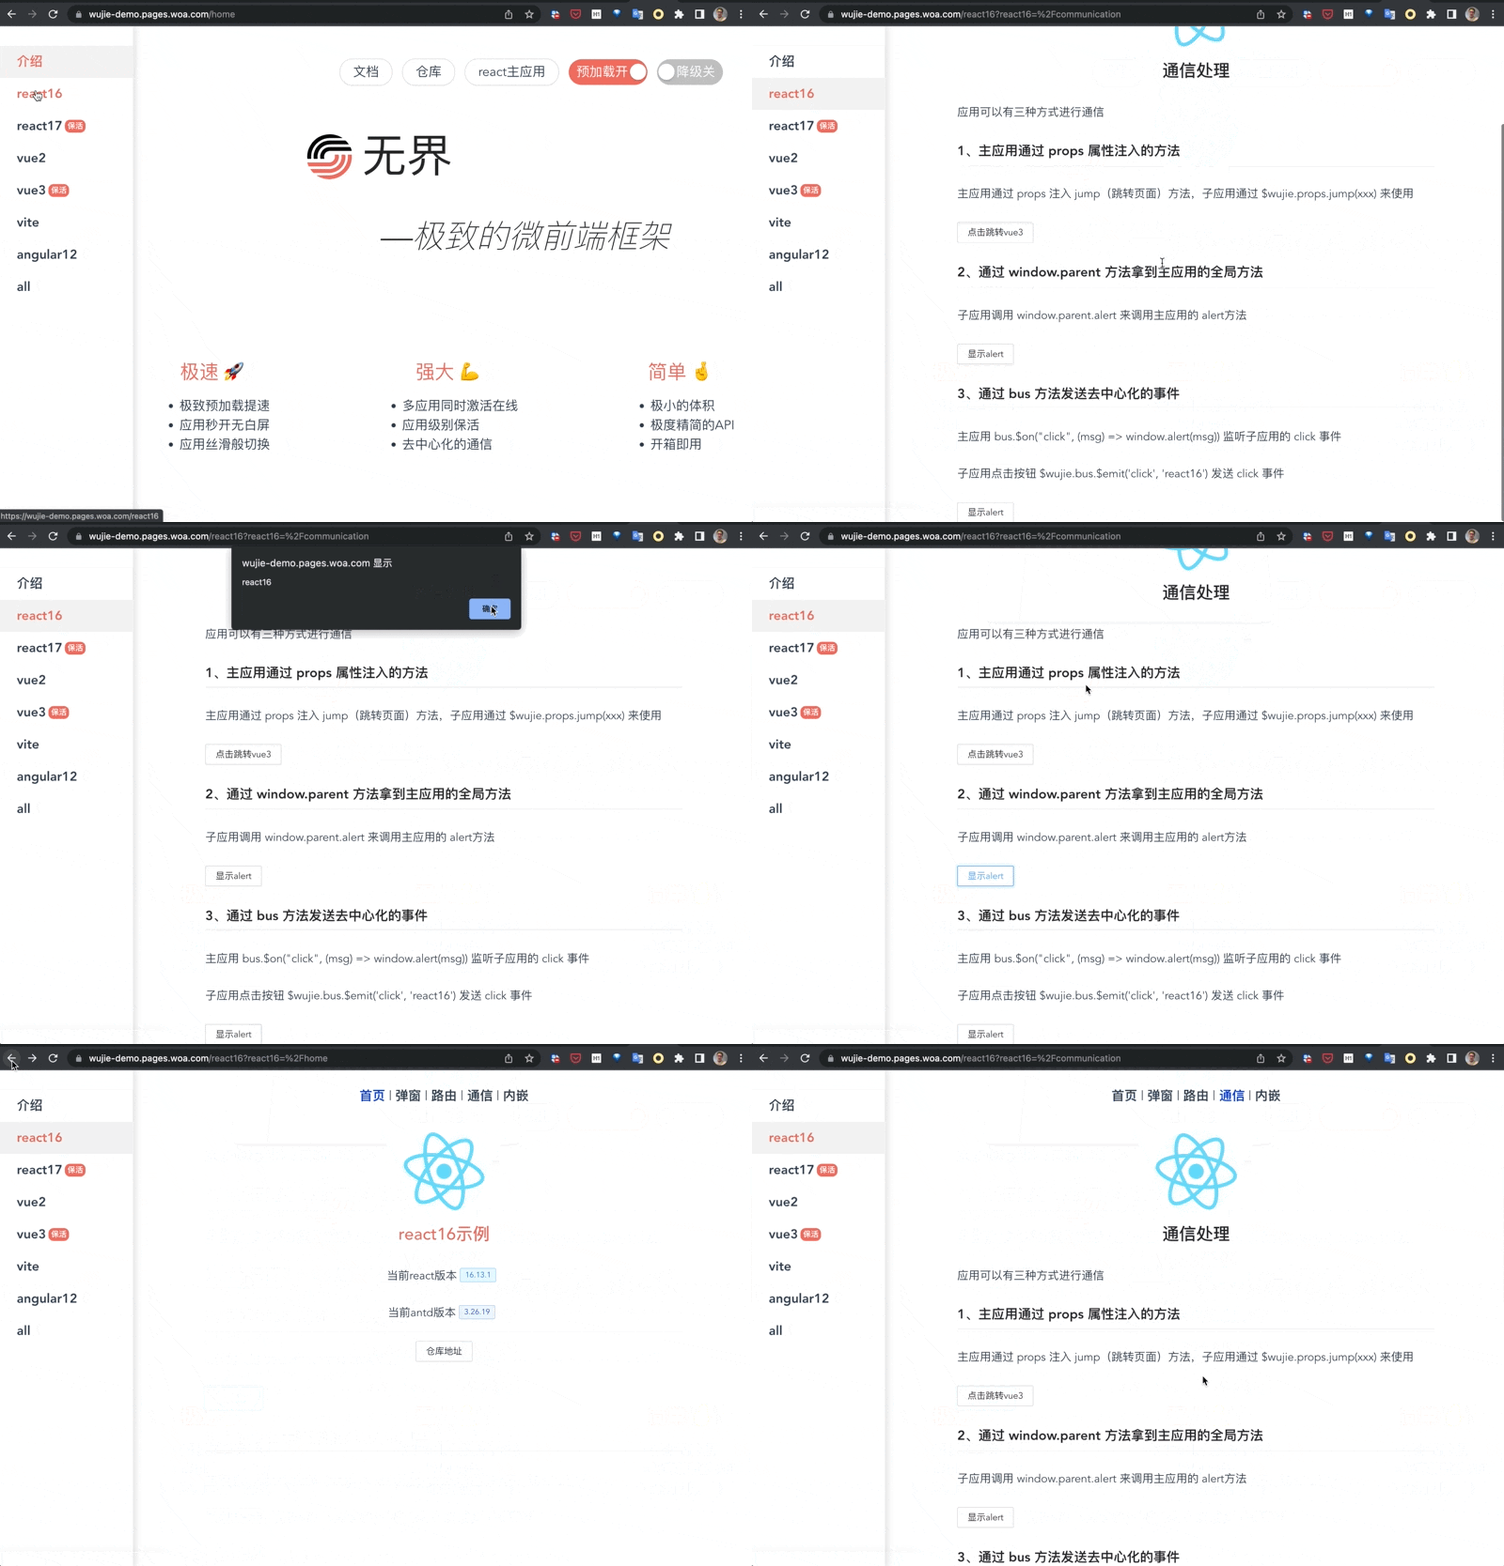
无界提供多种通信方式:window.parent 直接通信、props 数据注入、去中心化 EventBus 通信机制:
- 子应用 js 在和主应用同域的 iframe 内运行,所以 window.parent 可以直接拿到主应用的 window 对象来进行通信
- 主应用可以向子应用注入 props 对象,里面可以注入数据和方法供子应用调用
- 内置的 EventBus 去中心化通信方案可以让应用之间方便的直接通信
生命周期
无界提供完善的生命周期钩子供主应用调用:
- beforeLoad:子应用开始加载静态资源前触发
- beforeMount:子应用渲染前触发 (生命周期改造专用)
- afterMount:子应用渲染后触发(生命周期改造专用)
- beforeUnmount:子应用卸载前触发(生命周期改造专用)
- afterUnmount:子应用卸载后触发(生命周期改造专用)
- activated:子应用进入后触发(保活模式专用)
- deactivated:子应用离开后触发(保活模式专用)
插件系统
无界提供强大的插件系统,方便用户在运行时去修改子应用代码从而避免将适配代码硬编码到仓库中。
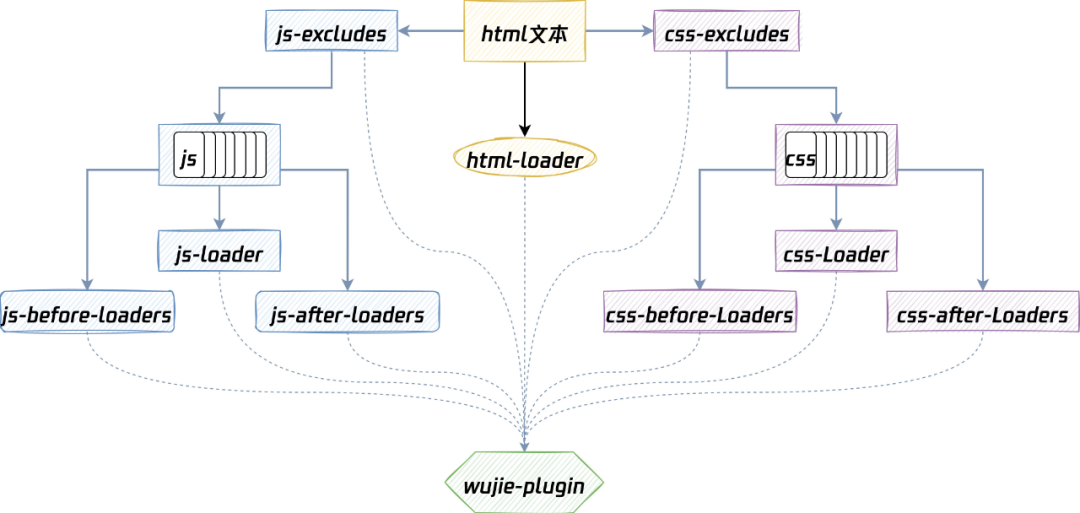
无界插件主要能力如下:
- html-loader 可以对子应用 template 进行处理
- js-excludes 和 css-excludes 可以排除子应用特定的 js 和 css 加载
- js-before-loaders、js-loader、js-after-loaders 可以方便的对子应用 js 进行自定义
- css-before-loaders、css-loader、css-after-loaders 可以方便的对子应用 css 进行自定义
vite 框架支持
无界子应用运行在 iframe 中原生支持 esm 的脚本,而且不用担心子应用运行的上下文问题,因为子应用读取的就是 iframe 的 window 上下文,所以无界微前端原生支持 vite 框架。

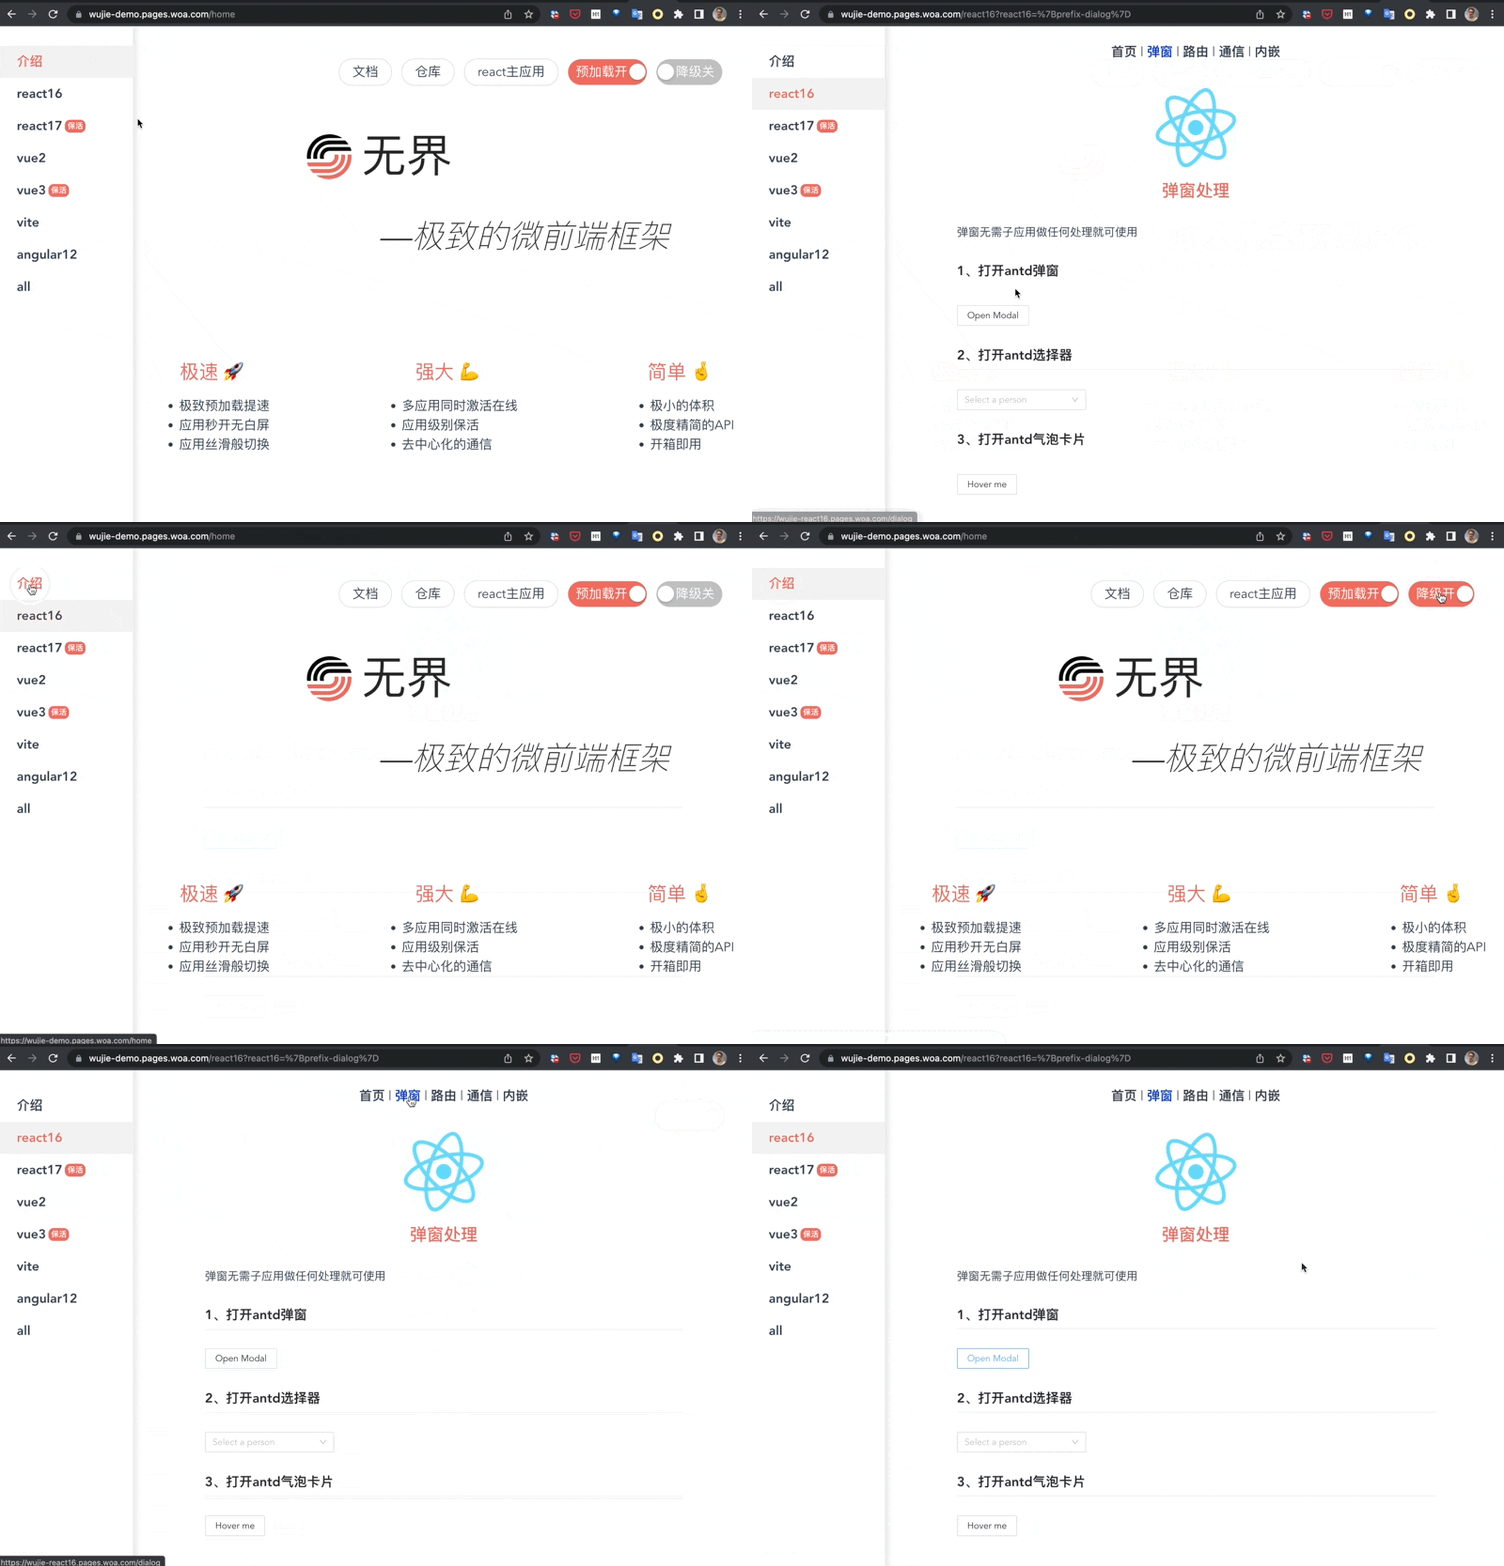
兼容 IE9
由于无界采用了 webcomponent + shadowdom + proxy 的方案,在某些低版本浏览器上无法运行时,无界微前端会自动降级。
降级方案采用:
- webcomponent + shadowdom ⇒ iframe(dom-iframe)
- proxy + Object.defineproperty ⇒ Object.defineproperty
- 子应用运行的方式是 dom-iframe + js-iframe + Object.defineproperty,IE9+ 都可以兼容(无界没有 polyfill es6,需用户手动 babel 处理)。
自动降级后无界依然可以保证子应用的 css 和 js 原生隔离,但是由于 dom-iframe 的限制,弹窗将只能在子应用内部打开
应用共享
一个微前端系统可能同时运行多个子应用,不同子应用之间可能存在相同的包依赖,那么这个依赖就会在不同子应用中重复打包、重复执行造成性能和内存的浪费。
无界提供一种工程上的策略结合无界的插件能力,可以有效的解决这个问题(其他微前端框架也可以做到),这里以一个场景举例:主应用使用到了 ant-design-vue,子应用 A 也使用到了相同版本的 ant-design-vue。
主应用:
1、修改主应用的 index.js,将共享包挂载到主应用的 window 对象上
 // index.js
 import Antdv from "ant-design-vue";
 // 将需要共享的包挂载到主应用全局
 window.Antdv = Antdv;
2、加载子应用时注入插件,将主应用的 Antdv 赋值到子应用的 window 对象上
 <WujieVue name="A" url="xxxxx" :plugins="[{ jsBeforeLoaders: [{ content: 'window.Antdv = window.parent.Antdv' }] }]">
 </WujieVue>
子应用: webpack 设置 externals
 module.exports = {
   externals: {
     "ant-design-vue": {
       root: "Antdv",
       commonjs: "Antdv",
       commonjs2: "Antdv",
       amd: "Antdv",
     },
   },
 };
如果子应用需要单独运行可以参考文档
总结
无界微前端采用 webcomponent + iframe 的来加载子应用,具有成本低、速度快、原生隔离、功能强大等一系列优点,在满足用户核心诉求的同时让使用微前端的体验就像使用普通组件一样简单,极大的降低了使用门槛。
无界已经开源 🎉🎉🎉,欢迎 star ⭐️⭐️⭐️:https://github.com/Tencent/wujie
- 为什么还要造微前端框架
- qiankun 方案
- micro-app 方案
- EMP 方案
- 结论
- 无界方案
- 成本低
- 主应用使用成本
- 子应用适配成本
- 速度快
- 首屏打开快
- 运行速度快
- 原生隔离
- css 沙箱隔离
- js 沙箱隔离
- js 沙箱和 css 沙箱连接
- 功能强大
- 子应用保活
- 子应用嵌套
- 多应用激活
- 去中心化通信
- 生命周期
- 插件系统
- vite 框架支持
- 兼容 IE9
- 应用共享
- 总结

腾讯云开发者

扫码关注腾讯云开发者
领取腾讯云代金券
Copyright © 2013 - 2025 Tencent Cloud. All Rights Reserved. 腾讯云 版权所有
深圳市腾讯计算机系统有限公司 ICP备案/许可证号:粤B2-20090059 深公网安备号 44030502008569
腾讯云计算(北京)有限责任公司 京ICP证150476号 | 京ICP备11018762号 | 京公网安备号11010802020287
Copyright © 2013 - 2025 Tencent Cloud.
All Rights Reserved. 腾讯云 版权所有


