在Mac催化剂上打开一个新窗口
我正在移植一个iPad应用程序使用Mac催化剂。我正在尝试打开一个视图控制器在一个新的窗口。
如果我使用的是严格的AppKit,我可以像这个帖子中描述的那样做一些事情。但是,由于我使用的是UIKit,所以没有可用的showWindow()方法。
这篇文章说,通过在项目中的一个新包中添加AppKit是可能的(我这样做了),但是它并没有解释如何实际显示新窗口的具体细节。上面写着..。
另一件您不能做的事情是生成一个具有UIKit视图层次结构的新的UIKit。但是,您的UIKit代码能够生成一个新的窗口场景,您的AppKit代码能够获取它所呈现的结果NSWindow,并劫持它来执行您想要的任何操作,因此在这个意义上,您可以为辅助调色板和各种其他功能生成UIKit窗口。
有人知道如何实现本文中所解释的内容吗?
TL;DR:,我如何用Mac催化剂作为一个新的独立NSWindow打开一个UIViewController?
回答 2
Stack Overflow用户
发布于 2019-11-27 01:50:35
编辑:添加了关于如何拥有其他不同窗口(如面板)的信息
为了在mac上支持多个窗口,您所需要做的就是在iPad上支持多个窗口。
您可以在从22:28分钟开始的这 WWDC会话中找到所需的所有信息,但是要总结它,您需要做的是支持新的场景生命周期模型。
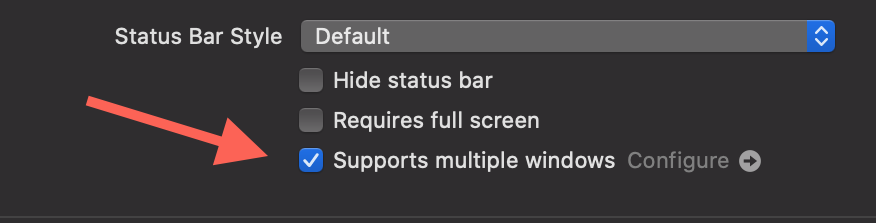
首先编辑目标并检查支持多窗口复选标记。
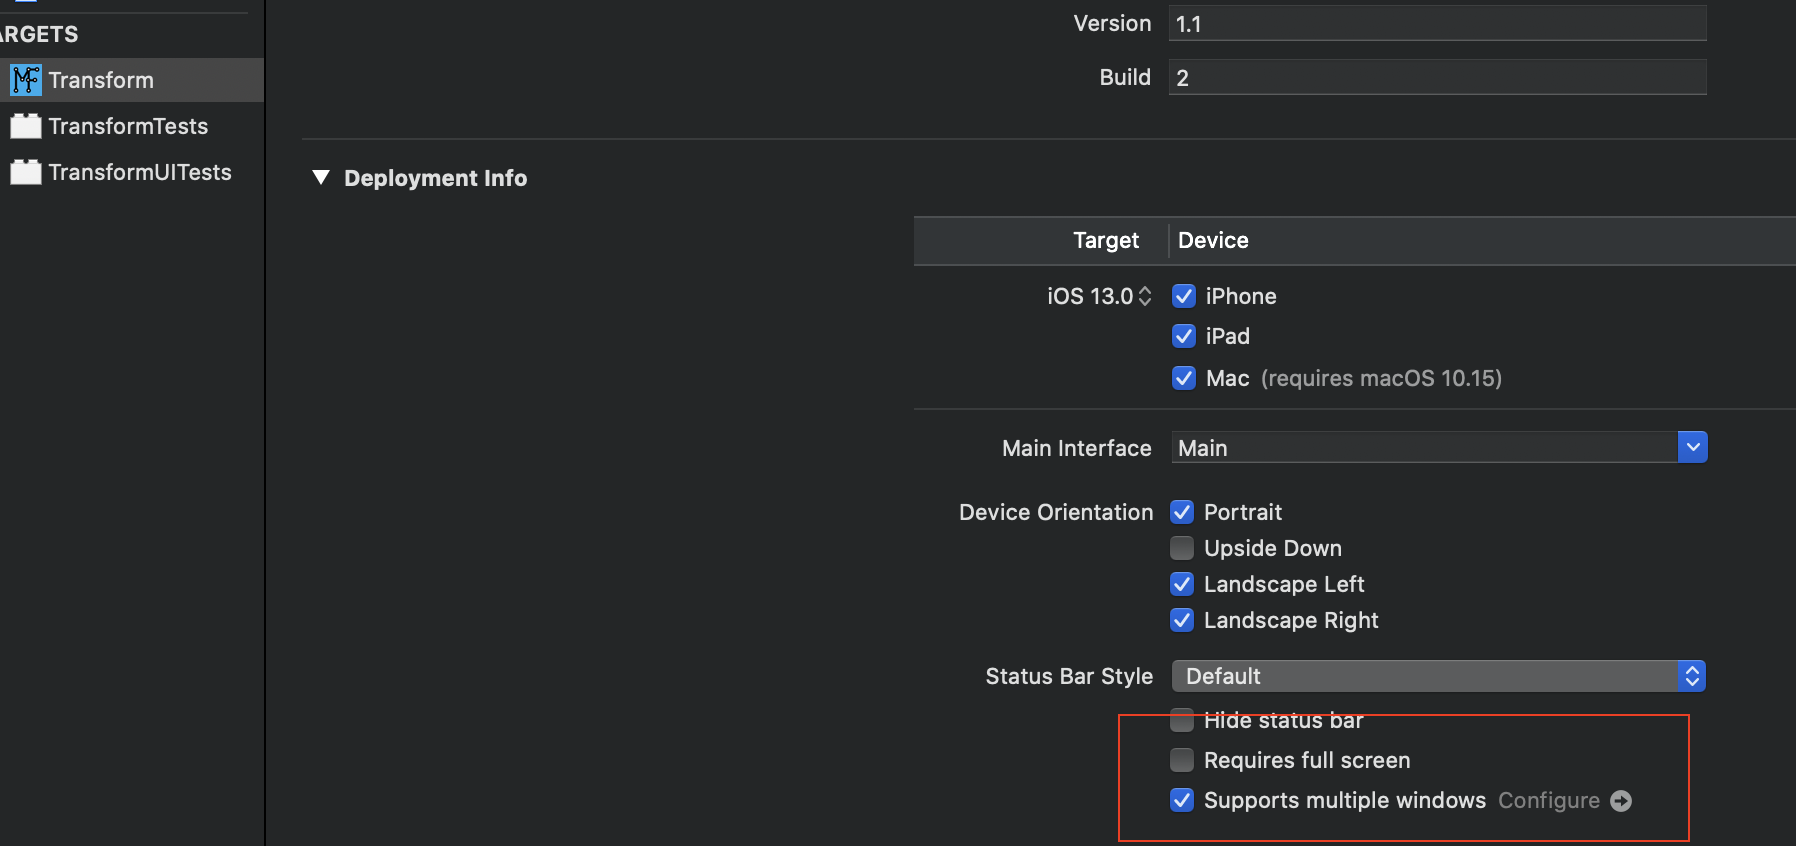
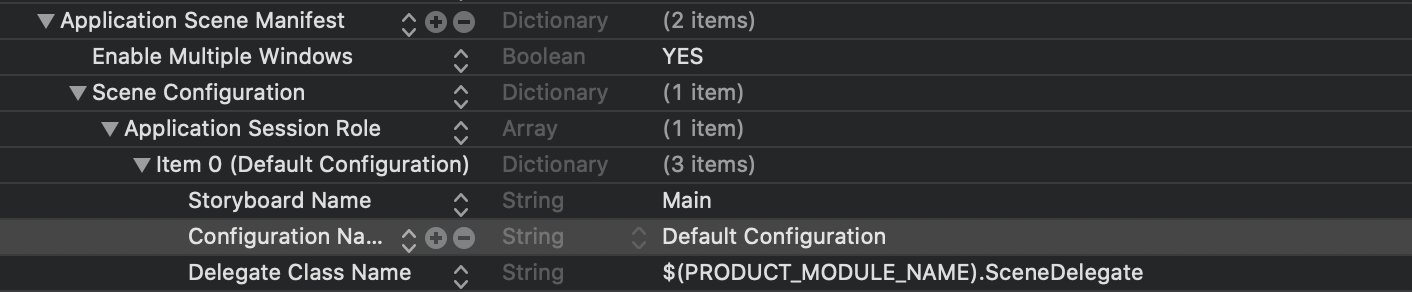
完成此操作后,单击配置选项,该选项将带您到info.plist。确保您有合适的应用场景报表条目
创建一个名为SceneDelegate.swift的新的快速文件,并将下面的样板代码粘贴到其中
import UIKit
class SceneDelegate: UIResponder, UIWindowSceneDelegate {
var window: UIWindow?
func scene(_ scene: UIScene, willConnectTo session: UISceneSession, options connectionOptions: UIScene.ConnectionOptions) {
// Use this method to optionally configure and attach the UIWindow `window` to the provided UIWindowScene `scene`.
// If using a storyboard, the `window` property will automatically be initialized and attached to the scene.
// This delegate does not imply the connecting scene or session are new (see `application:configurationForConnectingSceneSession` instead).
// Create the SwiftUI view that provides the window contents.
guard let _ = (scene as? UIWindowScene) else { return }
}
func sceneDidDisconnect(_ scene: UIScene) {
// Called as the scene is being released by the system.
// This occurs shortly after the scene enters the background, or when its session is discarded.
// Release any resources associated with this scene that can be re-created the next time the scene connects.
// The scene may re-connect later, as its session was not neccessarily discarded (see `application:didDiscardSceneSessions` instead).
}
func sceneDidBecomeActive(_ scene: UIScene) {
// Called when the scene has moved from an inactive state to an active state.
// Use this method to restart any tasks that were paused (or not yet started) when the scene was inactive.
}
func sceneWillResignActive(_ scene: UIScene) {
// Called when the scene will move from an active state to an inactive state.
// This may occur due to temporary interruptions (ex. an incoming phone call).
}
func sceneWillEnterForeground(_ scene: UIScene) {
// Called as the scene transitions from the background to the foreground.
// Use this method to undo the changes made on entering the background.
}
func sceneDidEnterBackground(_ scene: UIScene) {
// Called as the scene transitions from the foreground to the background.
// Use this method to save data, release shared resources, and store enough scene-specific state information
// to restore the scene back to its current state.
}
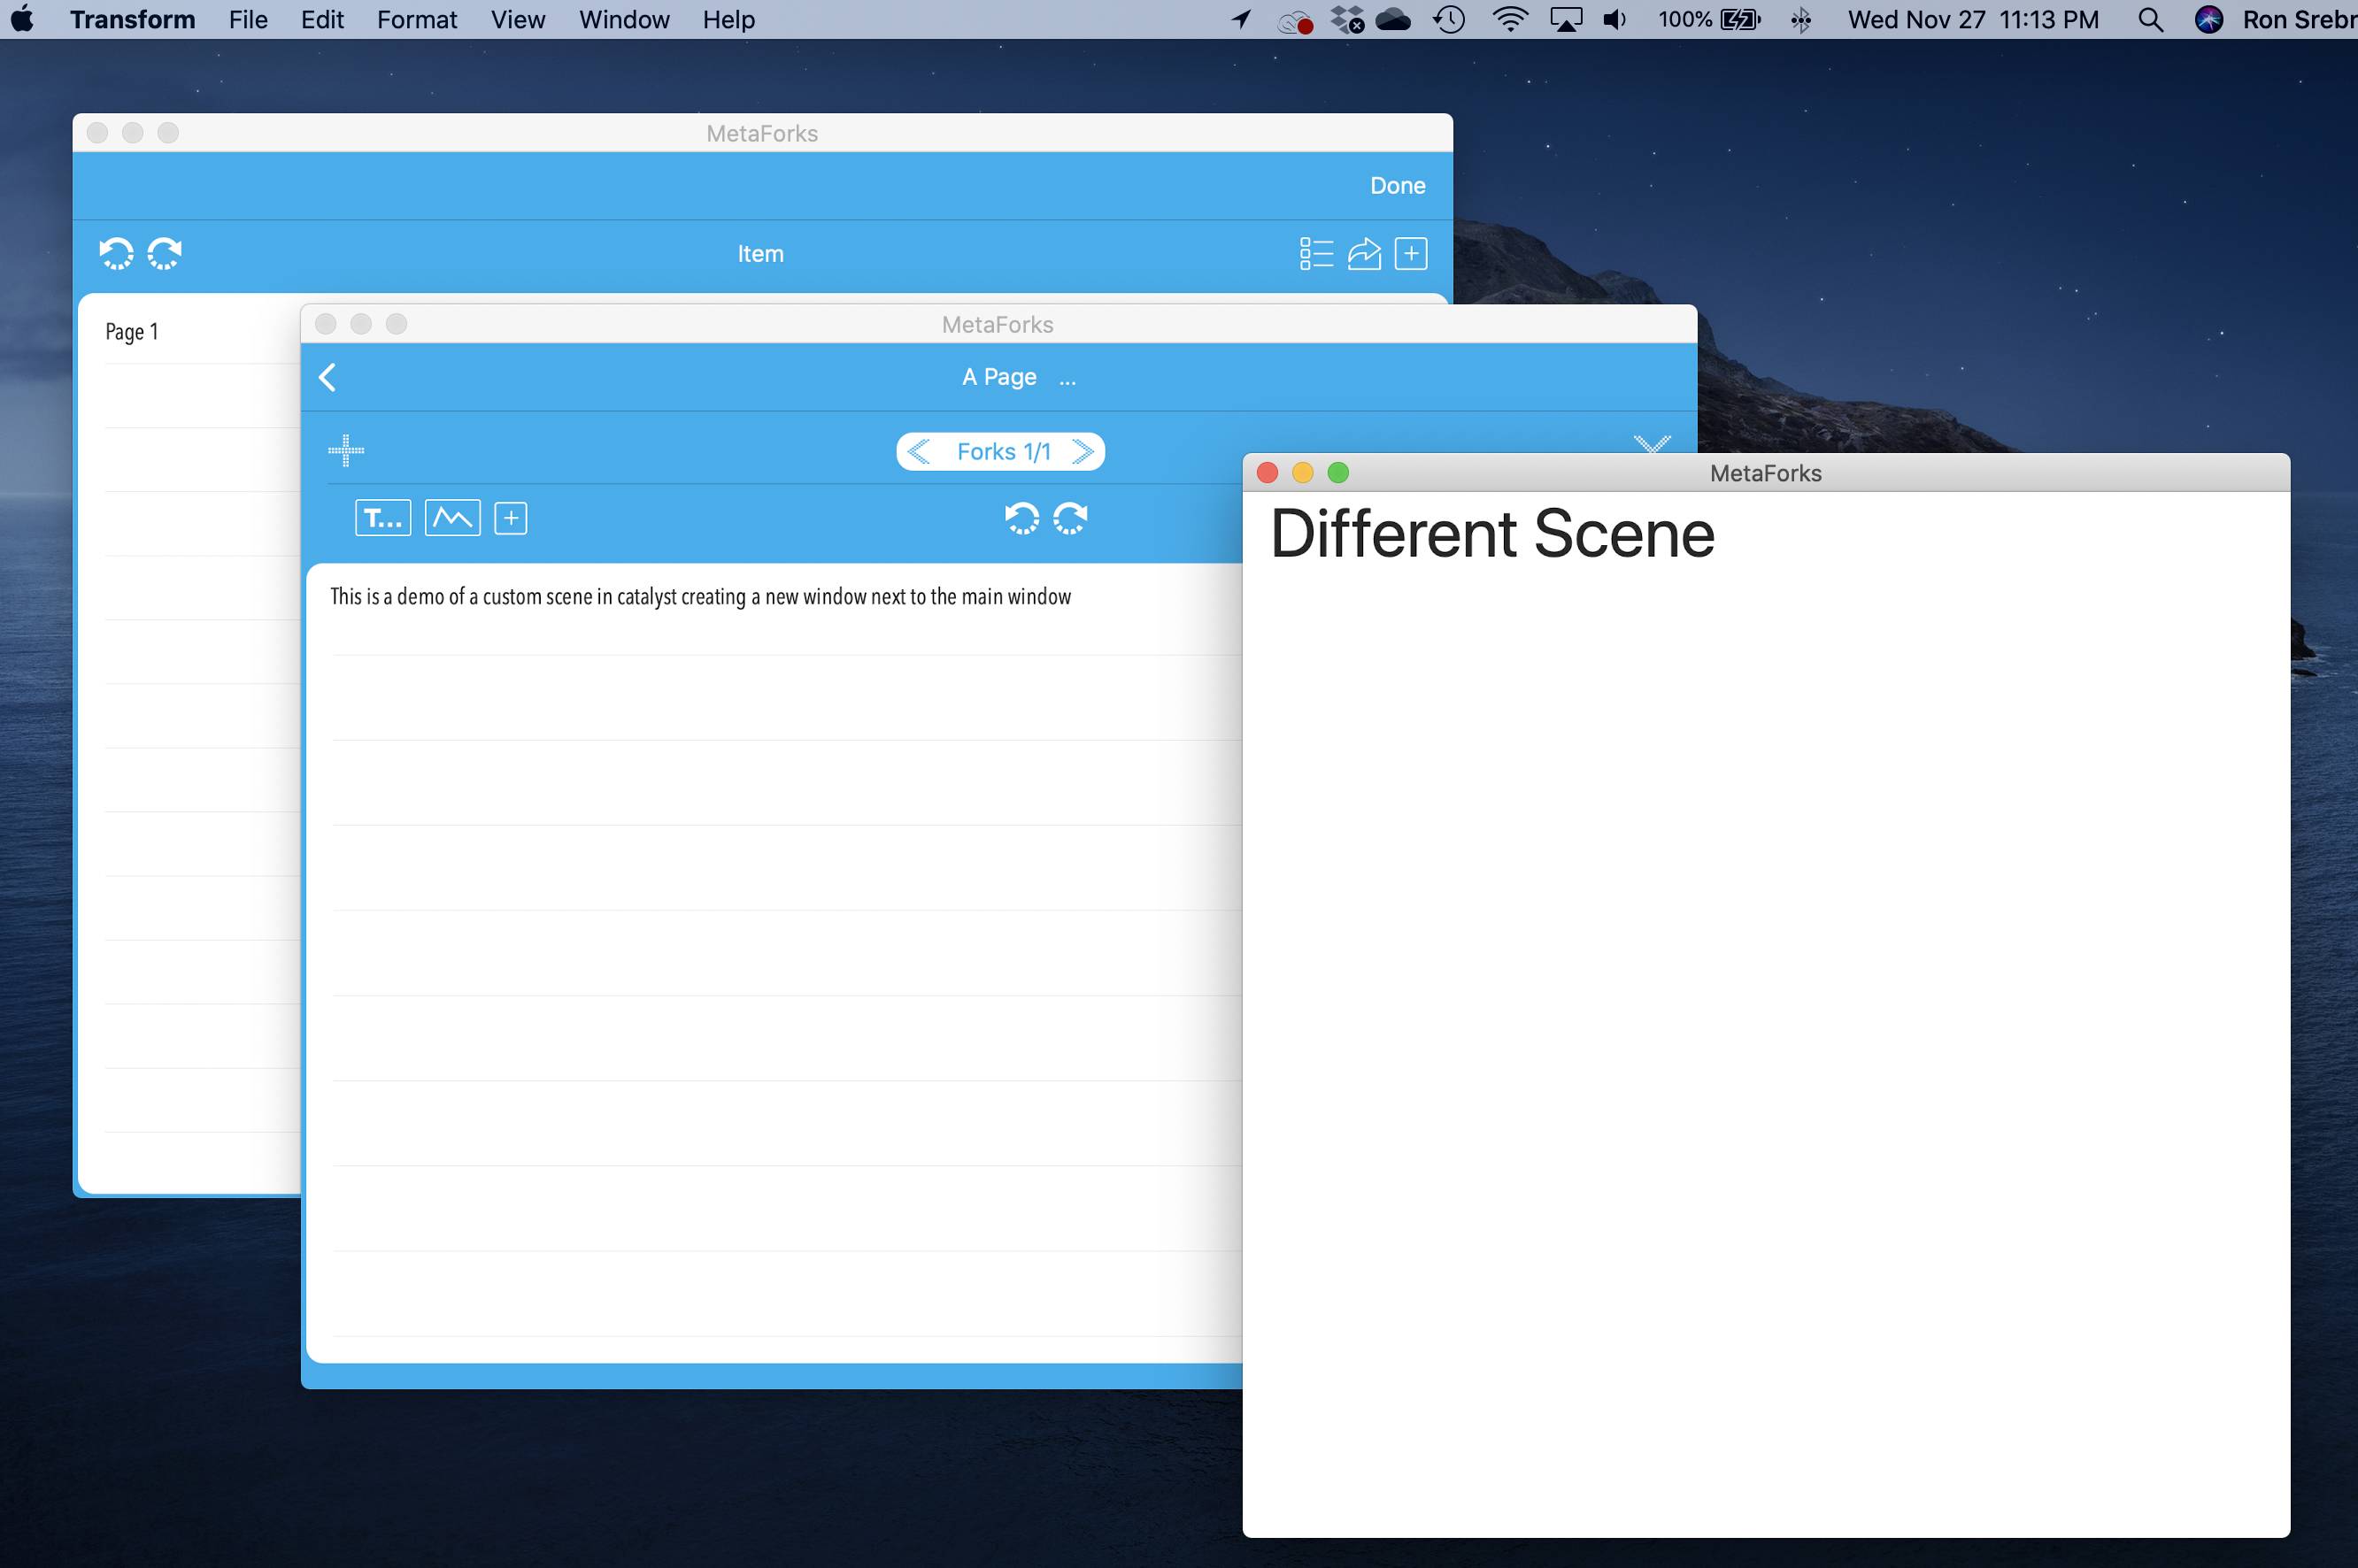
}你基本上就完蛋了。运行你的应用程序,点击命令+N创建任意数量的新窗口。
如果要在代码中创建新窗口,可以使用以下命令:
@IBAction func newWindow(_ sender: Any) {
    UIApplication.shared.requestSceneSessionActivation(nil, userActivity: nil, options: nil) { (error) in
        //
    }
},现在我们进入了如何创建额外的windows的大谜团。
关键是在应用程序中创建多个场景类型。您可以在info.plist (我无法正常工作)或在AppDelegate中完成。
让我们将函数更改为创建一个新窗口:
@IBAction func newWindow(_ sender: Any) {
    var activity = NSUserActivity(activityType: "panel")
    UIApplication.shared.requestSceneSessionActivation(nil, userActivity: activity, options: nil) { (error) in

    }
}
为您的新场景创建一个新的故事板,创建至少一个视图控制器,并确保设置为故事板中的initalviewcontroller。
让我们将以下函数添加到app委托中:
func application(_ application: UIApplication, configurationForConnecting connectingSceneSession: UISceneSession, options: UIScene.ConnectionOptions) -> UISceneConfiguration {
        if options.userActivities.first?.activityType == "panel" {
            let configuration = UISceneConfiguration(name: "Default Configuration", sessionRole: connectingSceneSession.role)
            configuration.delegateClass = CustomSceneDelegate.self
            configuration.storyboard = UIStoryboard(name: "CustomScene", bundle: Bundle.main)
            return configuration
        } else {
            let configuration = UISceneConfiguration(name: "Default Configuration", sessionRole: connectingSceneSession.role)
            configuration.delegateClass = SceneDelegate.self
            configuration.storyboard = UIStoryboard(name: "Main", bundle: Bundle.main)
            return configuration
        }
    }
通过在请求场景时设置userActivity,我们可以知道要创建哪个场景并相应地为其创建配置。菜单中的新窗口或CMD+N仍然会创建默认的新窗口,但是新窗口按钮现在将从新的故事板创建UI。
塔达:
Stack Overflow用户
发布于 2020-04-06 00:42:32
有了SwiftUI,您就可以这样做了(感谢罗恩·塞布罗):
1.激活多窗口支持:
2.要求新的场景:
struct ContentView: View {
    var body: some View {
        VStack {
            // Open window type 1
            Button(action: {
                UIApplication.shared.requestSceneSessionActivation(nil,
                                                                   userActivity: NSUserActivity(activityType: "window1"),
                                                                   options: nil,
                                                                   errorHandler: nil)
            }) {
                Text("Open new window - Type 1")
            }

            // Open window type 2
            Button(action: {
                UIApplication.shared.requestSceneSessionActivation(nil,
                                                                   userActivity: NSUserActivity(activityType: "window2"),
                                                                   options: nil,
                                                                   errorHandler: nil)
            }) {
                Text("Open new window - Type 2")
            }
        }
    }
}
3.创建新的窗口视图:
struct Window1: View {
    var body: some View {
        Text("Window1")
    }
}struct Window2: View {
var body: some View {
Text("Window2")
}
}4.更改SceneDelegate.swift:
    func scene(_ scene: UIScene, willConnectTo session: UISceneSession, options connectionOptions: UIScene.ConnectionOptions) {
        if let windowScene = scene as? UIWindowScene {
            let window = UIWindow(windowScene: windowScene)

            if connectionOptions.userActivities.first?.activityType == "window1" {
                window.rootViewController = UIHostingController(rootView: Window1())
            } else if connectionOptions.userActivities.first?.activityType == "window2" {
                window.rootViewController = UIHostingController(rootView: Window2())
            } else {
                window.rootViewController = UIHostingController(rootView: ContentView())
            }

            self.window = window
            window.makeKeyAndVisible()
        }
}https://stackoverflow.com/questions/58882047
复制


相似问题
催化剂:如何打开Mac上的设置?
在Mac催化剂上的应用
mac上python中的Matplotlib打开了一个新窗口
在NSAlert上打开新窗口
Mac催化剂游戏在GKAchievementInternal showBanner上崩溃
领取专属 10元无门槛券
AI混元助手 在线答疑

洞察 腾讯核心技术
剖析业界实践案例

腾讯云开发者
