Spring Security---授权操作详解
Spring Security---授权操作详解

Spring Security---授权操作详解
1.授权
所谓的授权,就是用户如果要访问某一个资源,我们要去检查用户是否具备这样的权限,如果具备就允许访问,如果不具备,则不允许访问。
2.准备测试用户
因为我们现在还没有连接数据库,所以测试用户还是基于内存来配置。
基于内存配置测试用户,我们有两种方式,第一种就是前面几篇文章用的配置方式,如下:
@Override
protected void configure(AuthenticationManagerBuilder auth) throws Exception {
    auth.inMemoryAuthentication()
            .withUser("dhy")
            .password("123").roles("admin")
            .and()
            .withUser("大忽悠")
            .password("123")
            .roles("user");
}
这是一种配置方式。
由于 Spring Security 支持多种数据源,例如内存、数据库、LDAP 等,这些不同来源的数据被共同封装成了一个 UserDetailService 接口,任何实现了该接口的对象都可以作为认证数据源。
因此我们还可以通过重写 WebSecurityConfigurerAdapter 中的 userDetailsService 方法来提供一个 UserDetailService 实例进而配置多个用户:
   @Bean
   protected UserDetailsService userDetailsService() {
      InMemoryUserDetailsManager manager = new InMemoryUserDetailsManager();
      manager.createUser(User.withUsername("dhy").password("123").roles("admin").build());
      manager.createUser(User.withUsername("大忽悠").password("123").roles("user").build());
      return manager;
}放入容器中后,会被自动使用
两种基于内存定义用户的方法,大家任选一个。
3.准备测试接口
测试用户准备好了,接下来我们准备三个测试接口。如下:
@RestController
public class HelloController {
    @GetMapping("/hello")
    public String hello() {
        return "hello";
    }

    @GetMapping("/admin/hello")
    public String admin() {
        return "admin";
    }

    @GetMapping("/user/hello")
    public String user() {
        return "user";
    }
}
这三个测试接口,我们的规划是这样的:
- /hello 是任何人都可以访问的接口
- /admin/hello 是具有 admin 身份的人才能访问的接口
- /user/hello 是具有 user 身份的人才能访问的接口
- 所有 user 能够访问的资源,admin 都能够访问
注意第四条规范意味着所有具备 admin 身份的人自动具备 user 身份。
4.配置
接下来我们来配置权限的拦截规则,在 Spring Security 的 configure(HttpSecurity http) 方法中,代码如下:
http.authorizeRequests()
        .antMatchers("/admin/**").hasRole("admin")
        .antMatchers("/user/**").hasRole("user")
        .anyRequest().authenticated()
        .and()
        ...
        ...
这里的匹配规则我们采用了 Ant 风格的路径匹配符,Ant 风格的路径匹配符在 Spring 家族中使用非常广泛,它的匹配规则也非常简单:
通配符 | 含义 |
|---|---|
** | 匹配多层路径 |
* | 匹配单层路径 |
? | 匹配任意单个字符 |
上面配置的含义是:
- 如果请求路径满足 /admin/** 格式,则用户需要具备 admin 角色。
- 如果请求路径满足 /user/** 格式,则用户需要具备 user 角色。
- 剩余的其他格式的请求路径,只需要认证(登录)后就可以访问。
注意代码中配置的三条规则的顺序非常重要,和 Shiro 类似,Spring Security 在匹配的时候也是按照从上往下的顺序来匹配,一旦匹配到了就不继续匹配了,所以拦截规则的顺序不能写错。
另一方面,如果你强制将 anyRequest 配置在 antMatchers 前面,像下面这样:
http.authorizeRequests()
        .anyRequest().authenticated()
        .antMatchers("/admin/**").hasRole("admin")
        .antMatchers("/user/**").hasRole("user")
        .and()
此时项目在启动的时候,就会报错,会提示不能在 anyRequest 之后添加 antMatchers:

这从语义上很好理解,anyRequest 已经包含了其他请求了,在它之后如果还配置其他请求也没有任何意义。
从语义上理解,anyRequest 应该放在最后,表示除了前面拦截规则之外,剩下的请求要如何处理。
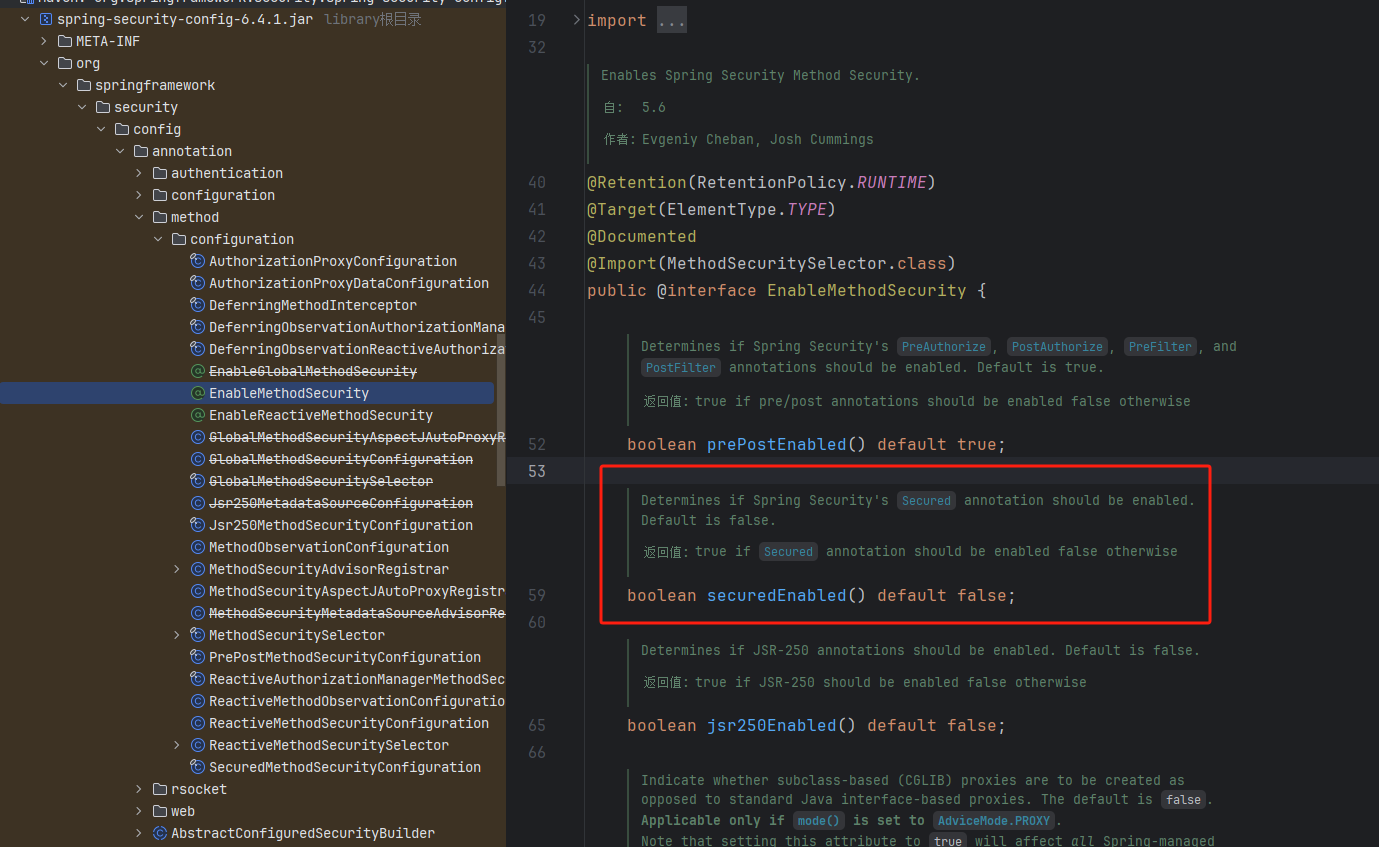
在拦截规则的配置类 AbstractRequestMatcherRegistry 中,我们可以看到如下一些代码(部分源码):
public abstract class AbstractRequestMatcherRegistry<C> {
	private boolean anyRequestConfigured = false;
	public C anyRequest() {
		Assert.state(!this.anyRequestConfigured, "Can't configure anyRequest after itself");
		this.anyRequestConfigured = true;
		return configurer;
	}
	public C antMatchers(HttpMethod method, String... antPatterns) {
		Assert.state(!this.anyRequestConfigured, "Can't configure antMatchers after anyRequest");
		return chainRequestMatchers(RequestMatchers.antMatchers(method, antPatterns));
	}
	public C antMatchers(String... antPatterns) {
		Assert.state(!this.anyRequestConfigured, "Can't configure antMatchers after anyRequest");
		return chainRequestMatchers(RequestMatchers.antMatchers(antPatterns));
	}
	protected final List<MvcRequestMatcher> createMvcMatchers(HttpMethod method,
			String... mvcPatterns) {
		Assert.state(!this.anyRequestConfigured, "Can't configure mvcMatchers after anyRequest");
		return matchers;
	}
	public C regexMatchers(HttpMethod method, String... regexPatterns) {
		Assert.state(!this.anyRequestConfigured, "Can't configure regexMatchers after anyRequest");
		return chainRequestMatchers(RequestMatchers.regexMatchers(method, regexPatterns));
	}
	public C regexMatchers(String... regexPatterns) {
		Assert.state(!this.anyRequestConfigured, "Can't configure regexMatchers after anyRequest");
		return chainRequestMatchers(RequestMatchers.regexMatchers(regexPatterns));
	}
	public C requestMatchers(RequestMatcher... requestMatchers) {
		Assert.state(!this.anyRequestConfigured, "Can't configure requestMatchers after anyRequest");
		return chainRequestMatchers(Arrays.asList(requestMatchers));
	}
}
从这段源码中,我们可以看到,在任何拦截规则之前(包括 anyRequest 自身),都会先判断 anyRequest 是否已经配置,如果已经配置,则会抛出异常,系统启动失败。
这样大家就理解了为什么 anyRequest 一定要放在最后。
5.启动测试
接下来,我们启动项目进行测试。
我们先通过大忽悠用户的账号访问:
登录成功后,分别访问 /hello,/admin/hello 以及 /user/hello 三个接口,其中:
- /hello 因为登录后就可以访问,这个接口访问成功。
- /admin/hello 需要 admin 身份,所以访问失败。
- /user/hello 需要 user 身份,所以访问成功。
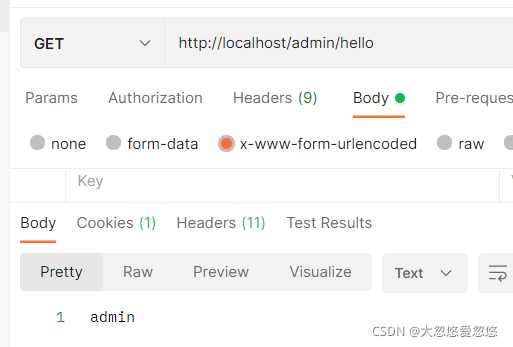
首先登录:


访问admin身份可以访问的资源时,成功
当访问user身份才可以访问的资源时,会显示403,无权限

完整的配置:
public class SecurityConfig extends WebSecurityConfigurerAdapter {

   private ObjectMapper objectMapper=new ObjectMapper();

   @Bean
   PasswordEncoder passwordEncoder() {
      return NoOpPasswordEncoder.getInstance();
   }

   @Override
   public void configure(WebSecurity web) throws Exception {
      web.ignoring().antMatchers("/js/**", "/css/**","/images/**");
   }

   @Override
   protected void configure(AuthenticationManagerBuilder auth) throws Exception {
      auth.inMemoryAuthentication()
              .withUser("dhy")
              .password("123").roles("admin")
              .and()
              .withUser("大忽悠")
              .password("123")
              .roles("user");
   }

   @Override
   protected void configure(HttpSecurity http) throws Exception {
      http.authorizeRequests()
              .antMatchers("/admin/**").hasRole("admin")
              .antMatchers("/user/**").hasRole("user")
              .anyRequest().authenticated()
              .and()
              .formLogin()
              //注意放行请求,否则会404
              .loginPage("/login.html").permitAll()
              .loginProcessingUrl("/login").permitAll()
              .successHandler(new AuthenticationSuccessHandler() {
                 @Override
                 public void onAuthenticationSuccess(HttpServletRequest httpServletRequest, HttpServletResponse httpServletResponse, Authentication authentication) throws IOException, ServletException {
                    httpServletResponse.setContentType("application/json;charset=UTF-8");
                    httpServletResponse.getWriter().write(objectMapper.writeValueAsString(authentication));
                 }
              }).permitAll()
              .and()
              .csrf().disable();

   }
}
角色继承
所有 user 能够访问的资源,admin 都能够访问,很明显我们目前的代码还不具备这样的功能。
要实现所有 user 能够访问的资源,admin 都能够访问,这涉及到另外一个知识点,叫做角色继承。
这在实际开发中非常有用。
上级可能具备下级的所有权限,如果使用角色继承,这个功能就很好实现,我们只需要在 SecurityConfig 中添加如下代码来配置角色继承关系即可:
@Bean
RoleHierarchy roleHierarchy() {
    RoleHierarchyImpl hierarchy = new RoleHierarchyImpl();
    hierarchy.setHierarchy("ROLE_admin > ROLE_user");
    return hierarchy;
}
注意,在配置时,需要给角色手动加上 ROLE_ 前缀。上面的配置表示 ROLE_admin 自动具备 ROLE_user 的权限。
配置完成后,重启项目,此时我们发现 dhy 也能访问 /user/hello 这个接口了。


腾讯云开发者