操作场景
云服务器系统内核需要支持 Virtio 驱动(包括块设备驱动
virtio_blk 和网卡驱动 virtio_net)才能在腾讯云上正常运行。为避免导入自定义镜像后,创建的云服务器实例无法启动,您需要在导入镜像前,检查是否需要在源服务器中检查以及修复镜像中对 Virtio 驱动的支持。本文档以 CentOS 操作系统为例,指导您如何在导入镜像前进行检查以及修复镜像中对 Virtio 驱动的支持。操作步骤
步骤1:检查内核是否支持 Virtio 驱动
执行以下命令,确认当前内核是否支持 Virtio 驱动。
grep -i virtio /boot/config-$(uname -r)
返回类似如下结果:
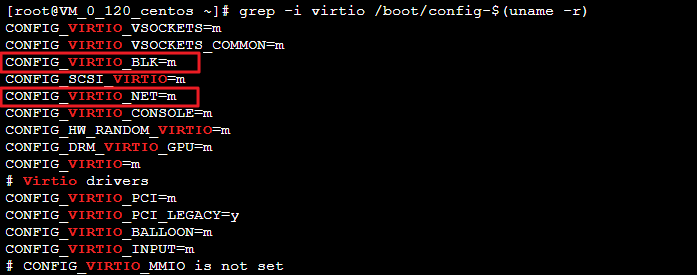
如果返回结果中
CONFIG_VIRTIO_BLK参数和CONFIG_VIRTIO_NET参数取值为m,请执行 步骤2:检查临时文件系统是否包含 Virtio 驱动。如果在返回结果中
CONFIG_VIRTIO_BLK参数和CONFIG_VIRTIO_NET参数取值为y,表示该操作系统包含了 Virtio 驱动,您可以直接导入自定义的镜像到腾讯云,操作详情请参见 导入镜像。如果在返回结果中没有
CONFIG_VIRTIO_BLK参数和CONFIG_VIRTIO_NET参数的信息,表示该操作系统不包含腾讯云需要的驱动,请 下载和编译内核。
步骤2:检查临时文件系统是否包含 Virtio 驱动
当
CONFIG_VIRTIO_BLK和CONFIG_VIRTIO_NET参数的取值均为m或一个为y一个为m时,运行以下命令,检查 Virtio 驱动是否已添加到临时文件系统。lsinitrd /boot/initramfs-$(uname -r).img | grep virtio
lsinitramfs /boot/initrd.img-$(uname -r) | grep virtio
lsinitrd /boot/initrd-$(uname -r) | grep virtio
mkdir -p /tmp/initrd && cd /tmp/initrdzcat /boot/initrd-$(uname -r).img | cpio -idmvfind . -name "virtio*"
返回类似如下结果:

如果返回结果包含了
virtio_blk和virtio_net,表示 Virtio 驱动已经添加到临时文件系统中,本文下方内容您无需继续执行,可直接 导入镜像。如果
CONFIG_VIRTIO_BLK和CONFIG_VIRTIO_NET参数的取值一个为y一个为m,则只需要判断取值为m的驱动是否已添加到临时文件系统。具体操作请参见:步骤3:将 Virtio 驱动添加到临时文件系统。
步骤3:将 Virtio 驱动添加到临时文件系统
通过检查,发现镜像内核支持 Virtio 驱动,但是未添加到临时文件系统中,需要手动添加。
mkinitrd -f --allow-missing --with=virtio_blk --preload=virtio_blk --with=virtio_net --preload=virtio_net --with=virtio_console --preload=virtio_console /boot/initramfs-$(uname -r).img $(uname -r)
echo -e 'xen-blkfront\\nvirtio_blk\\nvirtio_pci\\nvirtio_console' >> /etc/initramfs-tools/modulesmkinitramfs -o /boot/initrd.img-$(uname -r)
mkinitrd -m "virtio_blk virtio_net"
mkinitrd -f --allow-missing --with=xen-vbd --preload=xen-vbd --with=xen-platform-pci --preload=xen-platform-pci --with=virtio_blk --preload=virtio_blk --with=virtio_pci --preload=virtio_pci --with=virtio_console --preload=virtio_console /boot/initrd-$(uname -r).img $(uname -r)
附录
安装 Virtio 驱动
步骤1:下载内核安装包
1. 执行以下命令,安装编译内核必要的组件。
yum install -y ncurses-devel gcc make wget
2. 执行以下命令,查询当前系统使用的内核版本。
uname -r
返回类似如下结果,当前系统使用的内核版本为
2.6.32-642.6.2.el6.x86_64。
3. 前往 Linux 内核下载页面,下载对应的或最接近的内核版本源码:
例如:
2.6.32-642.6.2.el6.x86_64下载路径为:https://mirrors.edge.kernel.org/pub/linux/kernel/v2.6/linux-2.6.32.tar.gz。5.4.101-***.x86_64下载路径为:https://mirrors.edge.kernel.org/pub/linux/kernel/v5.x/linux-5.4.101.tar.gz。4. 执行以下命令,下载安装包。
cd /usr/src/wget https://mirrors.edge.kernel.org/pub/linux/kernel/v2.6/linux-2.6.32.tar.gz
5. 执行以下命令,解压安装包并且建立软连接。
tar -xzf linux-2.6.32.tar.gzln -s linux-2.6.32 linux
步骤2:编译内核
1. 执行以下命令,编译内核。
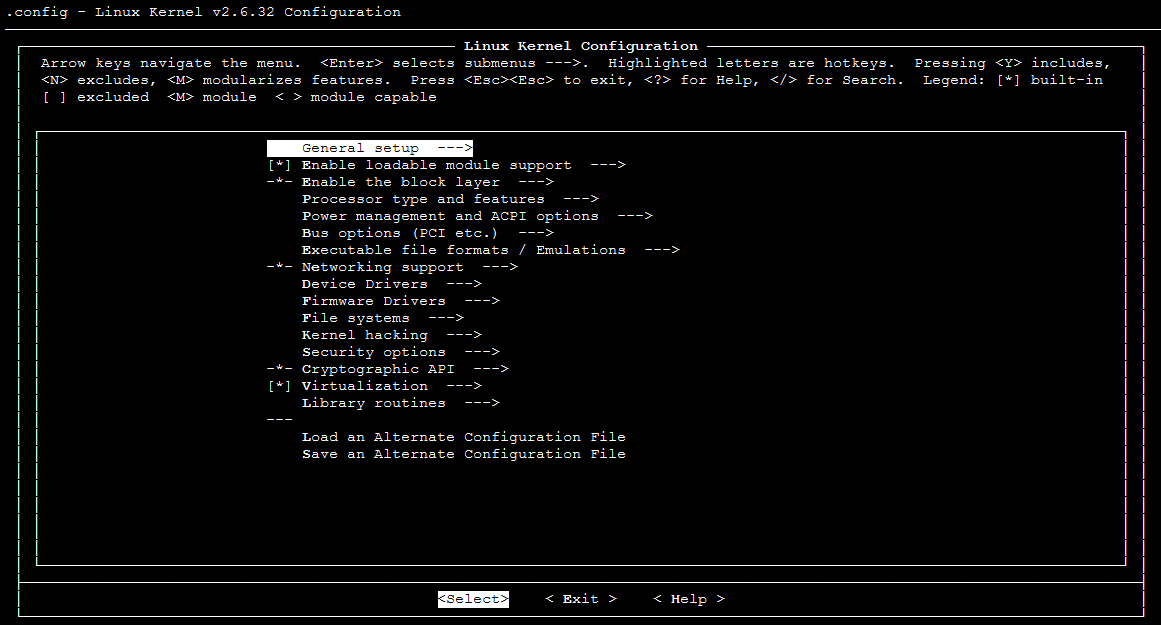
cd /usr/src/linuxmake mrpropercp /boot/config-$(uname -r) ./.configmake menuconfig
进入 Linux Kernel vX.X.XX Configuration 界面。如下图所示:
说明
按
Tab或 ↑ ↓ 方向键移动光标。按
Enter选择或执行光标所选项目。按空格键选中光标所选项目,
*表示编译到内核,M表示编译为模块。2. 配置
Virtualization。2.1 按
↓键将光标调到Virtualization,按空格键选中,并且按Enter进入详情界面。2.2 在详情界面,确认是否勾选了
Kernel-based Virtual Machine(KVM)support选项。如下图所示: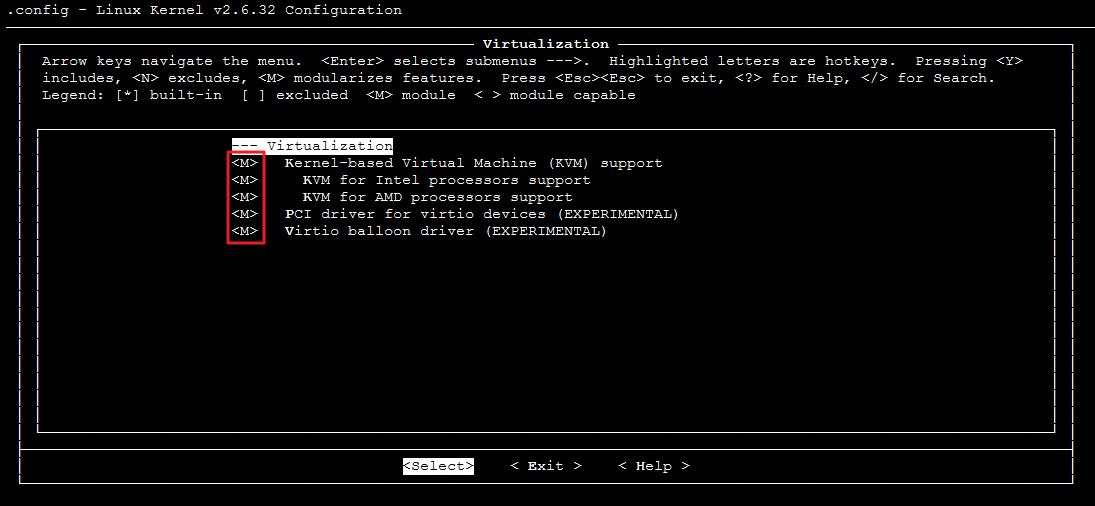
说明:
若未勾选,请按空格键选中
Kernel-based Virtual Machine(KVM)support选项。3. 按
Esc返回Linux Kernel vX.X.XX Configuration主界面。4. 配置
Processor type and features。4.1 按
↓键将光标调到 Processor type and features,按Enter,进入详情界面。4.2 按
↓键将光标调到 Paravirtualized guest support,按Enter,进入详情界面。4.3 确认是否勾选了
KVM paravirtualized clock和KVM Guest support。如下图所示: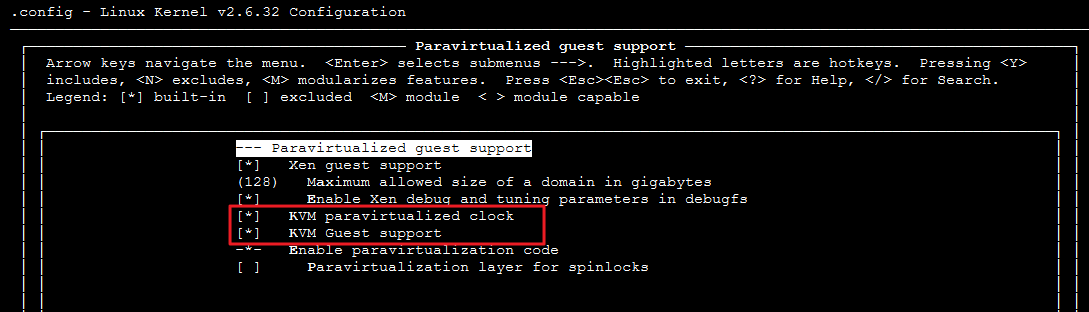
说明:
若未勾选,请按
空格键选中KVM paravirtualized clock和KVM Guest support选项。5. 按
Esc返回Linux Kernel vX.X.XX Configuration主界面。6. 配置
Device Drivers。6.1 按
↓键将光标调到Device Drivers,按 Enter,进入详情界面。6.2 启用磁盘驱动。
6.2.1 按
↓键将光标调到Block devices,按Enter,进入详情界面。6.2.2 确认是否勾选了
Virtio block driver (EXPERIMENTAL)。如下图所示: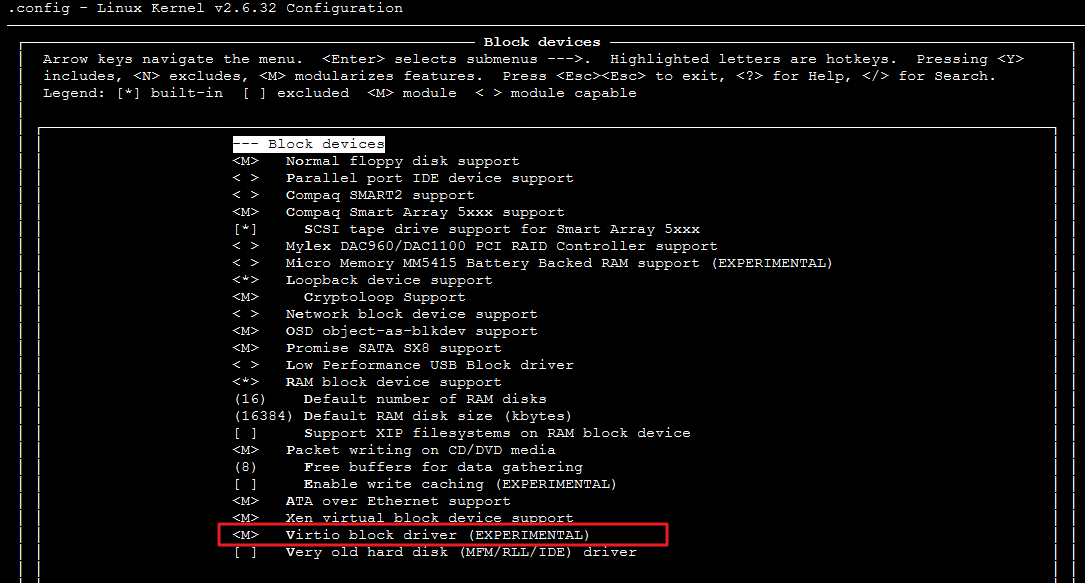
说明:
若未勾选,请按
空格键选中Virtio block driver (EXPERIMENTAL)选项。6.3 按
Esc返回 Device Drivers 详情界面。6.4 启用网卡驱动。
6.4.1 按
↓键将光标调到Network device support,按Enter,进入详情界面。6.4.2 确认是否勾选了
Virtio network driver (EXPERIMENTAL)。如下图所示: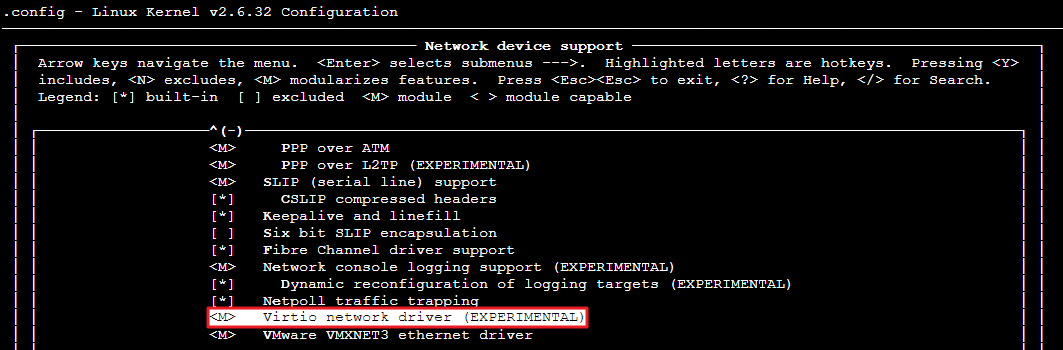
说明:
若未勾选,请按
空格键选中Virtio network driver (EXPERIMENTAL)选项。6.5 按
Esc返回 Device Drivers 详情界面。7. 按
Esc退出内核配置界面,并根据弹窗提示,选择YES,保存 .config 文件。8. 重新按照 步骤1:检查内核是否支持 Virtio 驱动,验证 Virtio 驱动是否已经正确配置,如果检查通过则代表安装成功,可以继续 导入镜像。
9. (
可选)
手动编辑 .config 文件。说明:
如果您符合如下任一条件,建议执行此操作:
若检查后发现,内核仍无 Virtio 驱动的相关配置信息。
编译内核时,无法进入内核配置界面或者未成功保存
.config 文件。make oldconfigmake preparemake scriptsmakemake install
依次执行以下命令,查看 Virtio 驱动的安装情况。
find /lib/modules/"$(uname -r)"/ -name "virtio.*" | grep -E "virtio.*"grep -E "virtio.*" < /lib/modules/"$(uname -r)"/modules.builtin
如果任一命令的返回结果输出
virtio_blk、virtio_pci、virtio_console 等文件列表,即表明您已经正确安装了 Virtio 驱动。


