必看!SpringAI轻松构建MCP Client-Server架构
必看!SpringAI轻松构建MCP Client-Server架构

MCP 这个概念相信大家已经听了无数次了,但不同人会有不同的解释,你可能也是听得云里雾里的。
不过没关系,今天这篇内容会通过 Spring AI 给你实现一个 MCP 的 Client 和 Server 架构,让你彻底搞懂 MCP 的概念,以及学会 MCP 的开发技能。
什么是MCP?
MCP 是 Model Context Protocol,模型上下文协议,它是由 Anthropic(Claude 大模型母公司)提出的开放协议,用于大模型连接外部“数据源”的一种协议。
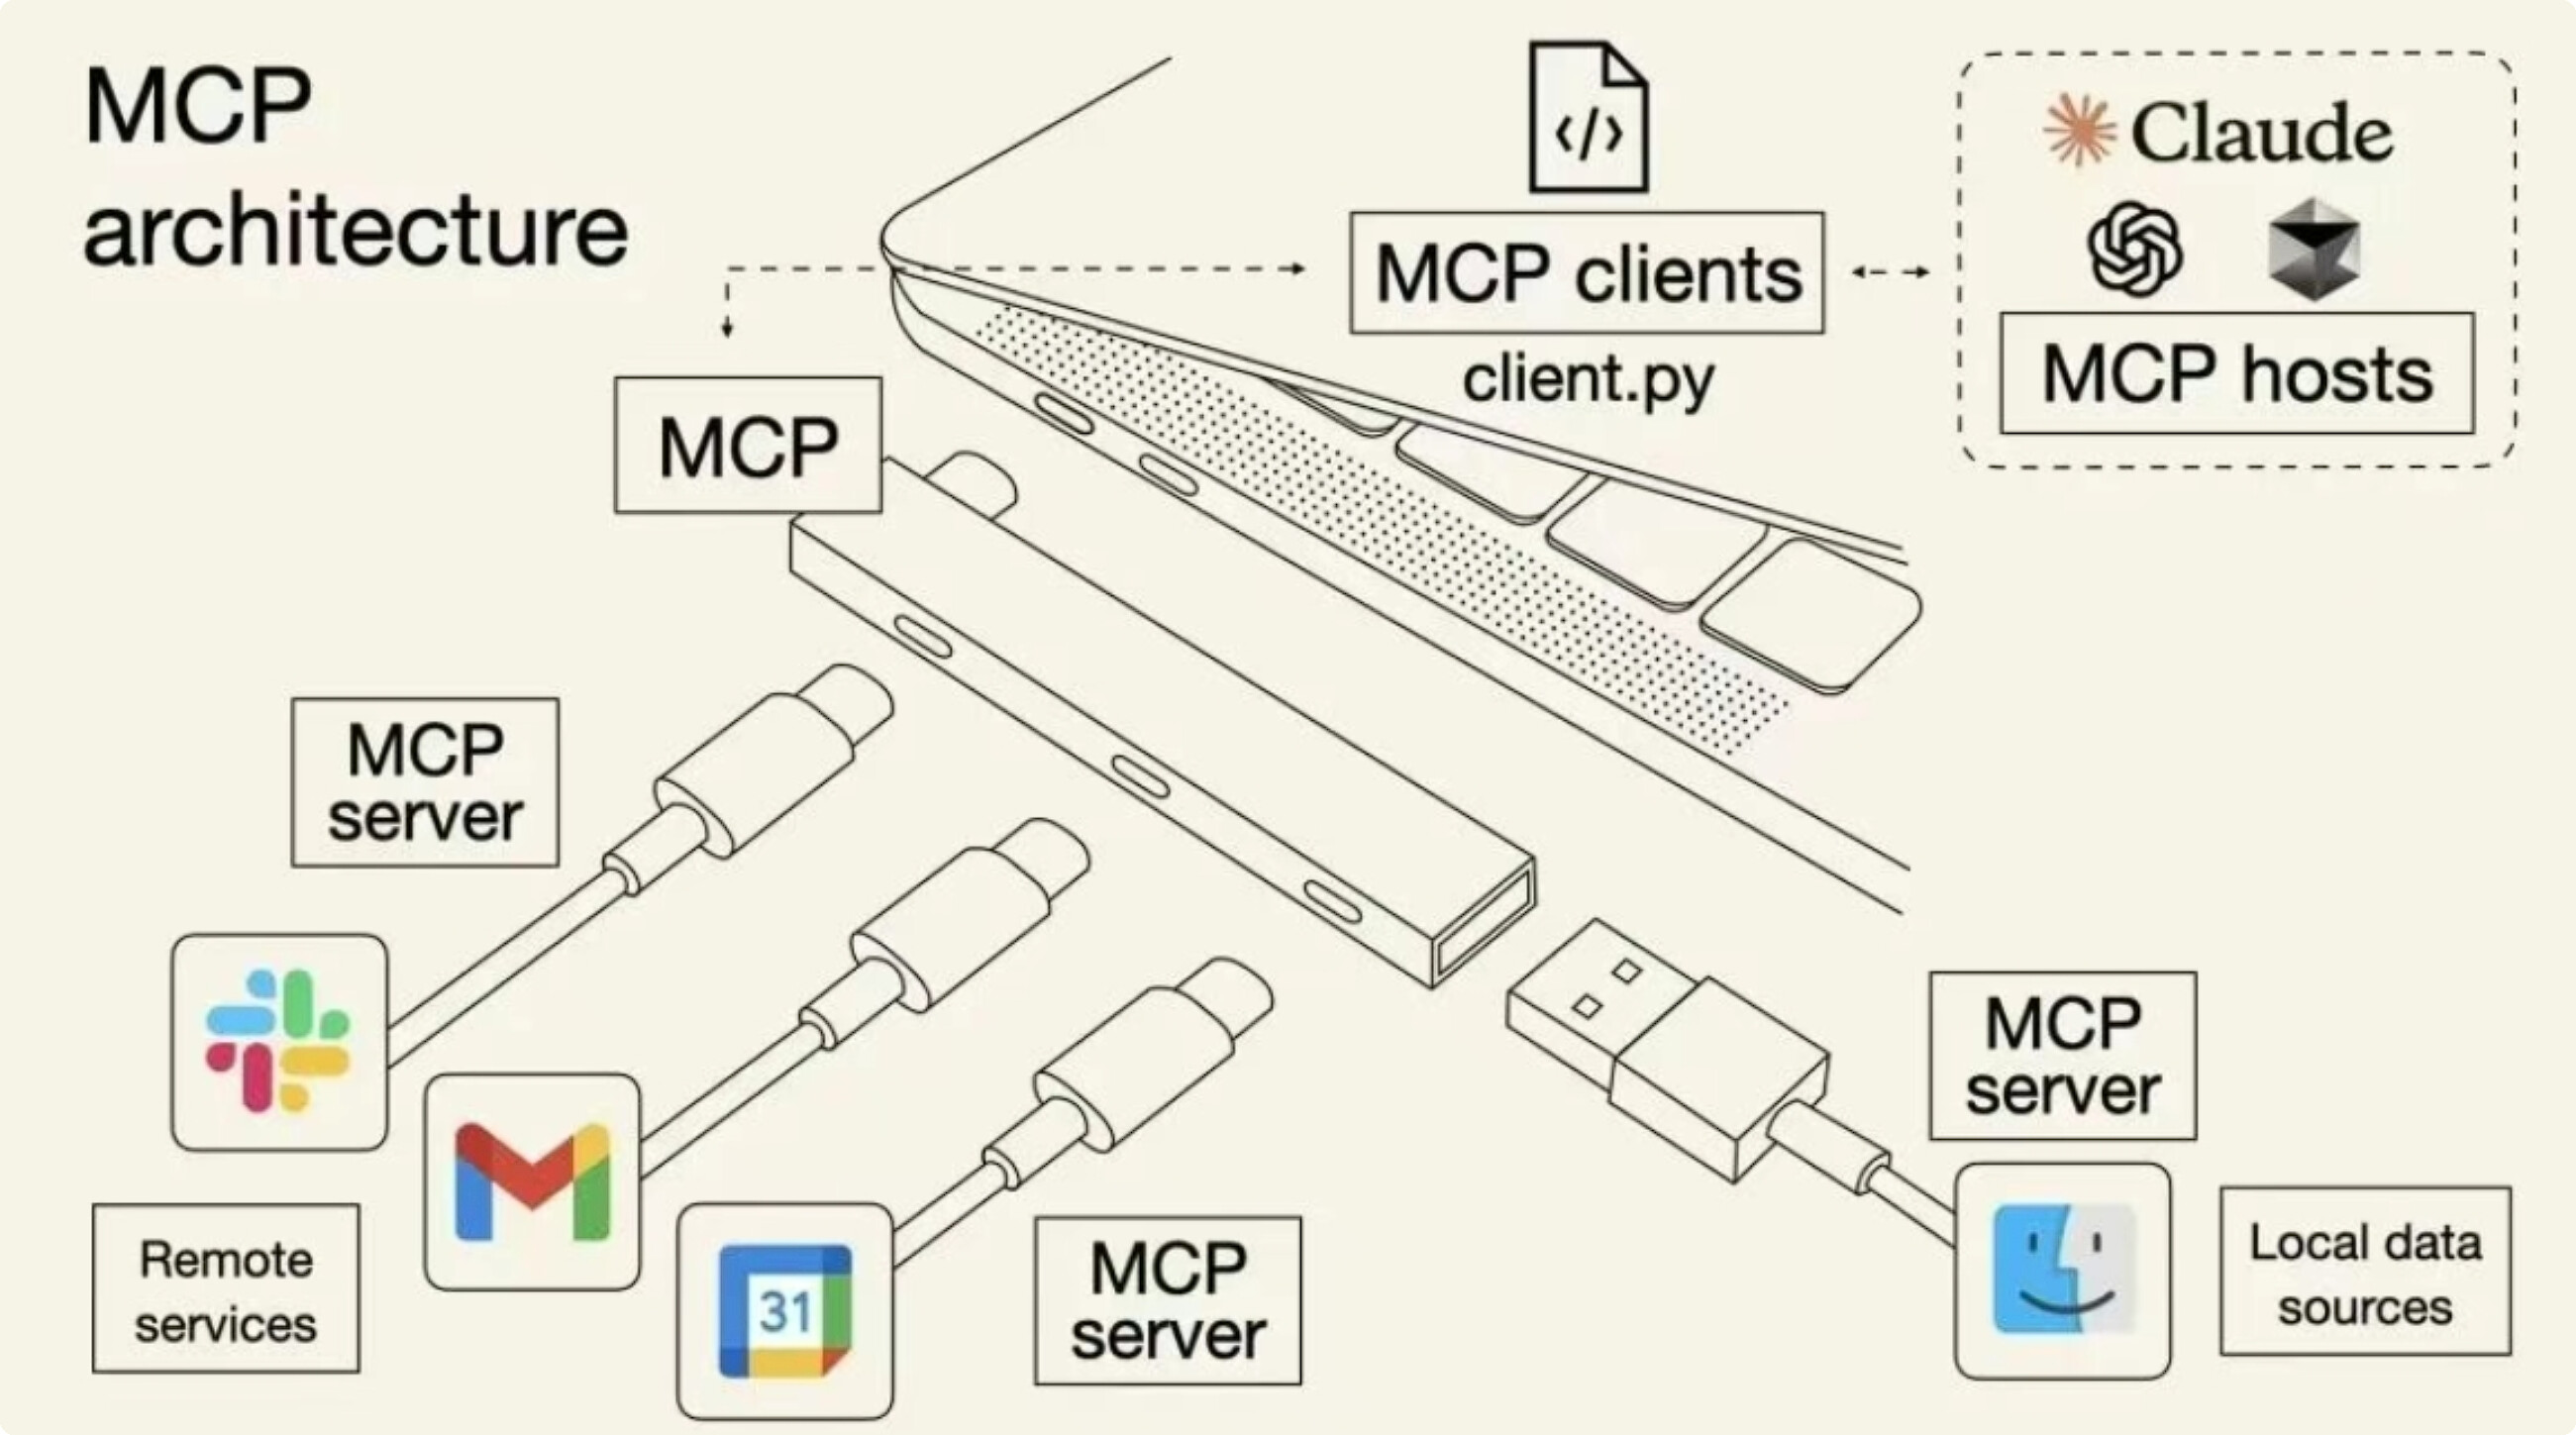
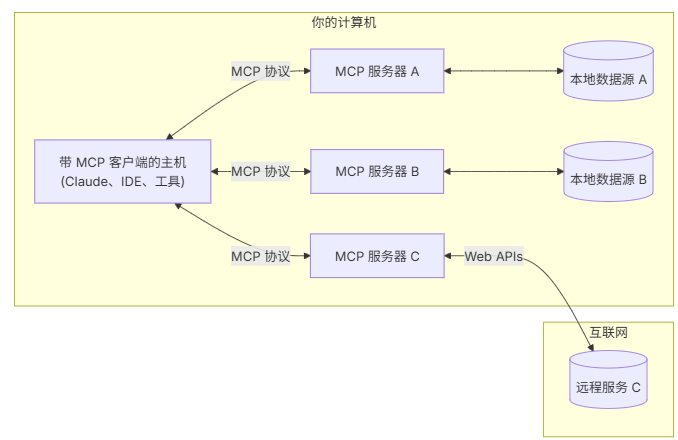
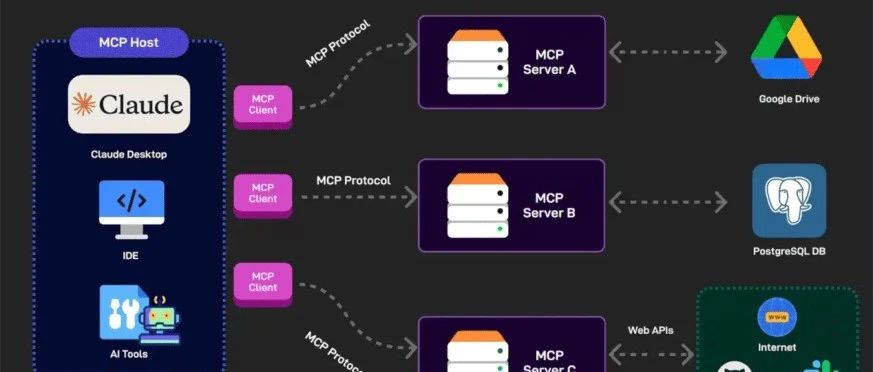
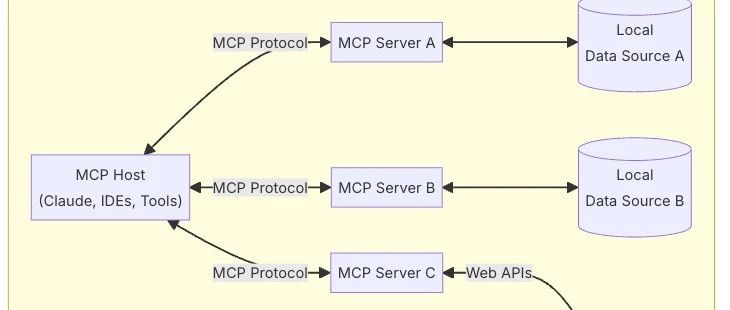
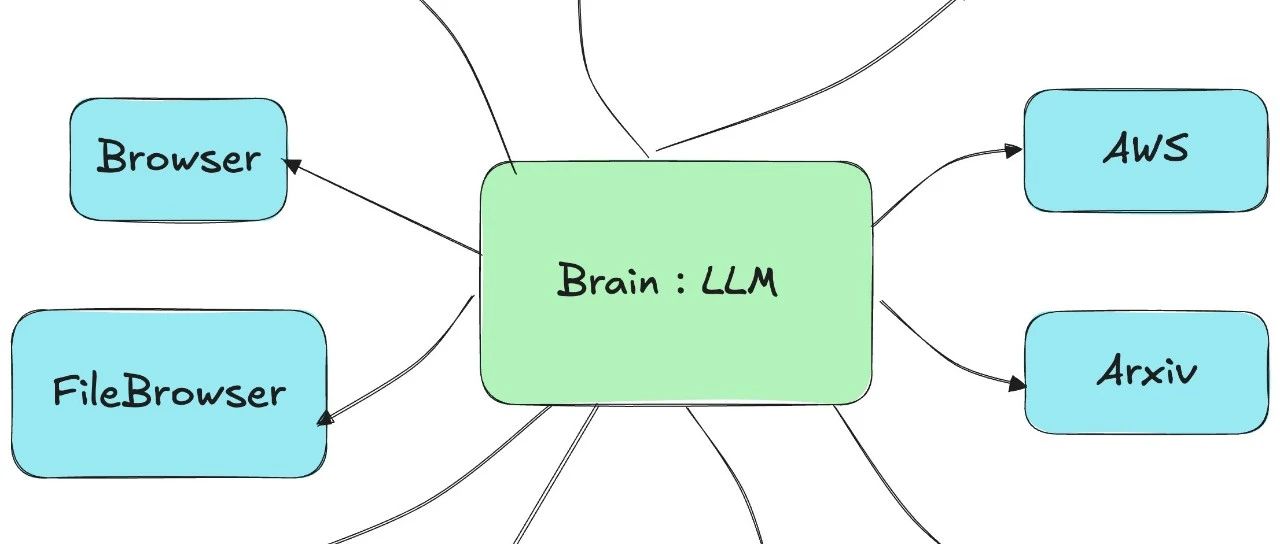
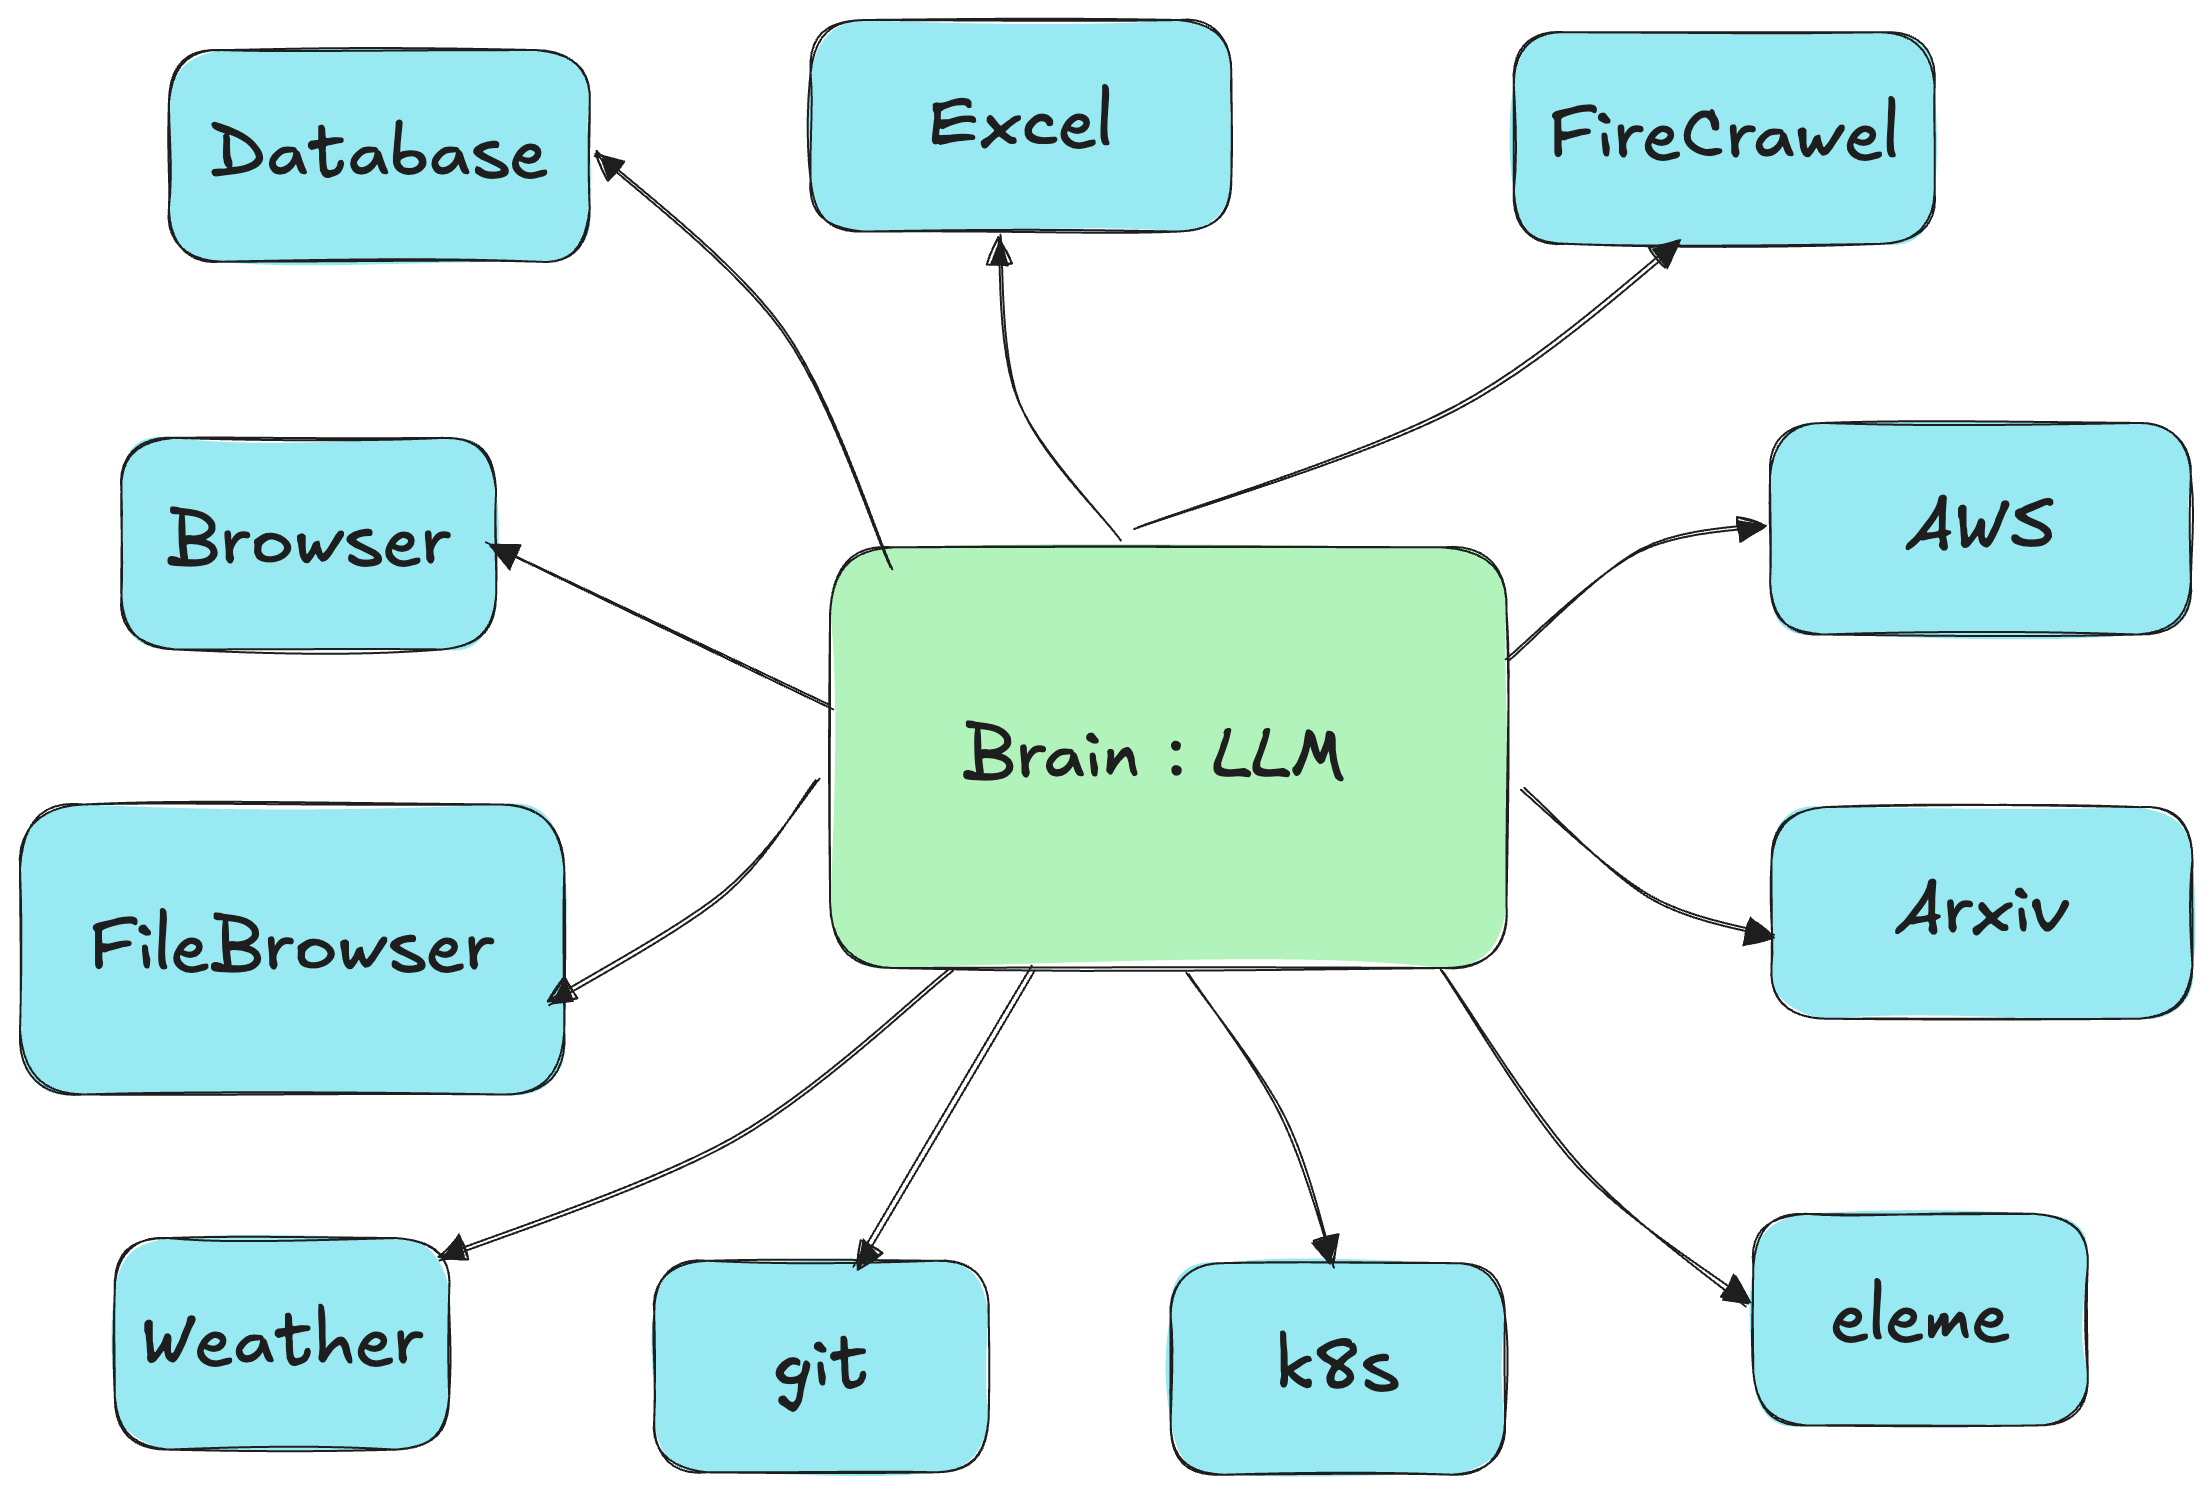
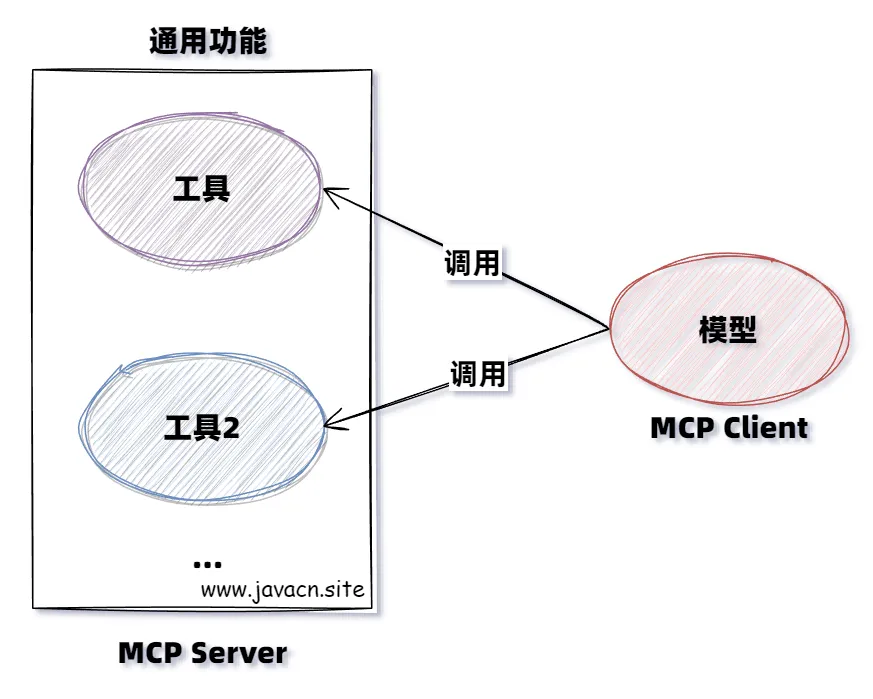
它可以通俗的理解为 Java 界的 Spring Cloud Openfeign,只不过 Openfeign 是用于微服务通讯的,而 MCP 用于大模型通讯的,但它们都是为了通讯获取某项数据的一种机制,如下图所示:
为什么需要MCP?
MCP 存在的意义是它解决了大模型时代最关键的三个问题:数据孤岛、开发低效和生态碎片化等问题。
1.打破数据孤岛,让AI“连接万物”
大模型本身无法直接访问实时数据或本地资源(如数据库、文件系统),传统方式需要手动复制粘贴或定制接口。MCP 通过标准化协议,让大模型像“插USB”一样直接调用外部工具和数据源,例如:
- 查天气时自动调用气象 API,无需手动输入数据。
- 分析企业数据时直接连接内部数据库,避免信息割裂。
2.降低开发成本,一次适配所有场景
在之前每个大模型(如 DeepSeek、ChatGPT)需要为每个工具单独开发接口(Function Calling),导致重复劳动,MCP 通过统一协议:
- 开发者只需写一次 MCP 服务端,所有兼容 MCP 的模型都能调用。
- 用户无需关心技术细节,大模型可直接操作本地文件、设计软件等。
3.提升安全性与互操作性
- 安全性:MCP 内置权限控制和加密机制,比直接开放数据库更安全。
- 生态统一:类似 USB 接口,MCP 让不同厂商的工具能“即插即用”,避免生态分裂。
4.推动AIAgent的进化
MCP 让大模型从“被动应答”变为“主动调用工具”,例如:
- 自动抓取网页新闻补充实时知识。
- 打开 Idea 编写一个“Hello World”的代码。
MCP 的诞生,相当于为AI世界建立了“通用语言”,让模型、数据和工具能高效协作,最终释放大模型的全部潜力。
MCP组成和执行流程
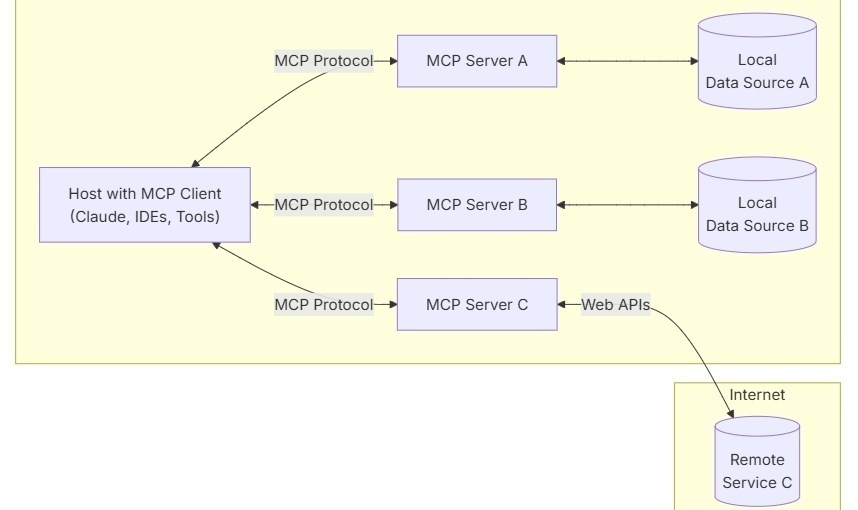
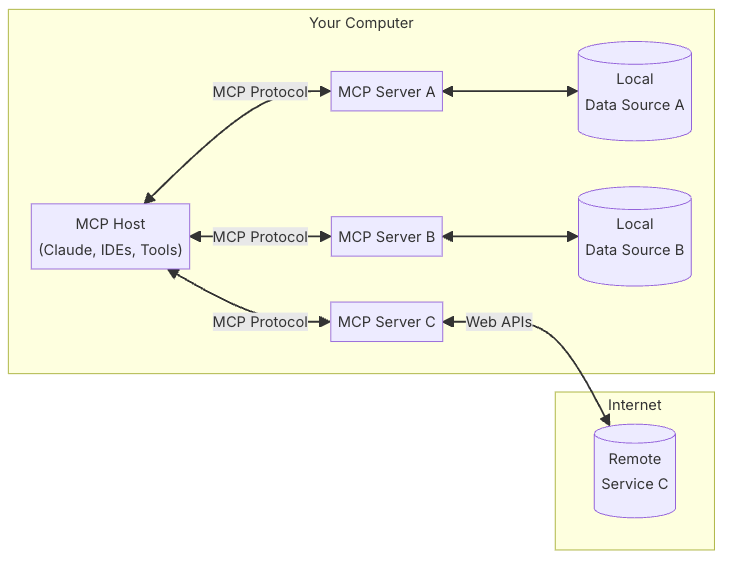
MCP 架构分为以下 3 部分:
- 客户端:大模型应用(如 DeepSeek、ChatGPT)发起请求。
- 服务器:中间层,连接具体工具(如数据库、设计软件)。
- 资源:具体的数据或工具(如 Exce l文件、网页 API)。
运行流程:
- 用户提问。
- 大模型通过 MCP 客户端发送请求。
- MCP 服务器接收指令。
- 调用对应工具(如数据库)执行。
- 返回结果给大模型。
- 生成最终回答。
Spring AI MCP 介绍
Spring AI MCP 是通过 Spring Boot 集成扩展了 MCP 的 Java SDK(开发工具),它同时提供了 Spring Boot 客户端和服务器的启动器,方便使用 Spring AI MCP 快速开发 AI 应用程序。
Spring AI MCP 实战
当前案例中,我们使用 MCP 实现一个天气查询小助手,其中包含的主要角色有:
- MCP Server:MCP 服务提供方,提供天气查询功能。
- MCP Client:MCP 客户端(大模型端)我们对接 DeepSeek LLM 实现对 MCP Server 的调用,从而实现天气预报的查询功能。
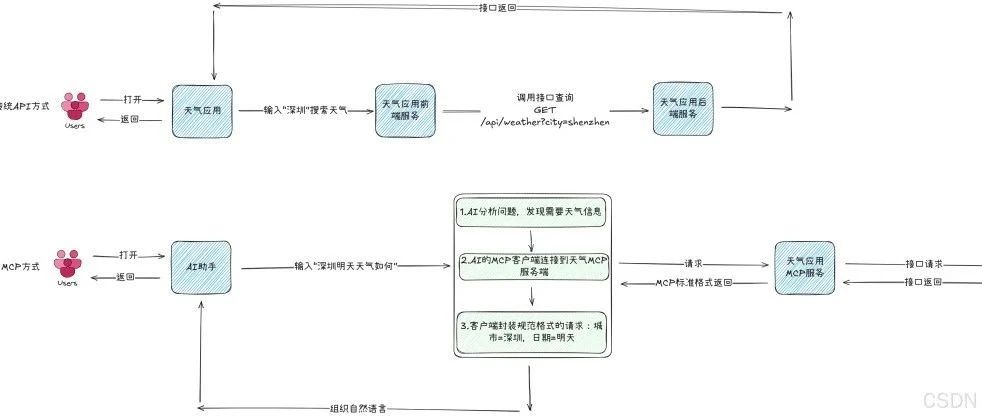
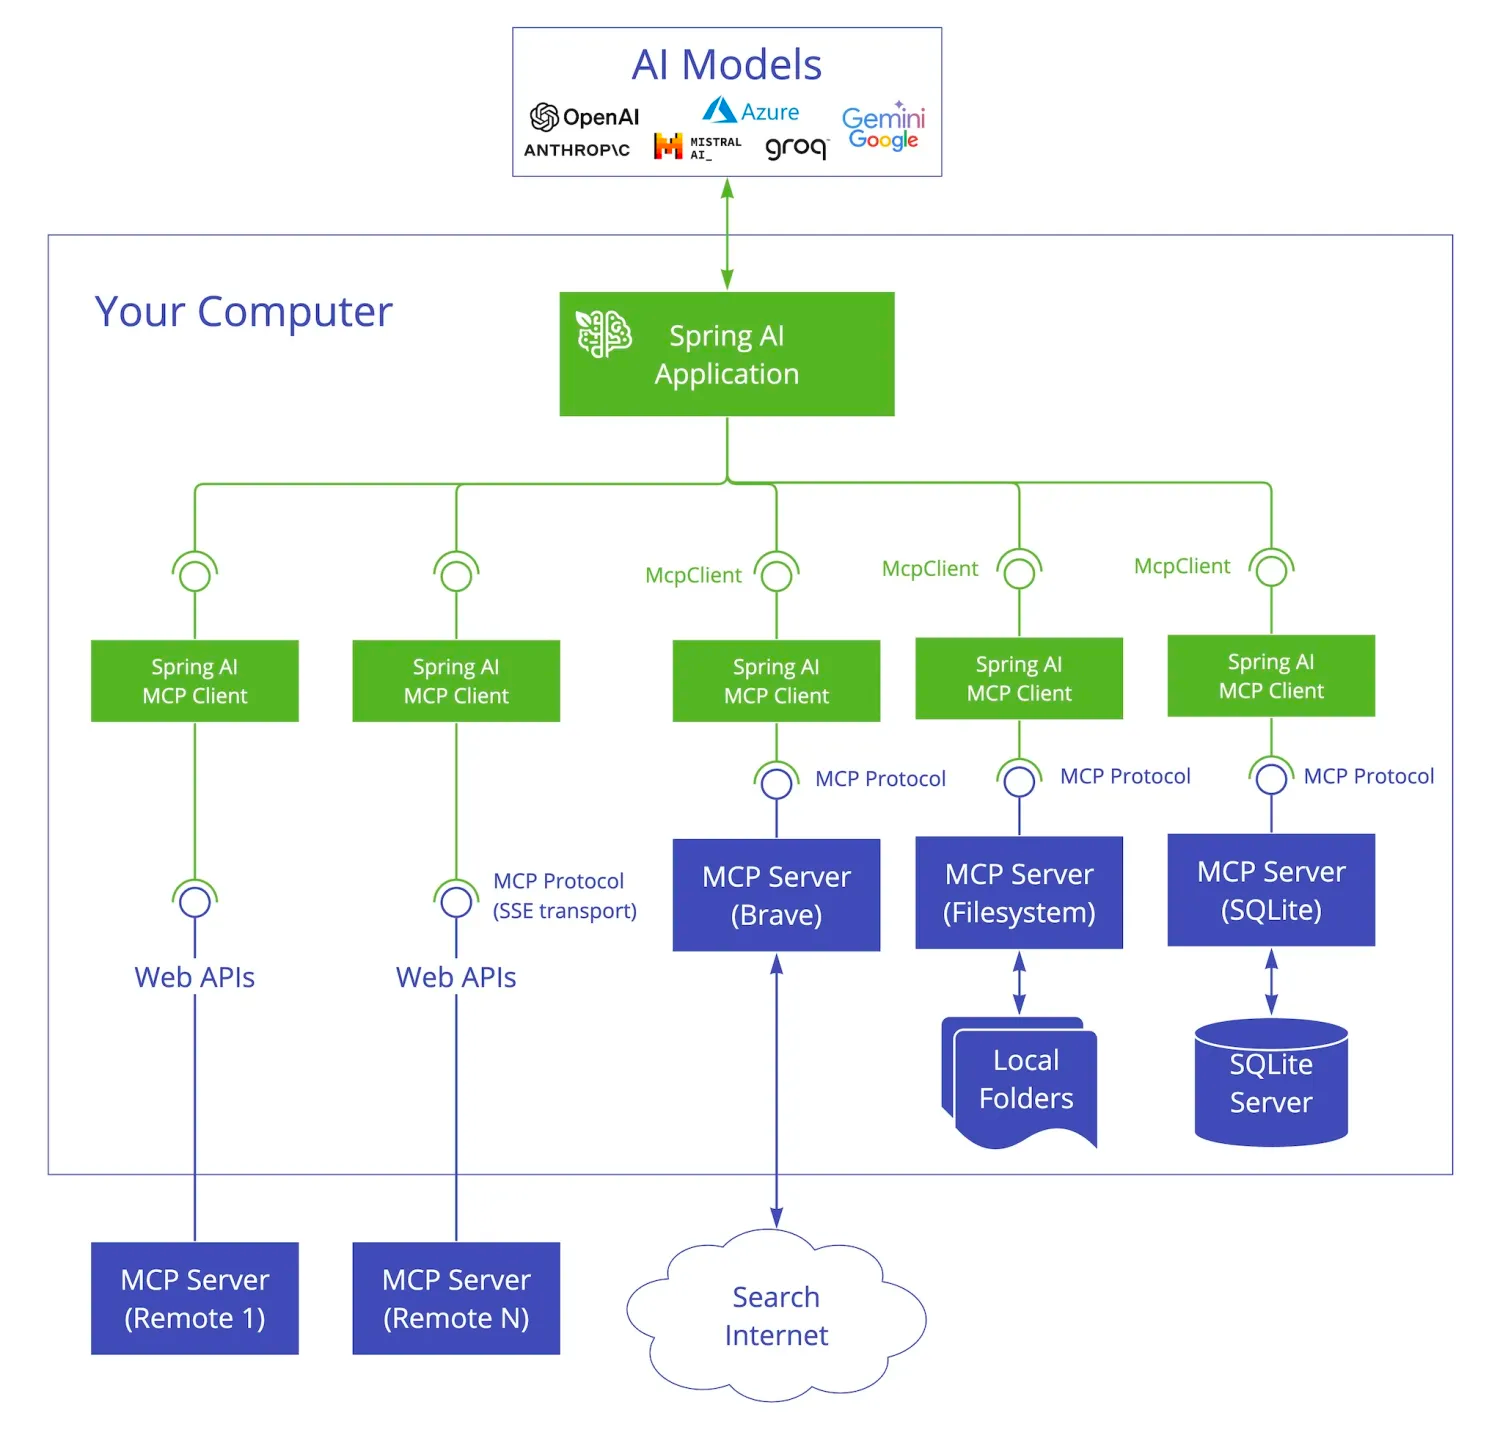
具体交互流程如下:

实现 MCP Server 代码编写
MCP Server 主要实现步骤如下:
- 添加 MCP Server 依赖。
- 设置 MCP 配置信息。
- 编写 MCP Server 服务代码。
- 将 MCP Server 进行暴露设置。
关键实现代码如下。
添加 MCP Server 依赖
<dependencies>
  <dependency>
    <groupId>org.springframework.ai</groupId>
    <artifactId>spring-ai-starter-mcp-server-webflux</artifactId>
  </dependency>
</dependencies>

<repositories>
  <repository>
    <name>Central Portal Snapshots</name>
    <id>central-portal-snapshots</id>
    <url>https://central.sonatype.com/repository/maven-snapshots/</url>
    <releases>
      <enabled>false</enabled>
    </releases>
    <snapshots>
      <enabled>true</enabled>
    </snapshots>
  </repository>
  <repository>
    <id>spring-milestones</id>
    <name>Spring Milestones</name>
    <url>https://repo.spring.io/milestone</url>
    <snapshots>
      <enabled>false</enabled>
    </snapshots>
  </repository>
  <repository>
    <id>spring-snapshots</id>
    <name>Spring Snapshots</name>
    <url>https://repo.spring.io/snapshot</url>
    <releases>
      <enabled>false</enabled>
    </releases>
  </repository>
</repositories>
MCP Server 依赖有三种类型:
- 标准输入/输出 (STDIO):spring-ai-starter-mcp-server
- Spring MVC(服务器发送的事件):spring-ai-starter-mcp-server-webmvc
- Spring WebFlux(响应式 SSE):spring-ai-starter-mcp-server-webflux
设置 MCP 配置信息
MCP Server 包含以下配置信息:
配置项 | 描述 | 默认值 |
|---|---|---|
enabled | 启用/禁用 MCP 服务器 | TRUE |
stdio | 启用/禁用 stdio 传输 | FALSE |
name | 用于标识的服务器名称 | mcp-server |
version | 服务器版本 | 1.0.0 |
type | 服务器类型 (SYNC/ASYNC) | SYNC |
resource-change-notification | 启用资源更改通知 | TRUE |
prompt-change-notification | 启用提示更改通知 | TRUE |
tool-change-notification | 启用工具更改通知 | TRUE |
tool-response-mime-type | (可选)每个工具名称的响应 MIME 类型。例如,将 mime 类型与工具名称相关联spring.ai.mcp.server.tool-response-mime-type.generateImage=image/pngimage/pnggenerateImage() | - |
sse-message-endpoint | Web 传输的 SSE 终端节点路径 | /mcp/message |
其中 MCP Server 又分为以下两种类型。
服务器类型
- 同步服务器:默认服务器类型,它专为应用程序中的简单请求-响应模式而设计。要启用此服务器类型,请在您的配置中设置。 激活后,它会自动处理同步工具规格的配置,spring.ai.mcp.server.type=SYNC。
- 异步服务器:异步服务器实现使用非阻塞作并针对非阻塞作进行了优化。要启用此服务器类型,请使用配置您的应用程序。此服务器类型会自动设置具有内置 Project Reactor 支持的异步工具规范,spring.ai.mcp.server.type=ASYNC。
编写 MCP Server 服务代码
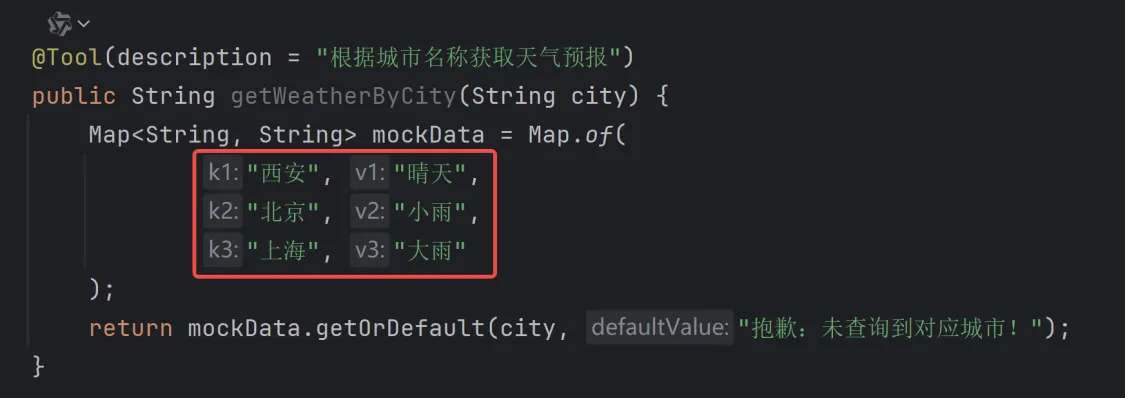
编写天气预报查询伪代码:
import org.springframework.ai.tool.annotation.Tool;
import org.springframework.stereotype.Service;

import java.util.Map;

@Service
public class WeatherService {

    @Tool(description = "根据城市名称获取天气预报")
    public String getWeatherByCity(String city) {
        Map<String, String> mockData = Map.of(
            "西安", "晴天",
            "北京", "小雨",
            "上海", "大雨"
        );
        return mockData.getOrDefault(city, "抱歉:未查询到对应城市!");
    }

}
将服务暴露出去
@Bean
public ToolCallbackProvider weatherTools(WeatherService weatherService) {
return MethodToolCallbackProvider.builder().toolObjects(weatherService).build();
}
这样 MCP Server 就编写完成了。
实现 MCP Client 代码编写
MCP Client 主要实现步骤如下:
- 添加 MCP Client 相关依赖。
- 设置配置信息。
- 设置 ChatClient 对象(调用 MCP Server)。
- 编写测试代码调用 MCP Server。
核心实现代码如下:
import org.springframework.ai.chat.client.ChatClient;
import org.springframework.beans.factory.annotation.Autowired;
import org.springframework.web.bind.annotation.RequestMapping;
import org.springframework.web.bind.annotation.RequestParam;
import org.springframework.web.bind.annotation.RestController;

@RestController
public class ClientController {

    @Autowired
    private ChatClient chatClient;

    @RequestMapping("/chat")
    public String chat(@RequestParam(value = "msg",defaultValue = "今天天气如何?") String msg) {
        String response = chatClient.prompt()
        .user(msg)
        .call()
        .content();
        System.out.println("响应结果: " + response);
        return response;
    }

}
最终执行结果如下:
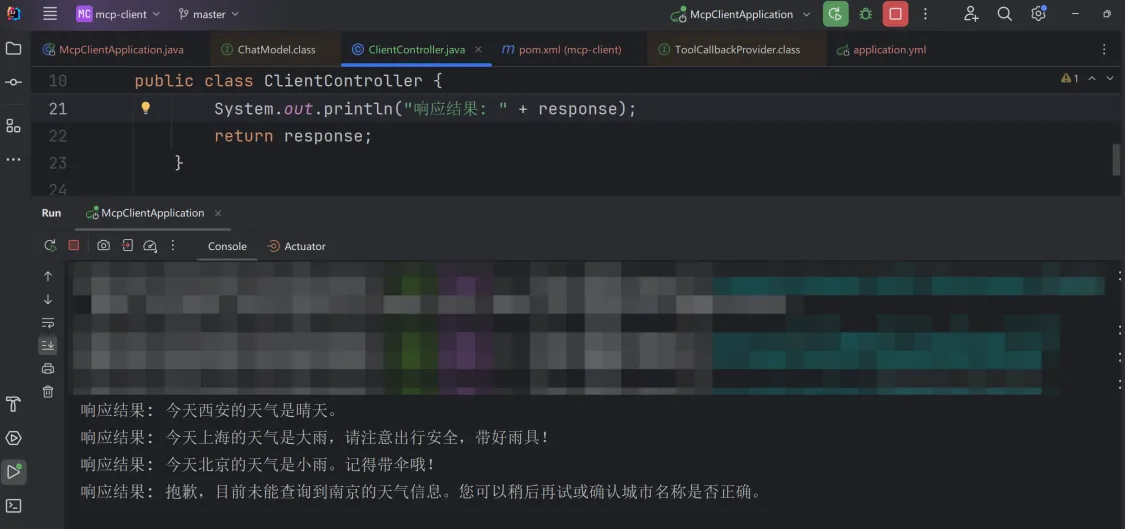
因为 MCP Server 只配置了 3 个城市,所以查询结果和预期相符:
想要获取完整案例的同学加V:vipStone【备注MCP】
小结
到这里使用 Spring AI 就实现了 MCP Client 和 Server 的调用了,可以看出 MCP 的推出只是为了增强大模型的能力的,有了 MCP 协议之后,任何大模型就可以调用任意实现了 MCP Server 的服务了,这样就无线扩充了大模型的能力,为 AI 的发展提供了标准的协议和便利的对接。
- 什么是MCP?
- 为什么需要MCP?
- 1.打破数据孤岛,让AI“连接万物”
- 2.降低开发成本,一次适配所有场景
- 3.提升安全性与互操作性
- 4.推动AIAgent的进化
- MCP组成和执行流程
- Spring AI MCP 介绍
- Spring AI MCP 实战
- 实现 MCP Server 代码编写
- 添加 MCP Server 依赖
- 设置 MCP 配置信息
- 编写 MCP Server 服务代码
- 将服务暴露出去
- 实现 MCP Client 代码编写
- 实现 MCP Server 代码编写
- 小结

腾讯云开发者

扫码关注腾讯云开发者
领取腾讯云代金券
Copyright © 2013 - 2025 Tencent Cloud. All Rights Reserved. 腾讯云 版权所有
深圳市腾讯计算机系统有限公司 ICP备案/许可证号:粤B2-20090059 深公网安备号 44030502008569
腾讯云计算(北京)有限责任公司 京ICP证150476号 | 京ICP备11018762号 | 京公网安备号11010802020287
Copyright © 2013 - 2025 Tencent Cloud.
All Rights Reserved. 腾讯云 版权所有
